Managing CSV files
Through Tray.io's CSV Editor, CSV Reader, and File Helpers connectors it is possible to import, export and manipulate CSV files of varying size in your workflows. This page will describe specific use cases for working with the CSV connectors and how to import files from different sources.
If you are new to the CSV connectors and would like a more detailed description of how to use them, please refer to their docs at CSV Editor and CSV Reader.
Common ways of getting a CSV file into a workflowCopy
FTP and SFTPCopy
Firstly you will need to setup the authentication of your server with the FTP Client connector, for details of how to do this see FTP Client documentation.
Step 1 - Download the file via the FTP ClientCopy
Drag the FTP Client into the workflow and select the authentication that you setup earlier. Now Set the operation to FTP Download or SFTP Download depending the type of connection your server operates on, and input the path of the file you wish to download.


Setup the FTP Client
Step 2 - Access the file via the CSV connectorsCopy
Depending on what operation you want to perform you can use the CSV Editor or CSV Reader to manipulate the file. Here we use the CSV Editor connector with the Create CSV From File, we bring the file into this step with the File URL property linked to the output of the FTP Client with a JSON path.


Configure the CSV Editor
Google DriveCopy
The Google Drive connector makes it possible to access CSV files in your Google Drive account. For a detailed explanation visit the CSV Editor documentation and navigate to the 'Create CSV from an existing file` example.
Email Trigger & File HelpersCopy
The Email trigger can be used to bring a CSV file into workflow, and the File Helpers connector now has the capacity to convert various types of encoded files (such as Base-64), into UTF-8. For more details on the latter please see the File Helpers documentation page.
Step 1 - Create a workflow with the email triggerCopy
Please visit Email Trigger documentation for details on how to get the trigger email address.
Once complete leave the operation as its default On Email Received. When an email arrives into this account it will now trigger this workflow, and provide an output including any attachments (such as a CSV file) that the email may have.
Step 2 - Access the attached CSV fileCopy
Bring a File Helpers connector into the workflow and set the operation as Create File from URL. Link the URL property to the Email Trigger output to grab the attachment URL. The output from the File Helper will reveal the attachment as a file, which can then be accessed by the CSV Editor or Reader for further manipulation.
If your CSV file is not already in the correct encoded format, please checkout the section within the File Helpers documentation page, on directly encoding files from URLs: Example 3.


Accessing CSV with the Email Trigger
AWS S3Copy
The S3 connector requires authentication before it can be used, for a detailed explanation of how to do this please visit the AWS S3 documentation.
Step 1 - Get the file from the S3 bucketCopy
Use the AWS S3 connector with the Get file from S3 bucket operation to grab the file from the S3 bucket. You will need to specify the Bucket name in the properties panel.


Get the file from your AWS S3 bucket
Step 2 - Bring the file into the workflow with the CSV EditorCopy
The AWS S3 bucket will expose the file's URL which can be brought into the workflow by the by the CSV Editor's Create CSV From File operation.
HTTP ClientCopy
The HTTP client is often used to call a URL which returns a file within the body. The file can be accessed very simply by using the CSV Editor connector. Simply select the Create CSV From File operation and link the File URL property with the output from the HTTP connector. Running the workflow will expose the file in the CSV Editor's output.
For details on how to use the HTTP Client please visit HTTP Client documentation

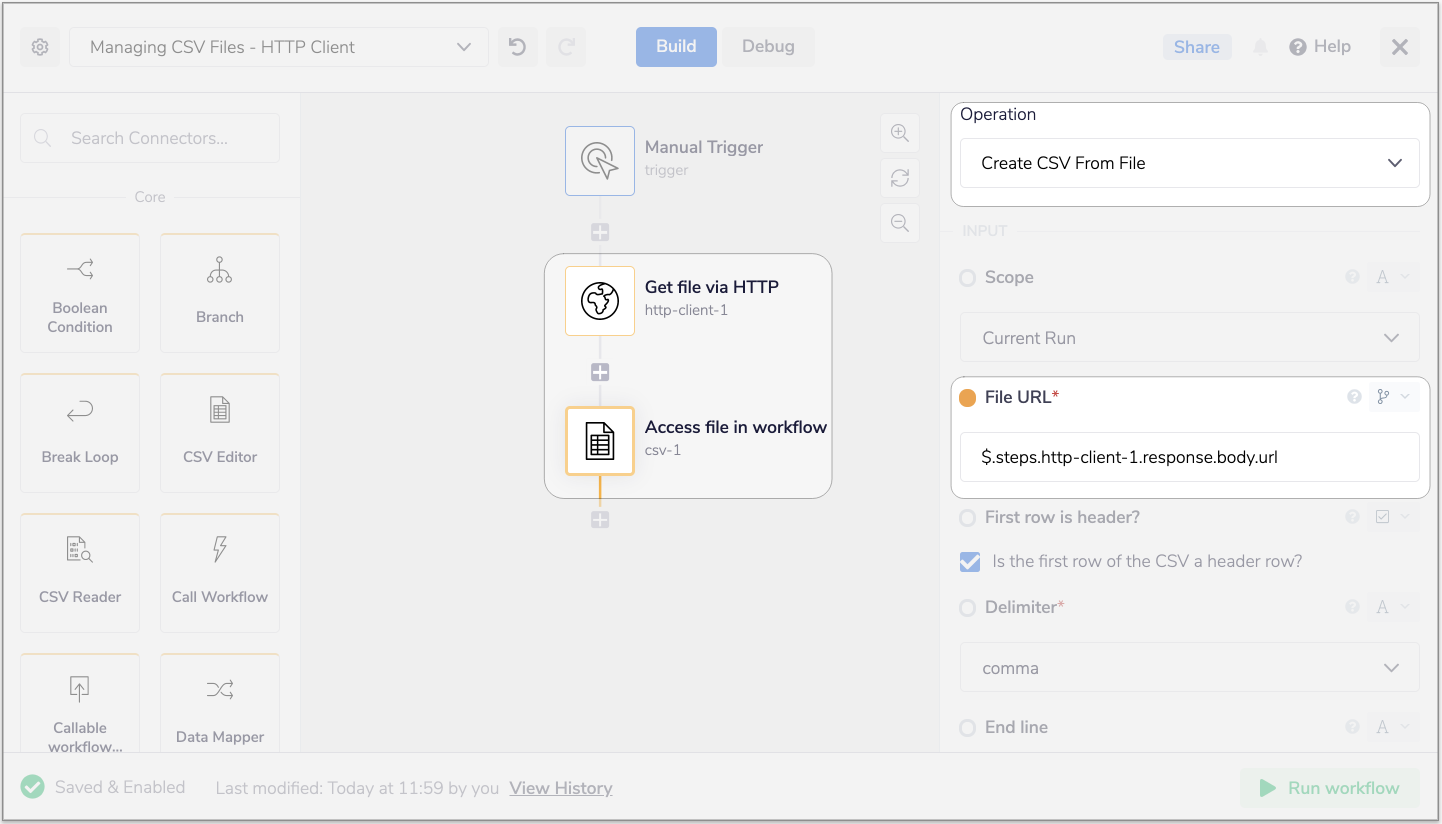
Using the HTTP Client to bring a file into the workflow