HTTP Client 5.6
Make calls to any third-party API with the HTTP Client core connector
OverviewCopy
The HTTP client connector allows you to make calls to any third-party API endpoints.
Two general scenarios which would necessitate the use of the Tray.io HTTP client connector are:
The endpoint you seek to use is not currently available within the service connector's operations list.
There is no Tray.io connector available for the service you need to reference. This means that the HTTP client connector can be used to effectively build your own connector by creating a new authentication and passing in a token as a parameter.
USER TIP: With scenario 2 it is likely that the HTTP client connector will be used in conjunction with the Webhook Trigger. This enables users to create workflows which are also triggered by an event in the service, for which there is no official Tray.io pre-built trigger yet either.
AuthenticationCopy
Using existing authsCopy
If Tray.io does have a connector but it doesn't have the operation you require, the HTTP client can use an auth you may have already created for that connector:

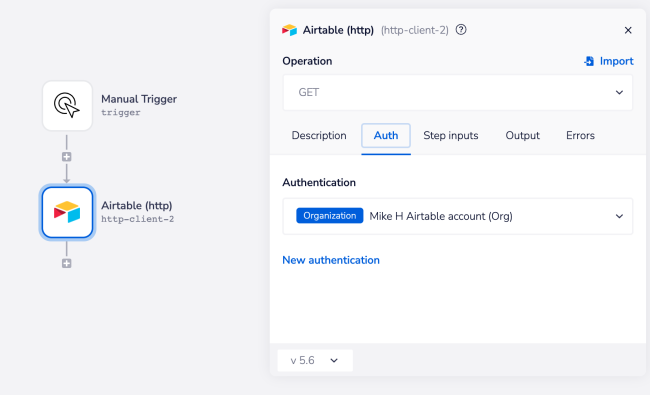
This can be done by selecting the auth in the Http client step. In which case you will notice that the HTTP client will adopt the icon for that service.
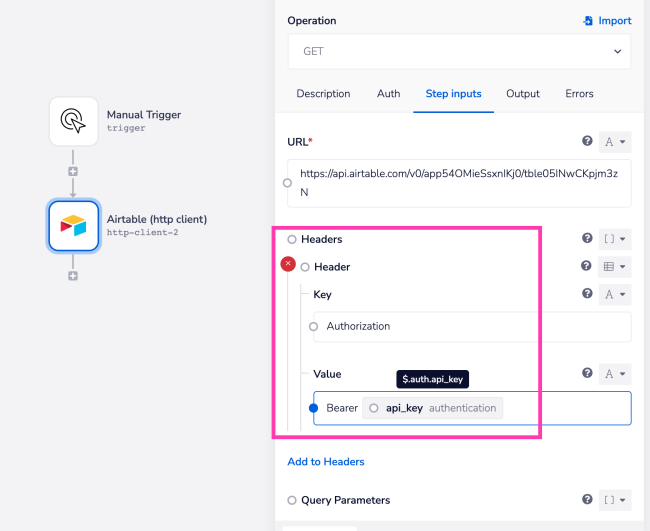
You can then make use of $.auth variables to meet any auth requirements the third party service may have.
This example shows passing $.auth.api_key as a bearer in the 'Authorization' header (exactly what the name of the token or key is will depend on the service - it could be e.g. $.auth.api_token or $.auth.access_key):

Custom / generic servicesCopy
If no Tray.io connector is available, to use the HTTP client you will either need to create a Generic Service Authentication or Create a new service for the service you wish to use
Secure use of authenticationsCopy
Do not hard code any authentication values directly into the properties panel!
Always use the above $.auth method to programatically pick up your tokens from a proper authentication.
This will ensure your token is properly obscured in the logs.
Using the HTTP clientCopy
You may find that using our cURL import feature is the easiest way to use the HTTP client!
Making a GET requestCopy
Assuming you have already set up an Airtable authentication as per the Custom services page, the following example shows how you can make a basic Airtable GET request using the HTTP Client:

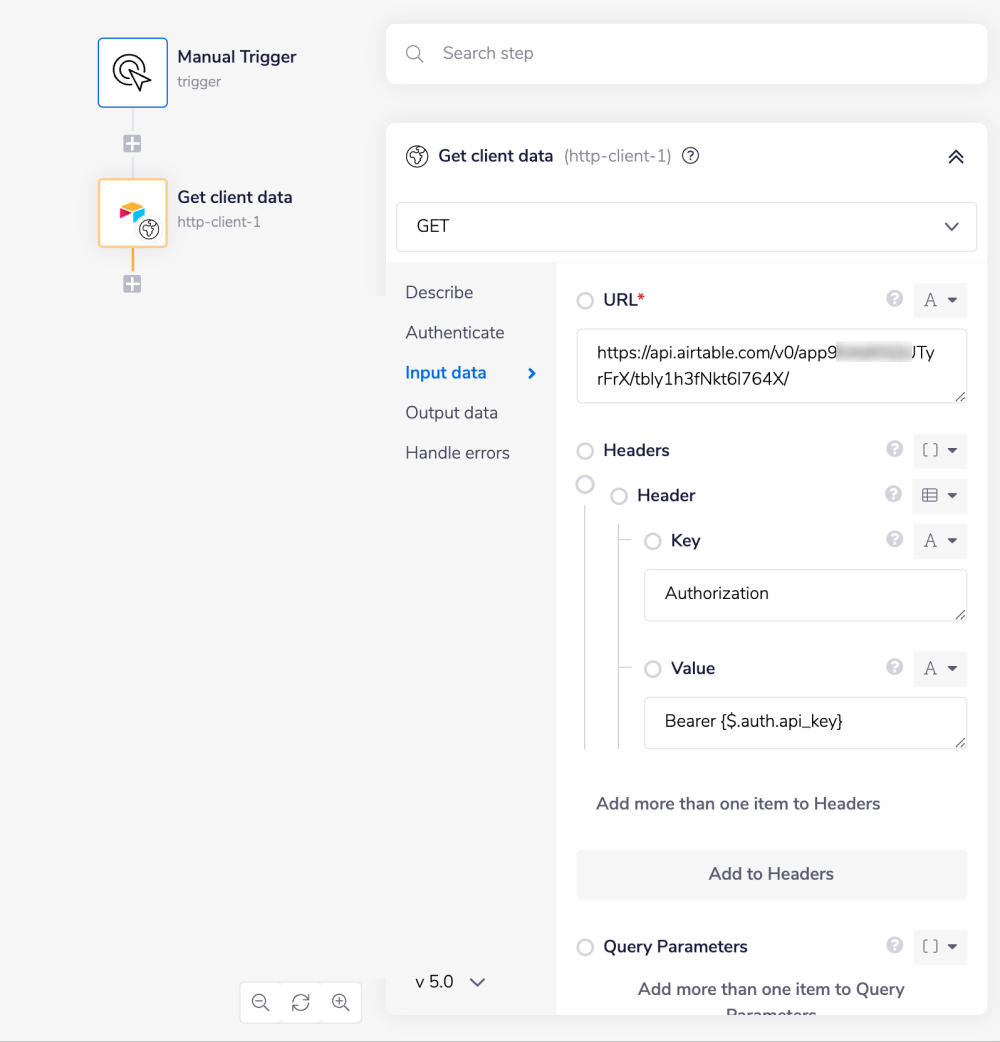
In this case we have had to use the Airtable API documentation to find the URL of the endpoint we wish to access.
We have also had to set an Authorization Header using the $.auth.api_key jsonpath.
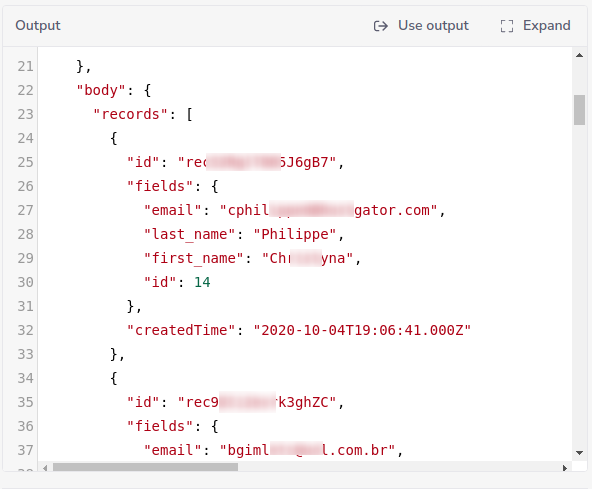
This will then return the data we are looking for:

Quickstart - import a requestCopy
It is possible to automatically create all the necessary inputs and query parameters for your request by importing what is called a 'curl command':
1// HubSpot API2curl --request GET \3--url 'https://api.hubapi.com/crm/v3/objects/contacts?limit=10&archived=false' \4--header 'authorization: Bearer YOUR_ACCESS_TOKEN'
Curl is a tool which allows you to specify http requests in plain text.
Developers would normally use this a command in a 'terminal', but in this case we can just import the request directly into the Tray Http client.
In its most basic format all you need is the curl command for your chosen API and an access key.
Handily, a lot of third-party services have ready-made curl commands in their docs that you can copy.
Import cURL methodsCopy
The video demonstrates how to use three different cURL examples using the Import cURL feature:
A simple cURL address.
A cURL address including queries.
A cURL address including headers.
Quick import exampleCopy
When using curl import you will need to have an authentication for the service you are using.
The exact authentication method will depend on your service. Please reference the Authentication section above for more guidance.
Below is an example (using HubSpot) of how we would use the cURL feature to auto-populate all the required fields.
Error: 'The pasted curl command could not be parsed'Copy
Note that if the url in your curl command contains curly braces you will receive a 'the pasted curl command could not be parsed' error message.
In the following example {groupId} will cause such an error:
1curl --request POST \2--url 'https://your-domain.atlassian.net/rest/api/3/group/user?{groupId}=' \3--user 'email@example.com:<api_token>' \4--data '{5"accountId": "dummy_account"6}'
The fix here would be to change the url to https://your-domain.atlassian.net/rest/api/3/group/user?groupId=
Note also, that you can pass curly brackets elsewhere in the curl command - as in the above --data parameter
Testing your setupCopy
The best way to check that everything is running properly is to use a manual trigger to call your API and inspect the logs to see what messages are being passed back and forth.
HTTP client featuresCopy
The HTTP client connector intelligently handles data to make things as clear, reliable and consistent as possible. Below are some of the measures we take to ensure this.
OAuth2 advanced featuresCopy
There are several advanced features available within the OAuth2 Advanced properties section:
Authorization type - Set the authorization type and HTTP headers behind the scenes. May be used in conjunction with setting up your own custom refresh logic as well.
Follow redirect - For if you want to move a webpage to a new location (redirects are not followed by default).
Reject unauthorised - Default is 'true', everything is HTTPS. Users are able to disable the secure functionality if need be here.
TLS - Users can make their own HTTPS settings. By default the connector states it is coming from Tray.io but this enables users to change the security information if need be and set the TLS setting in the HTTPS request.
Parse response - Automatically generated as a string, this can be changed to make the response JSON or XML etc.
Force file response - Instead of returning the response as a json object, this feature returns it as a file which can be downloaded.
Force file resonse name - The name of the file if the response is forced as a file object.
Status codes - Depending on the version number of the workflow in question, the connector will terminate depending on the status code. This feature allows users to specify the status codes that the HTTP client should expect as per their requirements. See Dealing with statuses returned by your calls for more details below.
Dealing with statuses returned by your callsCopy
VariablesCopy
All variables passed as query parameters are HTML-escaped automatically.
PaginationCopy
Tray has a page limit of 1 MB. So calls to APIs may return errors if the body of the returned content is too large.
To prevent this happening, you should implement a pagination method which is appropriate to the type of API calls you are making.
HeadersCopy
Any header required by the API Service can be added, as per the 'Authorization' header in the above Making a GET request example for a token-based auth.
ContentCopy
The Content-Type header is automatically set depending on the body provided, with application/ x-www-form-urlencoded being set if none is selected.
Additionally, the Content-Type of the request can be set/ overwritten by explicitly specifying it in the header itself.
AcceptCopy
The Accept header is fixed to application/json, with a few exceptions.
If the body is set to none, or the automatically detected Content-Type (dependent on the body) is either text/ plain or application / x-www-form-urlencoded, then Accept is not set.
Additionally, the Accept value of the request can be set/ overwritten by explicitly specifying it in the header.
Binary filesCopy
It is possible to use the HTTP client connector to send files across in a binary format using the 'Body type' -> 'Binary' option.
When a user sends a file using the 'Body type': 'binary' property, Tray.io will stream the data of that object to your endpoint.
The end result will be a string output, found within your output panel under the JSON key name: "body".
For the sake of clarity, this example will use two small Tray.io workflows to show the transportation of the data more clearly.
Multipart file uploadsCopy
Note that files can also be uploaded in multiple parts when using the form-data option.
This is found within the 'Body' type field.