
AWS S3 2.3
AWS S3 is an object storage service that offers industry-leading scalability, data availability, security, and performance.
- On this page
- AWS S3
- Overview
- API Information
- AWS S3 templates
OverviewCopy
AWS S3 provides simple object storage. It is useful for hosting website images and videos, data analytics, and both mobile and web applications. S3 object storage manages data as objects, meaning all data types are stored in their native formats.
API InformationCopy
The AWS S3 connector has the following Base URL: http://{{{url_region}}}amazonaws.com. More information can be found on their main API documentation (version: 2006-03-01) site. Details regarding their API limitations can be found here.
AWS S3 templatesCopy
Please note that we have the following AWS S3 templates available:

Sync Salesforce files to AWS S3 backups
Performs a daily sync of all files that have been added/updated in Salesforce over to AWS S3

Extract AWS S3 data as JSON
Generates a JSON list of data pulled from a CSV or XLSX file in AWS
Extract and transform CSV data from AWS S3
Extracts data from a CSV in AWS S3 and prepares the data to be easily interacted with
These will give you pre-configured best practice ways of working with AWS S3 and integrating it with other connectors.
However, please continue to at least read the Authentication setup instructions on this page to enable you to get started with using AWS S3.
Note on testing S3Copy
If you are testing an S3 bucket setup from scratch, an important point to bear in mind is that you need to have at least two buckets with subfolders in your S3 instance:


Each bucket should contain at least one folder:

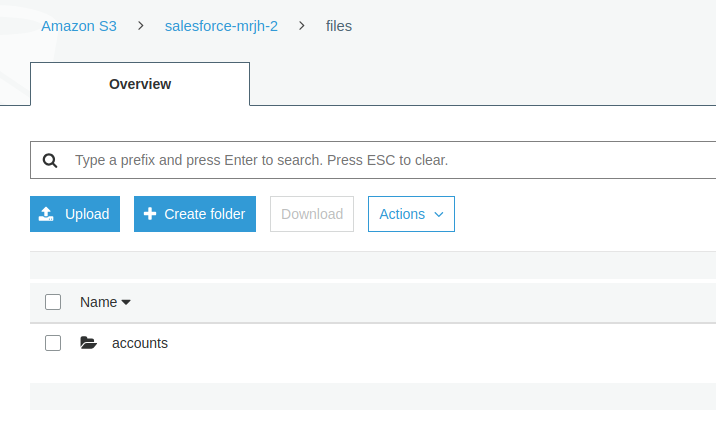
It is also important to check that the public settings of your buckets do not block any of your actions.
If you try and test with only one bucket set up, no buckets will show when you attempt to use any of the Tray get or put operations.
AuthenticationCopy
When using the Tray S3 connector you must first create an authentication for a correctly configured user by clicking on 'New Authentication':


Then entering the Access Key and Secret Key for the user

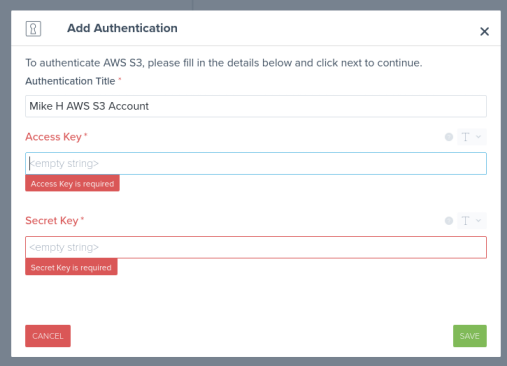
Please see the instructions below for how to correctly configure a user with access to your S3 buckets.
Important note on s3 regionCopy
It is important that you set the Amazon region your buckets are hosted in correctly.
This is done by clicking on 'Show Advanced Settings'
You can then specify the region using the appropriate drop-down:

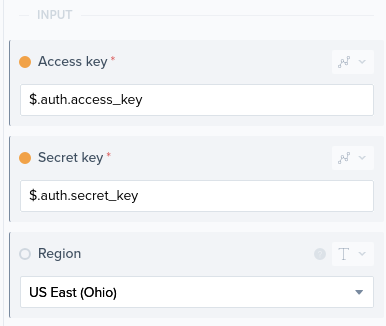
Leaving the region as 'auto' will lead to errors with some operations such as 'List Buckets' which will give:
"message": "getaddrinfo ENOTFOUND s3-auto.amazonaws.com s3-auto.amazonaws.com:80"
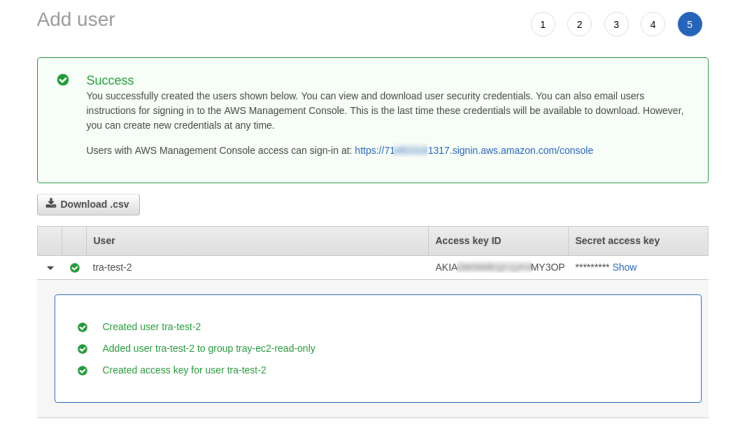
1 - Create a userCopy
In order to authenticate with the S3 Connector, you must use the IAM console to set up a user with the correct permissions. The two steps required for this are:
Create a user
Create a permissions policy
The user must be created with programmatic access:

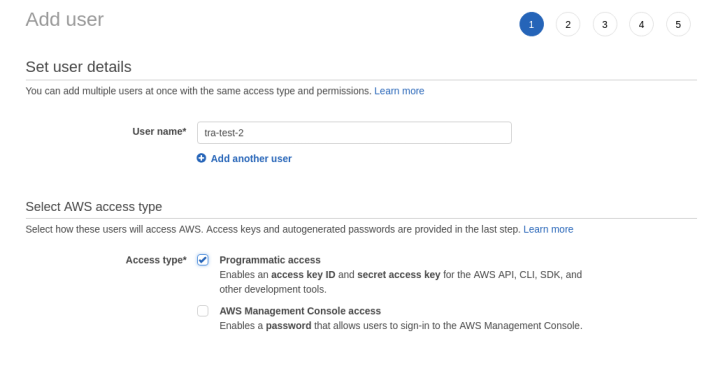
At the final stage you will be issued with the required Access key ID and Secret access key which you need to enter when authenticating with the Tray connector:

2 - Create a policyCopy
Before using the Tray S3 connector, you will need to make sure the user is set with the correct IAM permissions.
S3 permissions policies can be managed on two levels and you can manage all at user level if desired:
At the user level - the basic 'List Buckets' operation (which displays all buckets a user has access to) must be set at this level
At the individual bucket level - you can specify the user as a 'Principal' when defining bucket access permissions. All other permissions can be set here
You can divide the permissions between user- and bucket-level policies, but you will always need to set a user-level policy to allow for the 'List Buckets' operation.
Setting a policy at user levelCopy
In the IAM console, when setting permissions for an AWS user you can create a policy to add the user to or you can add an 'inline policy' in the user's details screen:


You can add the policy using the visual editor:


Or click on the JSON tab to enter a policy such as the following which would give the user access to a bucket called 'bucket-name-1':
1{2"Version": "2012-10-17",3"Statement": [4{5"Sid": "s3policy0",6"Effect": "Allow",7"Action": "s3:ListBucket",8"Resource": "arn:aws:s3:::bucket-name-1"9},10{11"Sid": "s3policy1",12"Effect": "Allow",13"Action": "s3:GetObject",14"Resource": "arn:aws:s3:::bucket-name-1/*"15},16{17"Sid": "s3policy2",18"Effect": "Allow",19"Action": [20"s3:PutObject",21"s3:DeleteObjectVersion",22"s3:DeleteObject"23],24"Resource": "arn:aws:s3:::bucket-name-1/*"25},26{27"Sid": "s3policy3",28"Effect": "Allow",29"Action": "s3:PutObjectAcl",30"Resource": "arn:aws:s3:::bucket-name-1/*"31},32{33"Sid": "s3policy4",34"Effect": "Allow",35"Action": "s3:ListAllMyBuckets",36"Resource": "*"37}38]39}
Note that the ARN (Amazon Resource Name) for the bucket/object has to be entered into the "Resource" for each permission, and how it is different for s3:ListBucket and s3:ListAllMyBuckets :
"Resource": "arn:aws:s3:::bucket-name-1/*" means that it applies to any invidual objects within a bucket (you could name specific objects e.g. arn:aws:s3:::bucket-name-1/picture1.jpg)
"Resource": "arn:aws:s3:::bucket-name-1" means that it applies to the bucket itself (note there is no trailing slash)
"Resource": "*" must be used for
s3:ListAllMyBucketsas it does not apply to one particular bucket
Remember that s3:ListAllMyBuckets can only be set at user level.
Setting a policy at bucket levelCopy
In the S3 console, it is also possible to set an individual policy on a specific bucket:

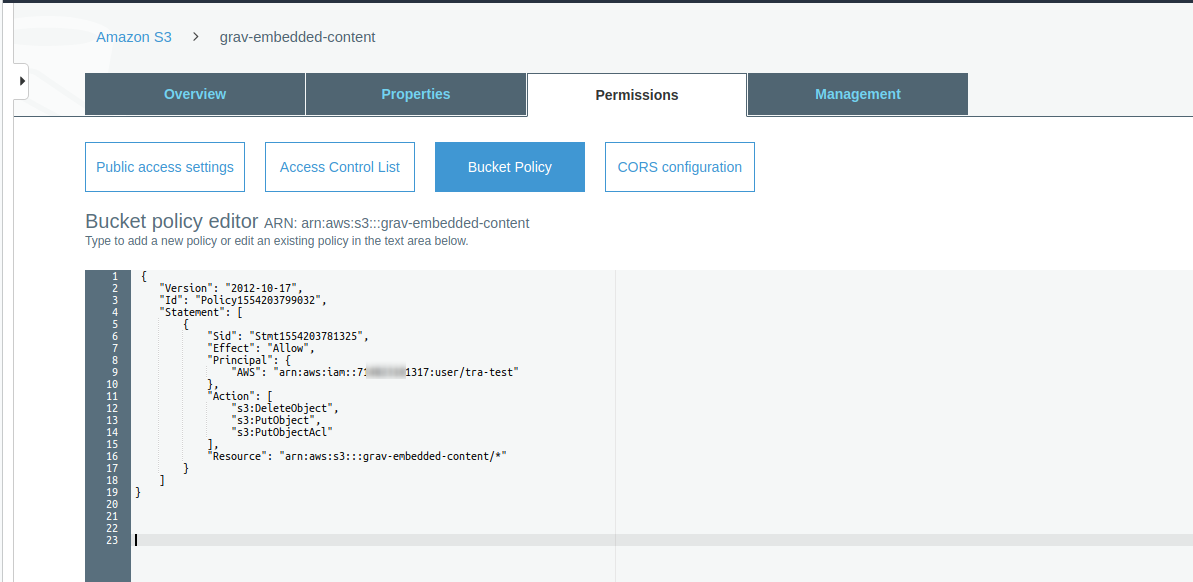
Note that you must specify a user's ARN as a Principal and remember that s3:ListAllMyBuckets can only be set at user level, so cannot be entered as part of a bucket policy.
Table of required permissionsCopy
The following table sets out the permissions that are required for full use of the different operations available in the Tray s3 connector:
| operation | permissions | resource |
|---|---|---|
| Delete Object | s3:GetObject, s3:DeleteObject, s3:DeleteObjectVersion | arn:aws:s3:::[bucket]/[object] |
| Get Object | s3:GetObject | arn:aws:s3:::[bucket]/[object] |
| Get Object Signed Url | s3:GetObject | arn:aws:s3:::[bucket]/[object] |
| Head Object | s3:GetObject | arn:aws:s3:::[bucket]/[object] |
| List Buckets | s3:GetObject, s3:ListAllMyBuckets | * |
| List Bucket Objects | s3:ListBucket, s3:GetObject | arn:aws:s3:::[bucket] |
| Put Object Acl | s3:GetObject, s3:PutObjectAcl | arn:aws:s3:::[bucket]/[object] |
| Put Object File | s3:PutObject, s3:PutObjectAcl | arn:aws:s3:::[bucket]/[object] |
| Put Object Text | s3:PutObject, s3:PutObjectAcl | arn:aws:s3:::[bucket]/[object] |