Overview
The Tray Embedded bundle is available to Enterprise customers as an optional add-on.
Please contact your sales representative if you wish to activate the bundle.
You can put the power of Tray in the hands of End Users (internal staff or external customers) by templatizing automations and making them available as integrations ready for easy activation:

A typical use case for this would be if your service features a range of integrations (or Solutions as we call them) involving your own product and a number of third party services (Zendesk, Slack, Salesforce, Marketo, etc.) and you wish to use Tray Embedded to enable your End Users to:
Very quickly authenticate themselves with each service involved
Enter Config Data which makes any further necessary personal configurations so that the integration works specifically for them (e.g. what Slack channel do they subscribe to, or what Salesforce contact type do they work with)
This can all be done in a properly 'white-labelled' sense - i.e. the fact that you are using Tray Embedded to automate these integrations is invisible to your End Users.
Building Embedded integrationsCopy
Building Tray Embedded integrations is a matter of:
1. In the Tray Embedded UI, create the workflows, projects and solutions which form the basis of your integrations:

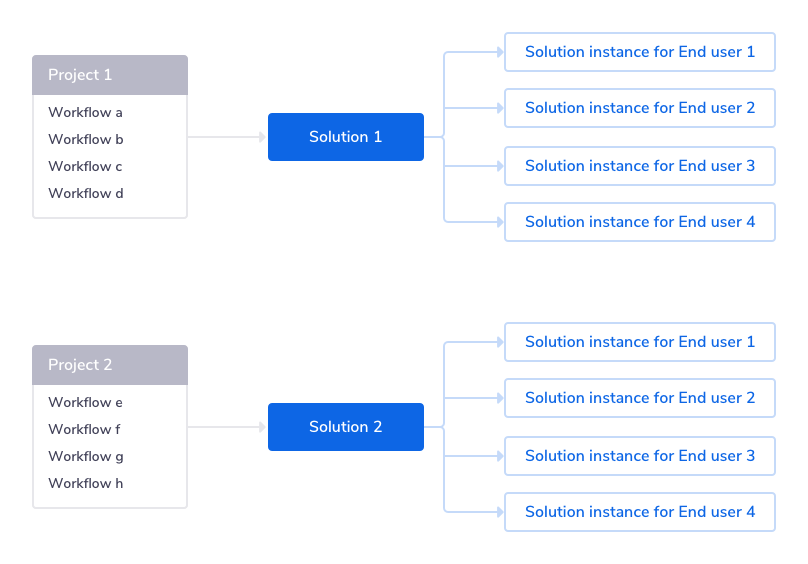
Workflows contain the intelligence which drives your integration - including the required Tray.io and service connectors, authentications and Config Data.
A Project can contain multiple workflows, and pulls together the Config Data shared across the workflows.
A Solution then makes a Project configurable for an End User (via the Config Wizard) by pulling all of the Config Data and Authentications contained in your project and making them available as Config Slots and Authentication Slots. These are populated with Config and Authentication values when the End User runs the Config Wizard, to create their own Solution Instances.
2. Build your app and make use of the Tray Embedded API to manage:
Front End tasks such as displaying available solutions and allowing users to click to activate the Config Wizard
Back End tasks such as creating Users and Solution Instances
Graphical overviewCopy
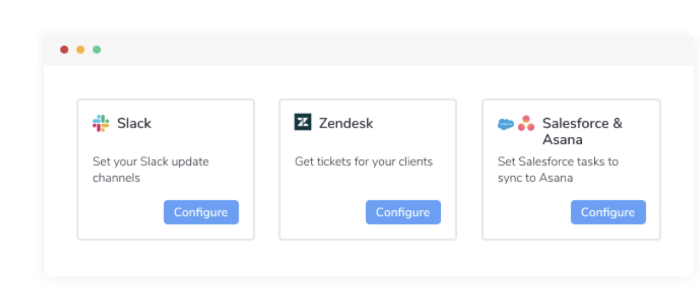
The graphic below gives a quick snapshot of a Tray Embedded application. It shows a setup whereby you have several Solutions available for your End Users and an End User has clicked to activate a Solution which automatically creates Asana tasks for them when Salesforce accounts of a certain type are created.
Note: The Platform Interface depicted in the centre of the graphic is a mock-up of how you might present your Tray Embedded Solutions within your own application. This is not a Tray.io component and the styling and presentation of this is up to you:

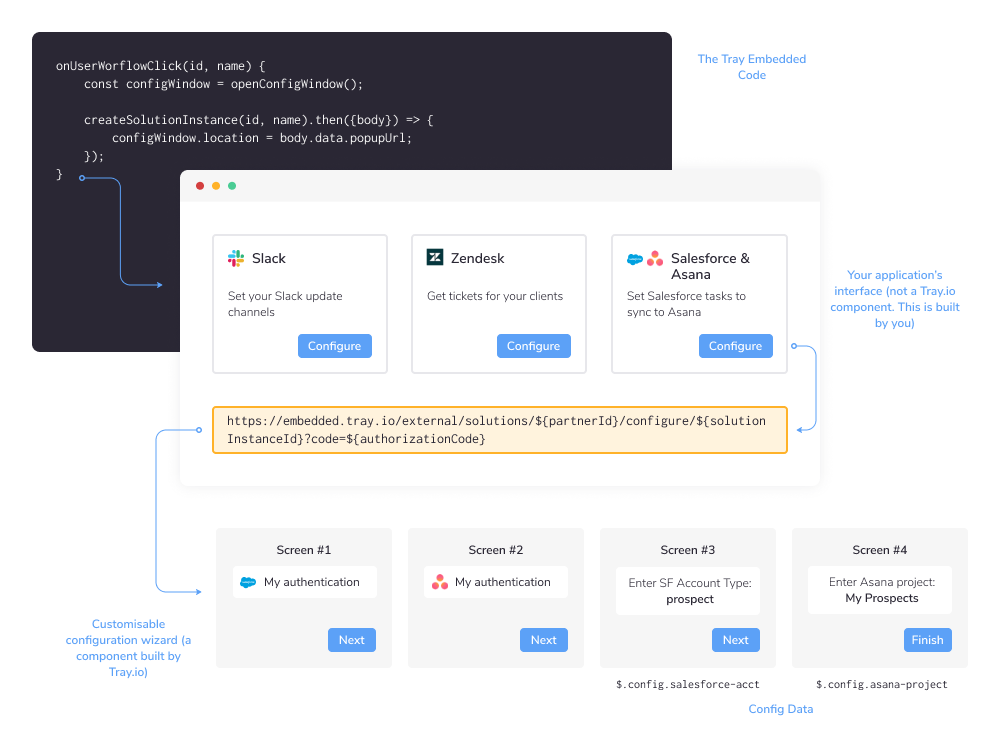
In the diagram there are 4 'layers':
Your application code behind the UI (in the dark box) which is built using our GraphQL APIs and can use our integration marketplace app as a guide. The example shows sample code which would trigger the
createSolutionInstanceAPI when a user clicks to configure a Solution for their own use.Your Application Interface (not a Tray.io component). This represents the main window of your interface where you present the Solutions available for your End Users to configure for their own use (rememember that this is a simple mock-up and how this is configured is entirely up to you! The key point is that you use our APIs to help you display available Solutions and control what happens when an End User clicks to activate them).
The Tray Customizable Configuration Wizard (this is a Tray.io component!) which is activated when an End User clicks to configure a Solution. This is represented in two parts:
The Tray Config Wizard URL (in the yellow box) which accepts the ID of the Solution Instance being created and the one-time authorization code for the End User
The individual screens (4 in this example) of the Configuration Wizard (these can be customized in our Solution Editor) which allow the End User to create their own authentications for the services involved (Salesforce and Asana in this example) and enter their own Config Data which means the Solution Instance will work for them as an individual.
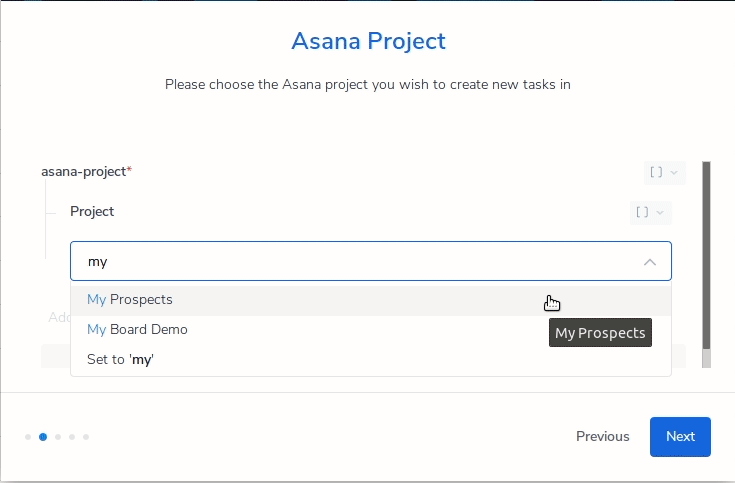
At the very bottom of the graphic you can also see the Config Data values of
$.config.salesforce-acctand$.config.asana-projectwhich link back to the source workflow which specified that these fields would be available in the Config Wizard.
As well as the fact that End Users need to set their own authentications, the most important point to grasp in the above example is that the End User has used Config Data to set the Salesforce Account Type and Asana Project so that the syncing of tasks only happens when new accounts of a certain type are created ('Prospect') and only syncs to the Asana Project they have specified ('My Prospects').
How Config Data is setCopy
The following set of visual tabs illustrates how Config Data is managed in 3 steps:
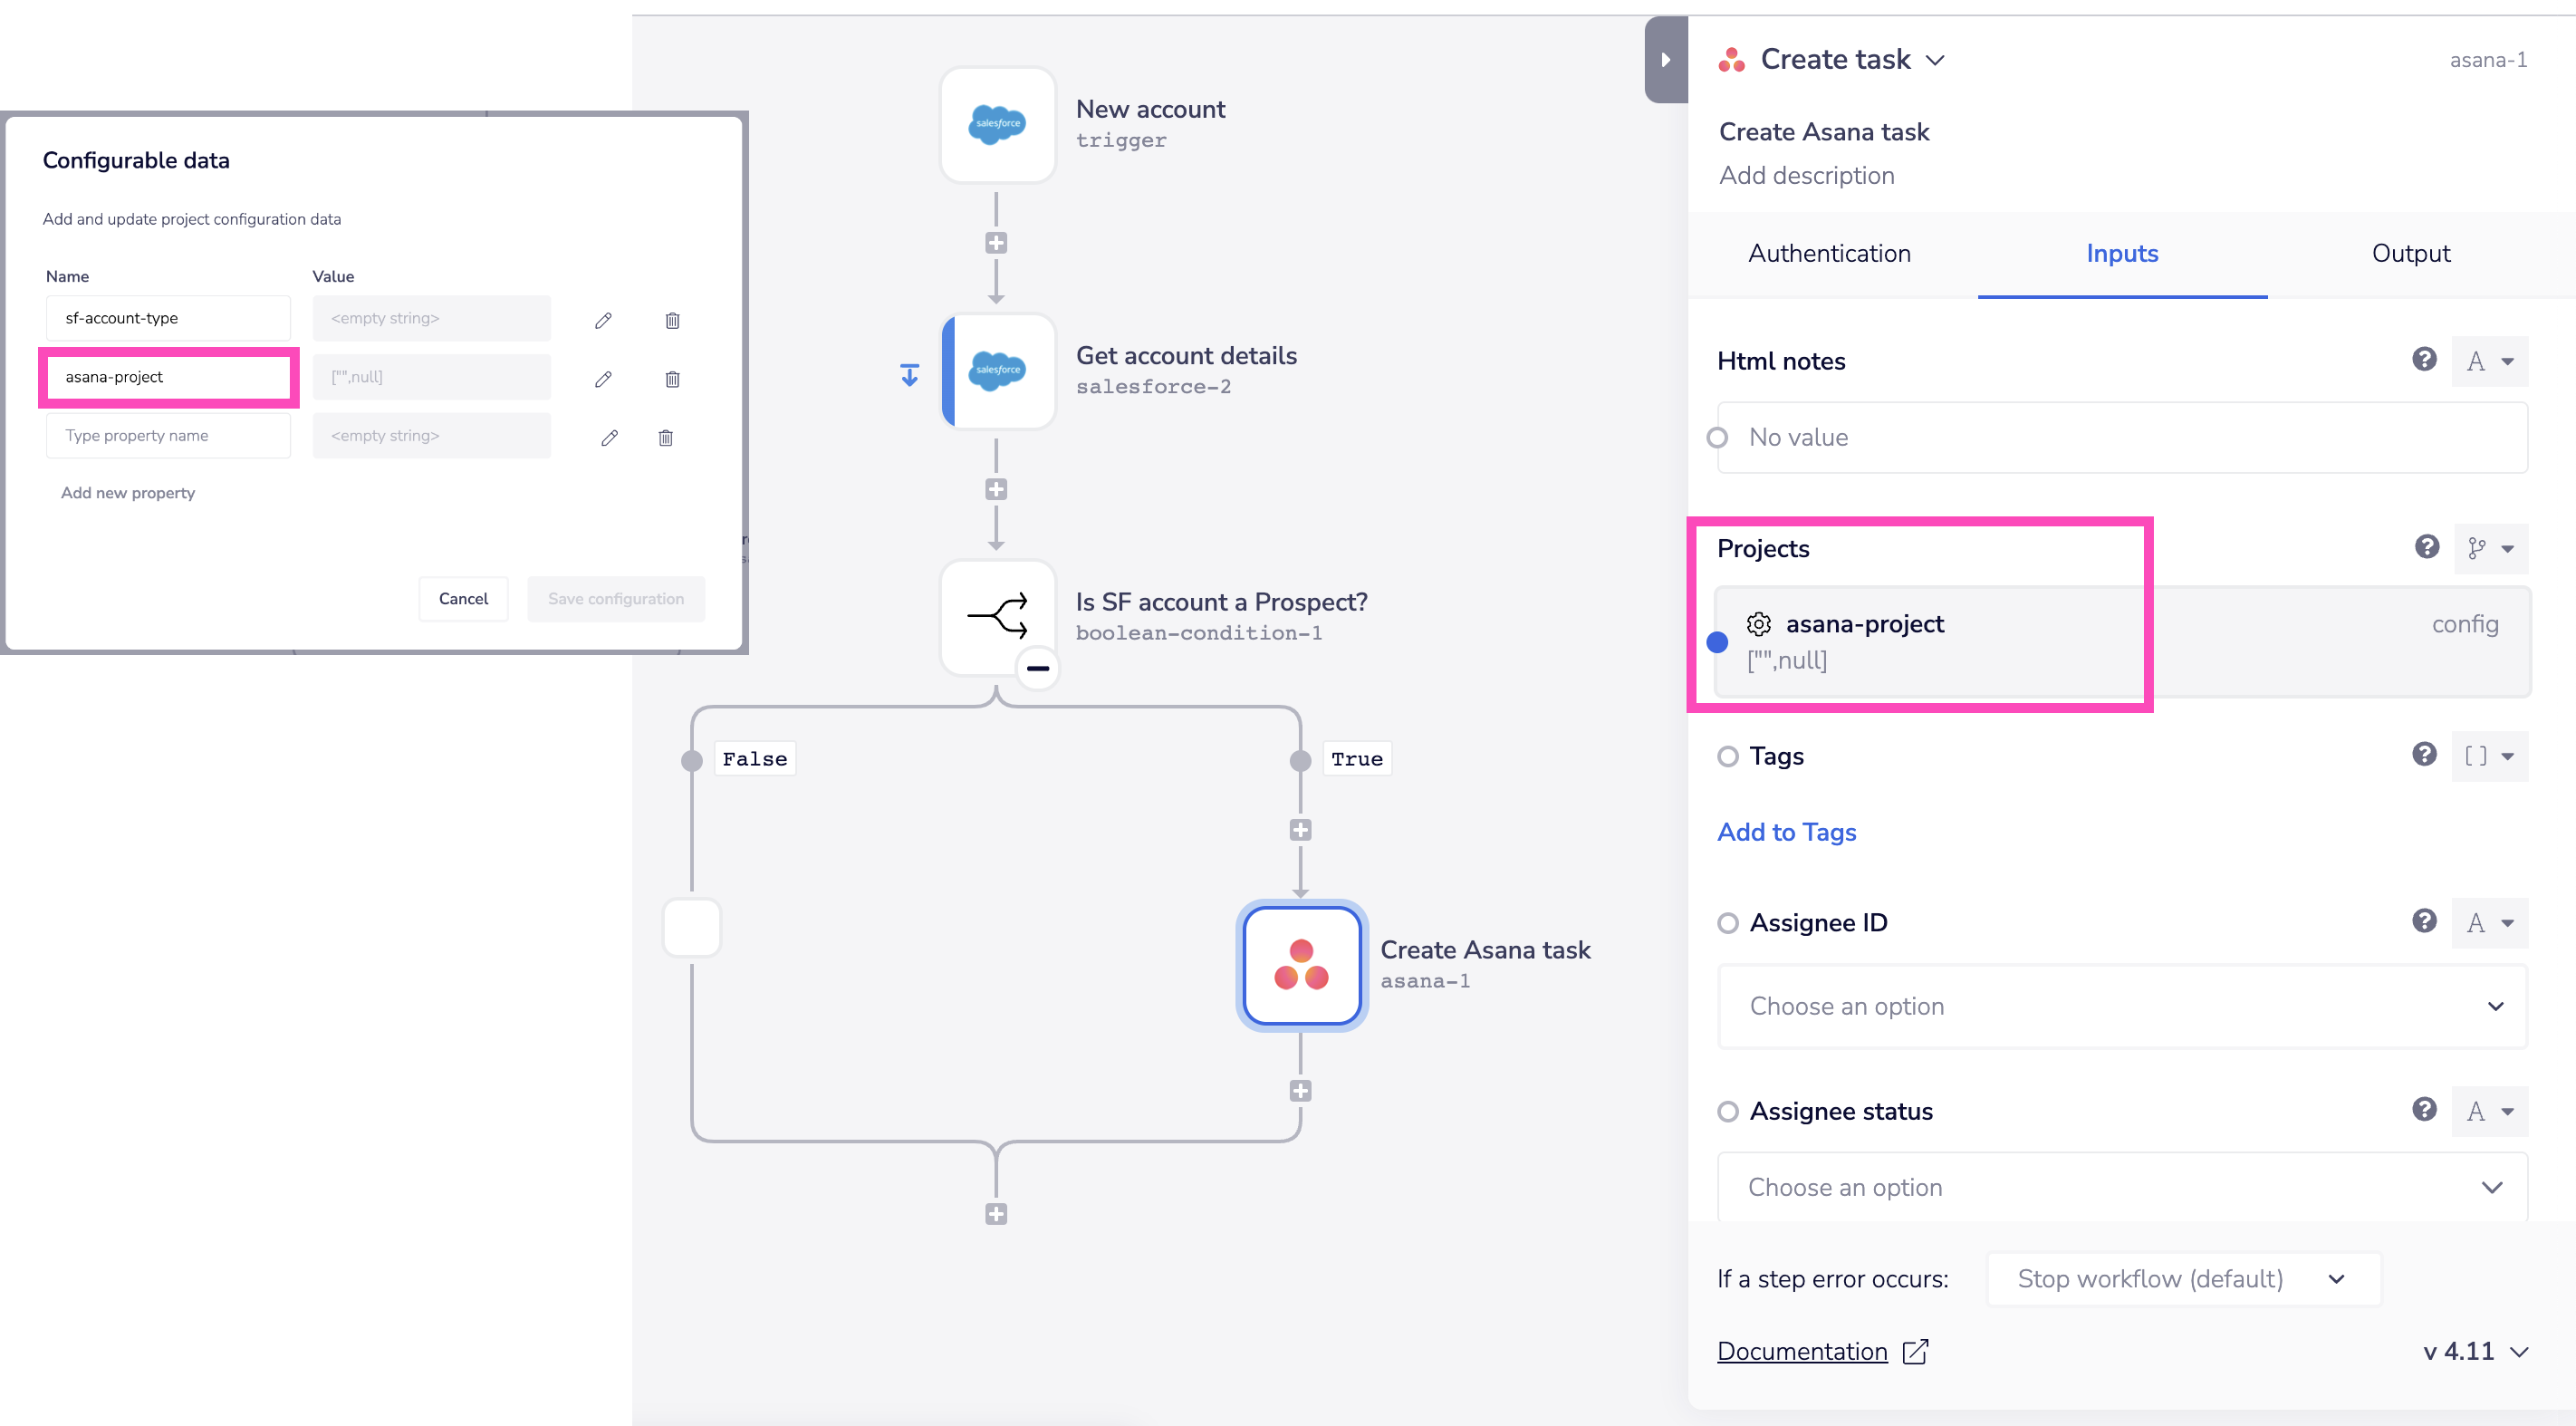
1 - Set Config DataCopy
First of all, you specify that certain fields are Config Data by entering $.config. jsonpaths in the source workflow. In this example we are using $.config.asana-project for the Projects field in the Asana Create Task operation:

2 - Add prompts in Solution EditorCopy
When you have created a Solution based on your source workflows you can then use the Solution Editor (found in the Tray Embedded UI) to add prompts for the End User to create their authentications and set their Config Data:


3 - End User activates Config WizardCopy
The end result is that the End User can then, in the Config Wizard (a Tray.io component) create their own authentications and set their Config Data: