
Asana 6.0
Asana is a web and mobile application designed to help teams organize, track, and manage their work
- On this page
- Asana
- Overview
- API Information
- Authentication
OverviewCopy
The Asana connector on Tray allows you to interact with the data in your Asana account in any way you choose. The majority of the API is currently supported on Tray, enabling you to do things like:
Copy a project for each new Salesforce Opportunity that's created
Add project status updates
Add comments
Attach files to tasks
API InformationCopy
The Asana connector has the following Base URL: https://app.asana.com/api/1.0. More information can be found on their main API documentation (v1) site. Details regarding their API limitations can be found here.
AuthenticationCopy
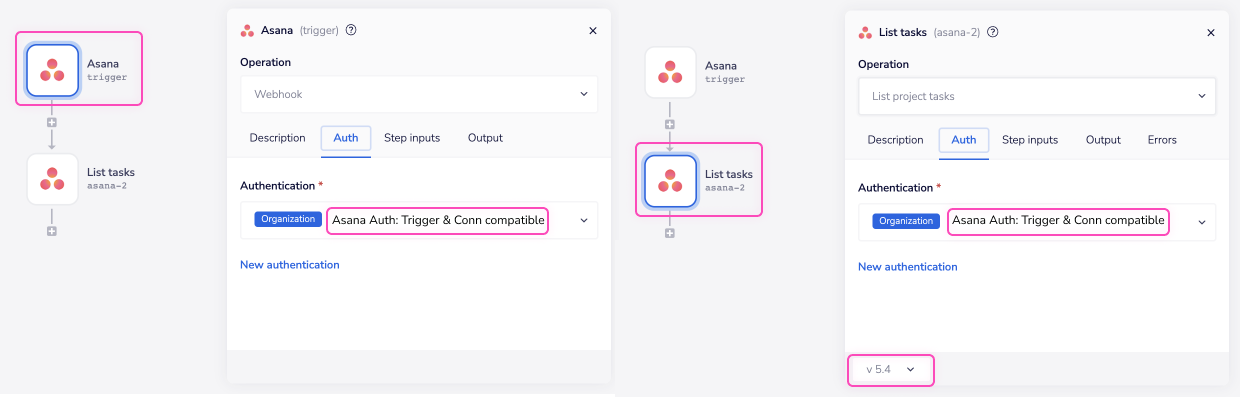
IMPORTANT!: Please note that the later versions of the Asana connector (version 6.0+) use a different version of Asana auth services than the trigger.
The different authentication versions are incompatible with one another and cannot be used together in the same workflow.
If you wish to use the Asana trigger and connector in the same workflow you will need to use an earlier version of the connector (version 5.4 and below) with the trigger.
Within the builder, click on the Asana connector to display the connector properties panel. Select the Auth tab and click on the New authentication button.
In the Tray.io authentication pop-up modal name your authentication in a way that will quickly identify it within a potentially large list. For example whether it is a Sandbox or Production auth, etc.
Consider who/ how many people will need access to this authentication when choosing where to create this authentication ('Personal' vs 'Organisational').
The next page asks for your authentication method and environment.


Once you have added these fields to your Tray.io authentication pop-up window click the Create authentication button.
Your connector authentication setup should now be complete. Please run the simplest operation available to test and make sure you can retrieve data as expected.
Asana TriggerCopy
IMPORTANT!: Please note that the later versions of the Asana connector (version 6.0+) use a different version of Asana auth services than the trigger.
The different authentication versions are incompatible with one another and cannot be used together in the same workflow.
If you wish to use the Asana trigger and connector in the same workflow you will need to use an earlier version of the connector (version 5.4 and below) with the trigger.
The Asana trigger allows you to receive notifications and trigger workflows when given events occur associated with the selected trigger operation.
Trigger Operations available:Copy
Webhook
Webhook SetupCopy
Select the Asana trigger. This can be done at the create new workflow stage or updated within the workflow builder itself.
Highlight the Asana trigger. In theAsana] trigger properties panel to the right of the builder, click on the Authenticate tab and the Add new authentication button.
Follow the instructions above to authenticate your trigger. Select Webhook as the event you wish your trigger to listen to in order to set off the workflow itself.
Available OperationsCopy
The examples below show one or two of the available connector operations in use.
Please see the Full Operations Reference at the end of this page for details on all available operations for this connector.
Notes on using AsanaCopy
Using the trigger & connector in the same workflowCopy
The Asana trigger and connector can only be used together if you use version 5.4 (and below) of the connector.
Connector version 6.0 and above cannot be used in conjunction with the trigger. The trigger and connector version 6.0> have different authentication modals behind the scenes.
Connector version 5.4< and the trigger can use the same authentication if you require both for your workflow.
For more details on the subject of versioning check out our section on Incompatability issues.

Copying Projects
You can only copy projects within the same
List TasksCopy
When using the List Tasks operation you should only choose one of Assignee ID or Project ID:

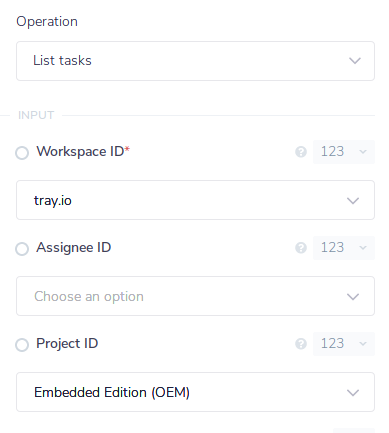
If you choose an option for both you will receive an error message such as:


Search TasksCopy
The Search Tasks operation is only available to premium Asana users.
A user is a premium if any of the following is true:
The workspace in which the search is being performed is a premium workspace.
The user is a member of a premium team inside the workspace.
Even if a user is only a member of a premium team inside a non-premium workspace, the search will allow them to find data anywhere in the workspace, not just inside the premium team.
When using Search Tasks, you must send a minimum of one parameter from either 'Search parameters' or 'Custom fields' inputs.
For more information on how to use each 'Search parameter', you can find details in the Asana documentation v1.0 - Search tasks in a workspace. The document helps to find the exact format that Asana will be expecting the 'Search parameters' to be passed in.
Example usageCopy
TRAY POTENTIAL: Tray.io is extremely flexible. By design there is no fixed way of working with it - you can pull whatever data you need from other services and work with it using our core and helper connectors.
Below is an example of a way in which you could potentially use the Asana connector to programatically copy a project - including all the tasks and custom fields associated with the original.
The overall logic of the workflow is:
Setup using a manual trigger, then create a new project. This is so there is a pre-existing space to relay your duplicated project information.
Add an Asana connector and copy all custom fields from the original project.
Add an Asana connector and copy all tasks from the original project.
Test your workflow.
Your end result will look similar to this. As you can see the a new project has been added to the workspace along with all the tasks from the original project.


Your completed workflow should look similar to this:

