Connector builder
This is a legacy feature in order to build your own connectors use CDK.
OverviewCopy
The Tray Connector Builder allows you to build your own connectors.
So if you have a service for which there is no pre-built Tray connector, you can create your own connector for the service and then publish it.
Once published, the connector is reviewed and approved by Tray.
We recommend using the HTTP client connector when you are seeking to use a single endpoint which is not currently available within the service connector's operations list.
We recommend using Connector Builder if there is no Tray connector available for the service and you need to create a new connector with all the required operations and share it with other users within your organisation.
How to access Connector Builder?Copy
Connector Builder is part of our core product with no additional fees required.
To access Connector Builder, head to your Tray.io account.
You can access Connector Builder under the Connectors tab of your Personal workspace.

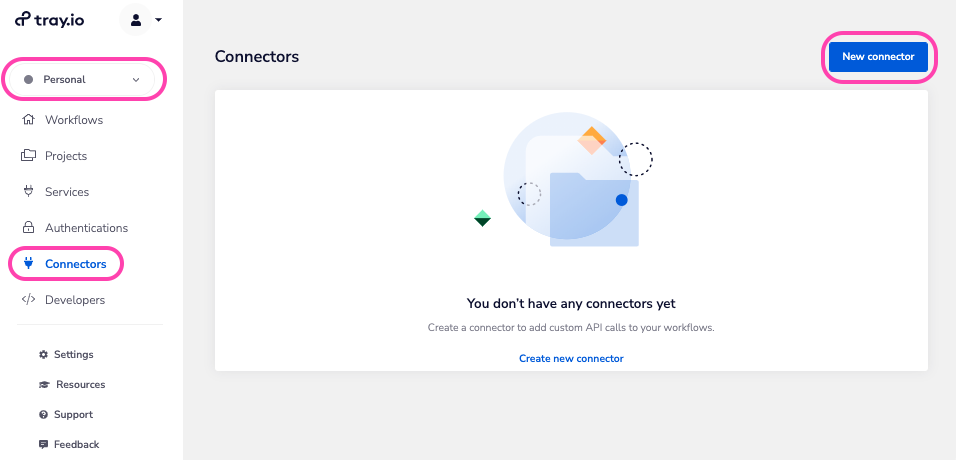
Please note that all the connectors built and published here will be deployed privately unless you share them with other users in the organisation.
For detailed information, refer to our Sharing Published Connectors section below.
You will not have a personal workspace if you are an embedded org owner. In that case, you can access Connector Builder in your embedded workspace.


Important NotesCopy
Programmatically accessing the credentialsCopy
To include an operation input in the request. Like while creating headers for your operation API calls or including any reference. You should never hardcode any auth credentials, as they will be exposed in your workflow logs.
Instead you should type two open curly brackets {{
When you type the two open curly brackets, they will not actually appear. Wait a few seconds and the drop down will activate!
Once done, a list of available options will appear. Select the appropriate reference from the drop-down list.

LimitationsCopy
Connector Builder has no limit regarding the number of operations you can add to your connector.
Having said that certain operations in service connectors may have API rate limits. So while creating a connector and its operations, you must be mindful of the API's rate limit and the volume of data you can account for the specific service.
For example, if a certain GET records type of endpoint has a limit of, say 2000 per call, then you will need to add pagination parameters such as a has_more, a next_page or a page_offset while creating the operation.
Our Paginate through Salesforce Records template show you how a connector facilities batch size and paginates through records. It also illustrate how you can paginate using loop connector etc.
Another example could be when you can upload only 200 records in one go, there may be a rate limit for the same. To resolve this issue, you can create a First In First Out (FIFO) queue using our data storage connector. This is discussed in our docs on Queuing Data.
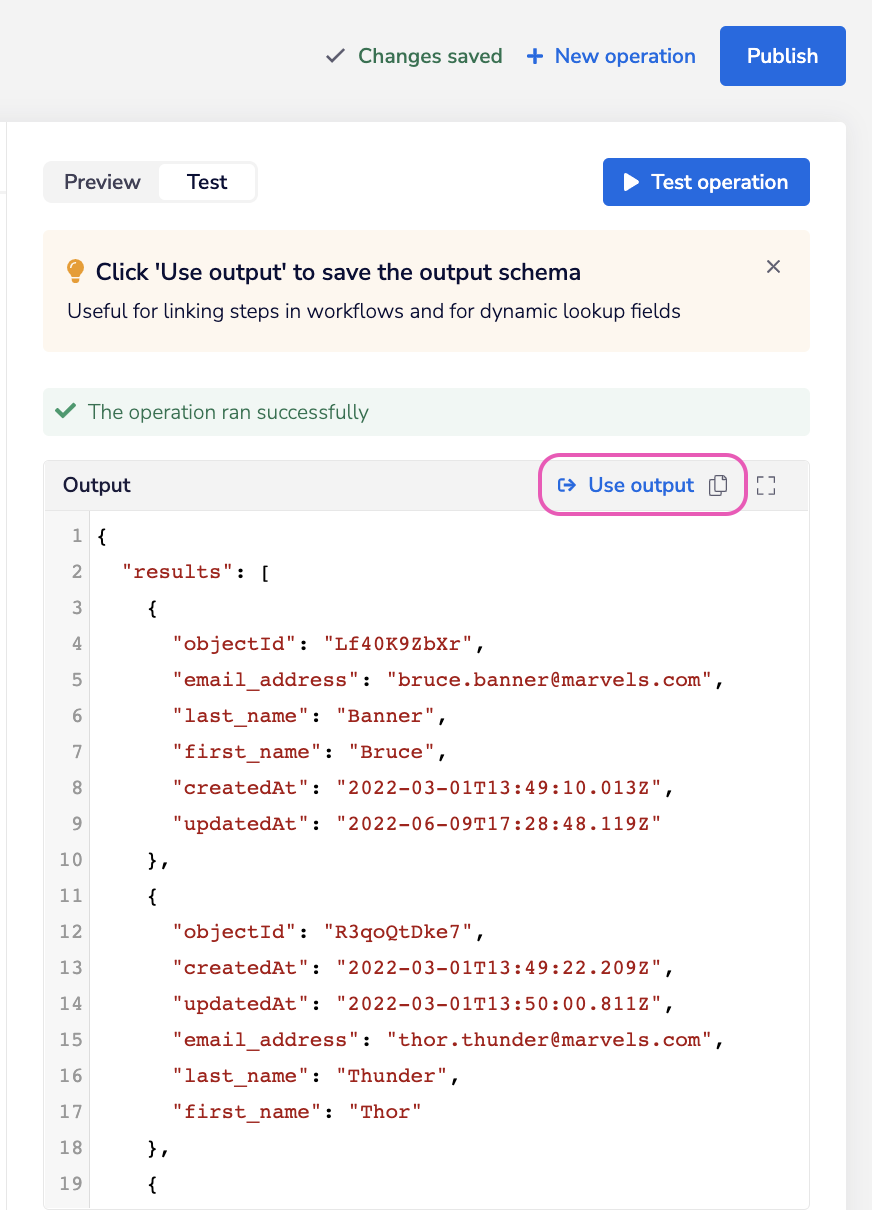
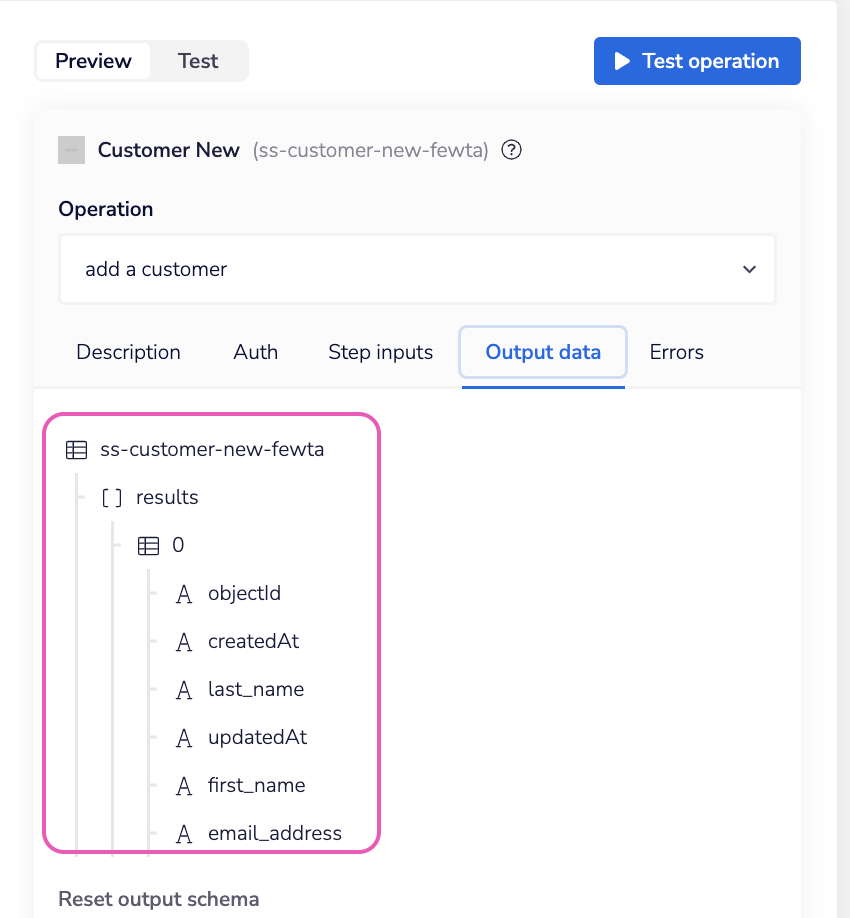
Set output schemaCopy
After successful run of each of your connector's operation it is recommended to set the output schema using the Use Output button from the Output panel.
This will help you properly reference the output data within a workflow.
Make sure every time you make any changes to the operation, rerun the test and set the output schema to ensure the output schema is up to date.


Versioning & DeprecationCopy
VersioningCopy
You can only have a maximum of 2 published versions of your connector.
You can only create one draft version at a time. One draft version per connector. You can also discard your draft connector and start afresh with a new one should you wish to do so.
It simply won't be live and available to users until a previous published version has been deprecated frist.
If you are editing anything post publication the builder will automatically create a new connector version for you.
For example:
Connector X: v1 > Published
Connector X: v2 > Published
Connector X: v3 > Draft &/ Minor edit > Can’t publish. User must deprecate the latest version before v3 can take its place and become the new public connector.
Remember that you can manage your versions using the Versions Dashboard:


Deprecation Copy
Workflows that are "currently" using a deprecated version of your connector will continue to be served.
However please note that the deprecated version wont be available once the connector version within the workflow itself has been upgraded. You will only be able to select from the current published versions.
This means that even if a user tries to revert back - by using the version switch option within the property panel (in the bottom left hand corner) - the option will not be presented to them.
Any new connector steps added will follow the same rule. Users will only be able to choose from one of the two published versions available.
Draft ConnectorsCopy
You can change the API connection associated with your custom service provided your connector is not already publicly available.
This is feature only works for Connectors still in a Draft state.
Import cURLCopy
The Import cURL feature speeds up the manual process of filling in API information by auto-generating it for you.
All you need do is provide the cURL code for your chosen API call and the fields will populate themsleves.
Example use caseCopy
Dynamic operations (DDLs)Copy
DDL is an operation type that helps you use the output from one operation as an input in another operation.
In connector builder, this can be done in 2 parts:
Configuring the operation whose output you would be using.
Configuring your actual operation for which you would be using the output of the previous operation.
Let's consider a scenario where you have to update the customers' email addresses in your Customer database and need a list of all the customers as a drop-down list.
For this, you can:
Configure the operation 'Get List of all Customers'
Use the list of all customers received as an input for the 'Update email address' operation.
Let's start with configuring the 'Get List of all Customers' operation:
Now that we have configured the DDL for the 'Get all Customer' operation, we can use a list of all customers received as an input for the Update email address operation.
Sharing Published ConnectorsCopy
You can now share your published connectors with other members of your organisation.
To share the connector click the horizontal hamburger icon next to your connector and click 'Share connector'.


A 'Share connector' pop-up modal will appear. You can select one or multiple people with whom you want to share the connector on this page. Once done, click on the 'Share' button.

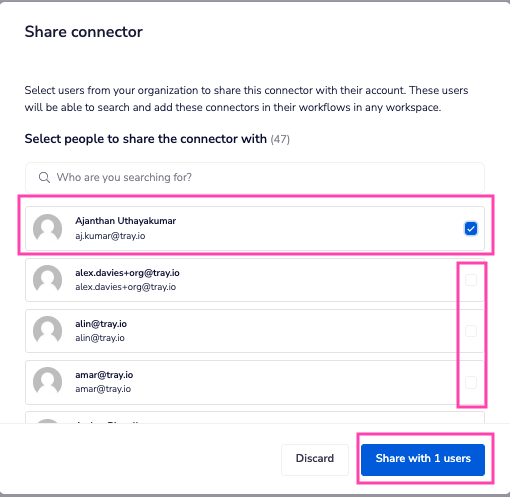
Points to remember:
Once you have shared the published connector with the people from your organisation there are some important factors you should know about:
If the creator of the connector is also the owner of the organisation, then everyone in that organisation has permission to use the connector and create authentication for it in any workspace.
Suppose the creator of the connector is not the owner of the organisation. In that case, everyone in that organisation has permission to use the connector, but they cannot create authentication for it.
In such a case, the creator of the connector must create an auth in the Org space. This auth can then be used in any workspace with the connector.
Building connectorsCopy
There are two stages to building a connector.
The first stage involves:
Creating a Custom Service
Creating the connector for the selected service
The second stage can be broken down into the following steps (and may vary depending on the operations you plan to create for your connector):
Add operations to the connector
Authenticate the connector
Add an HTTP request
Add Operation inputs
Publish the connector
Example usageCopy
Before you create your connector you need to either already have create a custom service available to test with or create one.
The subsequent steps may vary based on the connector operations you wish to create.
Below shows how to create a test API. How to create a connector and link it to your custom service. Plus a walkthrough of both a GET and POST operation example.
For further references see the Back4App documentation.
Create a test API serviceCopy
You can skip this step if you already have a service you wish to use.
To follow this tutorial we recommend creating a Back4App application that will serve as a database for our service.
It is a database-like solution that allows you to easily create entities which can then be queried and updated via RESTful API calls.
The following steps will show you how to set up the application:
Connect to your Service & AuthenticateCopy
When you connect to your custom service you will essentially be building an authentication as well as the connector itself.
Should you wish to create your service separately you can. Please note that you will only be able to connect your service to draft connectors. See our important notes section Versioning & Deprecation for more details.
Get Details of Customer (GET)Copy
Once you have created your connector, you can add various operations to it.
The first operation we are adding for the Customer connector is Get Details of Customer. This operation will fetch details of a specific customer based on the provided unique ID.
Add a New Customer (POST)Copy
We learned how to add an operation with the GET request method in the above section. In this section will see how you can add a new operation with the POST request method.
This operation we are adding is Add a New Customer. It will add a new customer to the Customer database.
Publish your connectorCopy
Once you have created your connector, added and tested all the operations, the last step is to Publish the connector.


While building, the connector is in a Draft state. To publish the connector click the Publish button on the top right corner.
A pop-up modal will appear requesting to make sure you have tested all the connector operations before publishing. Once verified, check the 'All operations are tested and ready to use' field and click the 'Publish' button.

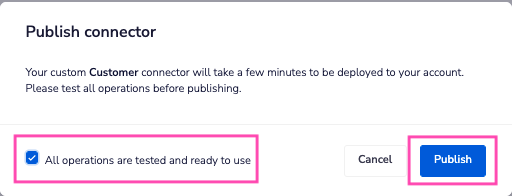
Once published, the connector may take around 10 minutes to be live and can be seen under the Published tab.

