
Sendoso 3.0
Sendoso is the leading Sending Platform.
OverviewCopy
Sendoso is the leading sending platform that delivers modern direct mail, personalized gifts, eGifts, and other Physical Impressions™ at scale. This makes it possible to build stronger, deeper, and more trusted relationships that move everything up and to the right!
API INFO: The Base URL used for the Sendoso connector is https://app.sendoso.com/api/v3/. More information can be found on their main API documentation (v3.0) site.
AuthenticationCopy
Within the workflow builder, highlight the Sendoso connector.
In the Sendoso connector properties panel to the right of the builder, click on the Authenticate tab and the 'Add new authentication' button.


This will result in a Tray.io authentication pop-up modal. The first page will ask you to name your authentication and select the type of authentication you wish to create ('Personal' or 'Organisational').
The next page asks you for your 'Environment' and 'Public' and 'Write' access permissions.

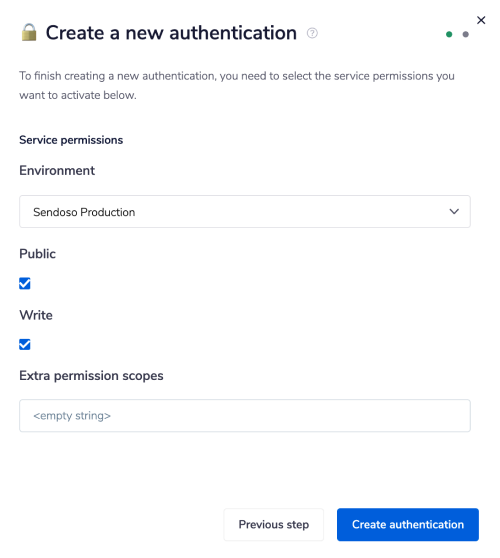
You can select the preferred 'Environment' from the dropdown. The Environment options available are 'Sendoso Production' and 'Sendoso Development'.
By default, the 'Sendoso Production' environment is selected. 'Sendoso Development' is a non-production environment for development and testing. If you wish to work and select the 'Sendoso Development' environment please reach out to hello@sendoso.com. The team will authorize and provide you with a testing environment.
Once you have selected the Environment of your choice, you can select or unselect the access permissions depending on your choice.
If you select the 'Public' access permission, you will have access to your basic information. If you select the 'Write' access permission, you will be able to send items or gifts on your behalf.
You can always provide extra permissions using the 'Extra permission scopes' field available at the bottom of the authentication modal.
Once you have added these fields to your Tray.io authentication pop-up window, click the 'Create authentication' button. Upon clicking 'Create authentication', you will be prompted to sign in to your Sendoso account.

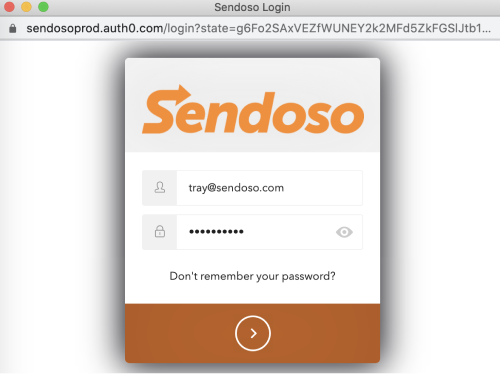
After you have logged in with your Sendosdo account credentials, go back to your settings authentication field (within the workflow builder properties panel), and select the recently added authentication from the dropdown options now available.
Your connector authentication setup should now be complete.
Available OperationsCopy
The examples below show one or two of the available connector operations in use.
Please see the Full Operations Reference at the end of this page for details on all available operations for this connector.
NEED A TRIGGER?: Remember that as a user you can always create your own service trigger should you require one. Check out the Webhook Trigger documentation page for more details.
Example UsageCopy
TRAY POTENTIAL: Tray.io is extremely flexible. By design there is no fixed way of working with it - you can pull whatever data you need from other services and work with it using our core and helper connectors. This demo which follows shows only one possible way of working with Tray.io and the Sendoso connector. Once you've finished working through this example please see our Introduction to working with data and jsonpaths page and Data Guide for more details.
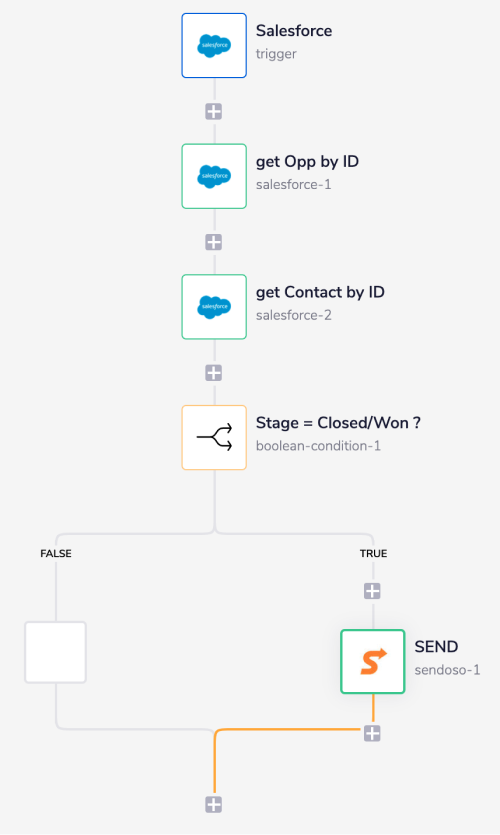
Below is an example of a way in which you could potentially use the Sendoso connector to send a gift to a prospect who has successfully converted into a customer in Salesforce.
In this scenario, upon a change in the 'Stage' field of a Salesforce record, the workflow checks if the 'Stage' field's value is equal to 'Closed won'. If that's the case, the workflow fetches the customer info using Salesforce connector's 'Find records' operation, and sends a gift to that customer using a Sendoso connector.
The steps will be as follows:
Set up the Salesforce trigger, which is triggered when the value of a Stage field in the Salesforce's record with type as opportunity is changed.
Fetch details of the opportunity record whose stage has recently changed.
Fetch the contact details of the customer from the same opportunity record.
Compare the opportunities Stage field value. If the value is equal to 'Closed won', send a gift to the customer using their contact information fetched in the previous step.
Your completed workflow should look similar to this:

1 - Setup the Salesforce triggerCopy
Select the Salesforce trigger from the trigger options available and set the operation to 'On Record Field Change'.
In the properties panel from the available drop-down options, choose the value for the fields 'Record type' as Opportunity and 'Field to watch' as Stage.

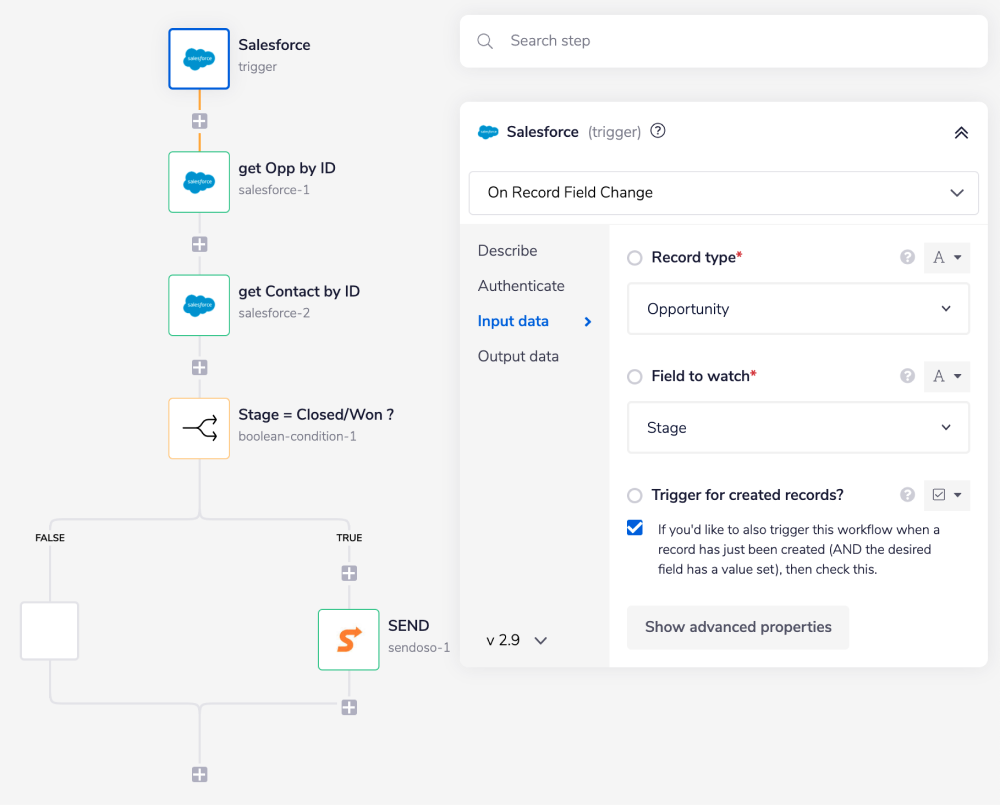
The workflow will be kicked off every time when there is a change in the 'Stage' field's value of a Salesforce record with the type as 'Opportunity'.
2 - Fetch opportunity and contact detailsCopy
From the connectors panel on the left, search for the Salesforce connector and add it as your next step. Set the operation to 'Find records'.
As you can see, the 'Record type' field is mandatory. Select the appropriate value for the field from the available drop-down options. In our example, we have selected the value Opportunity as we need to fetch details for an Opportunity.
The 'Fields' section allows you to choose the field for which you wish to retrieve the selected record type details. You can always fetch complete details by selecting all the fields for the selected record type. In our example, we are fetching values for the 'Stage' and the 'Contact ID' fields as they will be used as input in the later steps.
Later in the 'Conditions' section, we are comparing the existing 'Opportunity ID' with the Opportunity ID received from the trigger. The comparison will ensure that we fetch the record details for the opportunity that we have received from the trigger.
To do so for the 'Field', select the Opportunity ID as a value from the available drop-down options. Set the 'Operator' field to Equal to.
Lastly, using the connector-snake, find the jsonpath for the 'Value' field from the Trigger step. It should appear similar to: $.steps.trigger.events[0].Id.
JSONPATHS: For more information on what jsonpaths are and how to use jsonpaths with Tray.io, please see our pages on Basic data concepts and Mapping data between steps
CONNECTOR-SNAKE: The simplest and easiest way to generate your jsonpaths is to use our feature called the Connector-snake. Please see the main page for more details.
Make sure to set the 'Conditions matching' field to Match all conditions.


After execution, this particular step will provide values for the 'Stage' and the 'Contact ID' fields. We will use the values in the later steps.
Next, again add the Salesforce connector as your next step and set the operation to 'Find records'.
As you can see, the 'Record type' field is mandatory. Select the appropriate value for the field from the available drop-down options. This time, we have selected the value Contact as we need to send the gift on the fetched contact details.
Again as specified above, you can always fetch complete details by selecting all the fields for the selected record type. In our example, we are fetching values for the 'First Name' and the 'Email' fields as they are sufficient to send a gift.
Now configure the 'Conditions' section as we have done for the 'get Opp by ID' step. The condition will ensure that we are fetching the contact details for the opportunity that we have received from the trigger.
To do so for the 'Field', select the Contact ID as a value from the available drop-down options. Set the 'Operator' field to Equal to.
Lastly, using the connector-snake find the jsonpath for the 'Value' field from the Trigger step. It shoul appear similar to: $.steps.salesforce-1.records[0].ContactId.

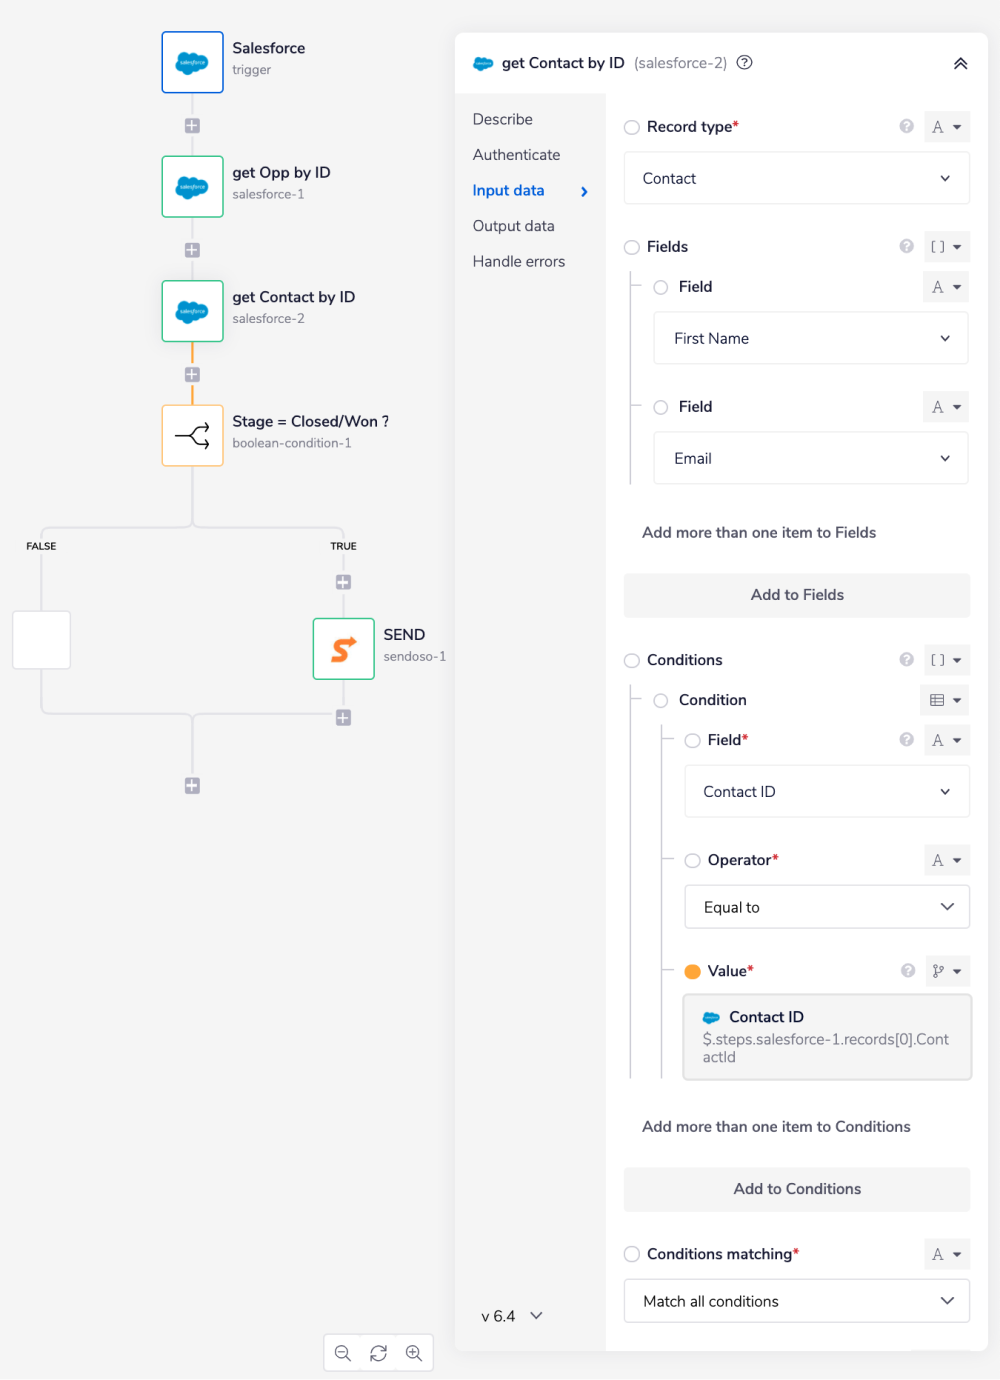
At this step, the 'Find records' operation will get contact information by fetching the 'First Name' and 'Email' details for the opportunity based on the provided condition.
3 - Check the Stage of the opportunity and send the gift accordinglyCopy
Next, search for the Boolean condition connector and drag it to the next step. Set the operation to 'Boolean condition'.
Using the Boolean condition connector, we will check if the Stage field's value is equal to Closed Won. If the condition satisfies the workflow, will move to the next step and will send a gift to the customer using the Sendoso connector. If not satisfied, the workflow will terminate.
To do so, using the connector-snake find the jsonpath for the '1st Value' from the 'get Opp by ID' step. It should appear similar to: $.steps.salesforce-1.records[0].StageName. Set the 'Comparison type' to Equal to and the '2nd Value' as Closed Won.


The last step is to drag a Sendoso connector on the true branch of the Boolean condition step. Set the operation to 'Send gifts'. As you can see, the 'Touch Id', 'Amount', and 'Email' field is required.
Choose an appropriate value for the 'Touch ID' field from the available drop-down options. The Touch ID specifies the type of gift you wish to send to your customer.
Set the amount of your choice in the 'Amount' field. The amount specifies the cost of the gift.
Lastly, using the connector step find the jsonpath for the 'Email' and 'Name' field from the 'get Contact by ID' step. It should appear simillar to: $.steps.salesforce-2.records[0].Email and $.steps.salesforce-2.records[0].FirstName.


Once the gift is successfully sent, you should receive a confirmation with a tracking code and URL. Click on the Debug tab to check the confirmation message in the final steps output panel.
It should appear similar to this:

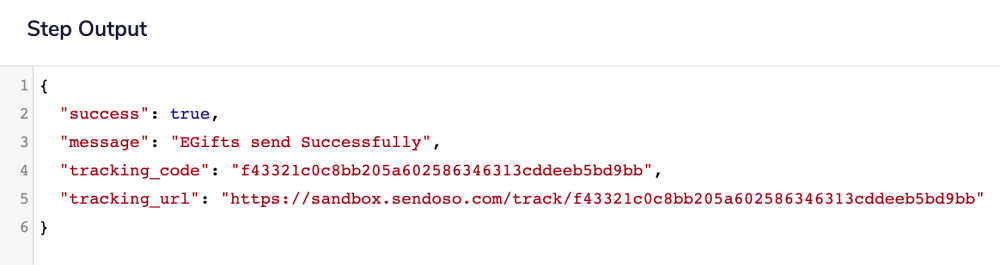
For use in any subsequent steps, you can then access the data output with jsonpaths such as:
$.steps.sendoso-1.tracking_code or $.steps.sendoso-1.tracking_url
BEST PRACTICES: Whenever you do decide to create your own workflow, be sure to check out some of our key articles such as: