
Example Usage
TRAY POTENTIAL: Tray.io is extremely flexible. By design there is no fixed way of working with it - you can pull whatever data you need from other services and work with it using our core and helper connectors. This demo which follows shows only one possible way of working with Tray.io and the Airtable connector. Once you've finished working through this example please see our Introduction to working with data and jsonpaths page and Data Guide for more details.
Create recordsCopy
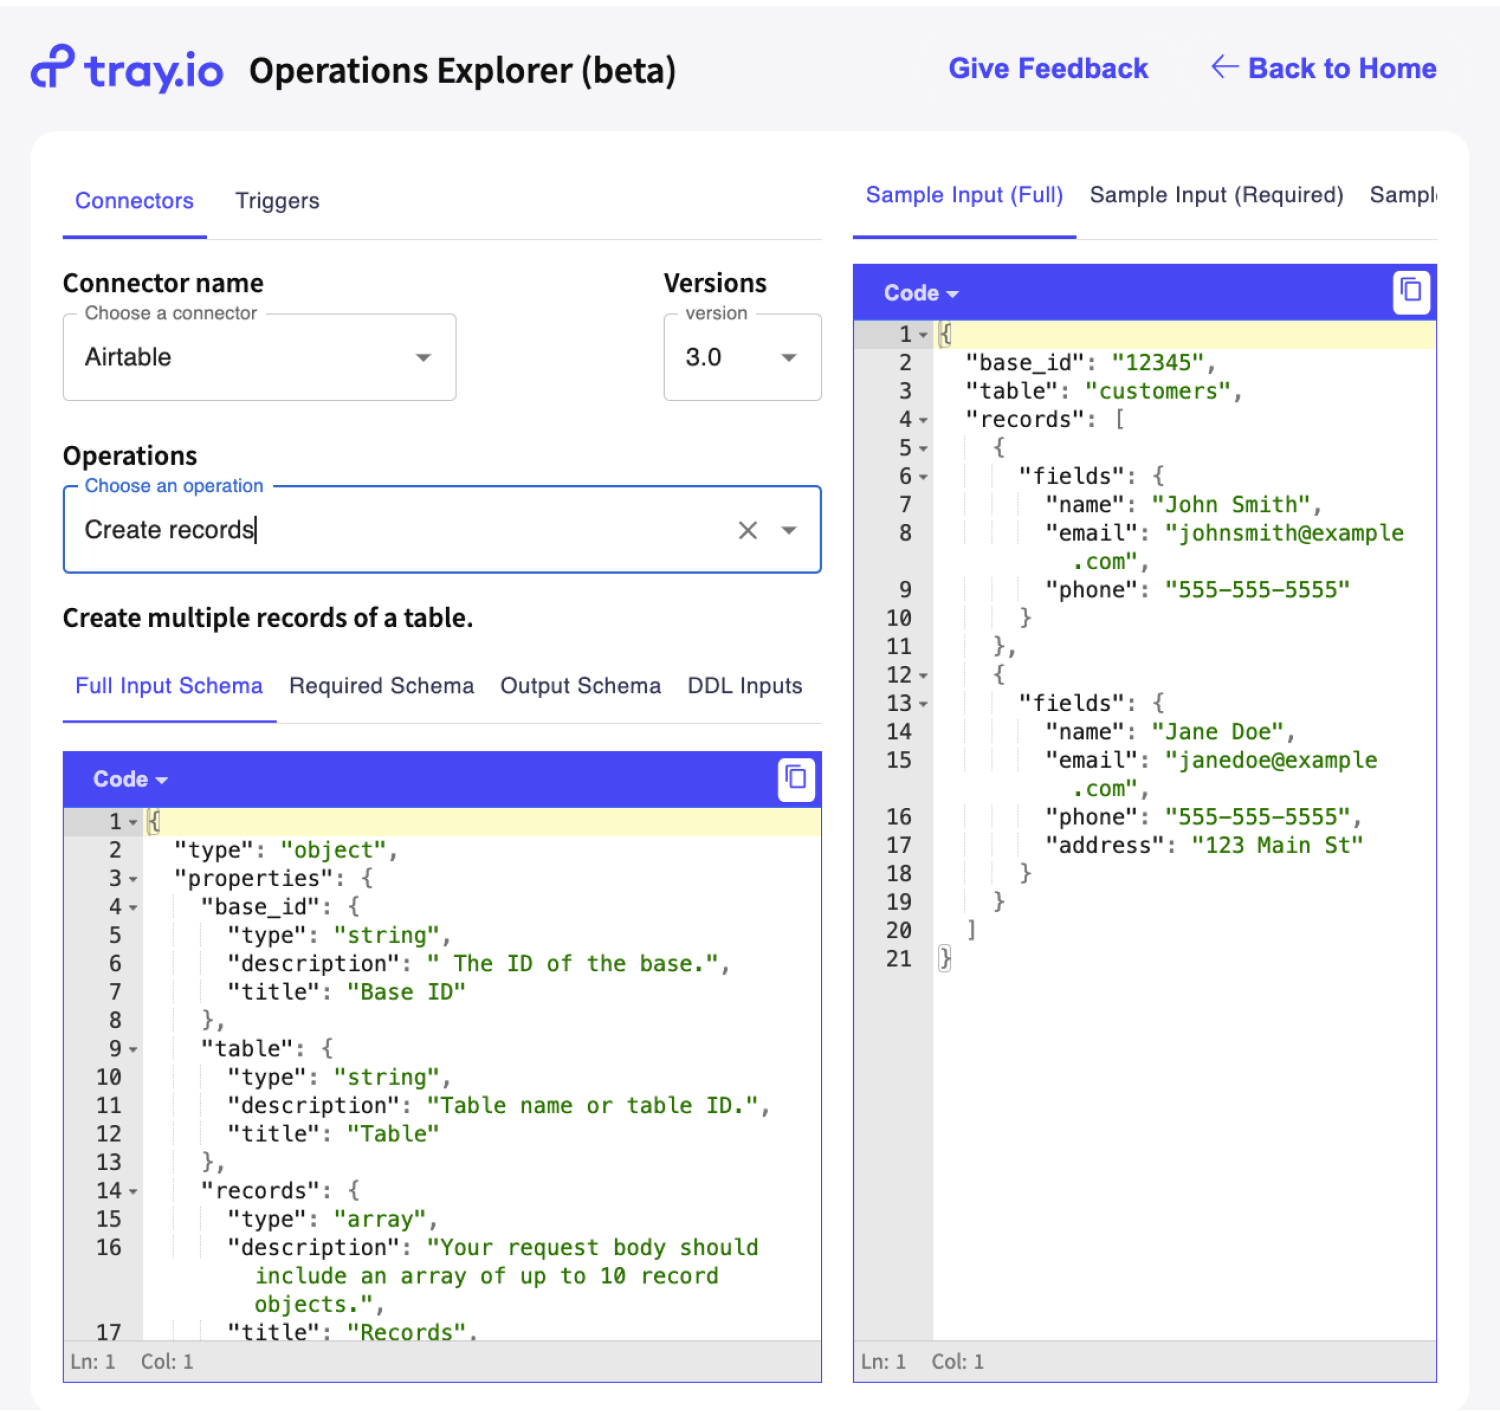
If you want to dynamically send the data to Airtable, it's crucial to understand the exact format that Airtable accepts data.
For this you can use our Ops Explorer tool, which assists in identifying the precise format required by Airtable.
By selecting the Airtable connector and the desired operation, users can receive a sample input that conforms to Airtable's format requirements.

In instances where your data payload doesn't match Airtable's required format, you can utilize Tray.io's Data Transformer tool.

This tool enables users to seamlessly convert input JSON data into the compatible Output JSON format expected by Airtable.

Once the data is formatted correctly, users can utilize the provided Expected Output JSON as input for their create record operations within the Airtable connector.

Advanced topicsCopy
Setting fallback valuesCopy
Airtable records often contain empty fields. When this is the case, the Airtable API will throw an error for these particular records.
This can be a problem should another field depend on the data coming in here, as it will stop the workflow from progressing any further.
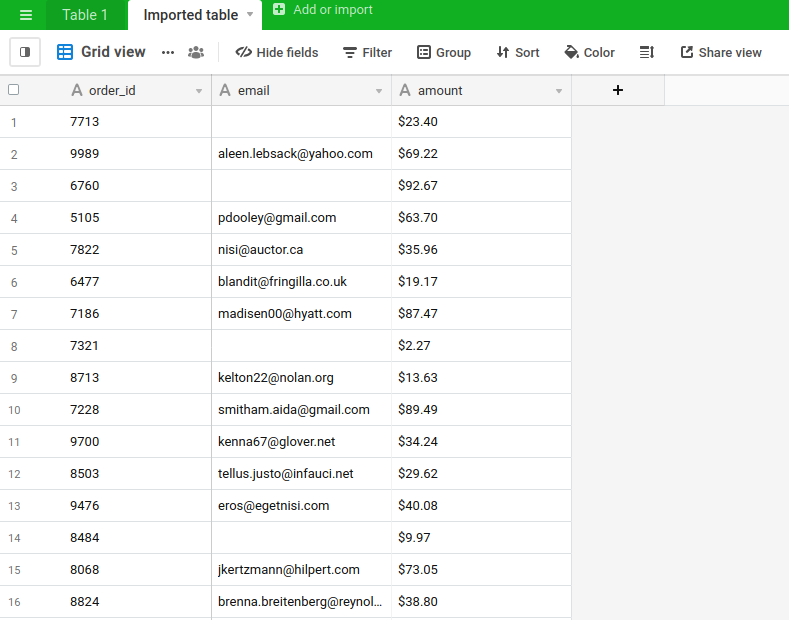
For example if we use the 'List records' operation in Airtable to get the following records:

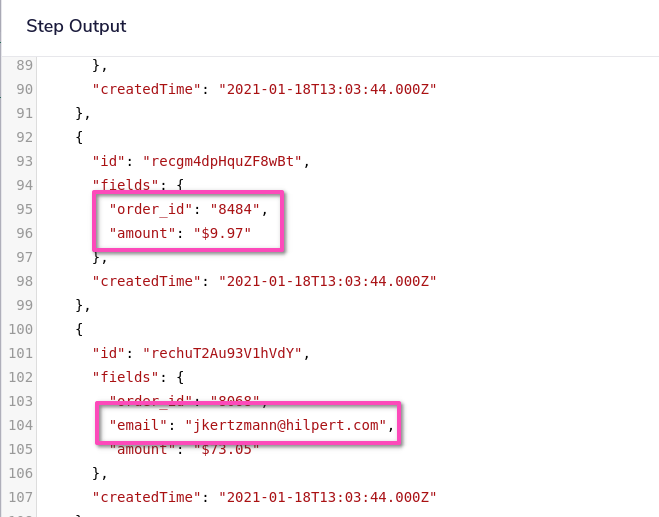
Then the orders which have no email address recorded will not return the email field at all:

The following workflow illustrates how to deal with this, using Google Sheets as a generic placeholder for any service you may be wanting to push the Airtable data into:

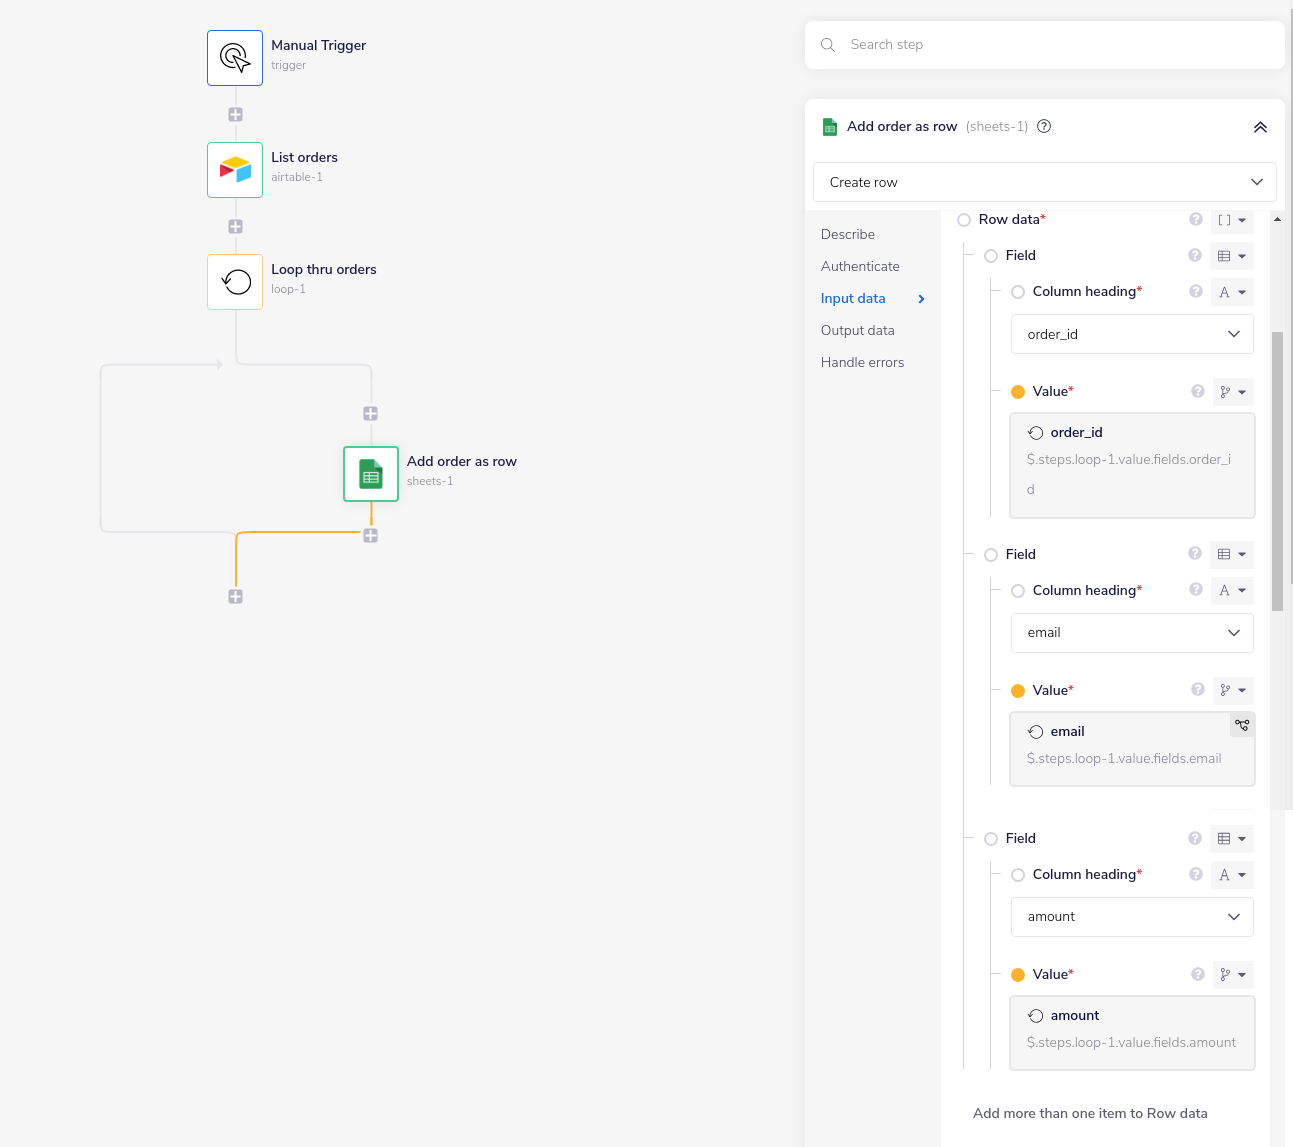
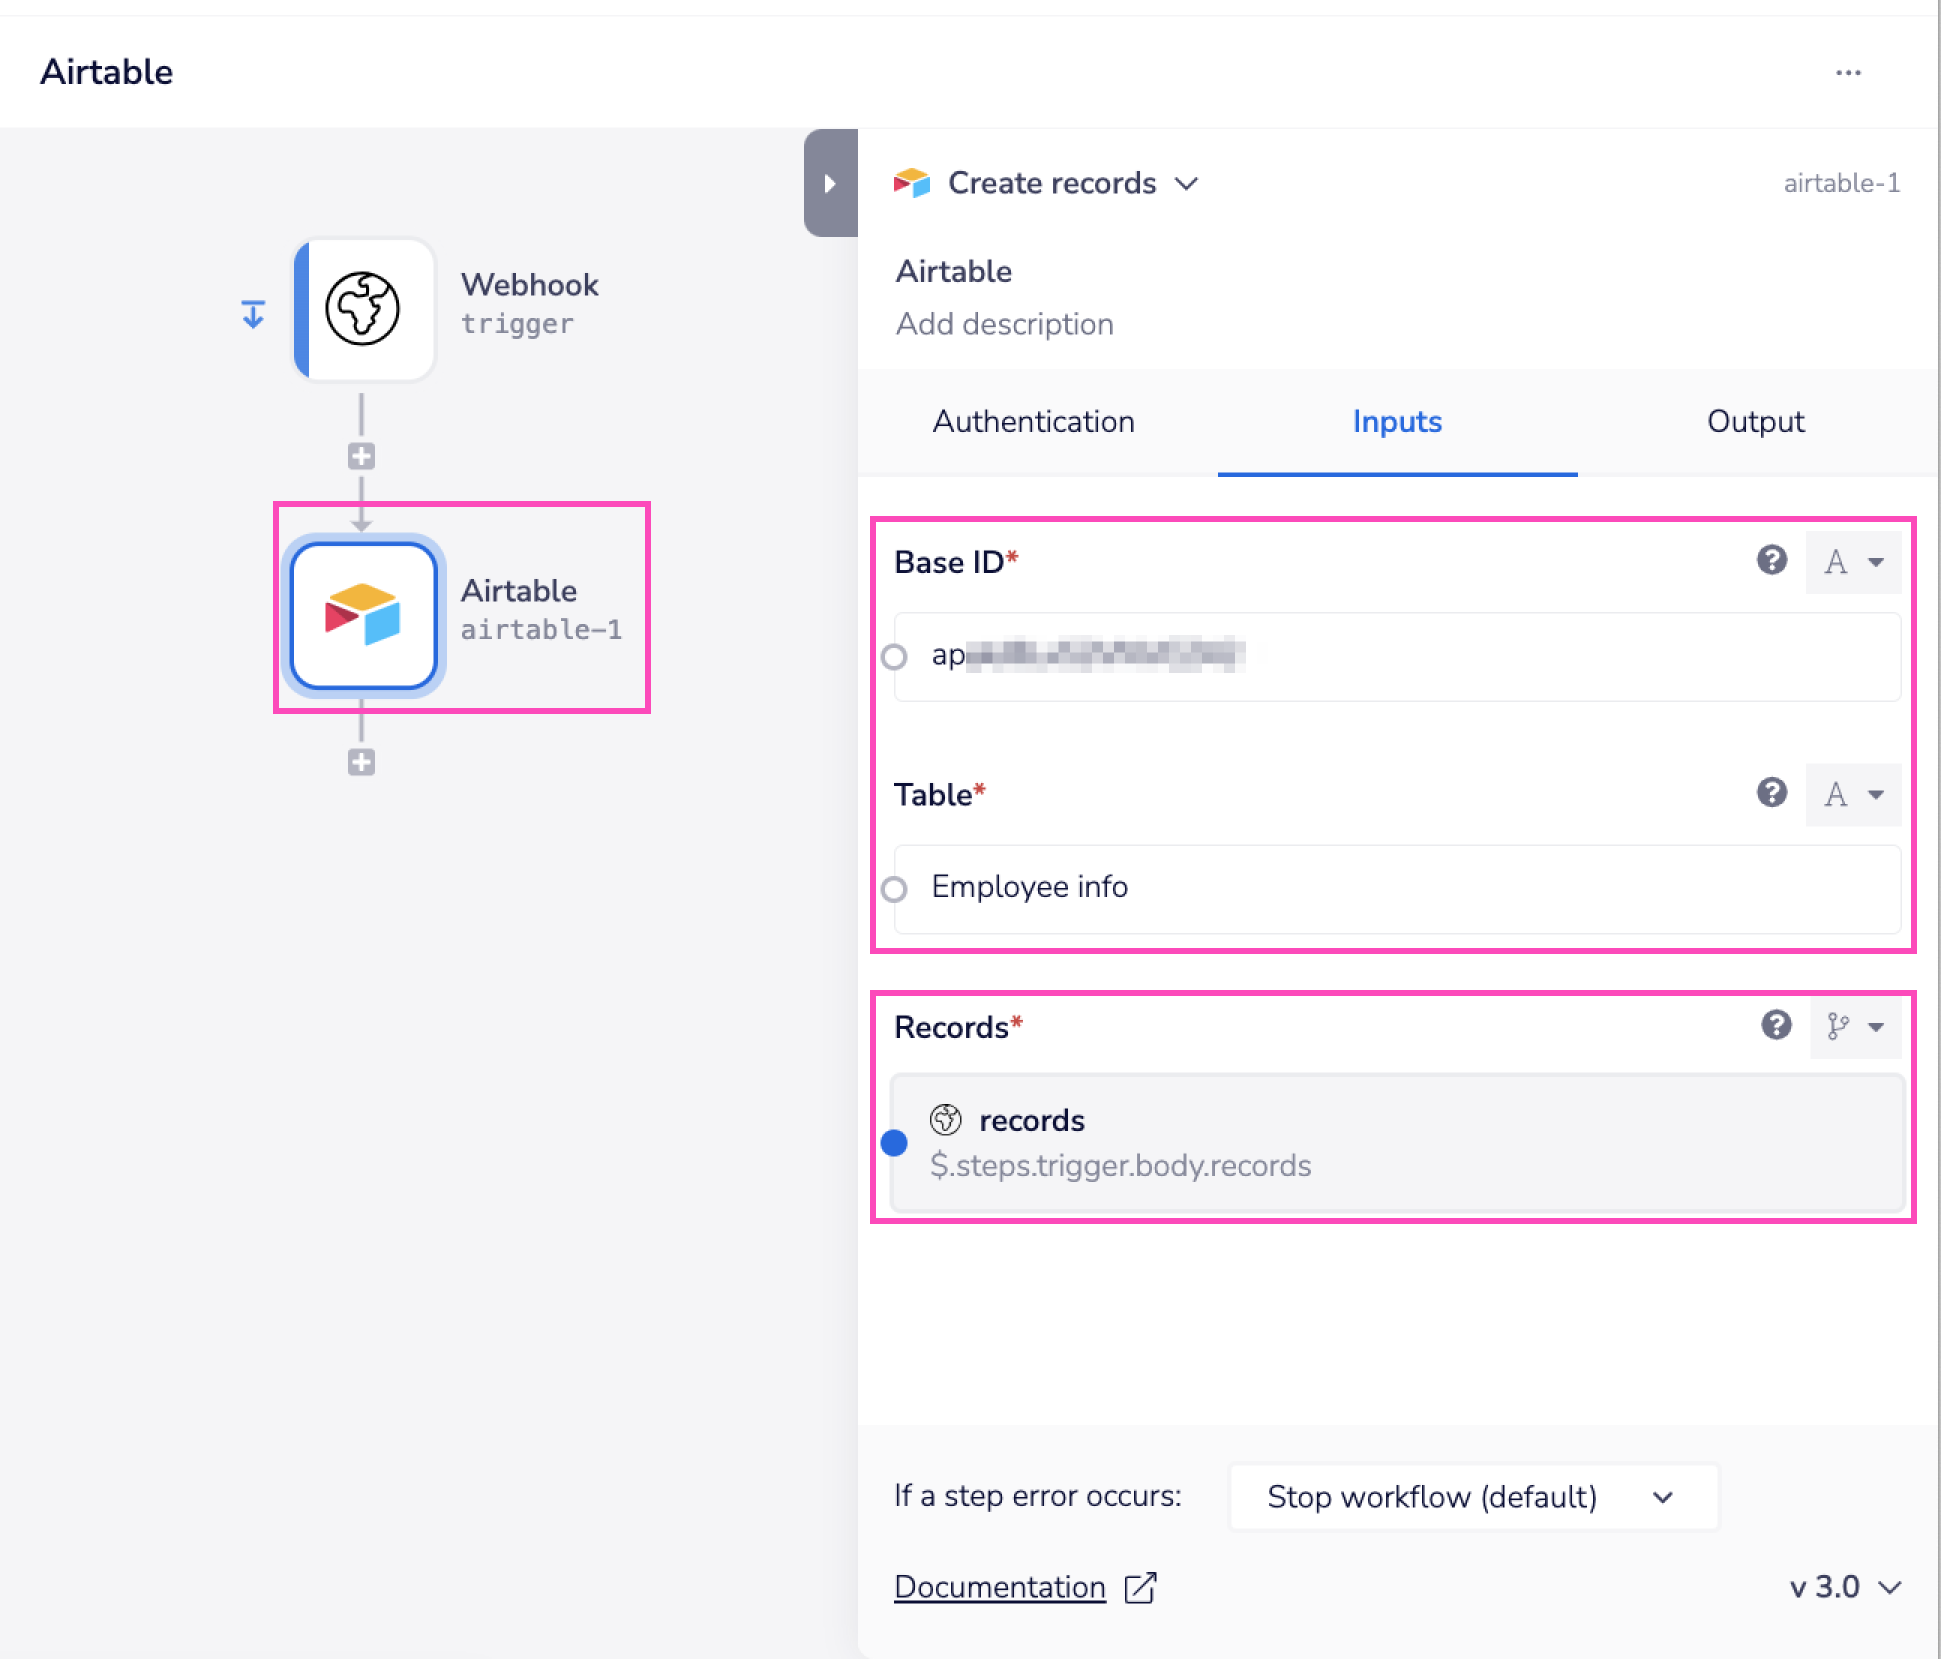
From the properties panel of the Add order as row step you can see that we are including 'email' as a field to be pushed.
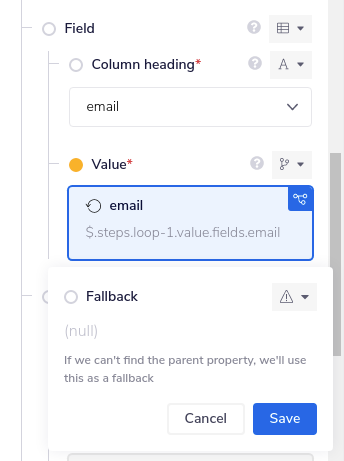
We can then also set the fallback value to be e.g.'null' (or 'not found' etc.):

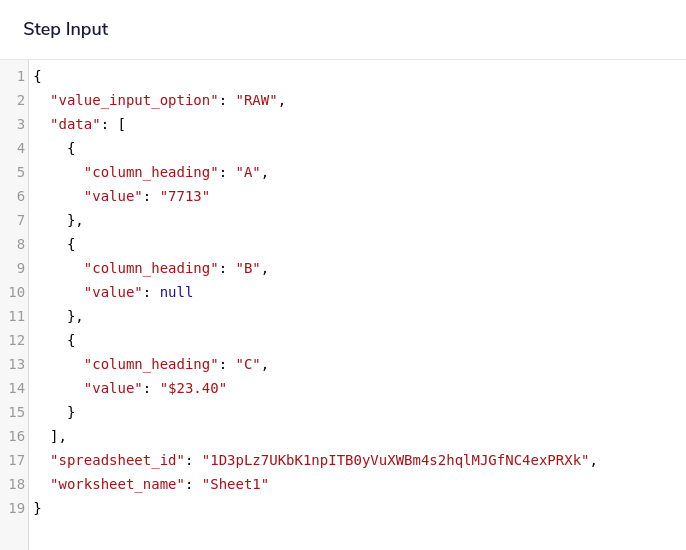
Inspecting the input logs from the debug tab for the Sheets Add order as row step will then show that the email 'null' value has been passed succesfully:

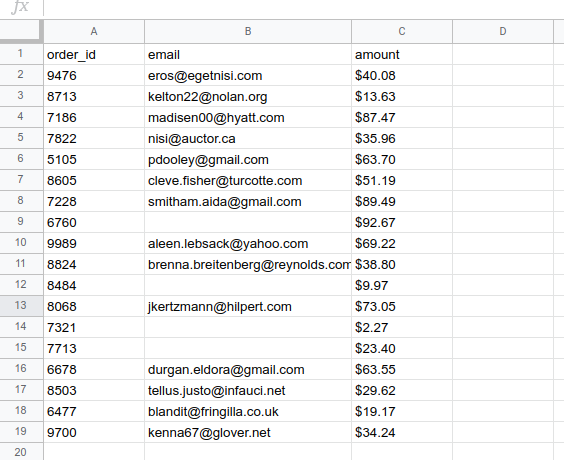
And all orders have been pushed to Google Sheets:

Manage duplicate recordsCopy
Over a period of time you may find duplicate records accumulating in Airtable.
The following workflow imagines a scenario, where you are comparing incoming records from the trigger with the existing records in Airtable. The records that match - i.e. the ones that already exist in Airtable - are skipped and the rest of the records that do not match are inserted into Airtable.
Thus by not allowing the existing records to be inserted again, the workflow manages the duplicate record issue.
The incoming records received through the Webhook are in JSON format and are as follows:
1[2{3"order_id": 1742,4"email": "tbrindley0@sina.com.cn",5"total_price": 85,6"currency": "Som"7},8{9"order_id": 3527,10"email": "swhoston1@census.gov",11"total_price": 54,12"currency": "Yuan Renminbi"13},14{15"order_id": 4739,16"email": "bparren2@vimeo.com",17"total_price": 53,18"currency": "Yuan Renminbi"19},20{21"order_id": 3124,22"email": "ncrab3@so-net.ne.jp",23"total_price": 60,24"currency": "Yen"25},26{27"order_id": 4937,28"email": "bcudbertson4@gmpg.org",29"total_price": 87,30"currency": "Yuan Renminbi"31}32]
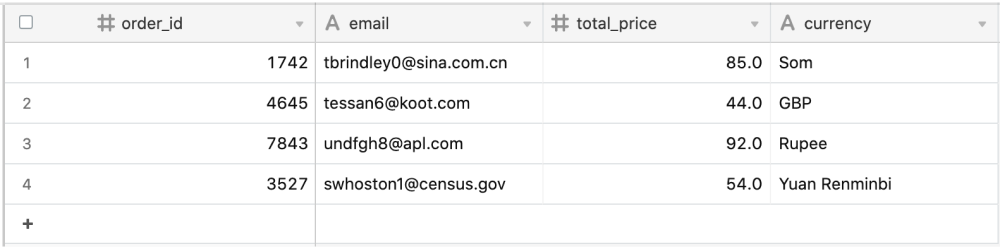
The existing records in Airtable are as follows:

The complete workflow looks like this:

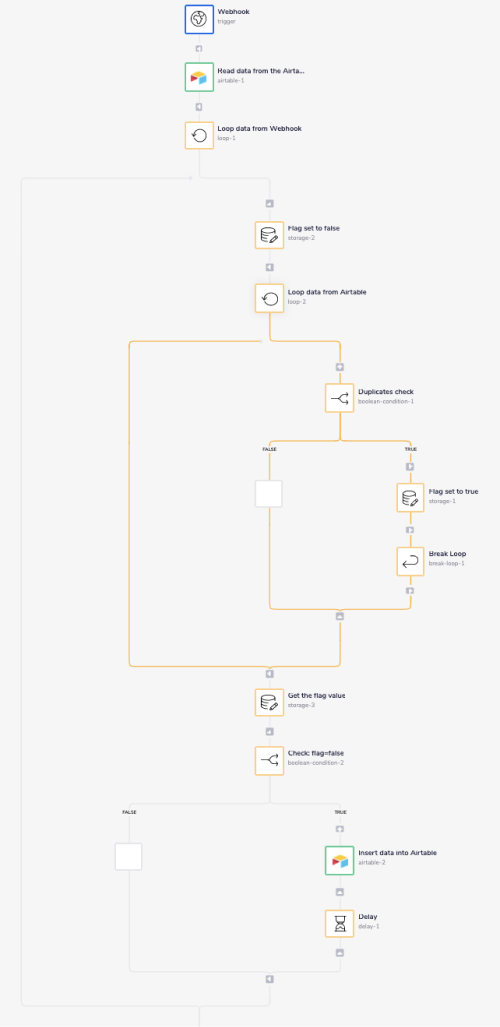
The steps involved in the workflow are:
The Webhook trigger step listens for the incoming records.
The Read data from Airtable step uses 'List records' operation to read the existing records from Airtable, based on the provided 'Base' and 'Table' ID.
These existing records will later be compared with the records received from the Webhook trigger using two levels of check.
The Loop data from Webhook step using the 'Loop List' operation traverses the records received via the Webhook trigger (
$.steps.trigger.body). Each record traversed through in this loop will be individually compared with all the existing records in Airtable.In the Flag set to false step using the Data Storage connector's 'Set Value' operation we are creating a 'Key' with name as
foundwith initial value set tofalse(explained in detail below).The Loop data from Airtable step using the 'Loop List' operation traverses the existing data that we are reading from Airtable (
$.steps.airtable-1.records) in the Read Data from Airtable step.The Duplicates check step is a Boolean condition that compares the records from the Webhook and Airtable to check for the existing records (explained in detail below)
The Get the flag value step using the Data Storage connector's 'Get Value' operation fetches the value of the
foundkey. This fetched value can be true or false based on if the record from the Webhook (loop-1) compared in the previous step with all the records from Airtable (loop 2) already exists in Airtable or not. If the record already exists then the Get Value operation will return true if it doesn't exist then it will return false.The Check: flag=false step is a Boolean condition step that checks if the value for the
foundkey fetched from the previous step ($.steps.storage-3.value), isEqual toFalse. If it is false the record from loop-1 is inserted to Airtable.If the value is not equal to false then the record from the loop is not inserted in Airtable and the loop1 continues the same process from step-5 to step-8 with the next records of the Webhook.The last step is a Delay connector step. This step delays the workflow execution by 10 seconds before it moves forward.
In doing this we are managing the API limit of Airtable which is 5 requests per second per base. If you exceed this rate, you will receive a 429 status code and will need to wait 30 seconds before subsequent requests will succeed.
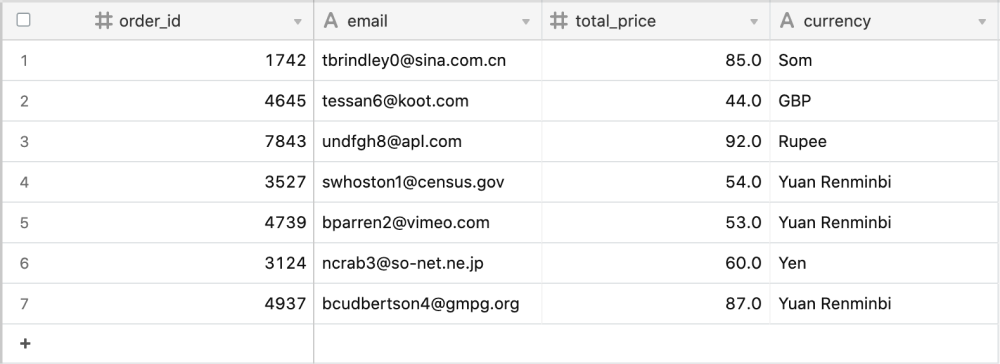
On successful execution of the above workflow the following records should be inserted into Airtable:
1[{2"order_id": 4739,3"email": "bparren2@vimeo.com",4"total_price": 53,5"currency": "Yuan Renminbi"6},7{8"order_id": 3124,9"email": "ncrab3@so-net.ne.jp",10"total_price": 60,11"currency": "Yen"12},13{14"order_id": 4937,15"email": "bcudbertson4@gmpg.org",16"total_price": 87,17"currency": "Yuan Renminbi"18}19]
The final table in your Airtable with all the records populated should look like this:

Flag set to false step explained
The 'Key', found, created at this stage works as a flag variable. A flag variable is usually a boolean variable with two values i.e. 0 and 1. O represents false and 1 reperesents true.
It is in general used to flag if certain condition is met and based on its status, i.e., either true or false certain actions are performed.
In our example, we are using the found key as a flag variable which is initially set as false and will be later set as true in subsequent steps based on the satisfaction of the boolean check done in the Compare order id step.
Based on the value of this variable we will decide if the incoming record is a new or an existing record and then perform the insert record action on Airtable accordingly.


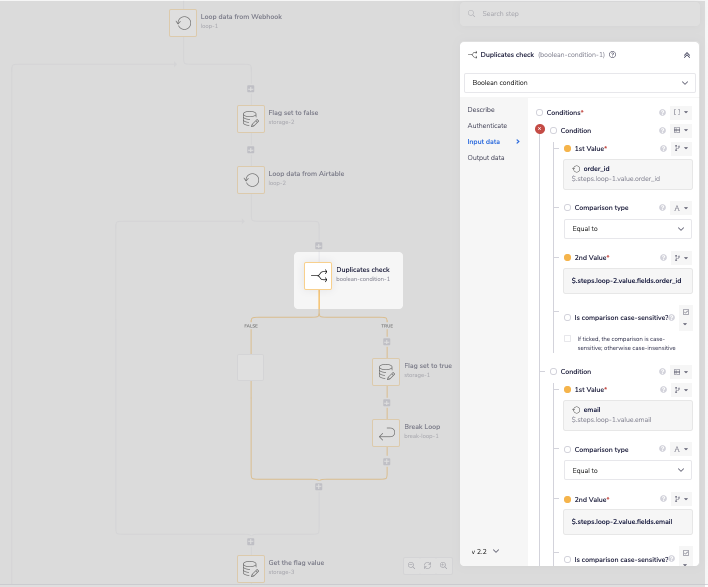
Duplicates check step explained
The Duplicates check is a Boolean condition that checks for a duplicate record using two level of checks. As you can see in the image below, the checks are 'order_id' and 'email' field.
We are using the two level check just for the sake of certainty. You can always do this with one level check.
The operation accepts the first value for both the checks from loop-1 ($.steps.loop-1.value.order_id, $.steps.loop-1.value.email). The loop1 is traversing the incoming records from the Webhook.
This first value is checked if it is Equal to the second value.
The second value for both the checks is fetched from loop-2 ($.steps.loop-2.value.fields.order_id, $.steps.loop-2.value.emal). Loop-2 is traversing the existing records within Airtable.
Now based on the provided values and the loops this condition will check individual record from loop-1 with each record of loop-2 to see if they match.
For example, as you can see the incoming and existing records mentioned above. To start with the record-1 from loop1 will be compared with all the records from loop-2.
Doing so if the match is found it means record-1 from loop-1 already exists, and there is no need to insert it again in Airtable. In such a situation the Key (found) that we have created in the Flag set to true step, for this particular record is set to true. After this loop-2 breaks and the workflow moves to the Get the flag value step.
If the match is not found then loop-2 continues to compare record-2 from loop-1 with each record from loop-2 and so on until all the records from loop-1 are compared with each record of loop-2.

BEST PRACTICES: Whenever you do decide to create your own workflow, be sure to check out some of our key articles such as: