Quickstart
Quickstart introCopy
The basics of TrayCopy
Essentially, building automations in Tray is about doing three things:
Getting data from one service
Doing something with that data
Sending that data to another service
When you start building Tray workflows, you need to then ask yourself the following questions:
How do I get data from the first service?
What do I do with the data?
How do I send it to the second service?
When using Tray, the Trigger that you choose for your workflow will be dictated by how you get your data.
Two of the most common scenarios are:
A workflow triggered by an event happening in a 3rd party service (using a pre-built Tray service trigger, or the Tray webhook trigger if no dedicated service trigger exists)
A scheduled trigger workflow where you periodically query the 3rd party service for new updated records (known as polling)
This Quickstart will take you through a service trigger-based scenario and introduce you to basic data processing principles.
The key thing that it will introduce you to is how to think about dealing with the data that comes into your workflows.
It will also introduce you to some key concepts in Tray usage:
Quickstart template overviewCopy
The use case that we are dealing with in this quickstart is processing survey results from Typeform:


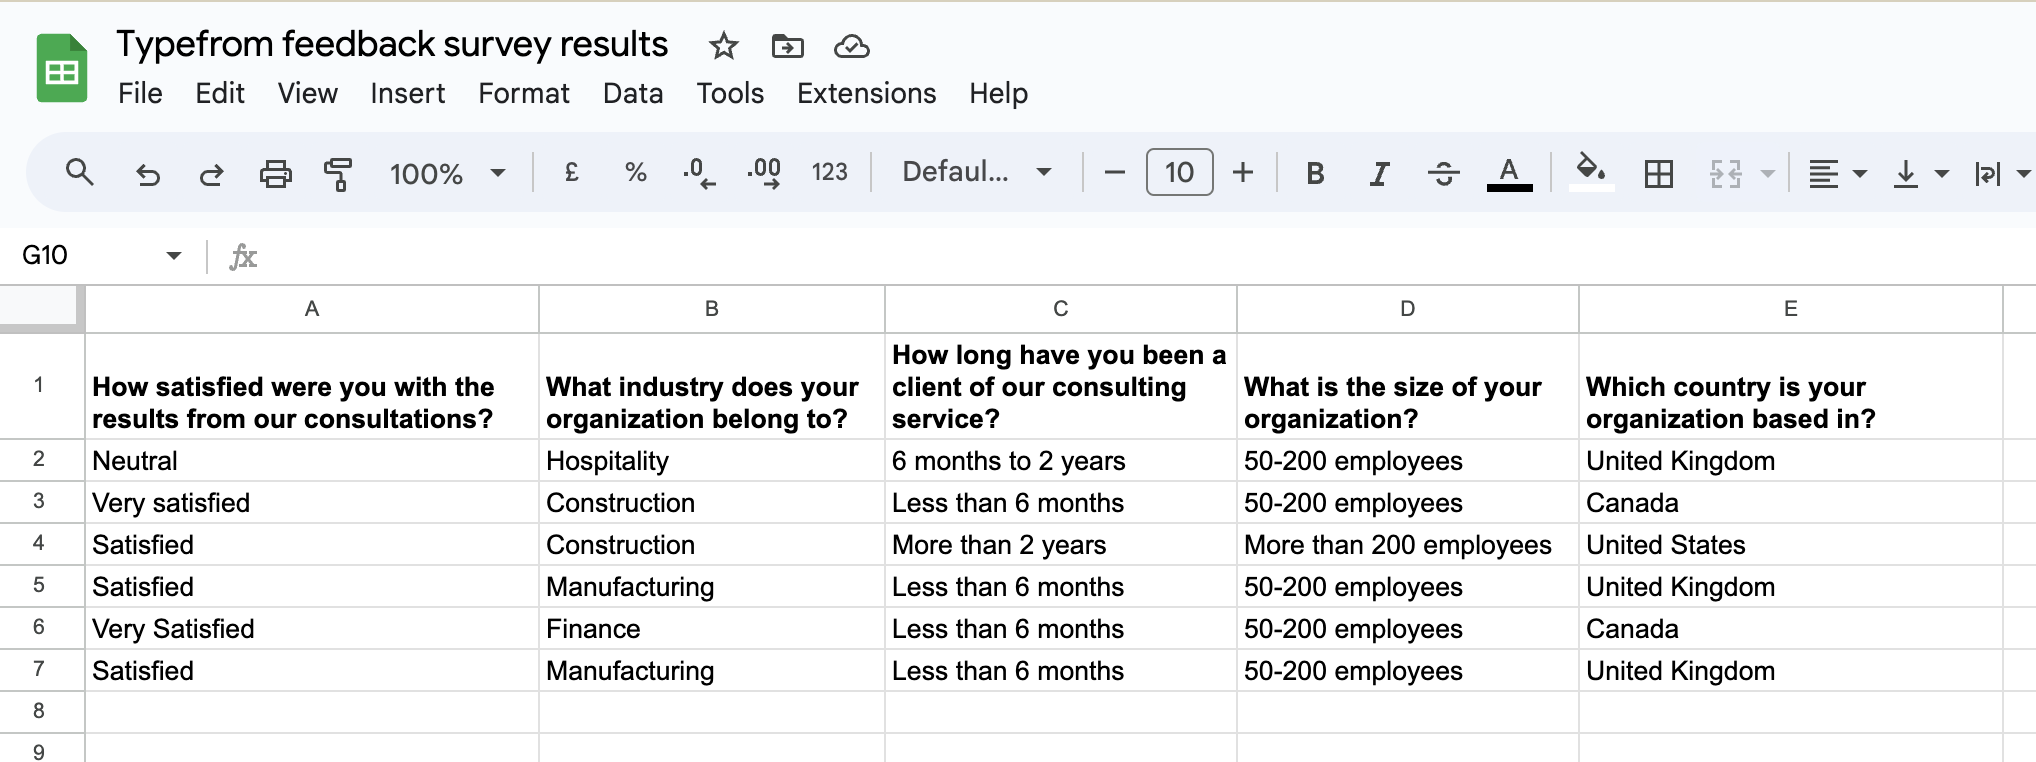
Ultimately we want to process each survey response to a Google Sheet:

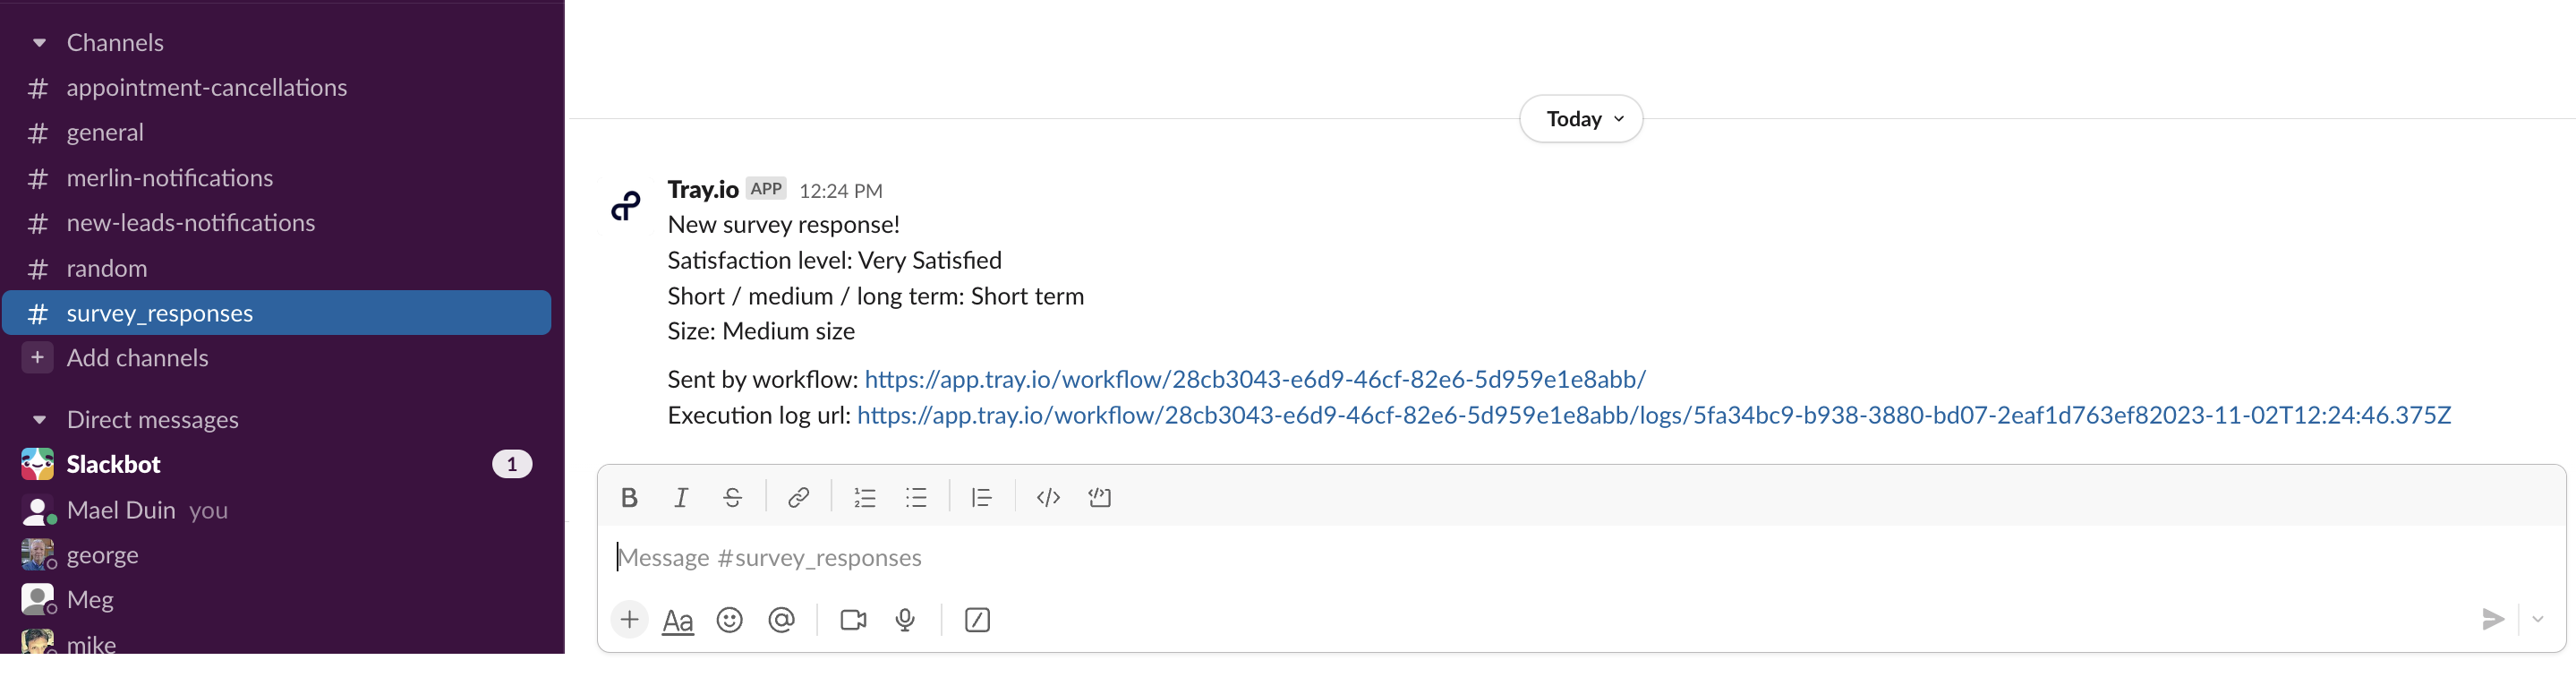
And notify a company Slack channel that a response has been processed:

Please install and run the Add Typeform survey responses to Google Sheets template associated with this project.
It only takes 10 minutes to set up a free Typeform account and start filling in test survey responses to test it out.
The template instruction page will take you through installing, configuring and testing the template.
This guide will then take you through the key points in how it was built
Working with data payloadsCopy
Every service operation or trigger that you work with will have its own payload structure that you will have to work with every time you receive or fetch data from it.
So this quickstart will introduce you to the general principles of working with payloads that can then be applied any time you are working with Tray.
With Typeform survey responses we are dealing with payloads 300+ lines long:

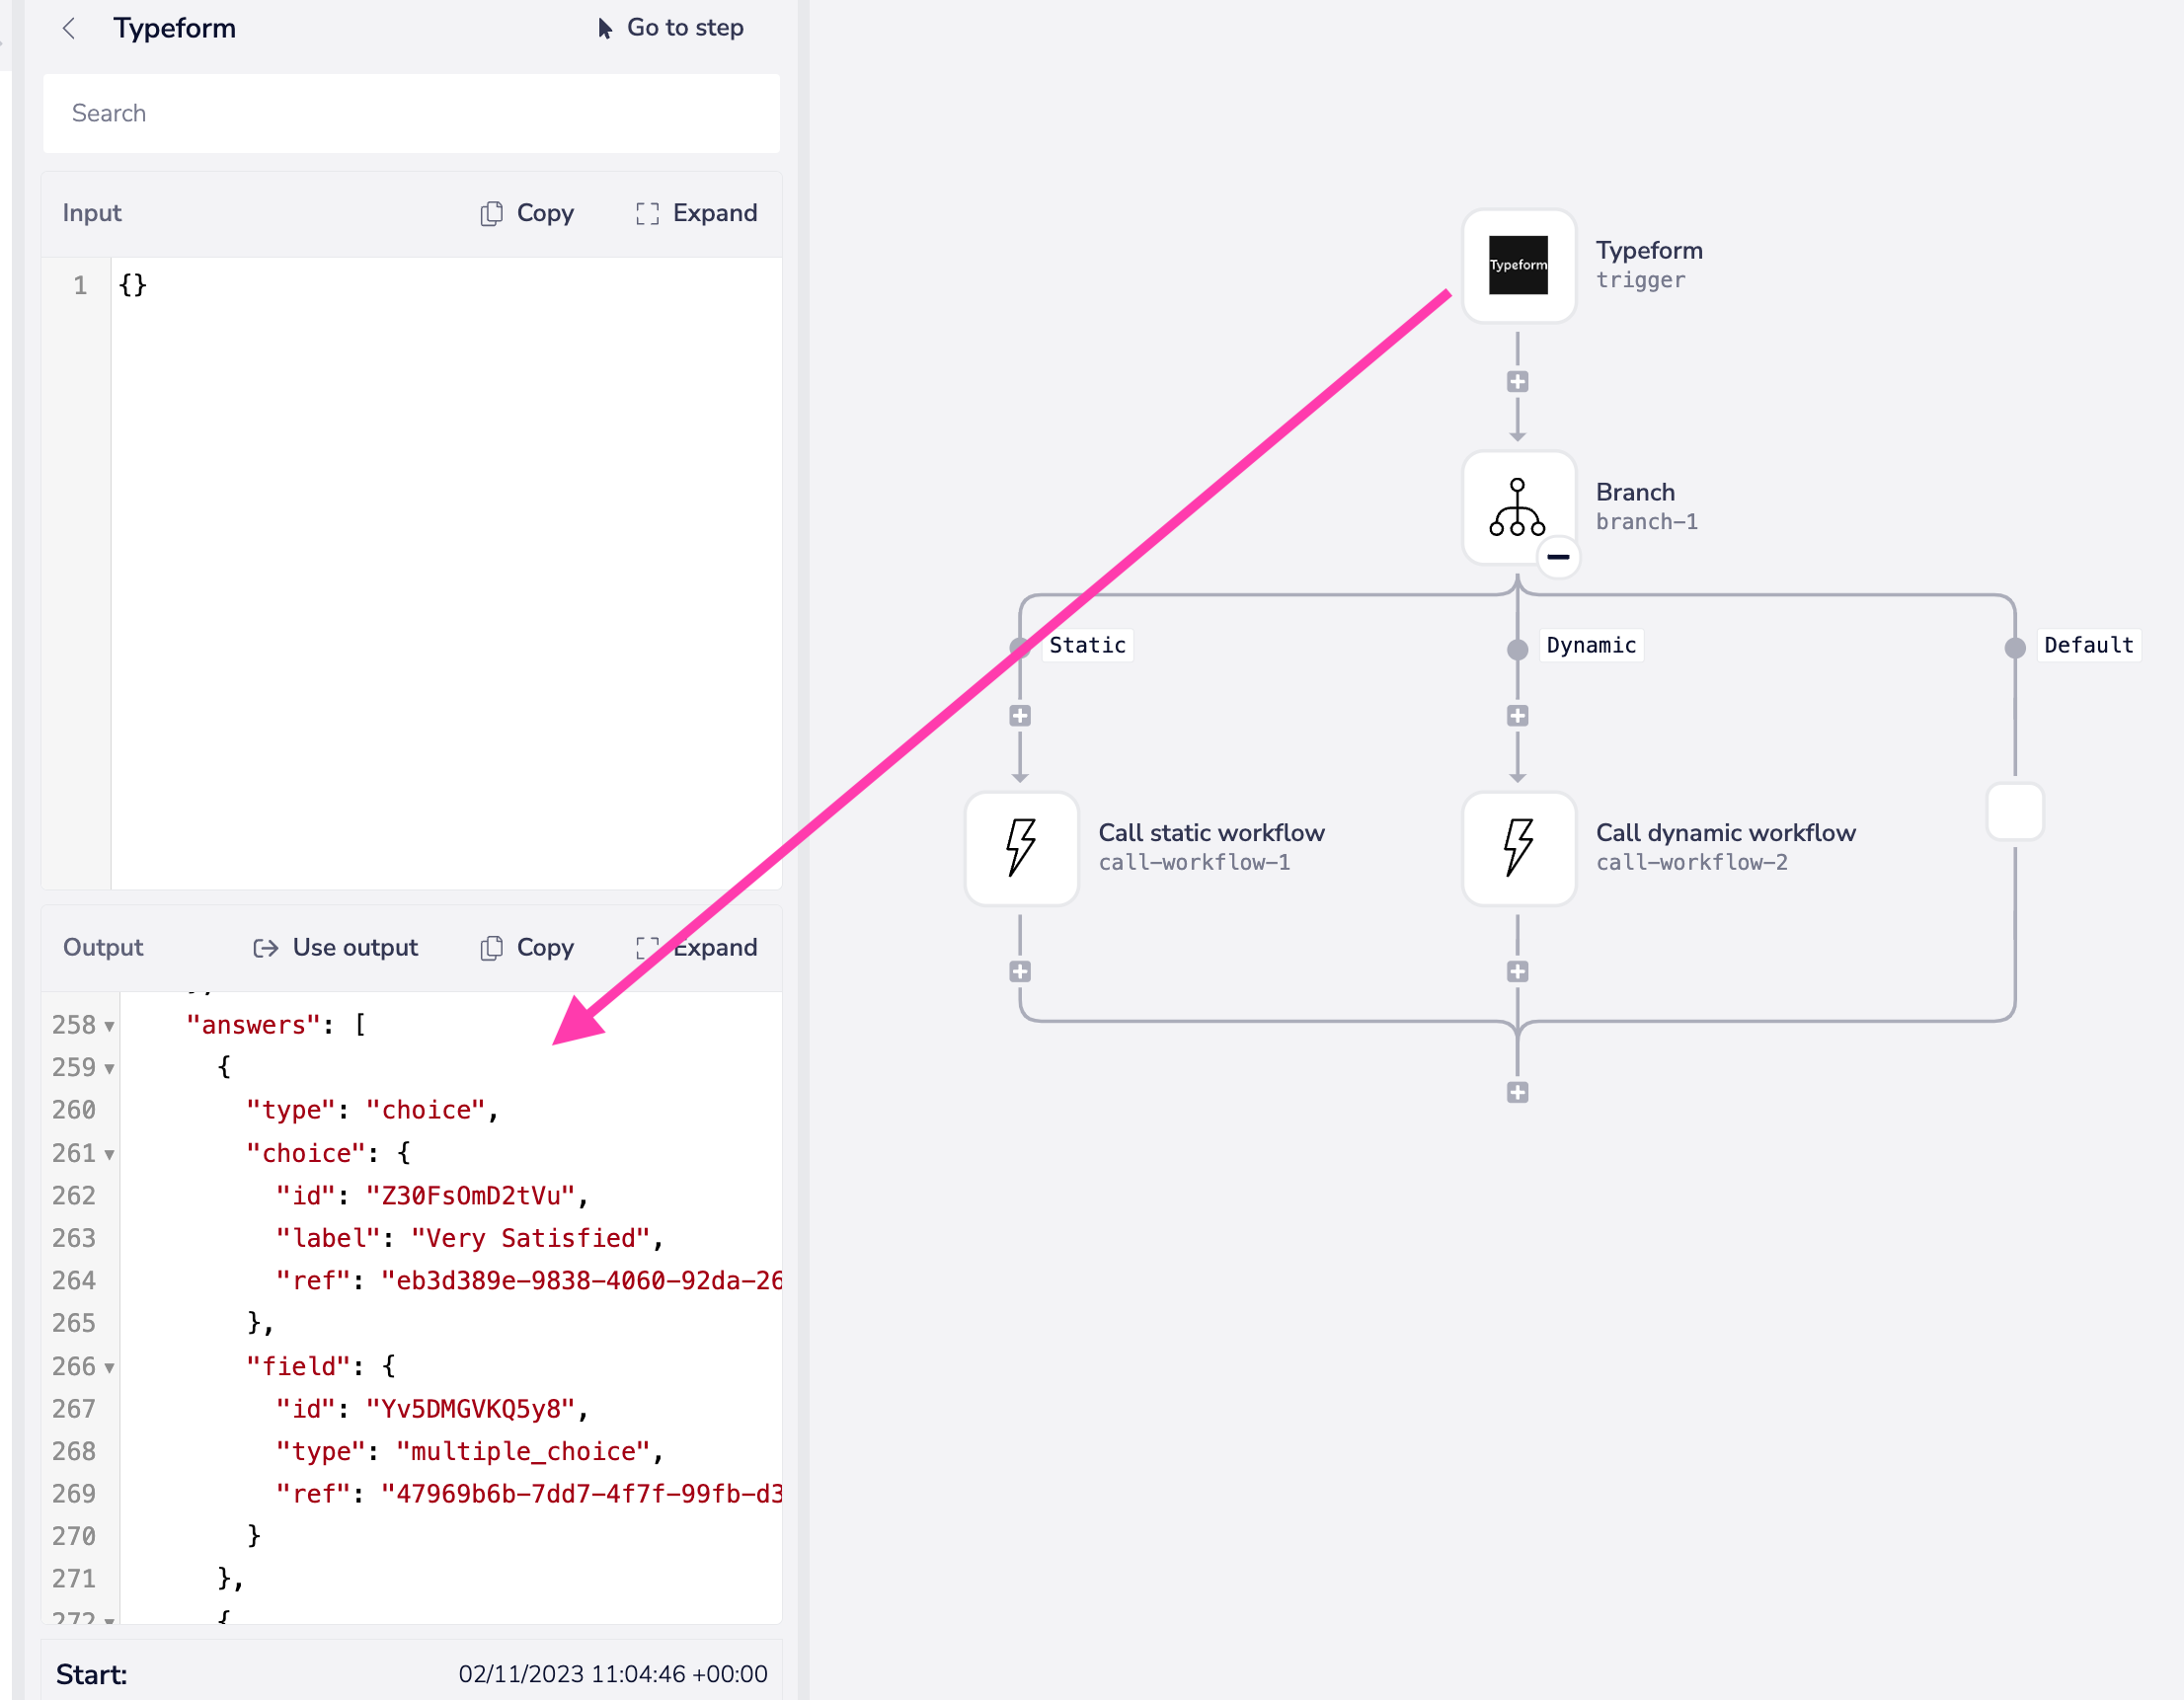
On inspection we find that key sections are:
The
form_response.definition.fieldsarray which includes:The
titleof each questionThe
typeof each question (dropdown, multiple choice, boolean etc.)
The
form_response.answersarray which includes:The
choicethe responder made for each question
The template is set up to automatically extract the key information from these sections, using the principles outlined in Mapping data between steps.
Simple implementationCopy
This workflow is not included in the template.It is only being shown here for introduction purposes.
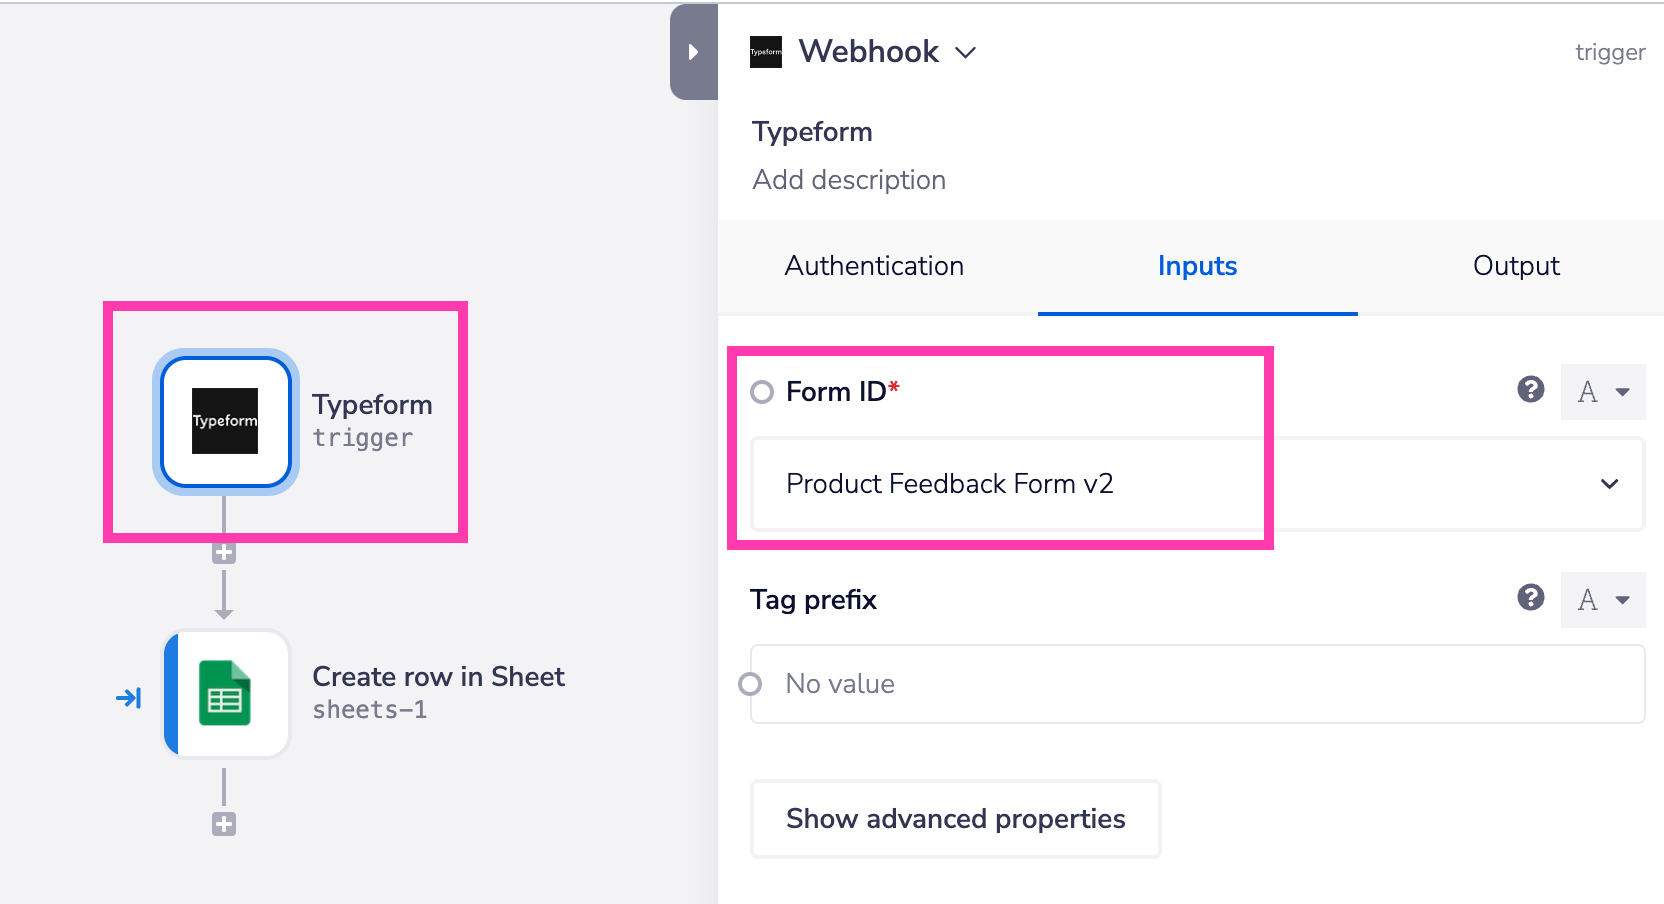
The most simple implementation of this use case (minus the Slack notification) is a single workflow which makes use of Tray's pre-built Typeform trigger.
Once you have authenticated your Typeform trigger you will be able to choose which of the forms in your account you wish to trigger the workflow:

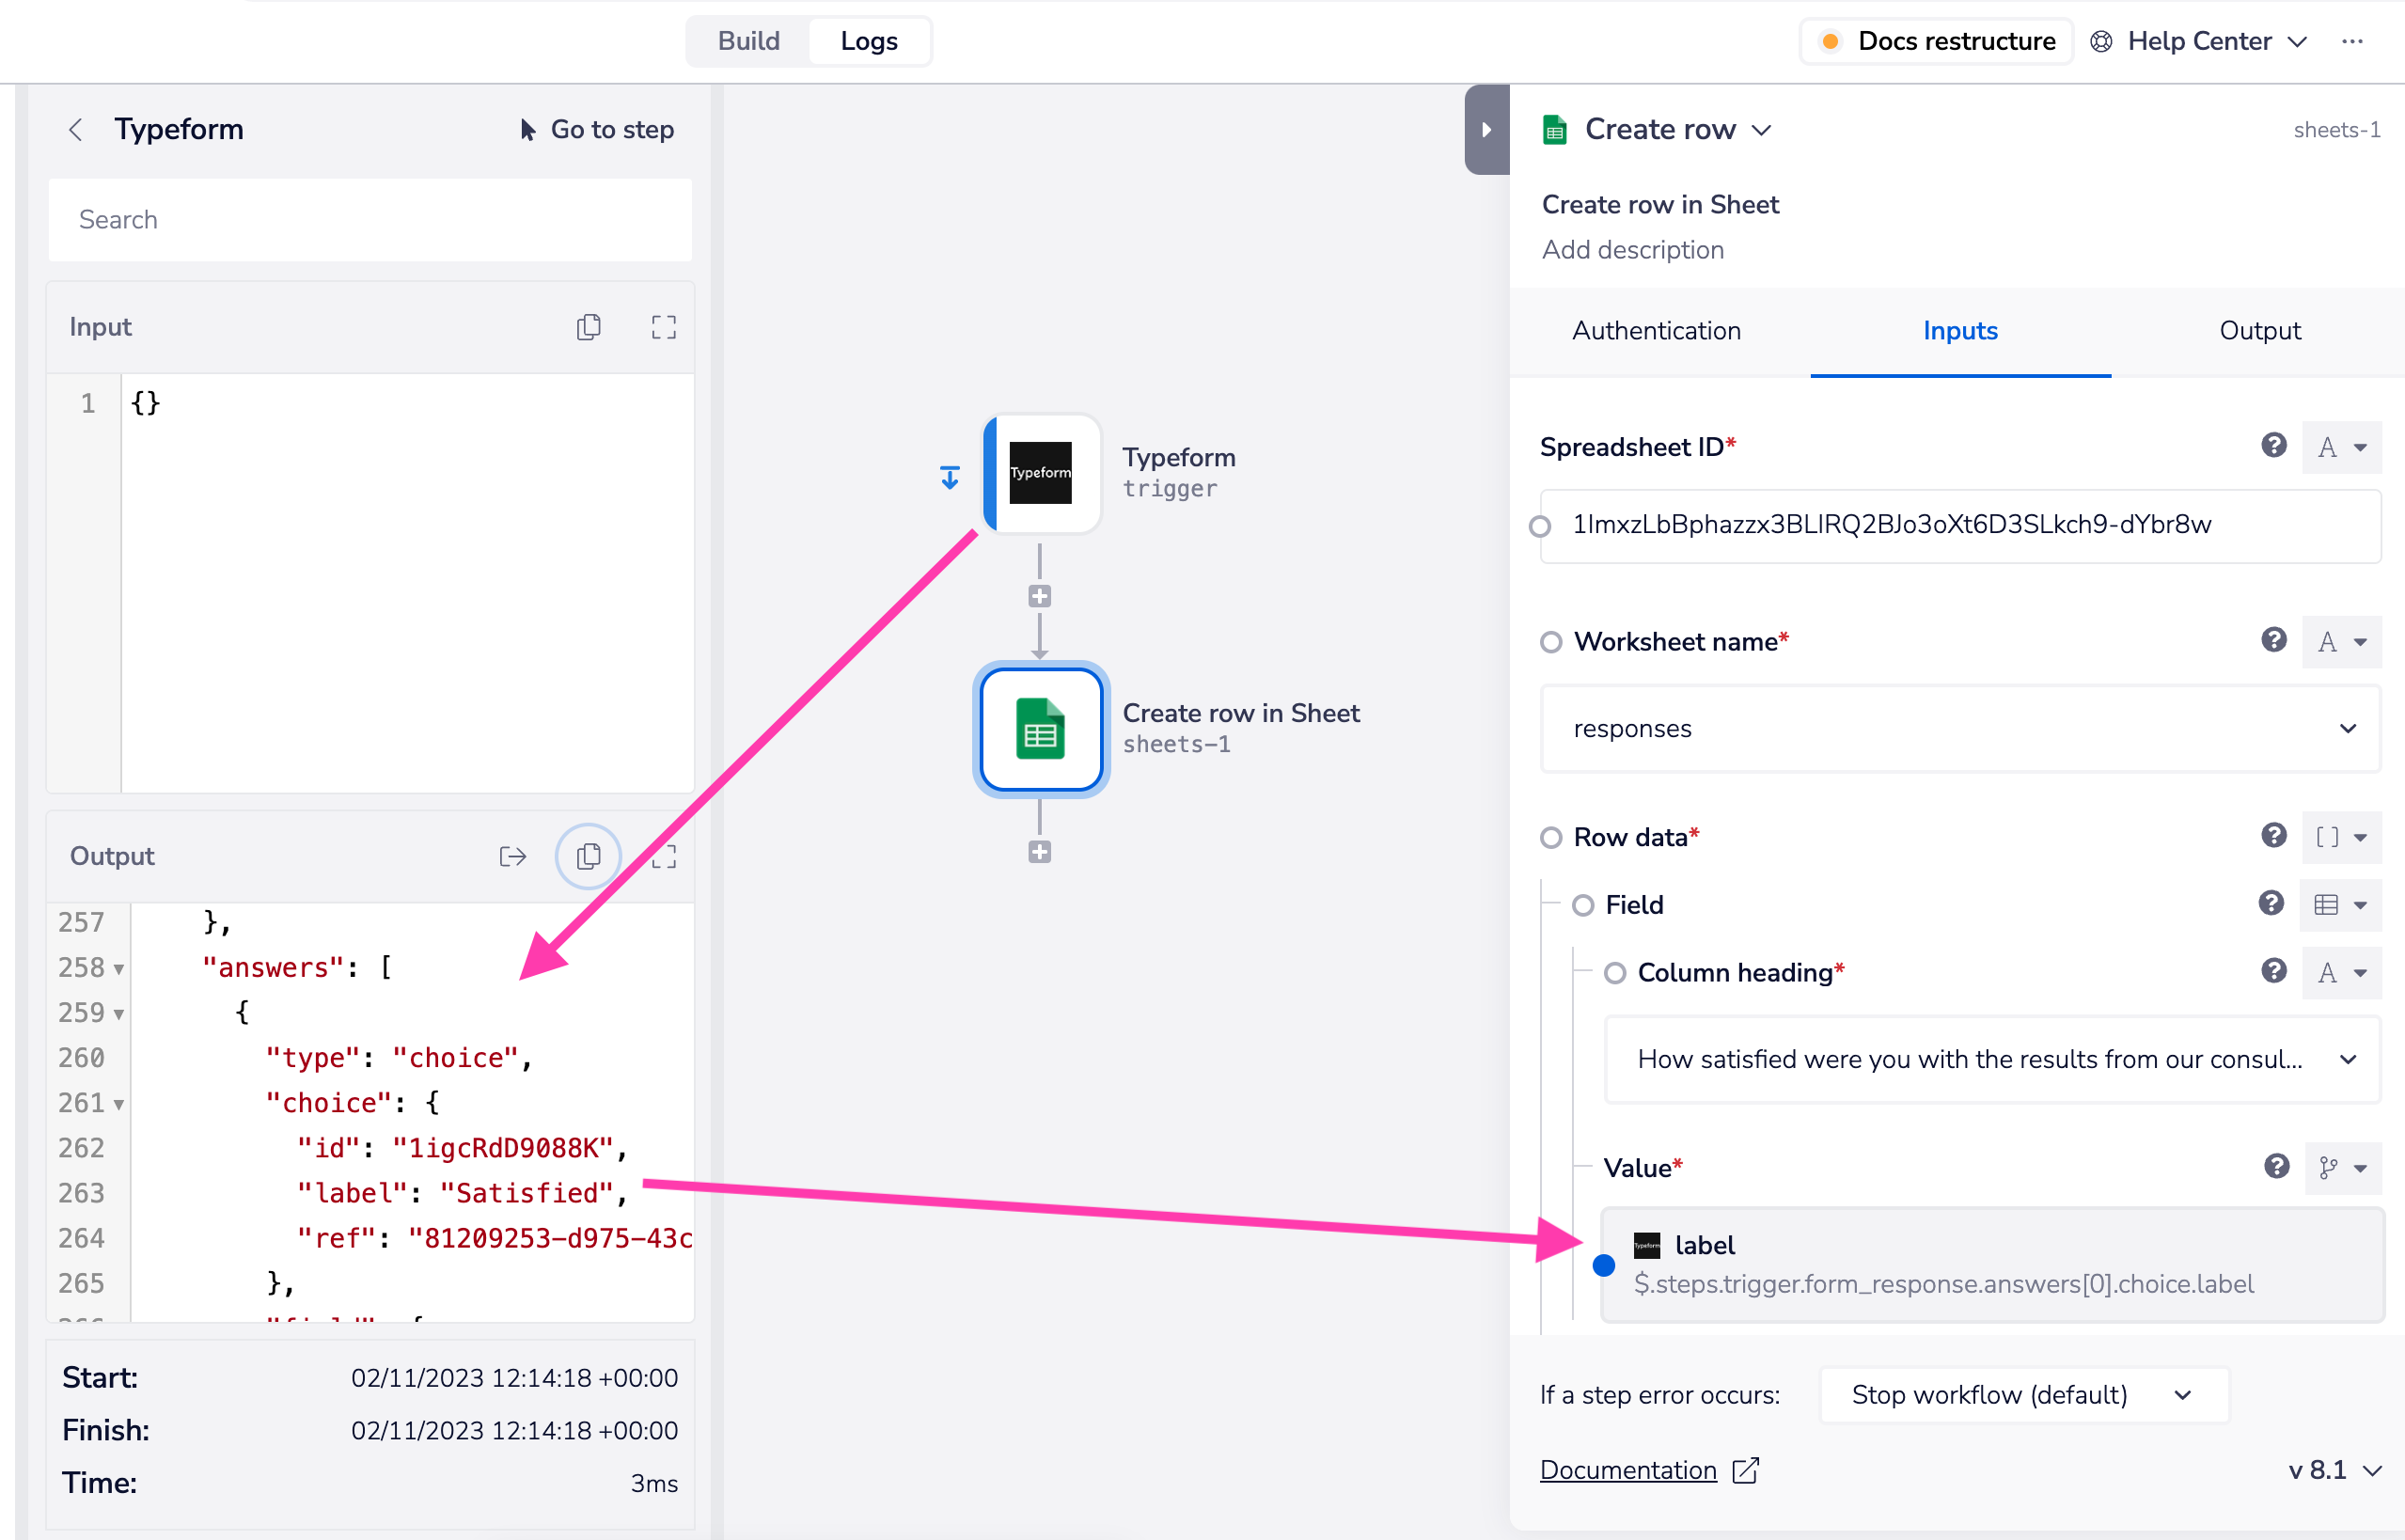
Then we can make use of the methods outlined in Mapping data between steps to use the following jsonpaths to get at the answers from the payload returned by the trigger:
$.steps.trigger.form_response.answers[0].choice.label$.steps.trigger.form_response.answers[1].choice.label$.steps.trigger.form_response.answers[2].choice.label$.steps.trigger.form_response.answers[3].choice.label
Note that the exact trigger payload and the jsonpaths will depend on the service.
Thus the payload and jsonpaths here are specific to Typeform. Please see Mapping data between steps for more guidance.

Quickstart template walkthroughCopy
OverviewCopy
The template itself has 2 processing workflows:
A 'static' workflow whereby it only deals with a fixed Typeform survey with 'string'-type answers and a fixed Google Sheet which already has its headers set up
A 'dynamic' workflow whereby it will deal with any Typeform survey and create the headers for an empty Google Sheet
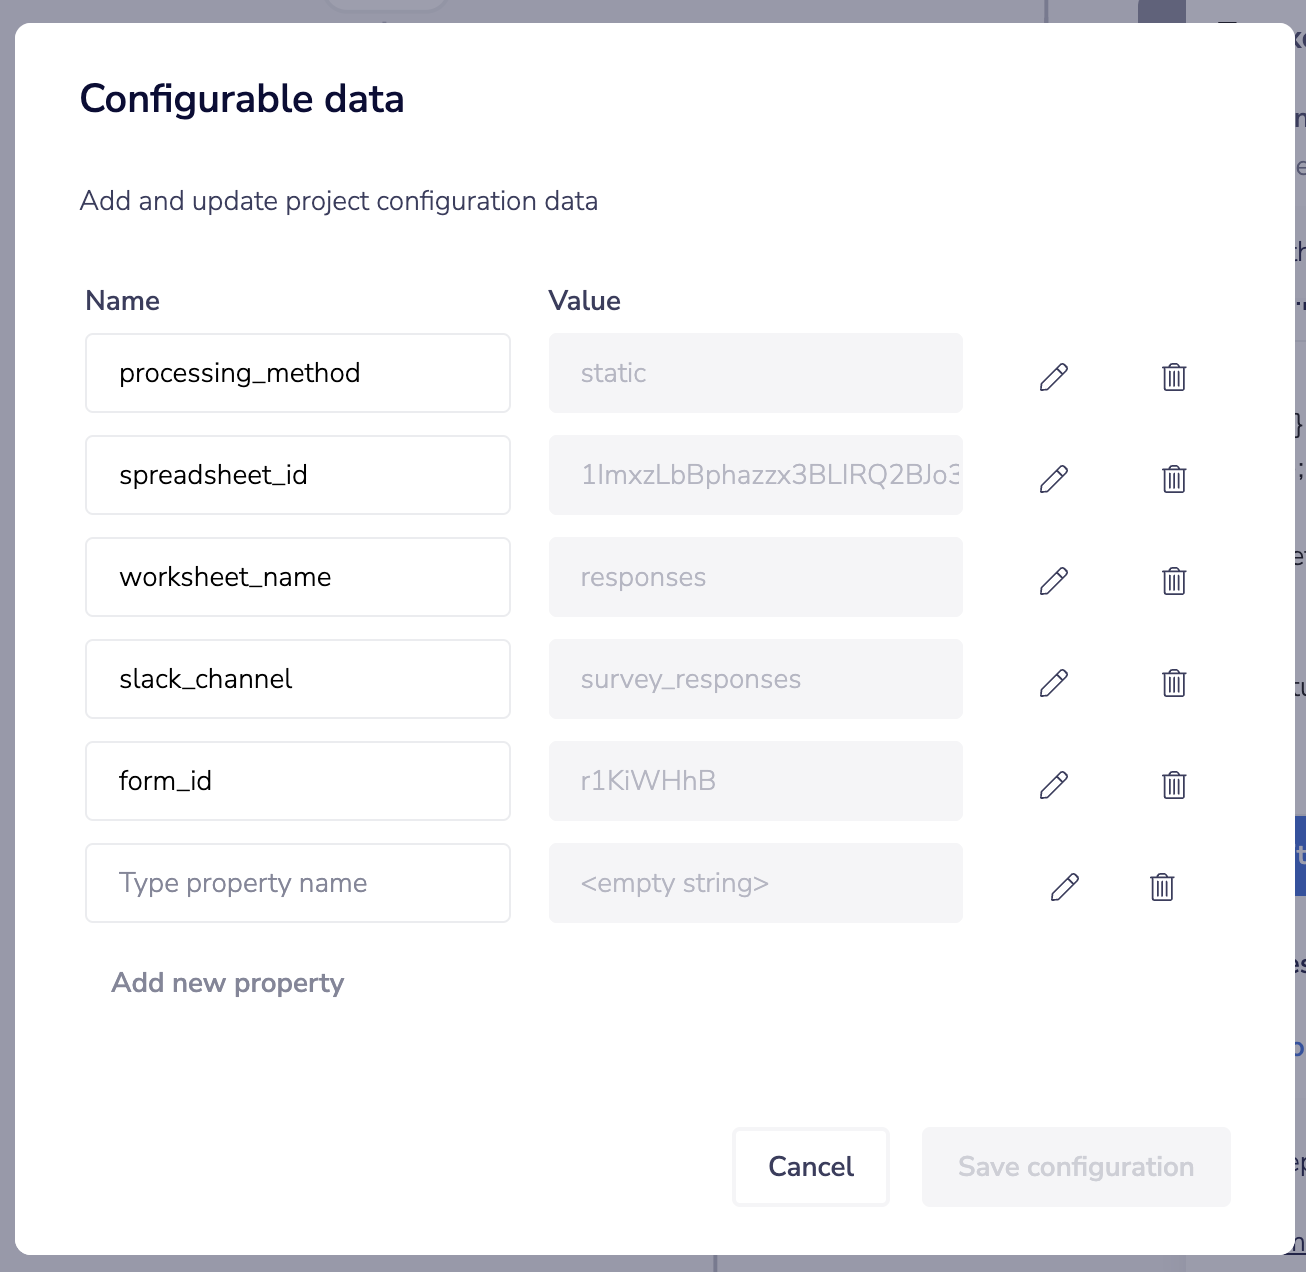
Project configCopy
Looking at the project config you will see that we have a processing_method variable which allows you to switch between static and dynamic processing.
For Typeform, Google Sheets and Slack, there are also variables for form_id, spreadsheet_id, worksheet_name and slack_channel as a best practice for single-sourcing variables that are used repeatedly in a project:

The Typeform trigger workflowCopy
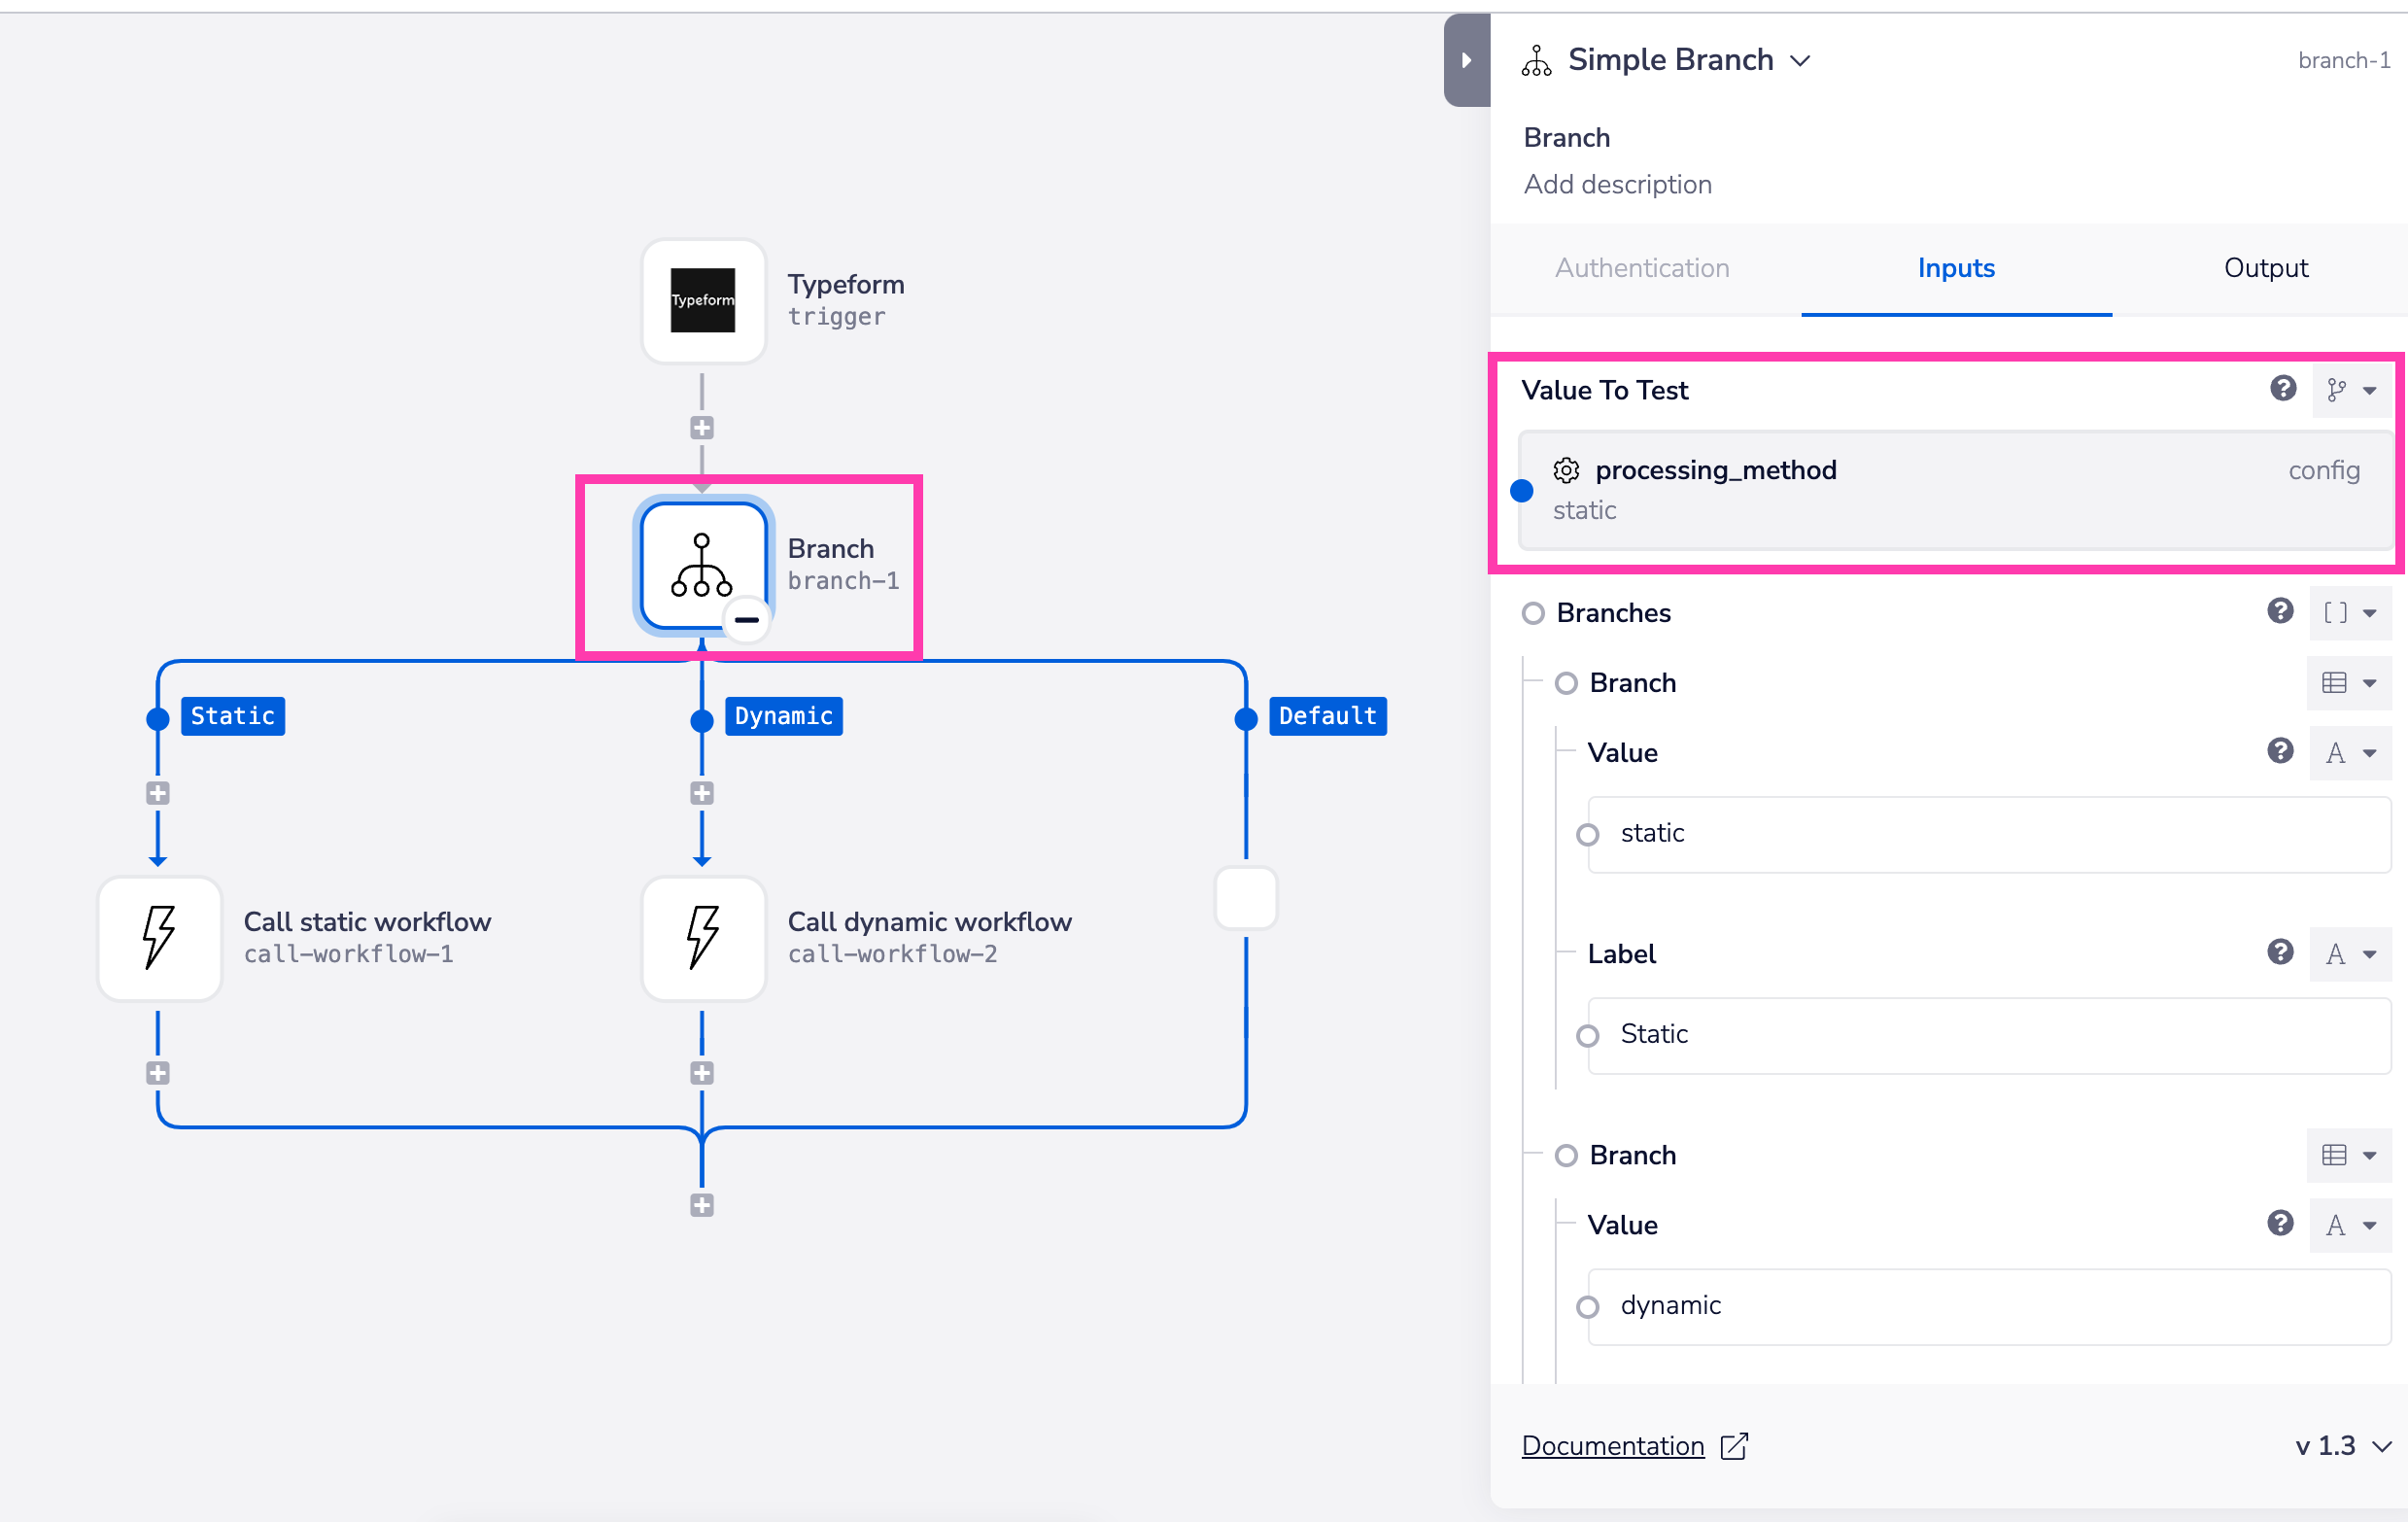
In the first 'Typeform trigger' workflow you will notice that a Branch connector is used.
The branch uses the processing_method config variable to decide which branch to go down, and whether to call the static or dynamic workflow:

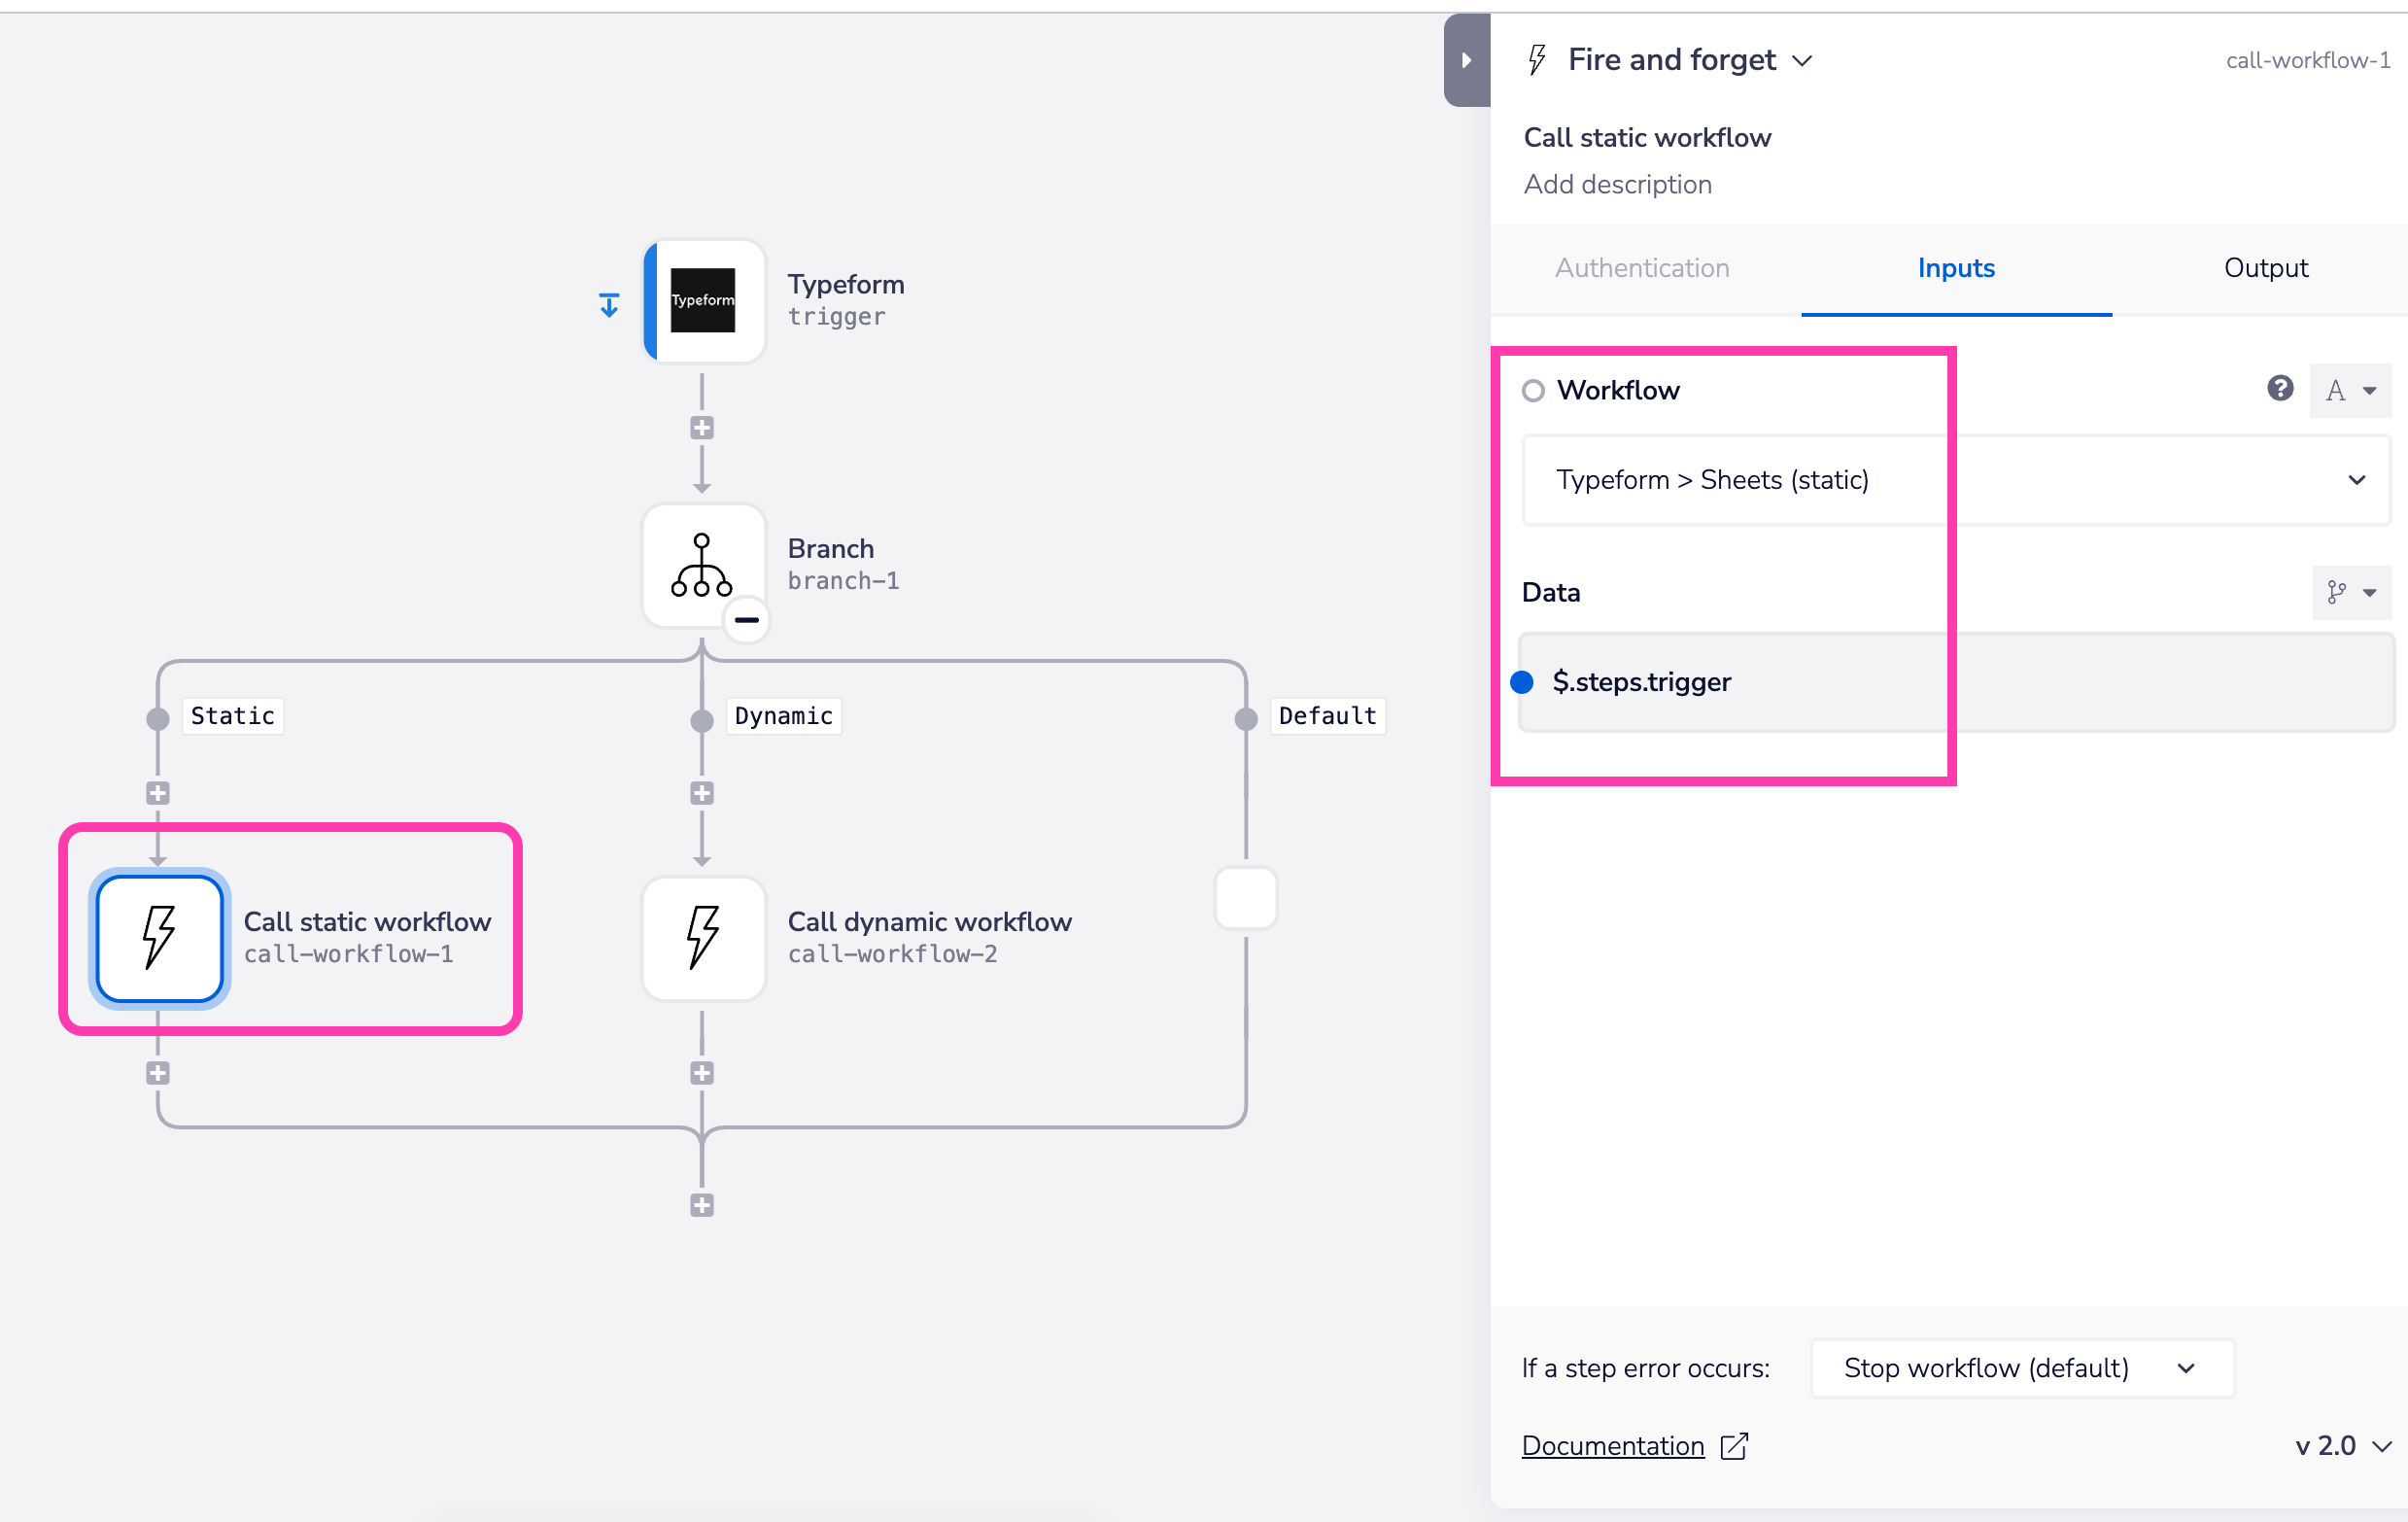
Then each branch calls the appropriate workflow and sends the trigger payload as 'Data':
The static processing workflowCopy
You will remember that this workflow is called 'static' as it only deals with a fixed Typeform survey and adds them to a Google Sheet which already has all the headers added.
However it does introduce you to some other Tray concepts:
1. Data mapping
We have decided that, for the purposes of our records it is more useful to have customers identified as:
short / medium / long term rather than how many months they have been using us
small / medium / large size rather than how many employees they have
To do this we can pull the payload from the trigger and use the Data mapper's 'map values' operation:

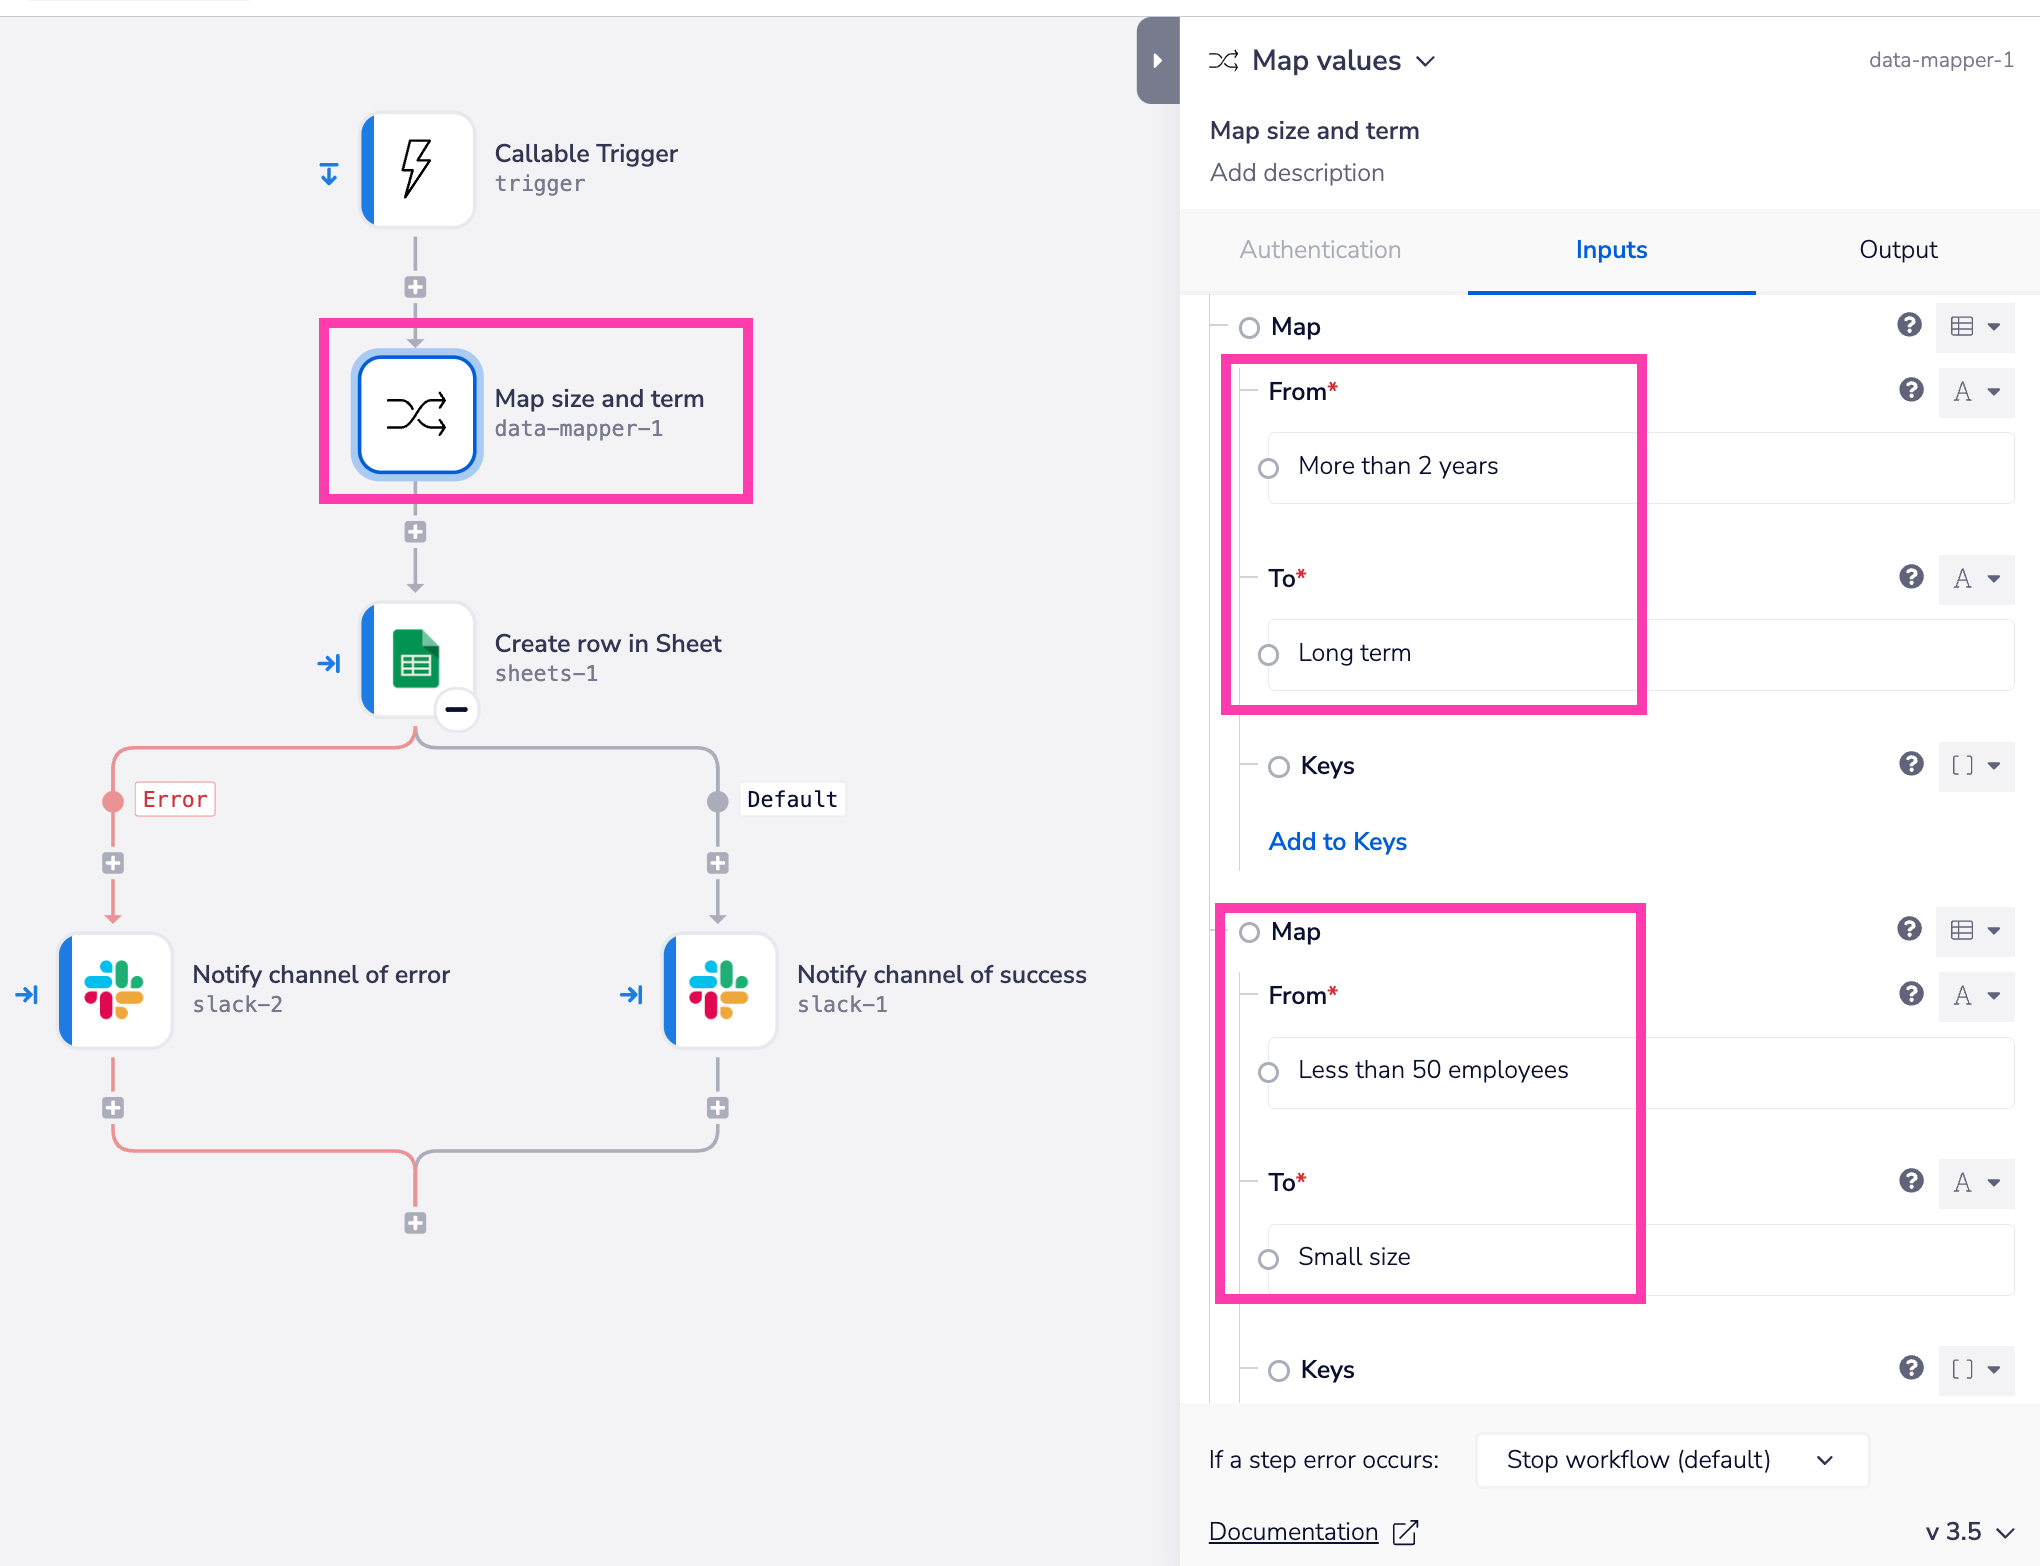
We can then use the output from the data mapper as inputs for each column in the worksheet:

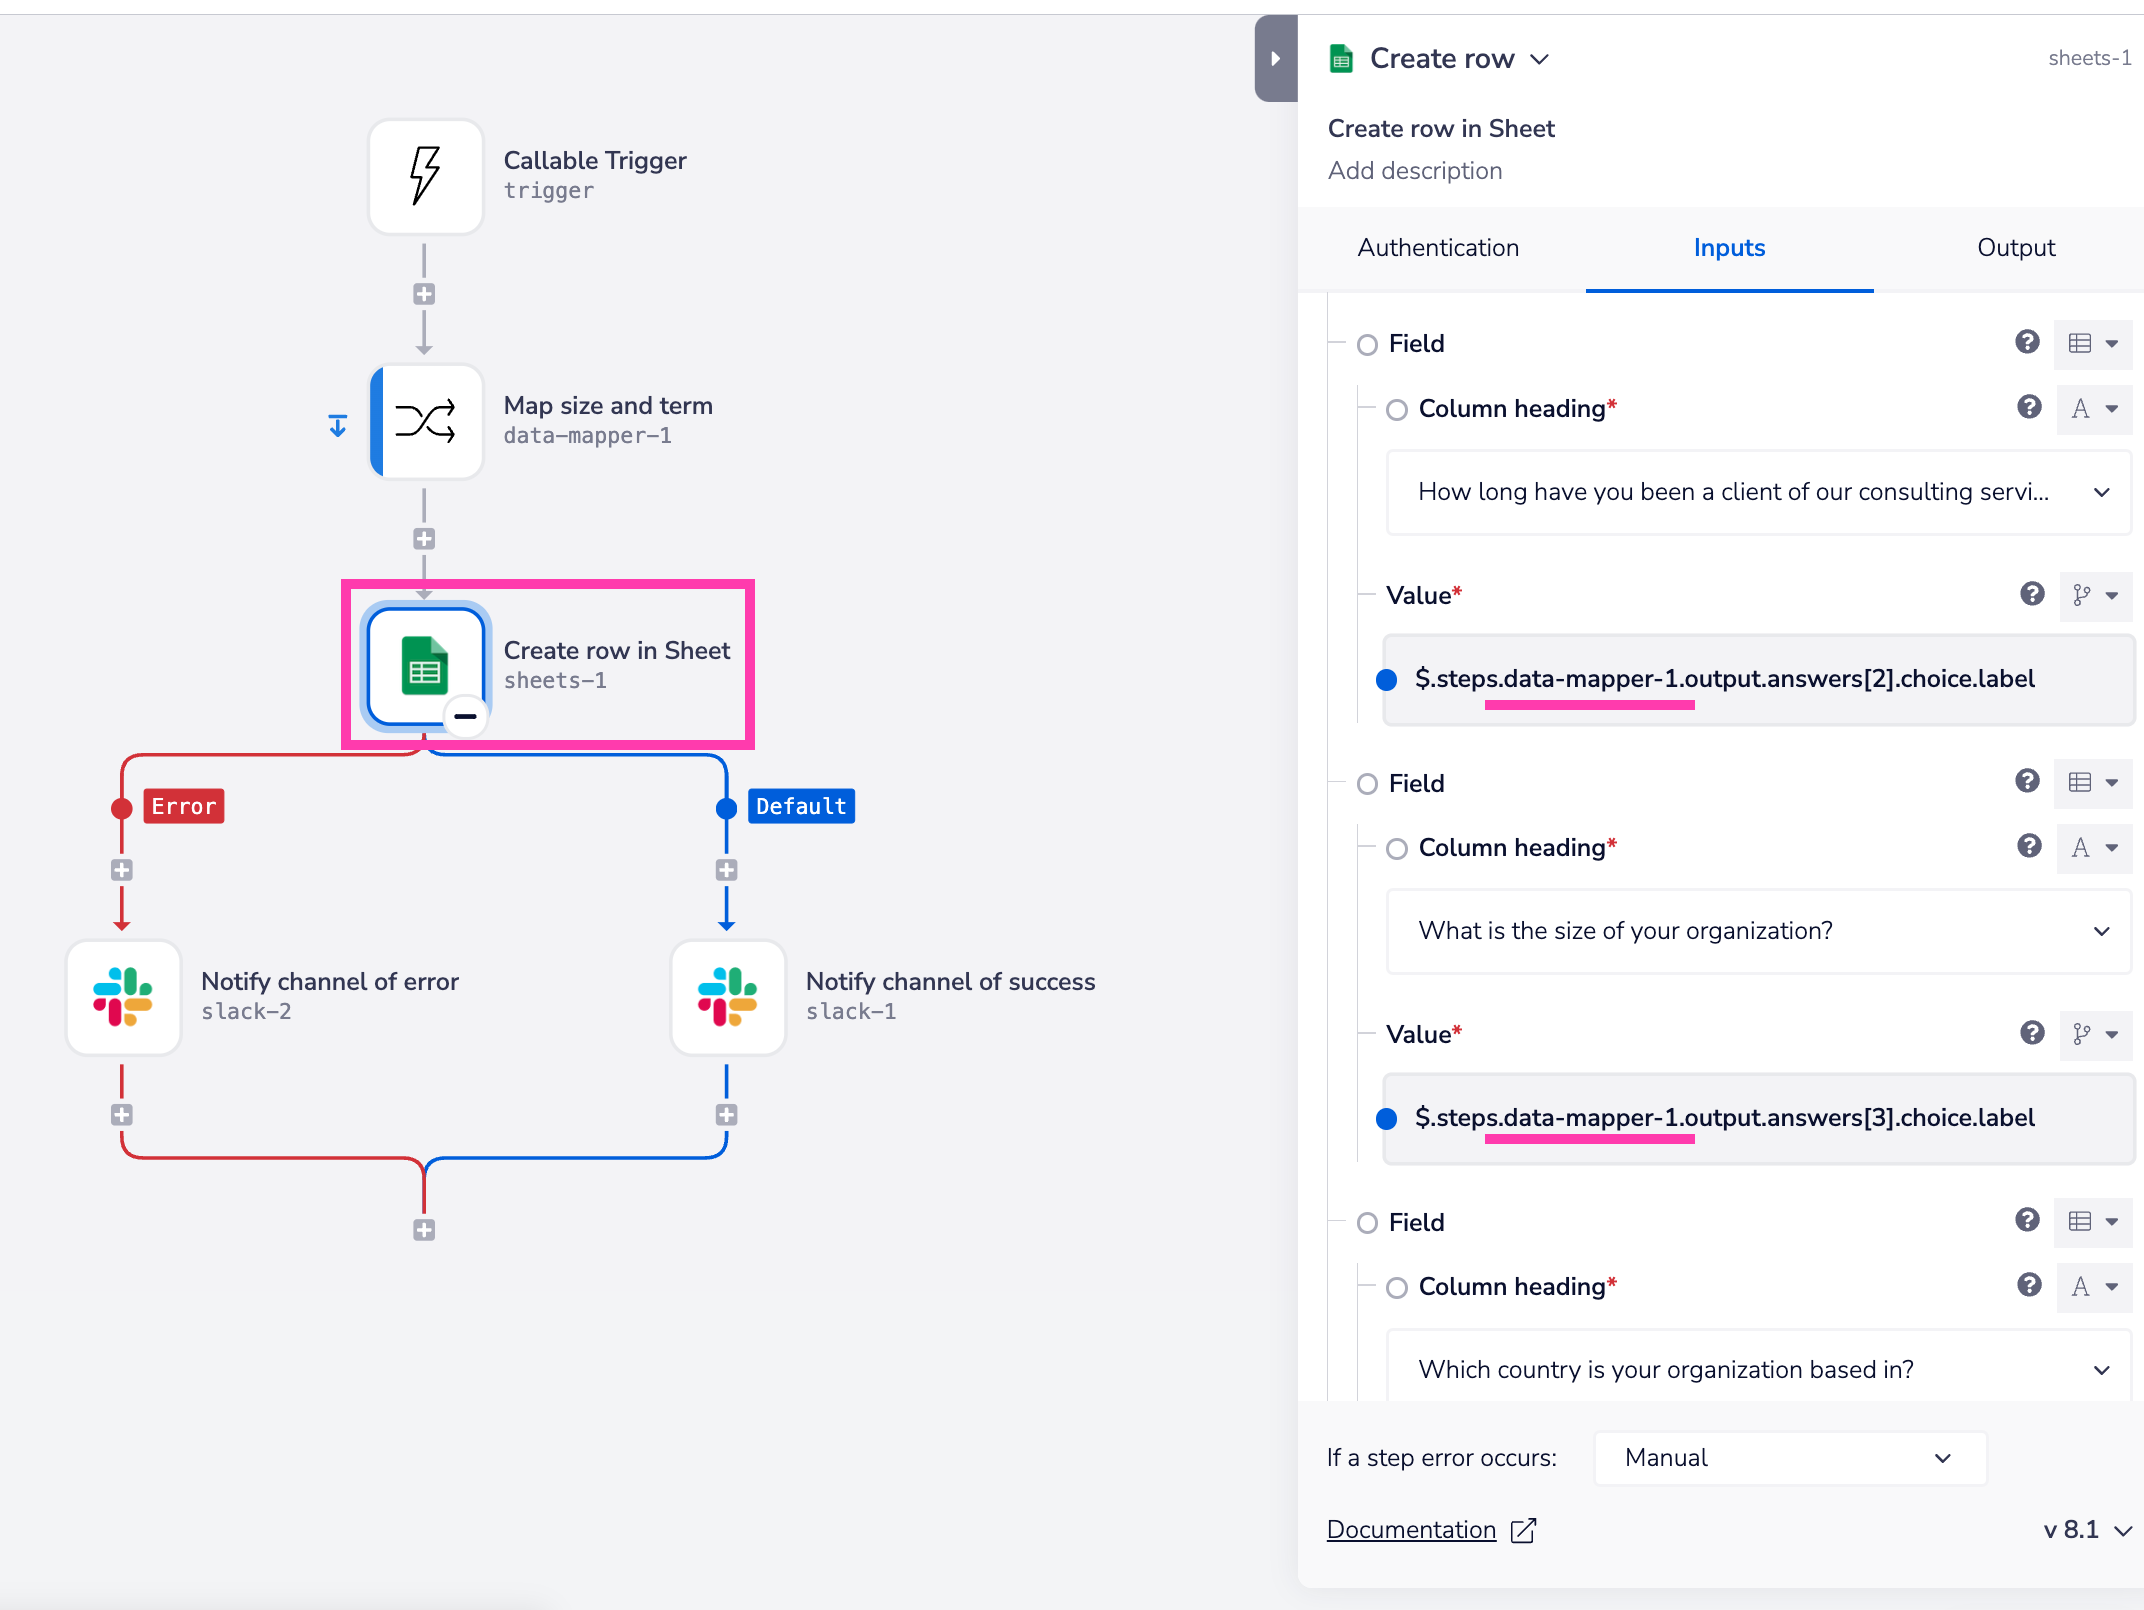
The end result is that the mapped values are entered for each customer response:


2. Error handling
In Tray projects, it is very important to set up Error Handling where appropriate.
In this case we might be concerned that Google Sheets occasionally returns a 500 or 503 and we want to make sure this doesn't mean we miss some responses being recorded.
Exactly how you will handle errors depends on your setup and use case.
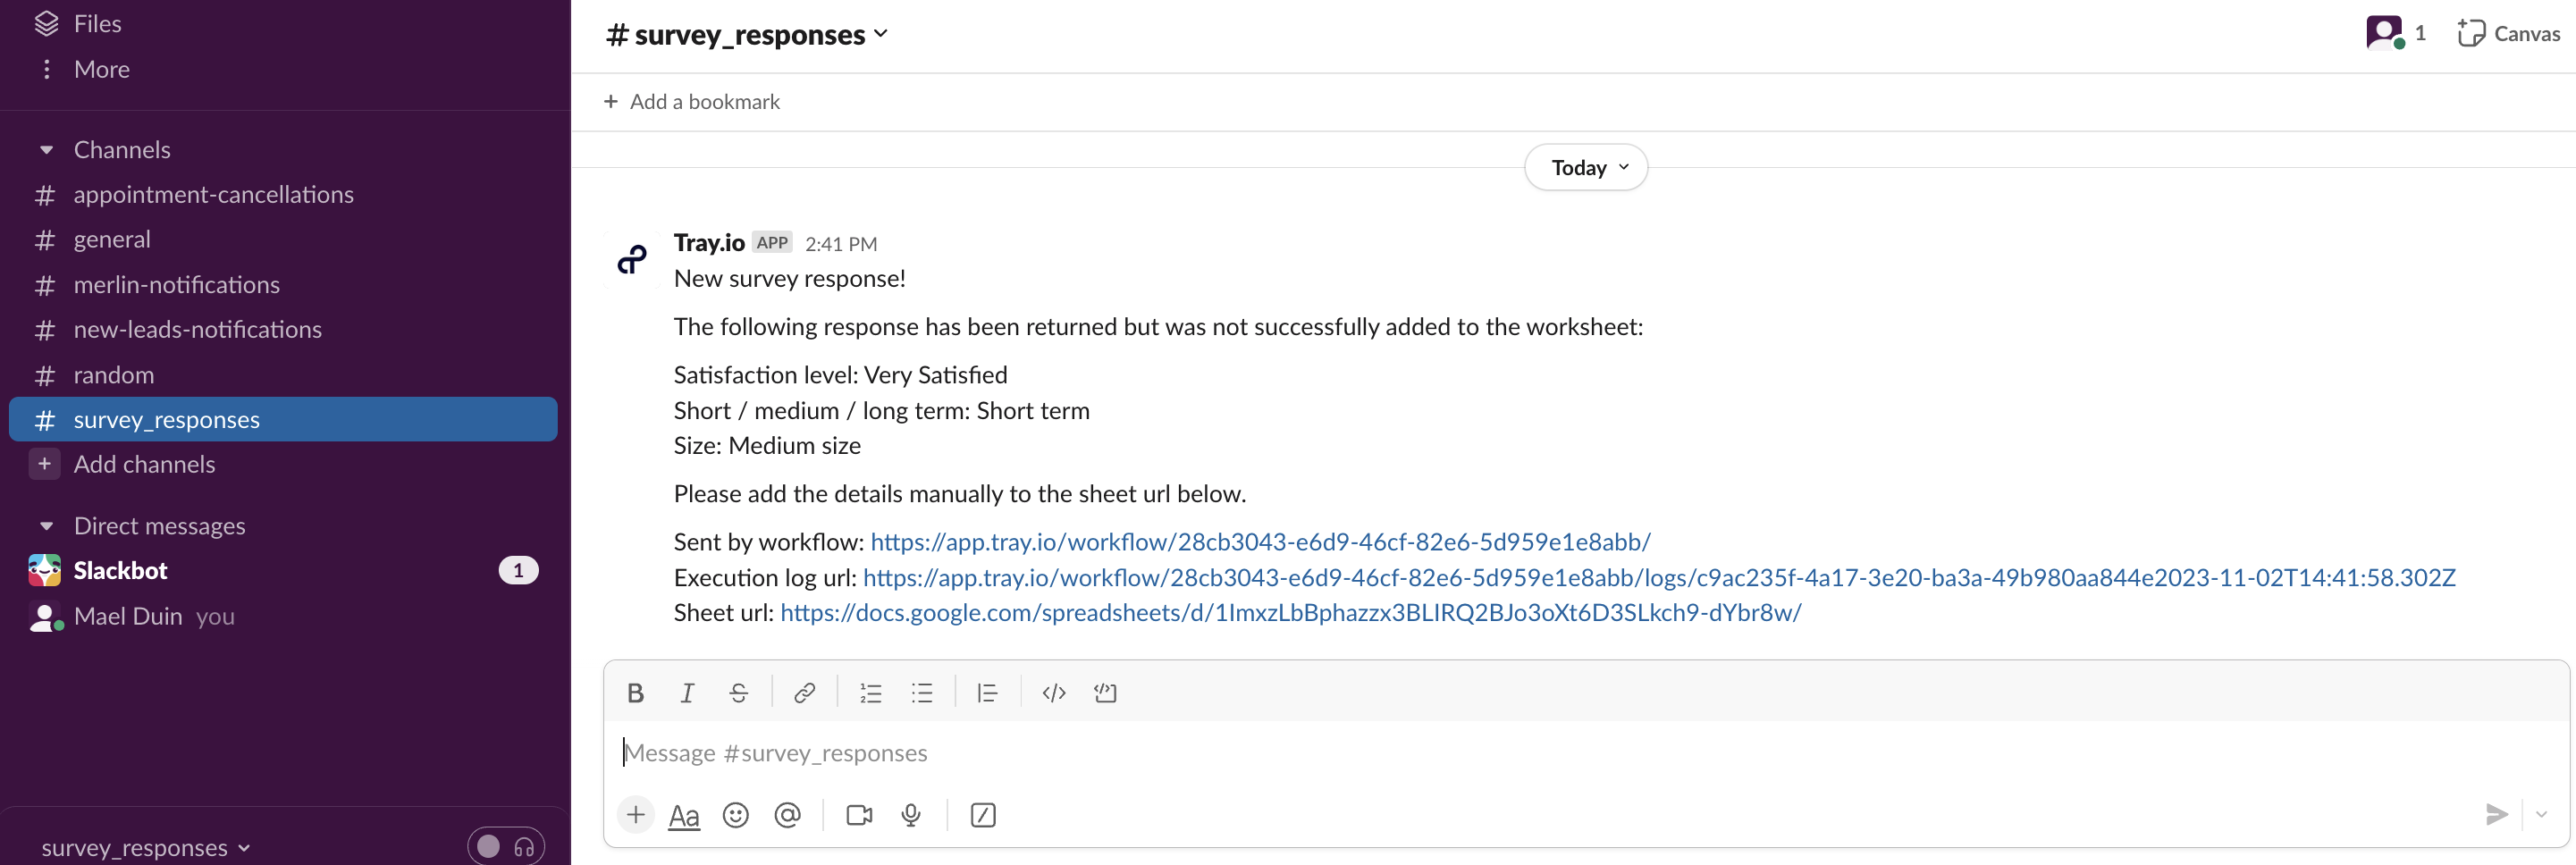
In this case we are sending a failure message to Slack:

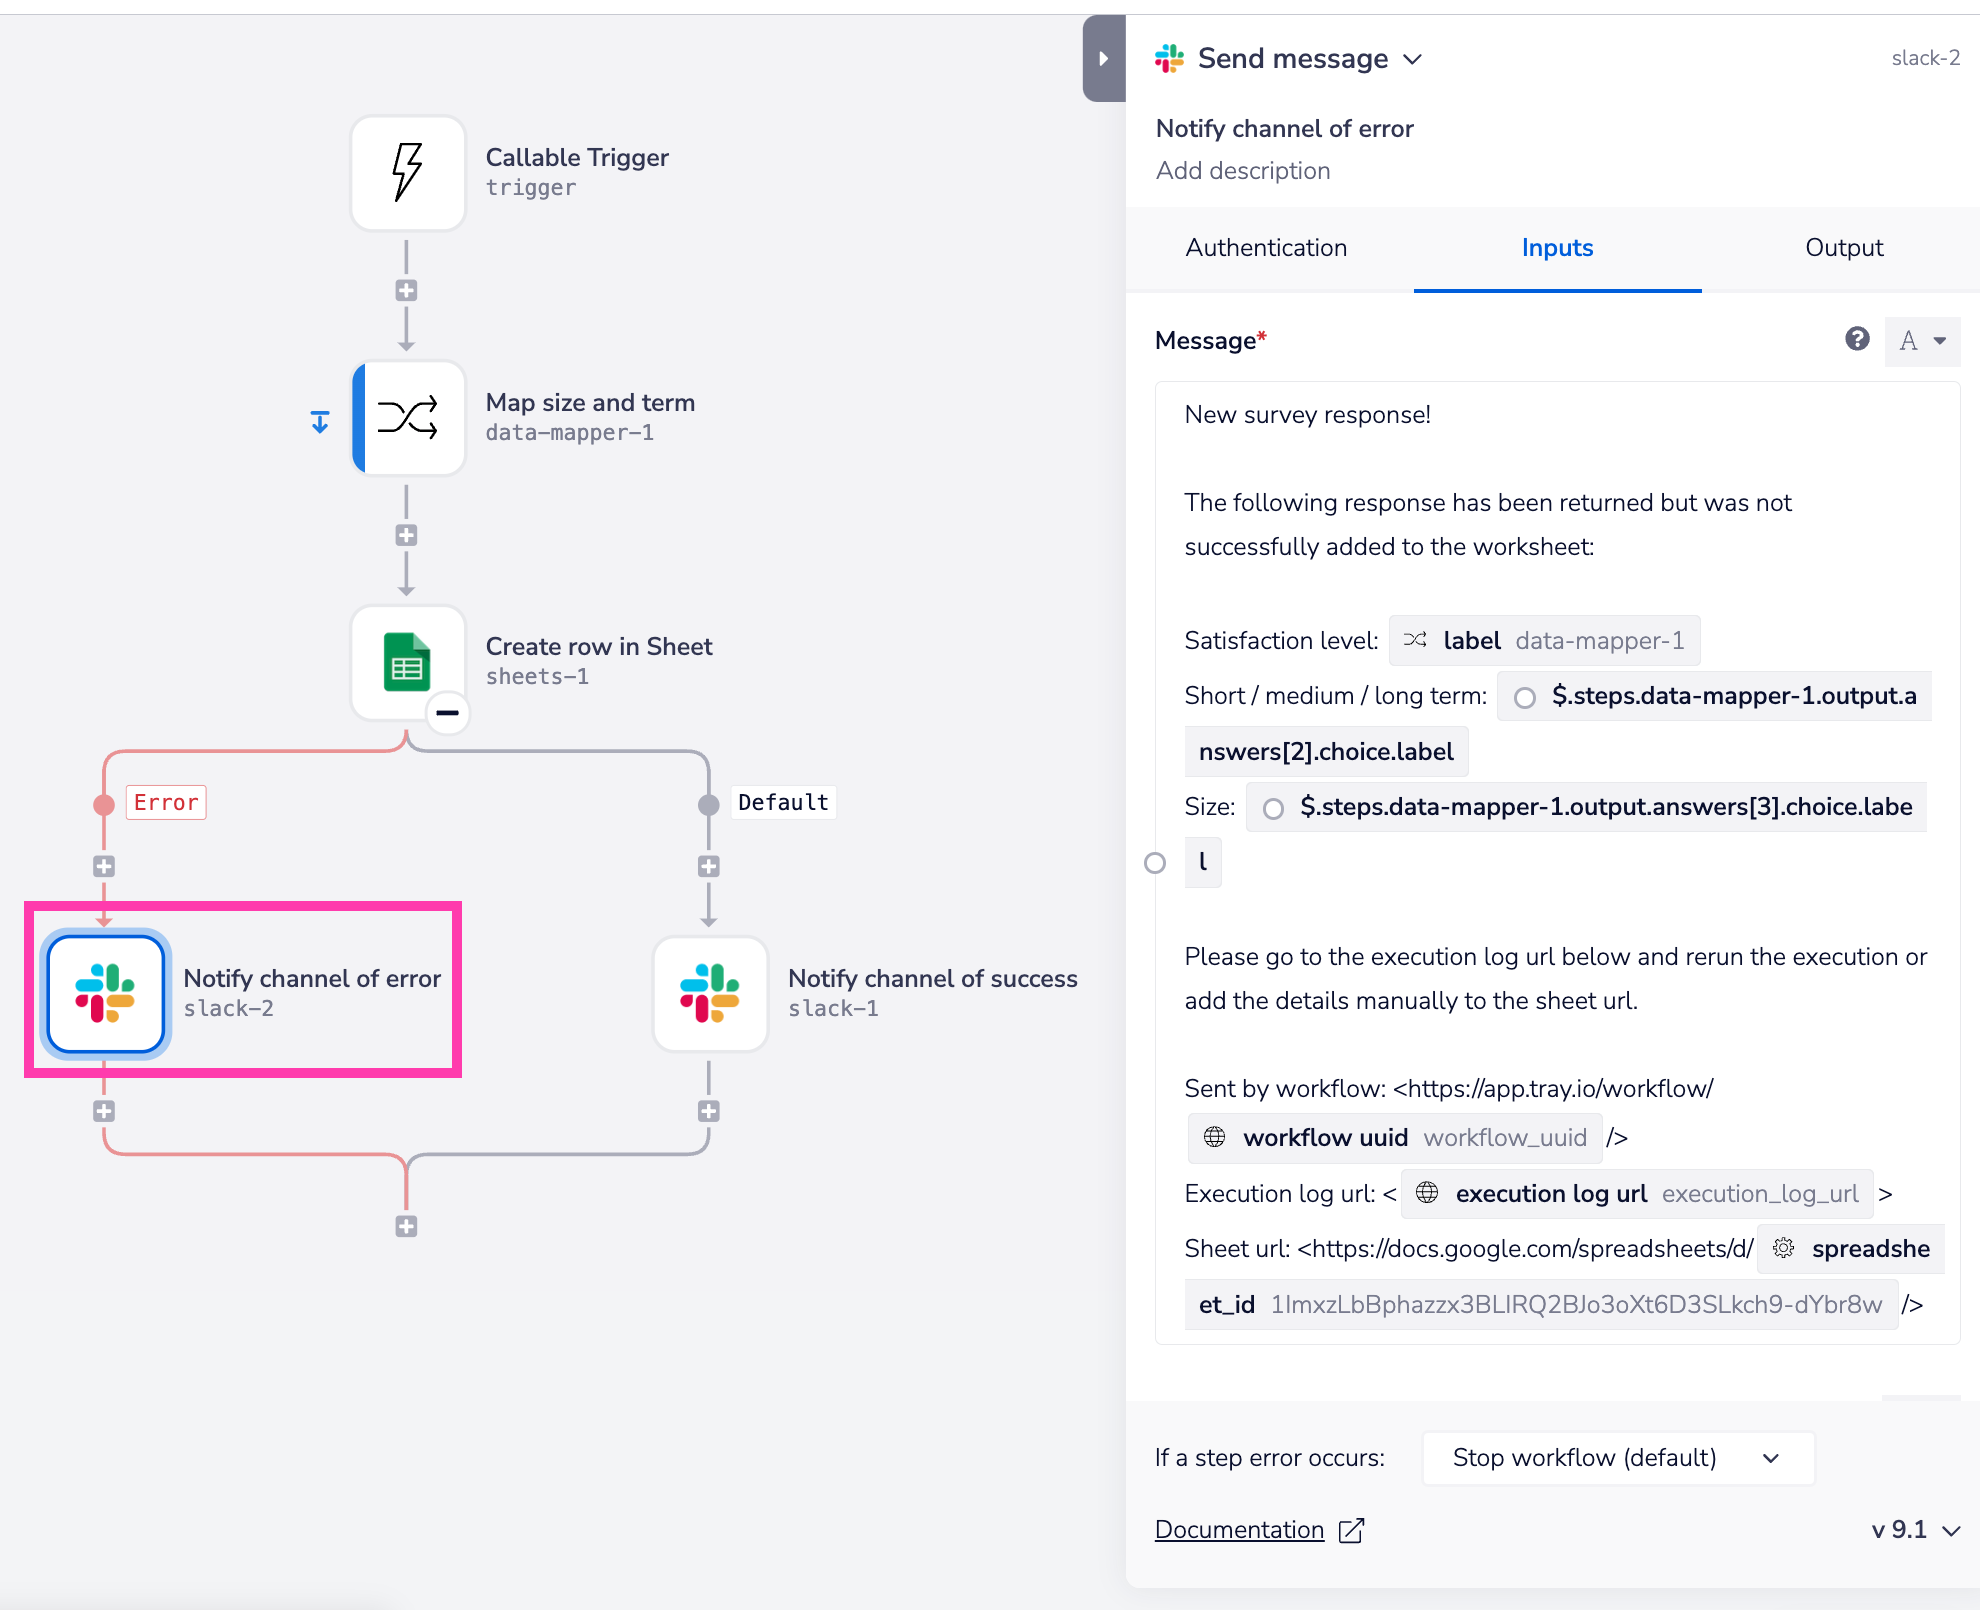
In that message we are making use of the following environment variables:
{$.env.workflow_uuid}to compose the url of the workflow{$.env.execution_log_url}to link directly to the logs for the failed execution
It also makes use of the {$.config.spreadsheet_id} project config in order to construct the url for the Google Sheet.
The end result is a message such as:

The dynamic processing workflowCopy
Check if the sheet has been started
The first thing we do in the dynamic processing workflow is check if the worksheet has already been started.
This is done by using the Google Sheets 'get sheet data' operation and then using the Boolean connector 'property exists?' operation to see if any 'values' were returned:

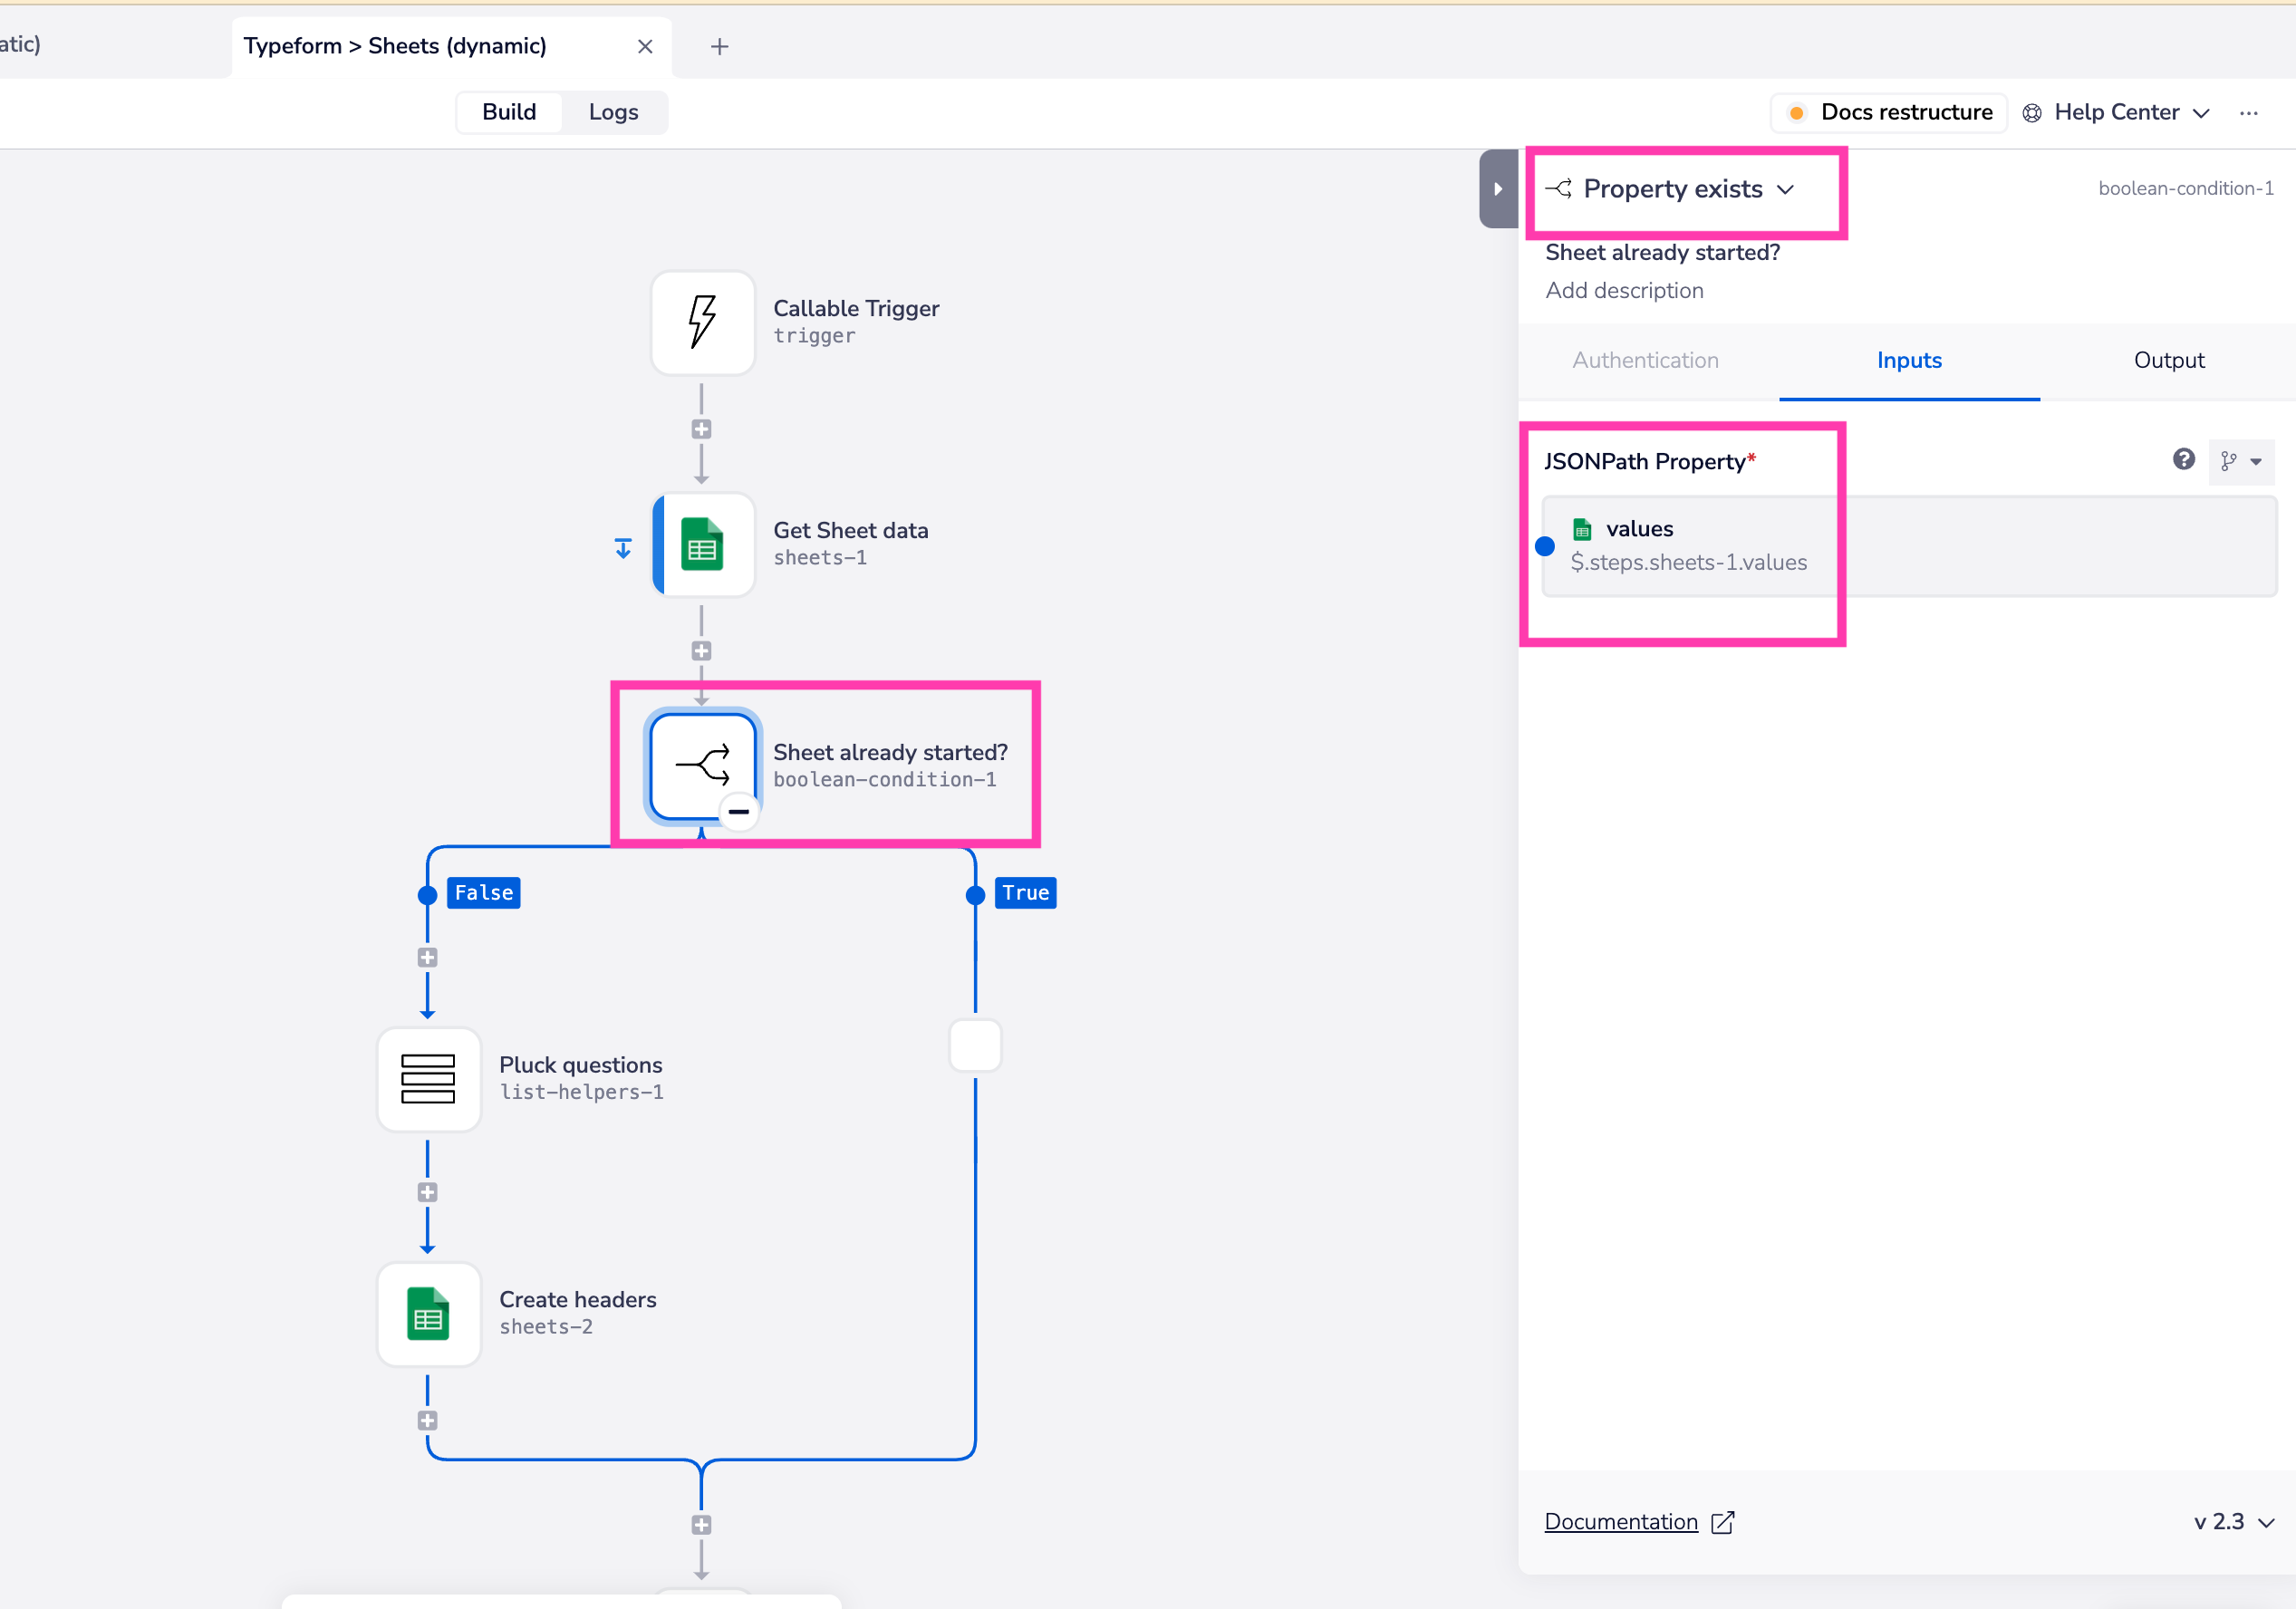
If no values have been returned this tells us that the sheet is empty.
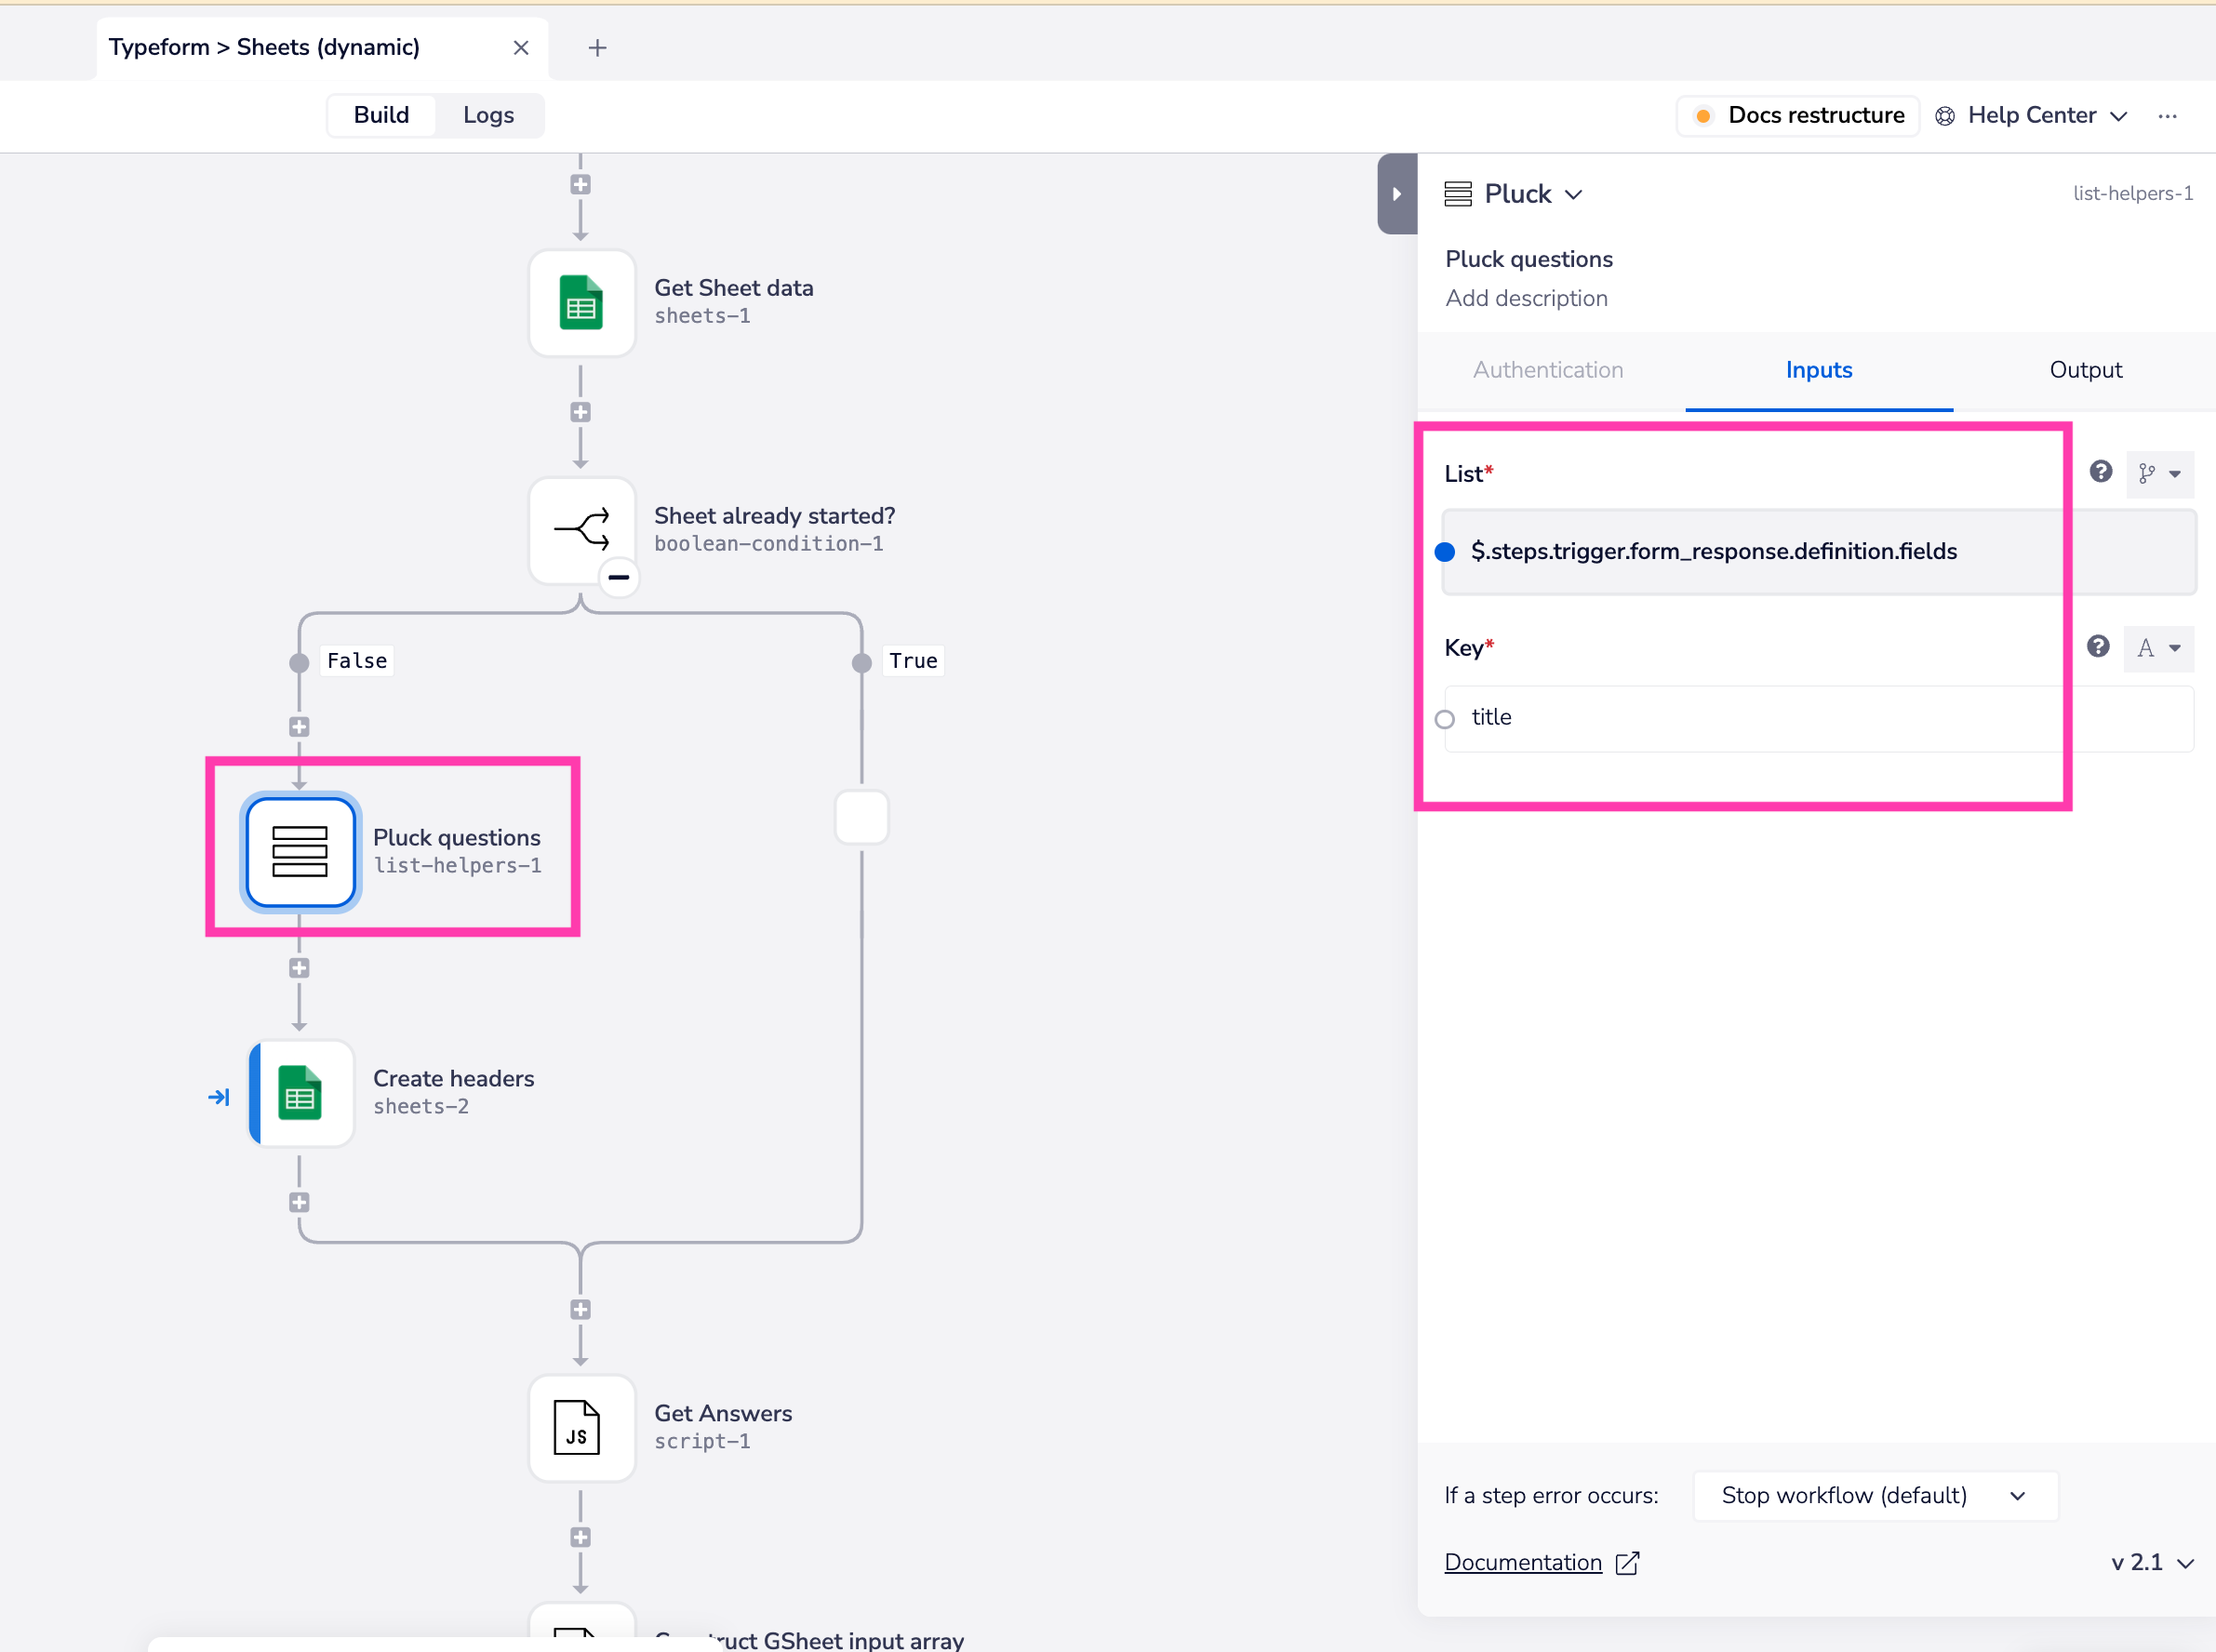
2. Creating the sheet headers
So on the 'false' branch we use the List Helpers 'pluck' operation to get all the answers using the $.steps.trigger.form_response.definition.fields jsonpath and plucking each 'title':

We can use the Tray Operations Explorer dev tool to investigate the input schema requirements for the Google Sheets 'Create column headers for sheet' operation:

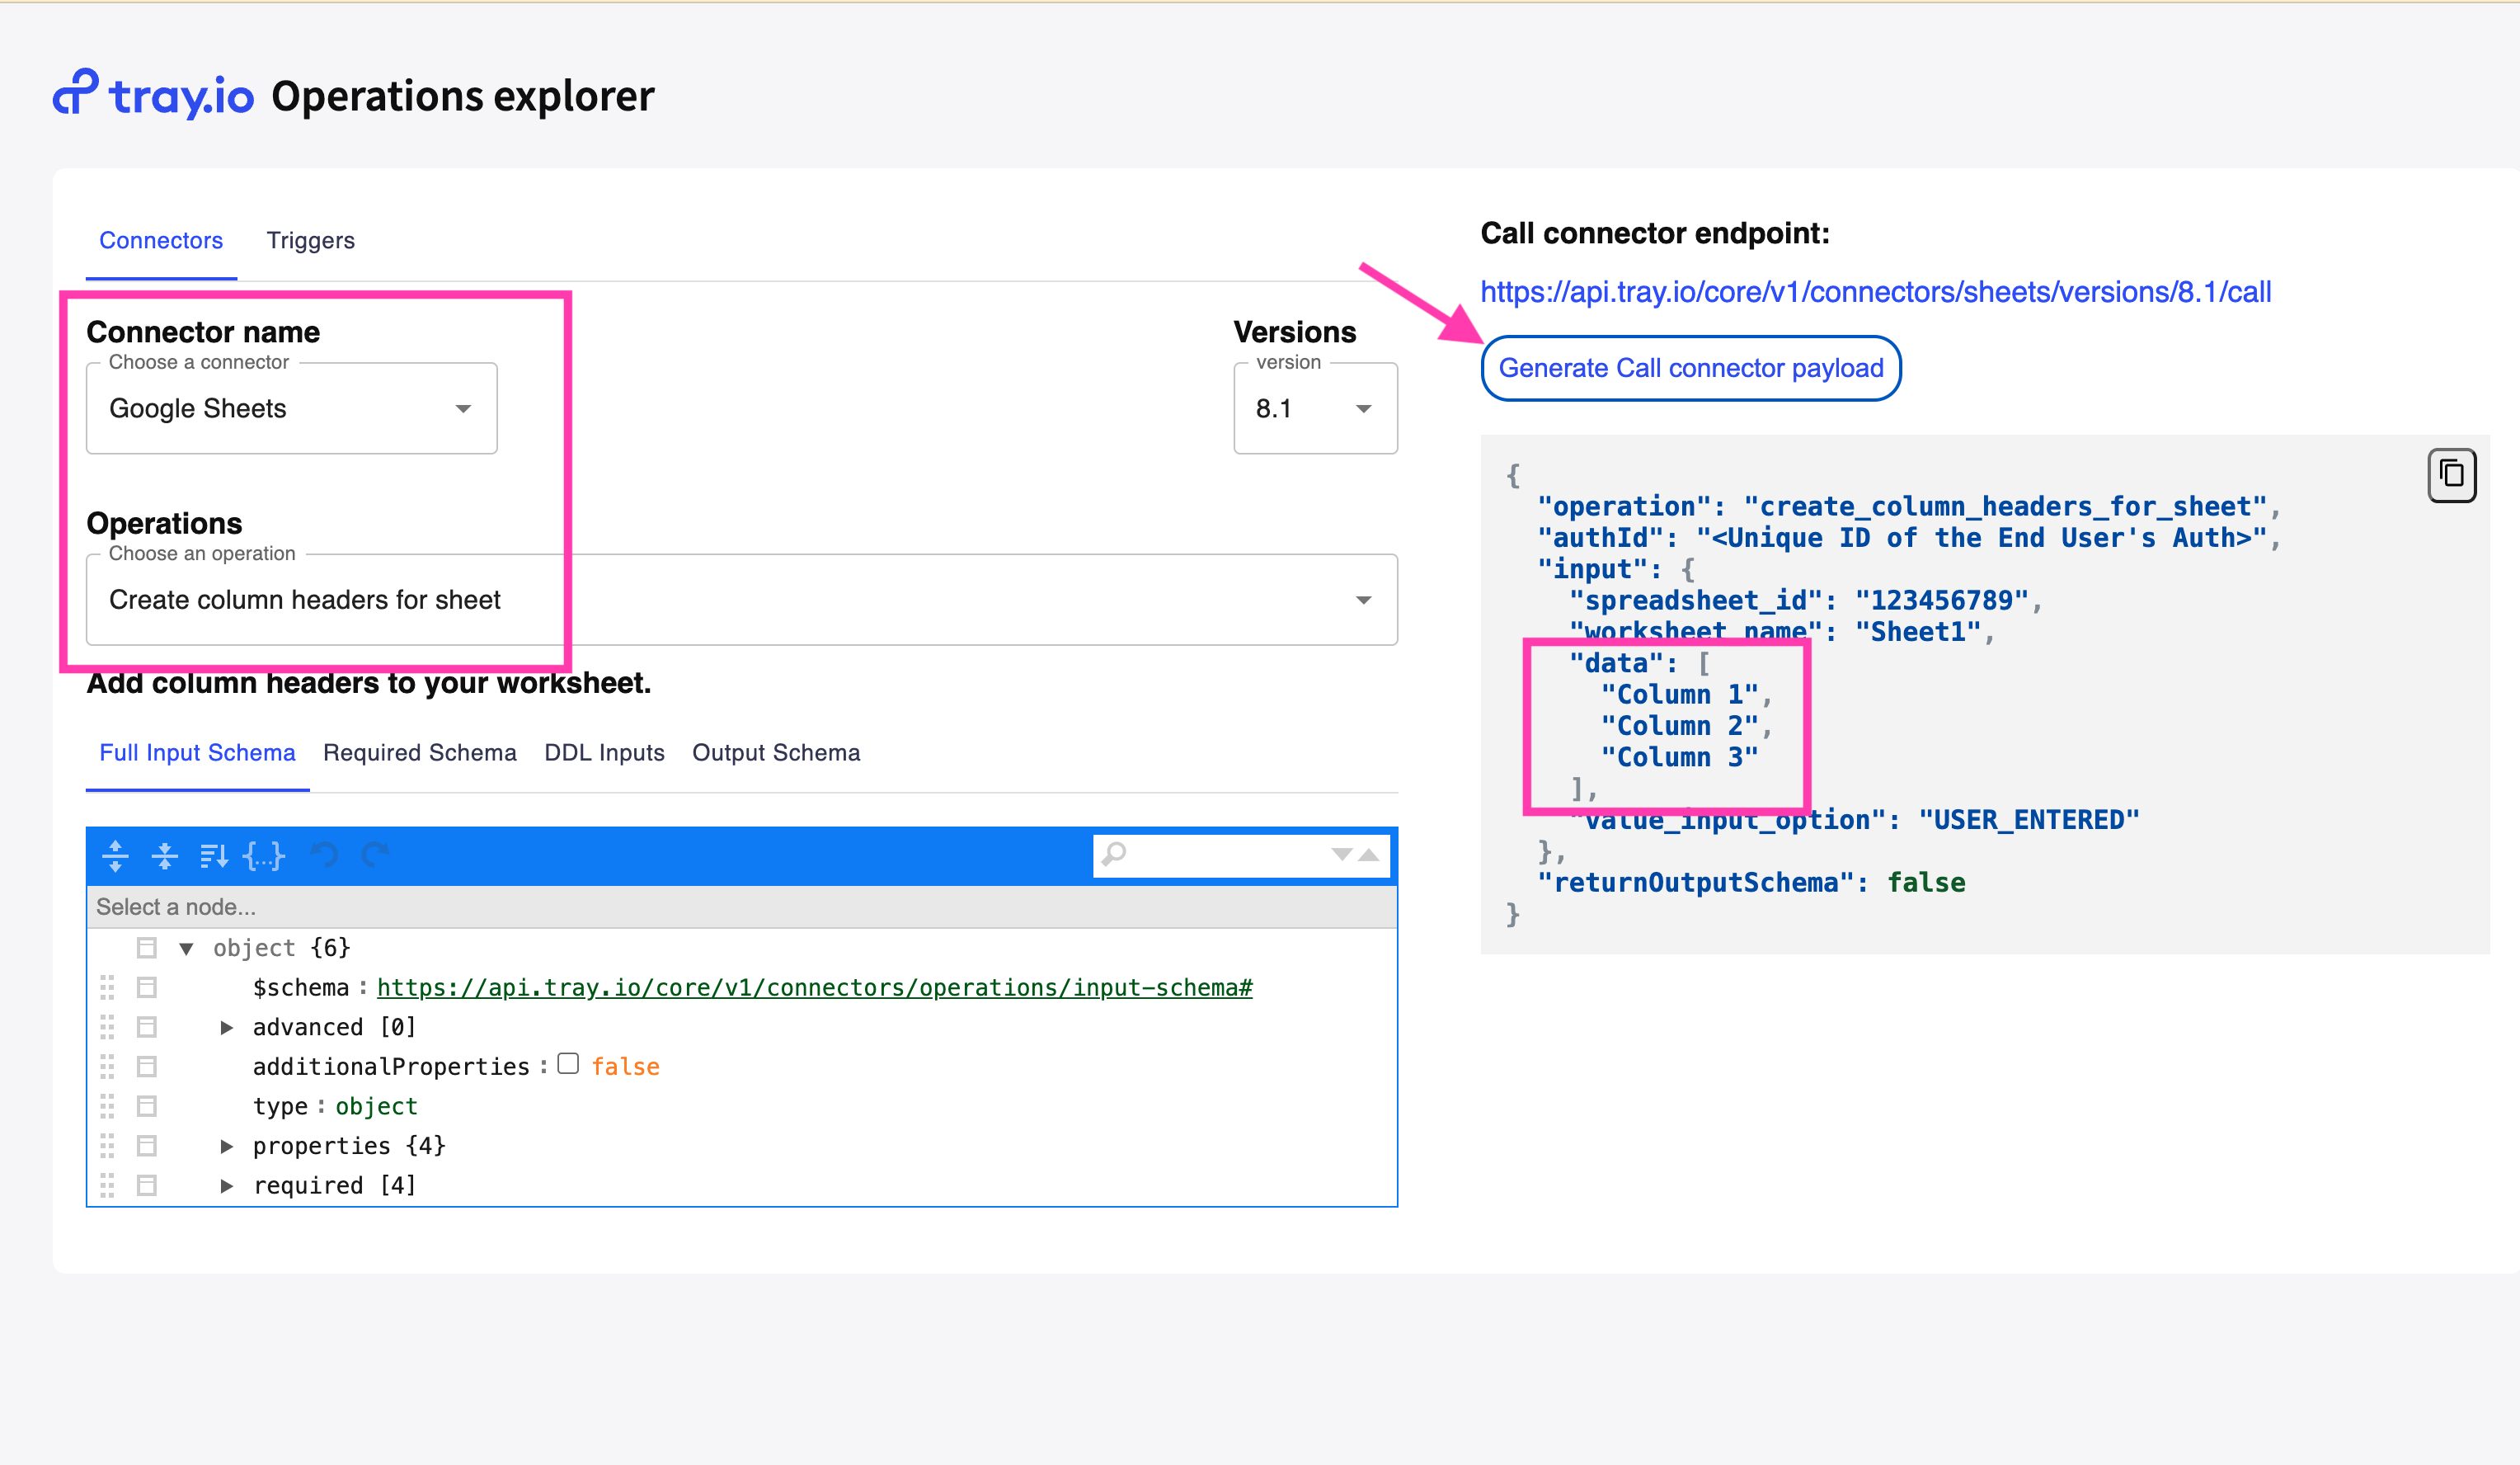
So we know that we can just pass a basic array into 'Row data' and the headers will be added:

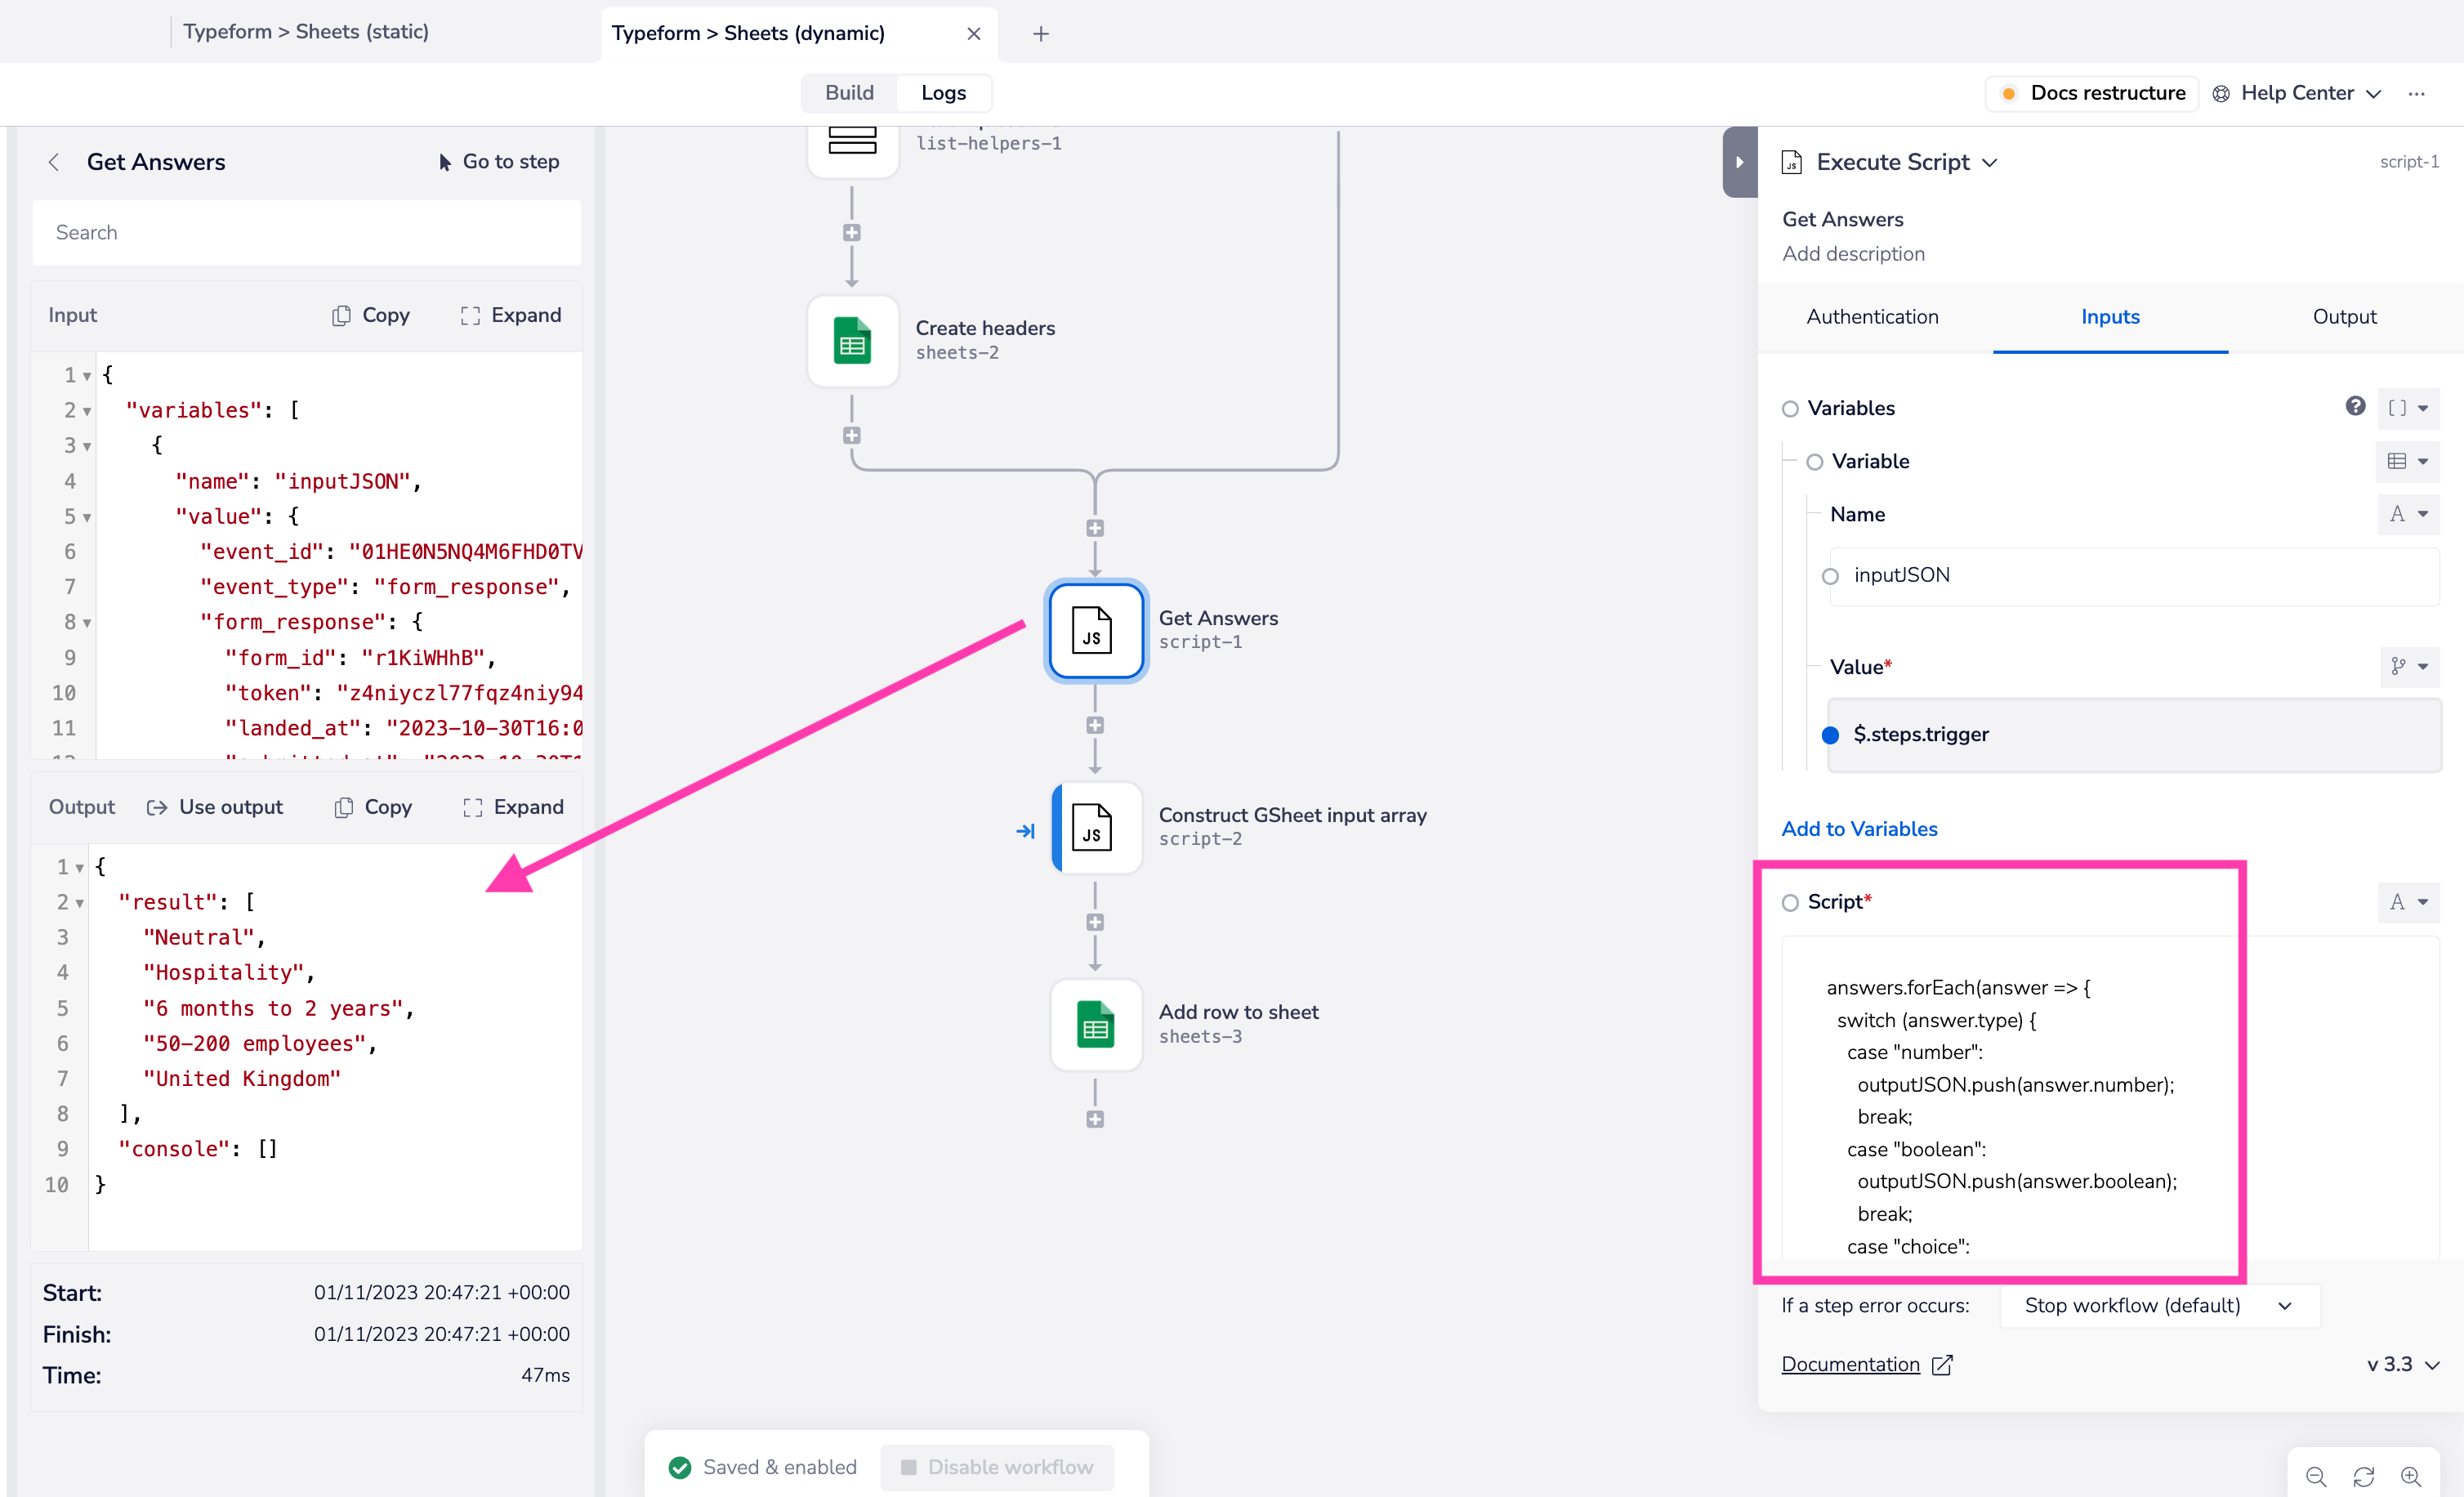
3. Getting the answers
In order to respond dynamically to the answers given in a response to any survey, we need to allow for the fact that answers in the payload coming from Typeform could be in a number of formats: number, boolean, string etc.
So we use a javascript connector step to write a switch statement to deal with each type and create a final array of answers:

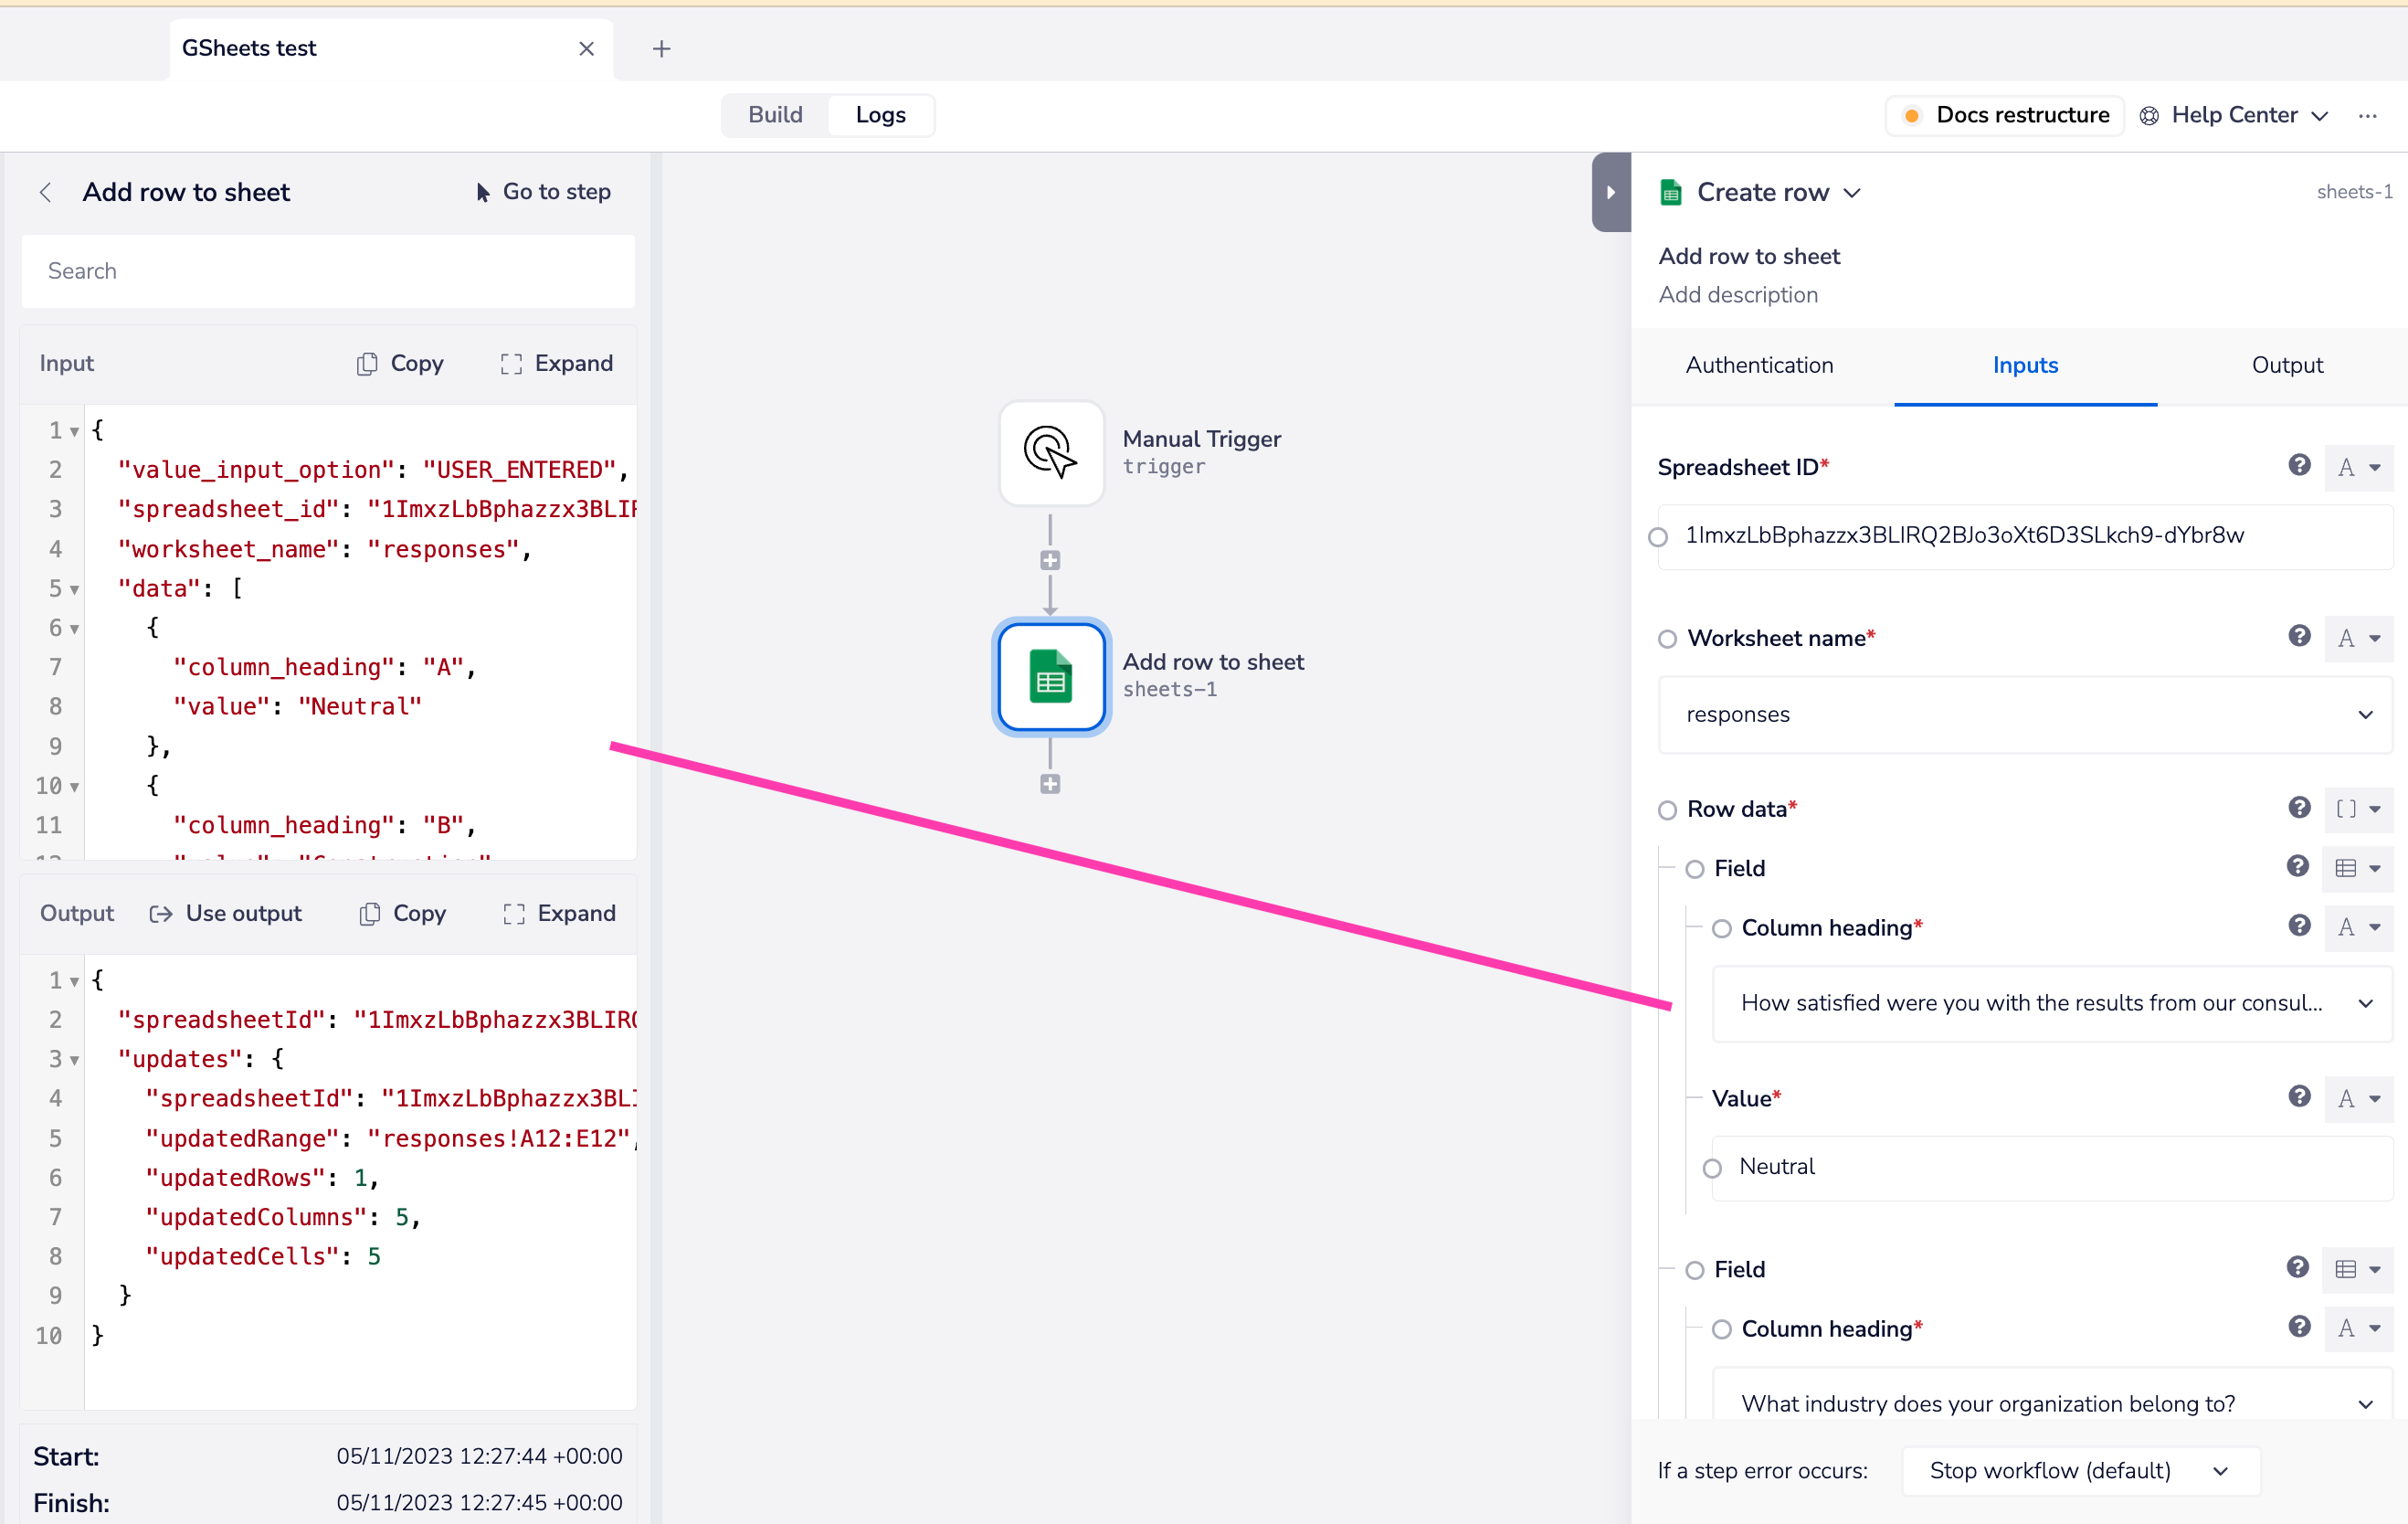
4. Adding the answers to Google Sheets
In order to dynamically add answers we must send them as a dynamically generated array, since we don't know how many there are.
A key point here is that any connector operation which allows you to add multiple records will have a particular input schema.
To find this out we can do a manual test run of the Google Sheets 'create row' operation and inspect the input logs in the Tray UI:

(Note that you could also make use of our Tray Operations Explorer dev tool (beta)) to create a dummy input payload and find out the required schema)
This tells us that we must transform our simple array of answers:
1{2"result": [3"Neutral",4"Hospitality",5"6 months to 2 years",6"50-200 employees",7"United Kingdom"8]9}
Into an array of 'column_heading' / 'value' pairs.
In the 'Construct GSheet input array' step this is done using a simple for loop:

When building your own workflows this is a script you could write yourself, or you could make use of our Data transformer tool (beta) to generate the script for you!
The result of this script step can then be passed directly into the 'Row data' for the Google Sheets 'create row' operation.