Key concepts
Workspaces and projectsCopy

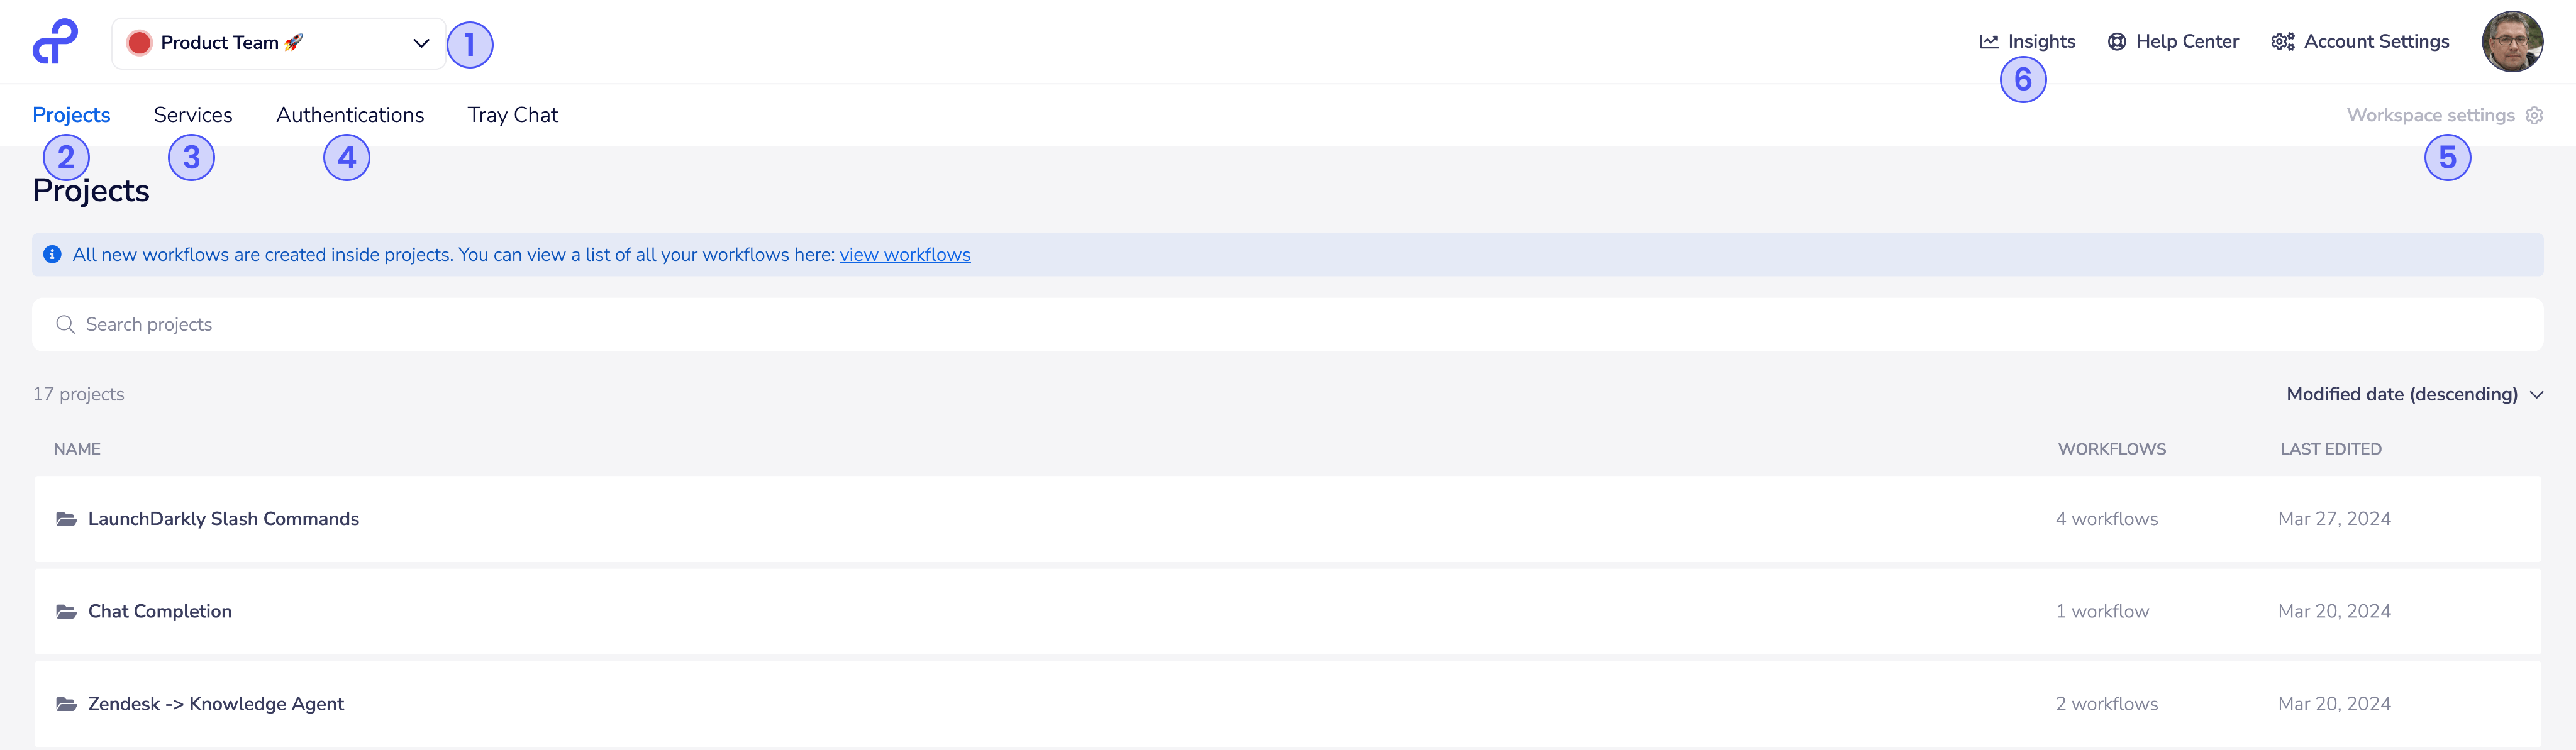
Workspace (1)Copy
Workspaces are used to divide up your organization into sub-categories such as departments.
They can also be used to set up e.g. 'dev' and 'prod' workspaces for environment promotion
Projects (2)Copy
Projects are used to group workflows which work together to achieve a particular purpose.
Via callable workflows, they can also be used as callable 'functions' (e.g. repeatable data processing tasks) which other projects in the same workspace can make use of.
All workflows in Tray must be added to a project.
Projects can be exported for e.g. import into a production workspace (manually or programmatically via API).
Services (3)Copy
Tray has a list of 100s of pre-built 3rd party service connectors that you can use in your project workflows.
It is also possible to build your own Custom Services for services that don't have a pre-built Tray connector, and to then make use of these with our universal HTTP client.
Authentications (4)Copy
Each time a user in your org wishes to make use of a service they will need to create an authentication
Authentications can be created within workflows, and can be personal, workspace or organization auths.
Workspace details (5)Copy
Here you can manage the users of a workspace and also set workspace task limits for testing purposes.
Insights (6)Copy
Tray's Insights hub gives you graphical feedback on the health of your projects and workflows.
It can help identify problem workflows and is a powerful troubleshooting tool.
The Build UICopy

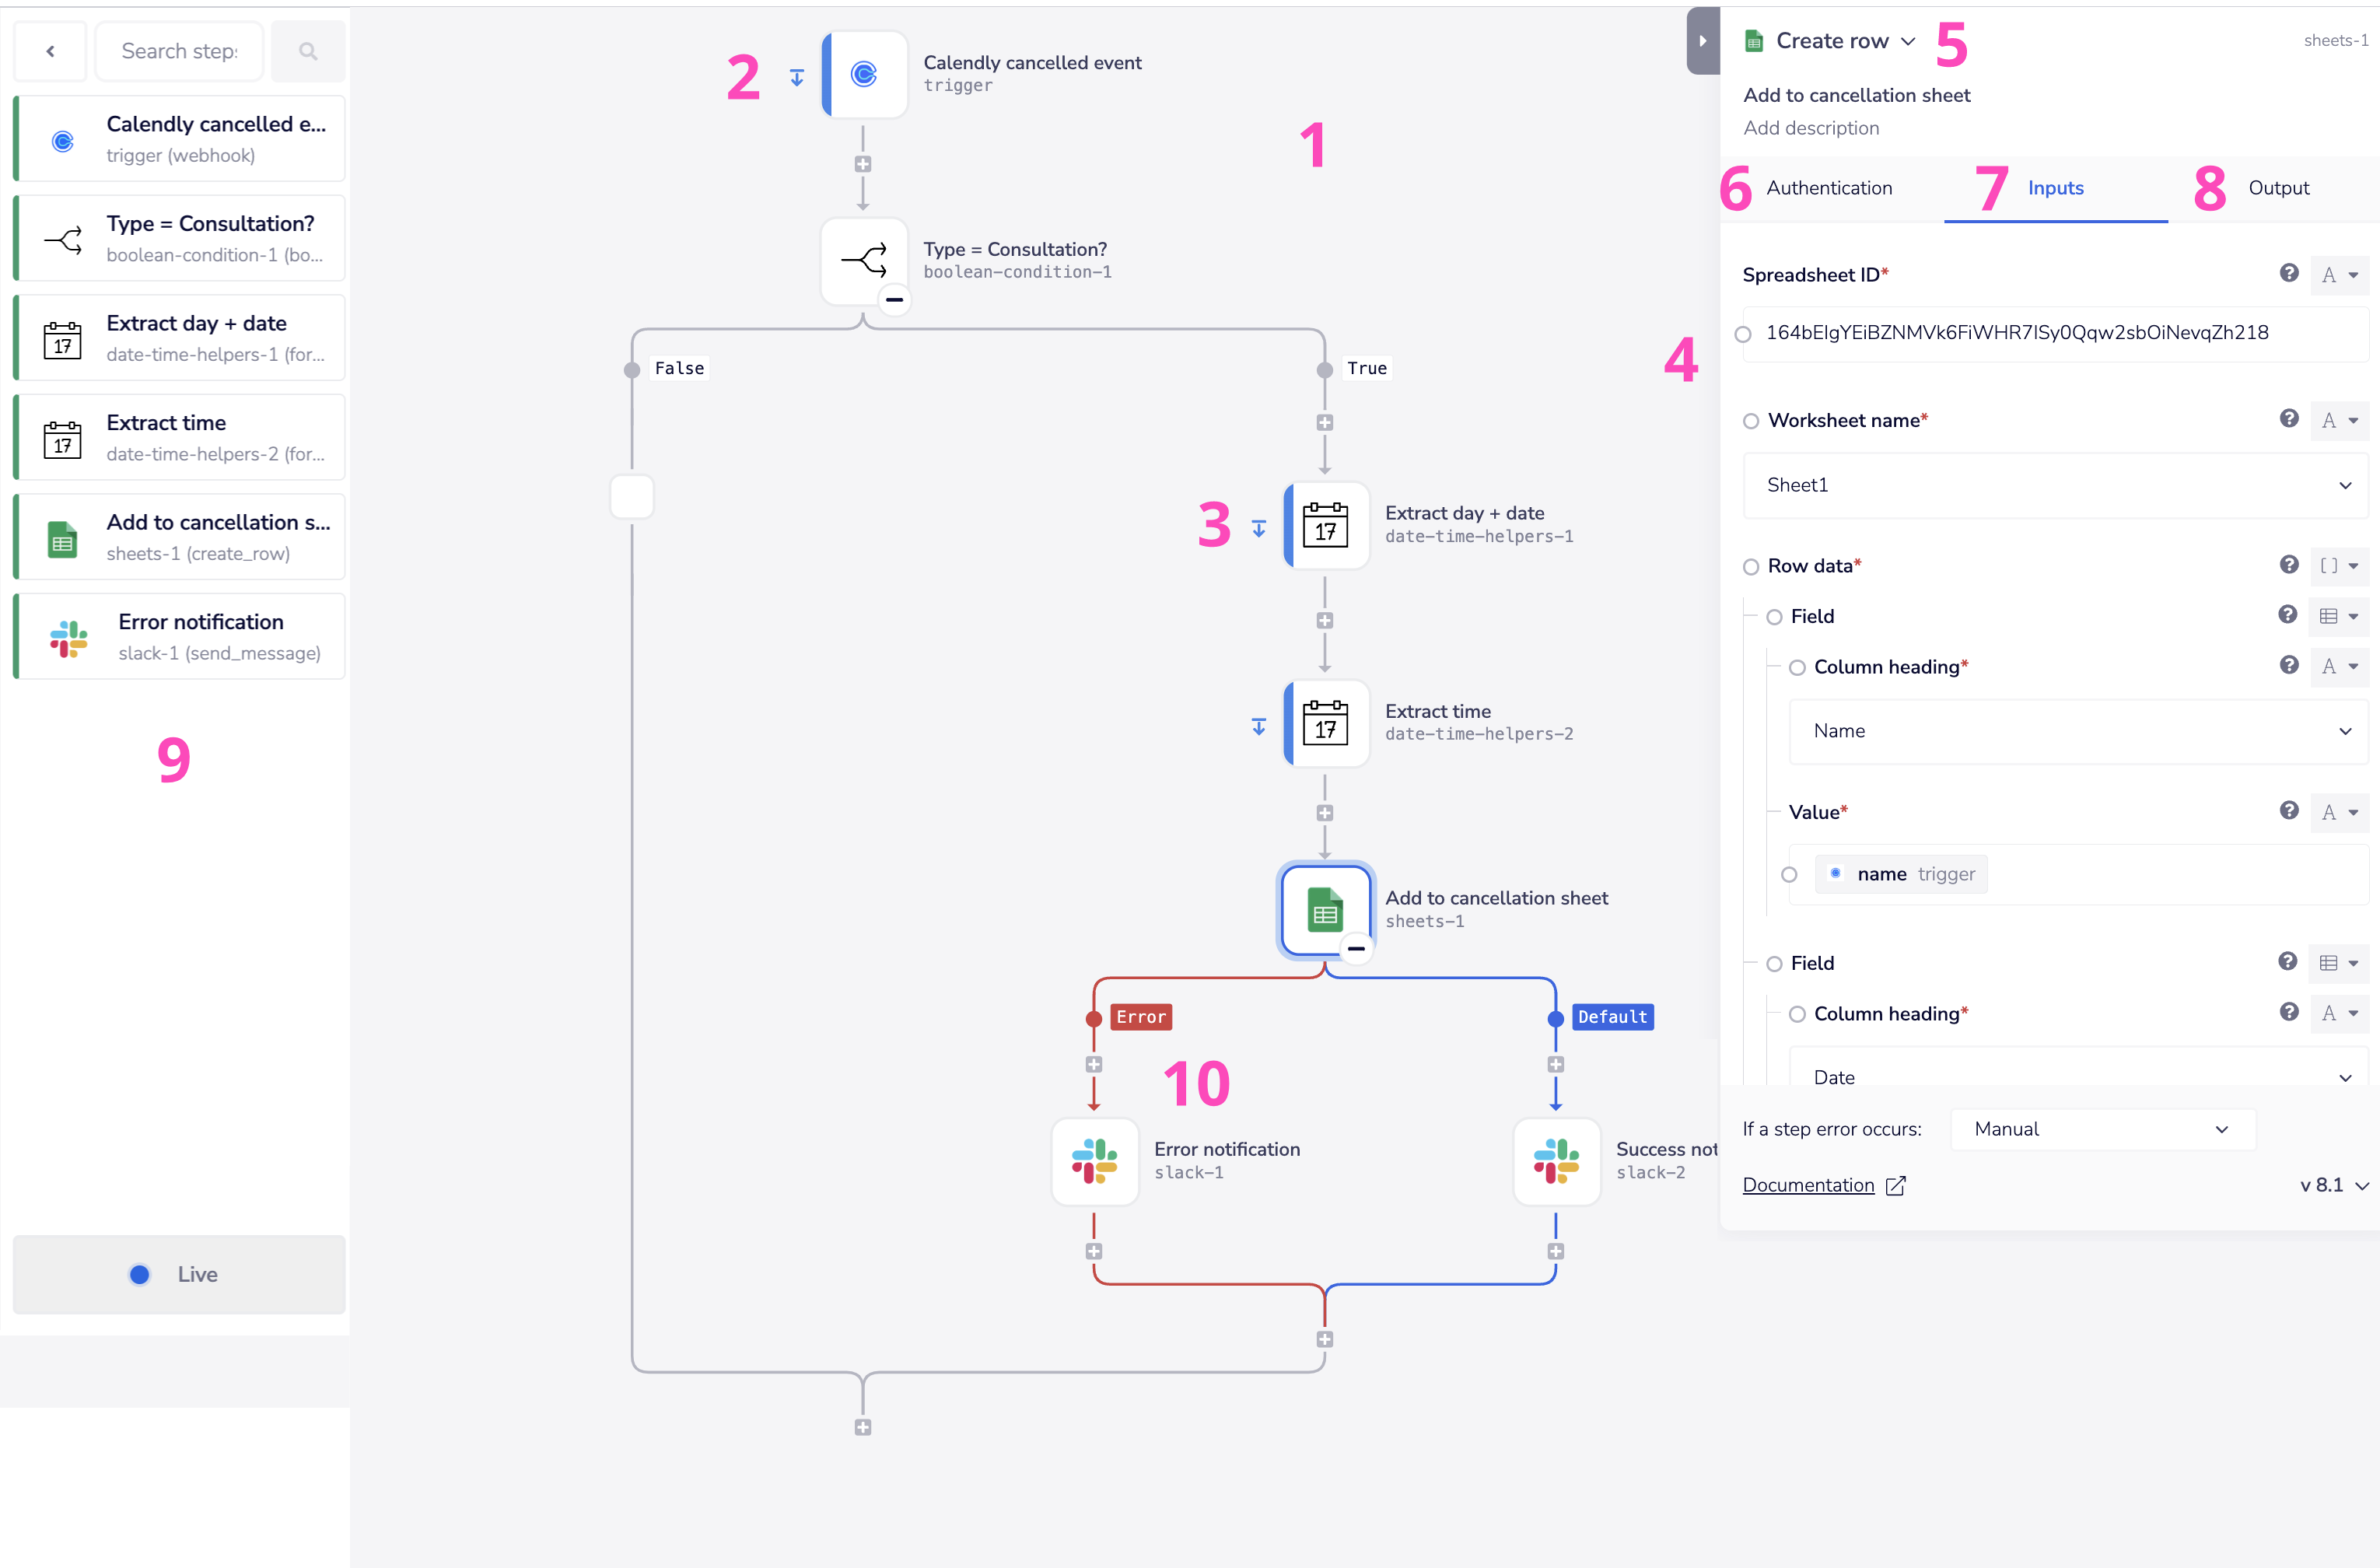
The workflow canvas (1)Copy
A drag n drop interface to sequentially arrange your service connectors and appropriate data manipulation steps
Workflow Trigger (2)Copy
The first step which kicks off a 'run' of your workflow. This can be:
A real-time trigger (kicked off by an external event)
A Service trigger (the above example shows a Calendly trigger which is activated every time a Calendly event is created or cancelled) (Tray.io has hundreds of pre-built service triggers)
A Webhook trigger (used for when Tray.io does not have a pre-built service trigger)
An Email trigger (for e.g. older systems which issue data via CSV attachments)
A Form trigger (you can capture data from staff / users via a pre-built form hosted on a specific url)
A scheduled trigger (used to periodically check for new data in an external service - aka polling)
A manual trigger (for testing as you build, and for workflows you wish to run on-demand)
A callable trigger (for efficiently processing large / complex data payloads)
An alerting trigger (for handling errors that may occur in your workflows)
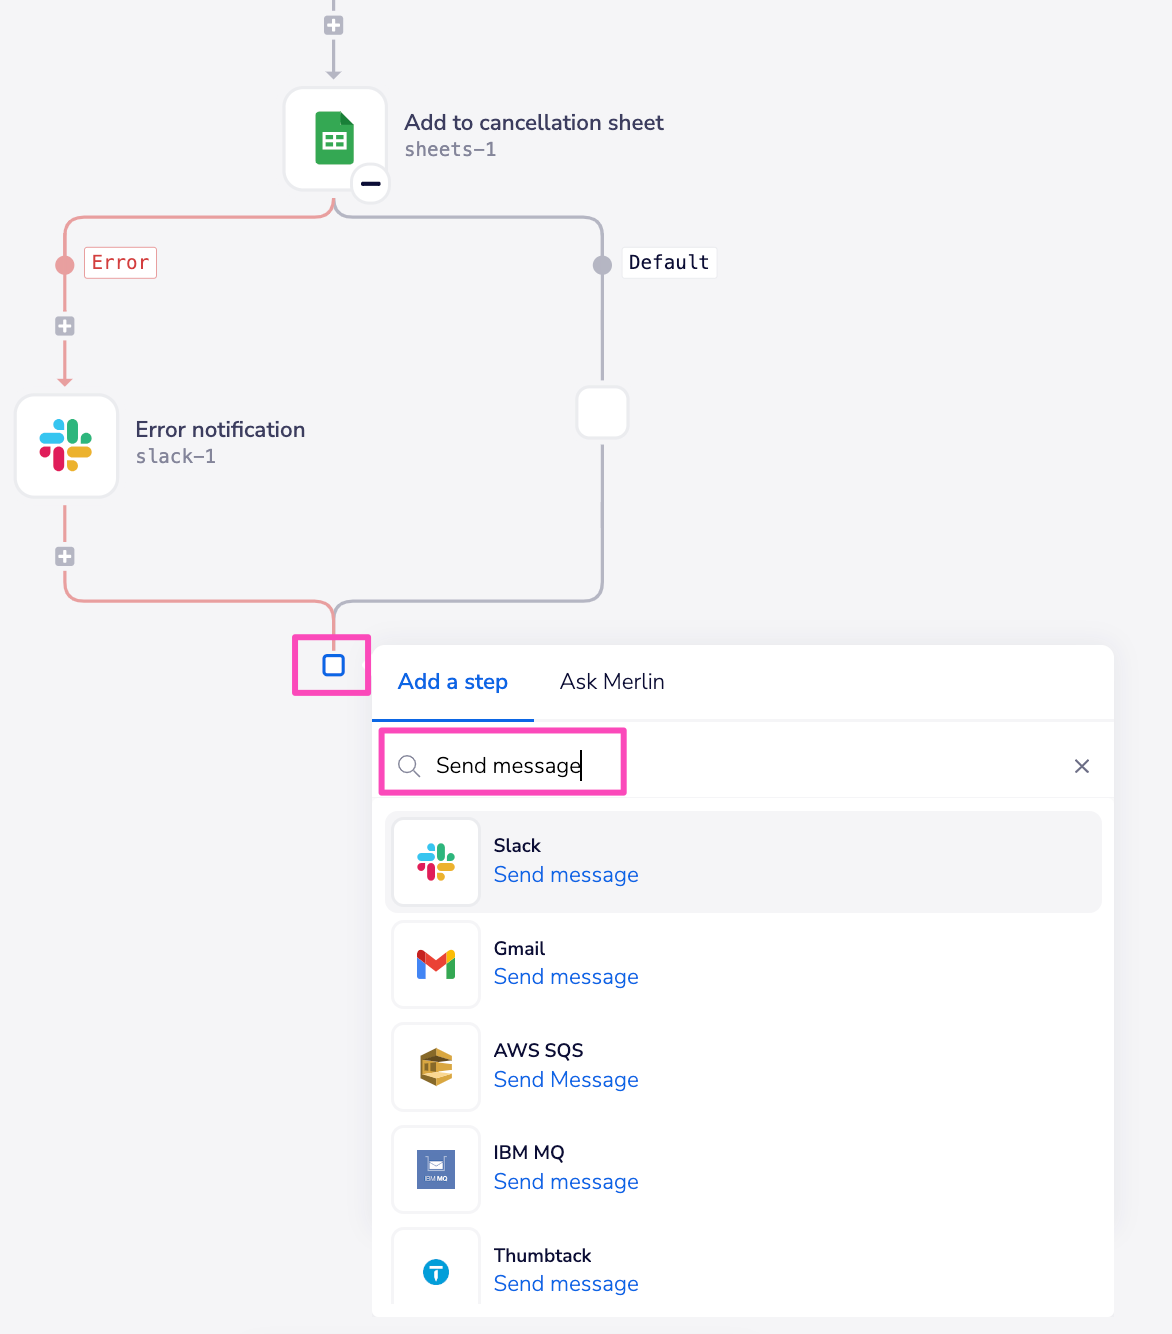
Connector steps (3)Copy
Each step in a workflow will be one of:
A 3rd-party service connector - for key apps such as Salesforce, Hubspot, Slack etc, Tray.io has pre-built connectors, each with a list of powerful operations
A Tray.io core / helper connector - Tray.io has a range of tools to help with data processing and manipulation
A call workflow step - used for efficiently processing large / complex data payloads
An http client step - used to connect to service endpoints when that service has no official Tray.io connector
A step for a connector you have built yourself using Connector Builder or the Tray.io CDK
To add a connector as a step, click the '+' icon, and search for the connector by connector name or required operation.

The properties panel (4)Copy
Each step in your workflow will reveal its 'properties panel' when clicked on.
This is where you make all the settings to correctly configure that particular step:
Operation (5)Copy

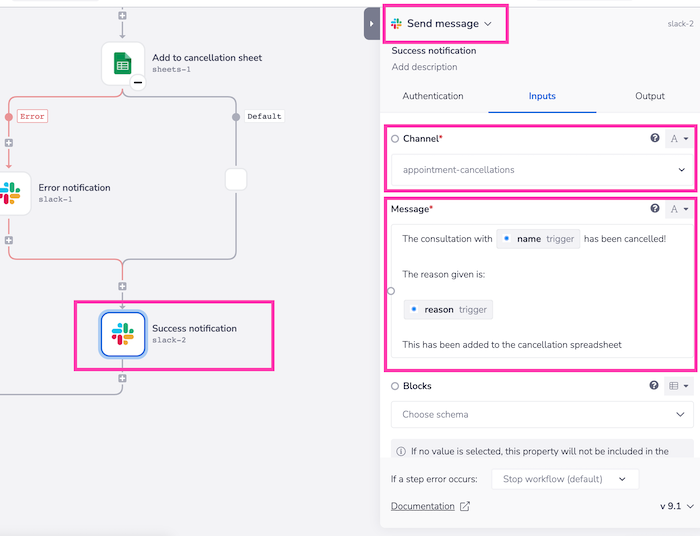
For each connector there is a drop-down list of pre-built operations.
The above example shows the 'Send message' operation for the Slack step titled 'Success notification'
Authentication (6)Copy
When connecting to services you will need to create an authentication.
Authentications can be either Personal or shared with others in a workspace.
Pre-built services have an authentication dialog and instructions to follow on the individual service connector page.
When using the Http Client, Connector Builder or CDK you will need to create your own custom or generic service to create authentications with.
When building integrations to be embedded in your own app that can then be activated by multiple End Users, each End User will create an authentication of their own via the 'Config Wizard' or 'auth-only dialog'.
You can also create auths for End Users via our Auth API
Step inputs (Input schema) (7)Copy
Each operation will have a list of possible step inputs.
Required inputs will be indicated by a red star.
For the above GSheets 'create row' operation the required inputs are Spreadsheet ID, Worksheet name and Row data.
Step inputs can be:
Hardcoded (as per 'Spreadsheet ID' above)
A dropdown list (DDL) (as per 'Worksheet name' above)
Mapped from the output of a previous workflow step (in the above example 'Value' for the 'Name' has mapped the name from the Calendly trigger step)
For certain 'batch update' operations you may need to map an entire payload to the corresponding input schema.
Guidance on this can be found in our page on Satisfying input schema requirements.
Output (Output schema) (8)Copy
At any time you can view the expected output for a workflow step.
The following example for Salesforce 'Get Records' shows us that an array [ ] of 'records' will be returned and each object will contain Name, Company, Email, Status and Rating.
In any subsequent steps, this array can then be looped through and the fields for each record can be accessed using our Basic Data Mapping.

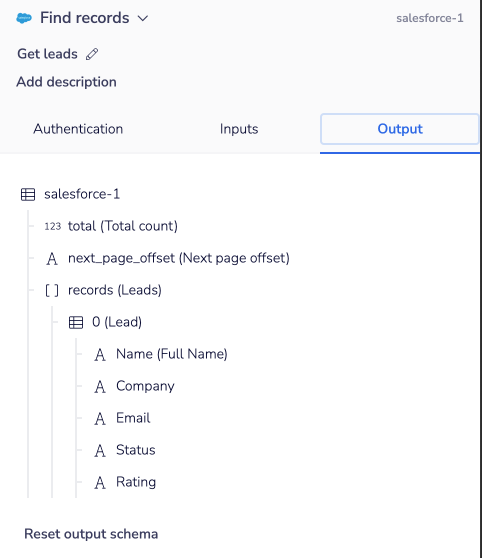
Output schemas are often dynamic. In this example the schema will depend on the fields you specified that you want returned.
You may find that the schema needs to be manually updated. This can be done via the workflow logs
Workflow logs (9)Copy
Workflow logs can be used for monitoring the success and failure of your workflows and all the steps involved:

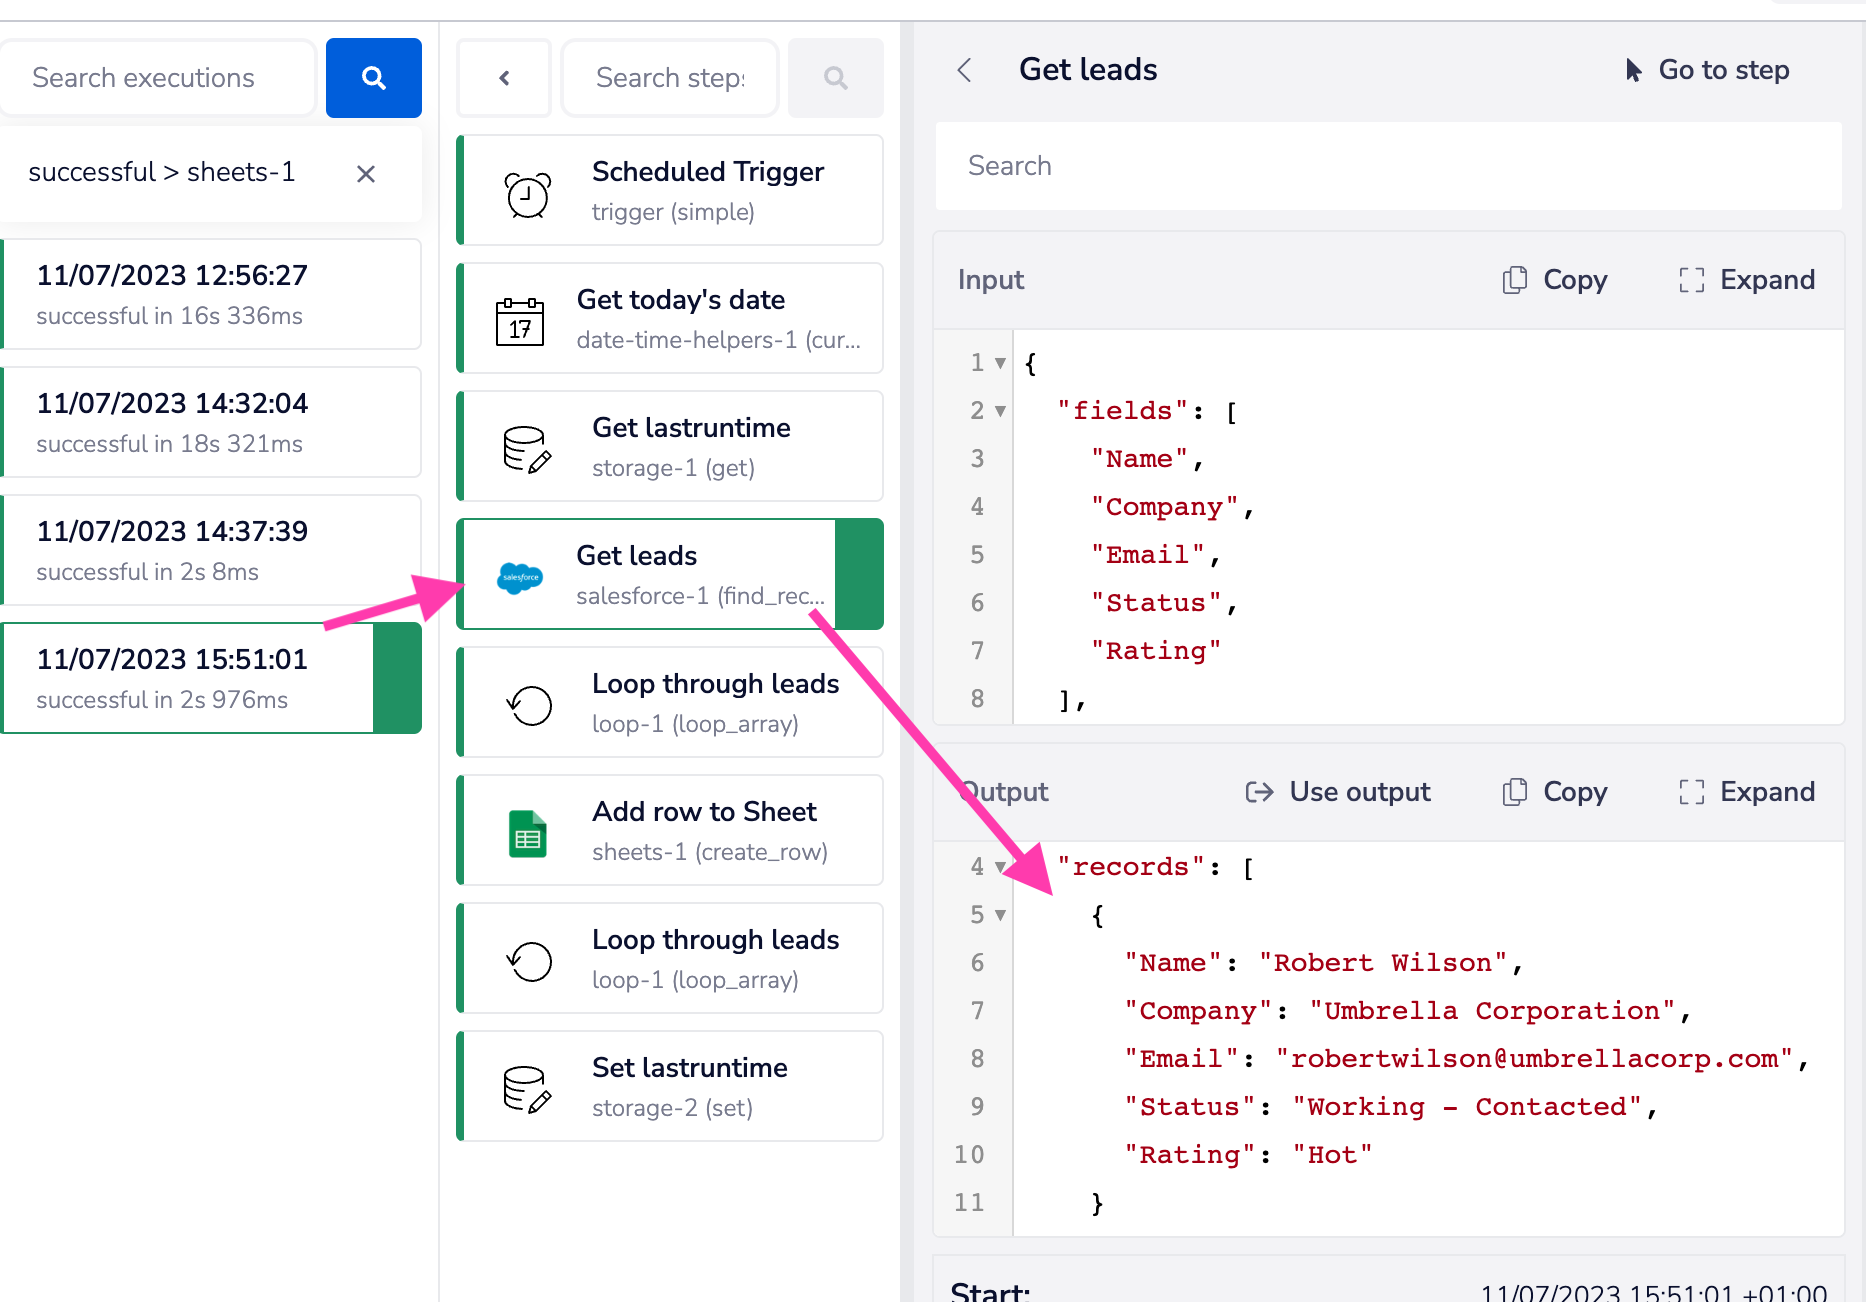
Logs can be used to:
Troubleshoot failed runs and identify errors for particular steps
Rerun failed runs after an attempted fix
Manually set output schema with the 'Use output' button (for when a step output is not returning expected results)
The url for each log run is is stored in a $.env environment variable that can be shared for easy acess.
Please see our logs documentation for more info
It is also possible to stream logs to external systems for monitoring
Error handling (10)Copy
A 3rd party connector step (Slack, HubSpot, Salesforce etc.) might error for a number of reasons, such as:
you are trying to access / edit a record that doesn't exist (404 response in the logs)
the service is temporarily down (500 response in the logs)
the request has timed out (408 response in the logs)
The above example shows using the 'manual' error handling method whereby you can take a set of actions on the error path - in this case a simple Slack notification.
The other options for error handling are:
stop workflow (and send error details to an alert-triggered workflow)
continue workflow (ignore errors and continue)
There are a number of options for dealing with errors:
Simple notification (Slack / Email)
Larger scale storing and monitoring:
Store errors in a spreadsheet such as Google Sheets / Airtable
Store errors in a SQL database
A robust system such as Segment
Logging your errors outside of the Tray app in some way is essential to making this process work for your organization.
What service you choose for this logging process is entirely up to you and what you have available in your technology stack.
Note that if you receive a 429 - too many requests error or are informed that you have tried to upload too many records at once, you will need to take one of the following actions:
When pulling data set up a pagination system to pull data in batches instead of making repeated single requests
When pushing data chunk data into smaller batches before pushing to the 3rd party
When receiving events via webhook implement a queue system if webhook events are consistently coming through at too fast a rate
SolutionsCopy

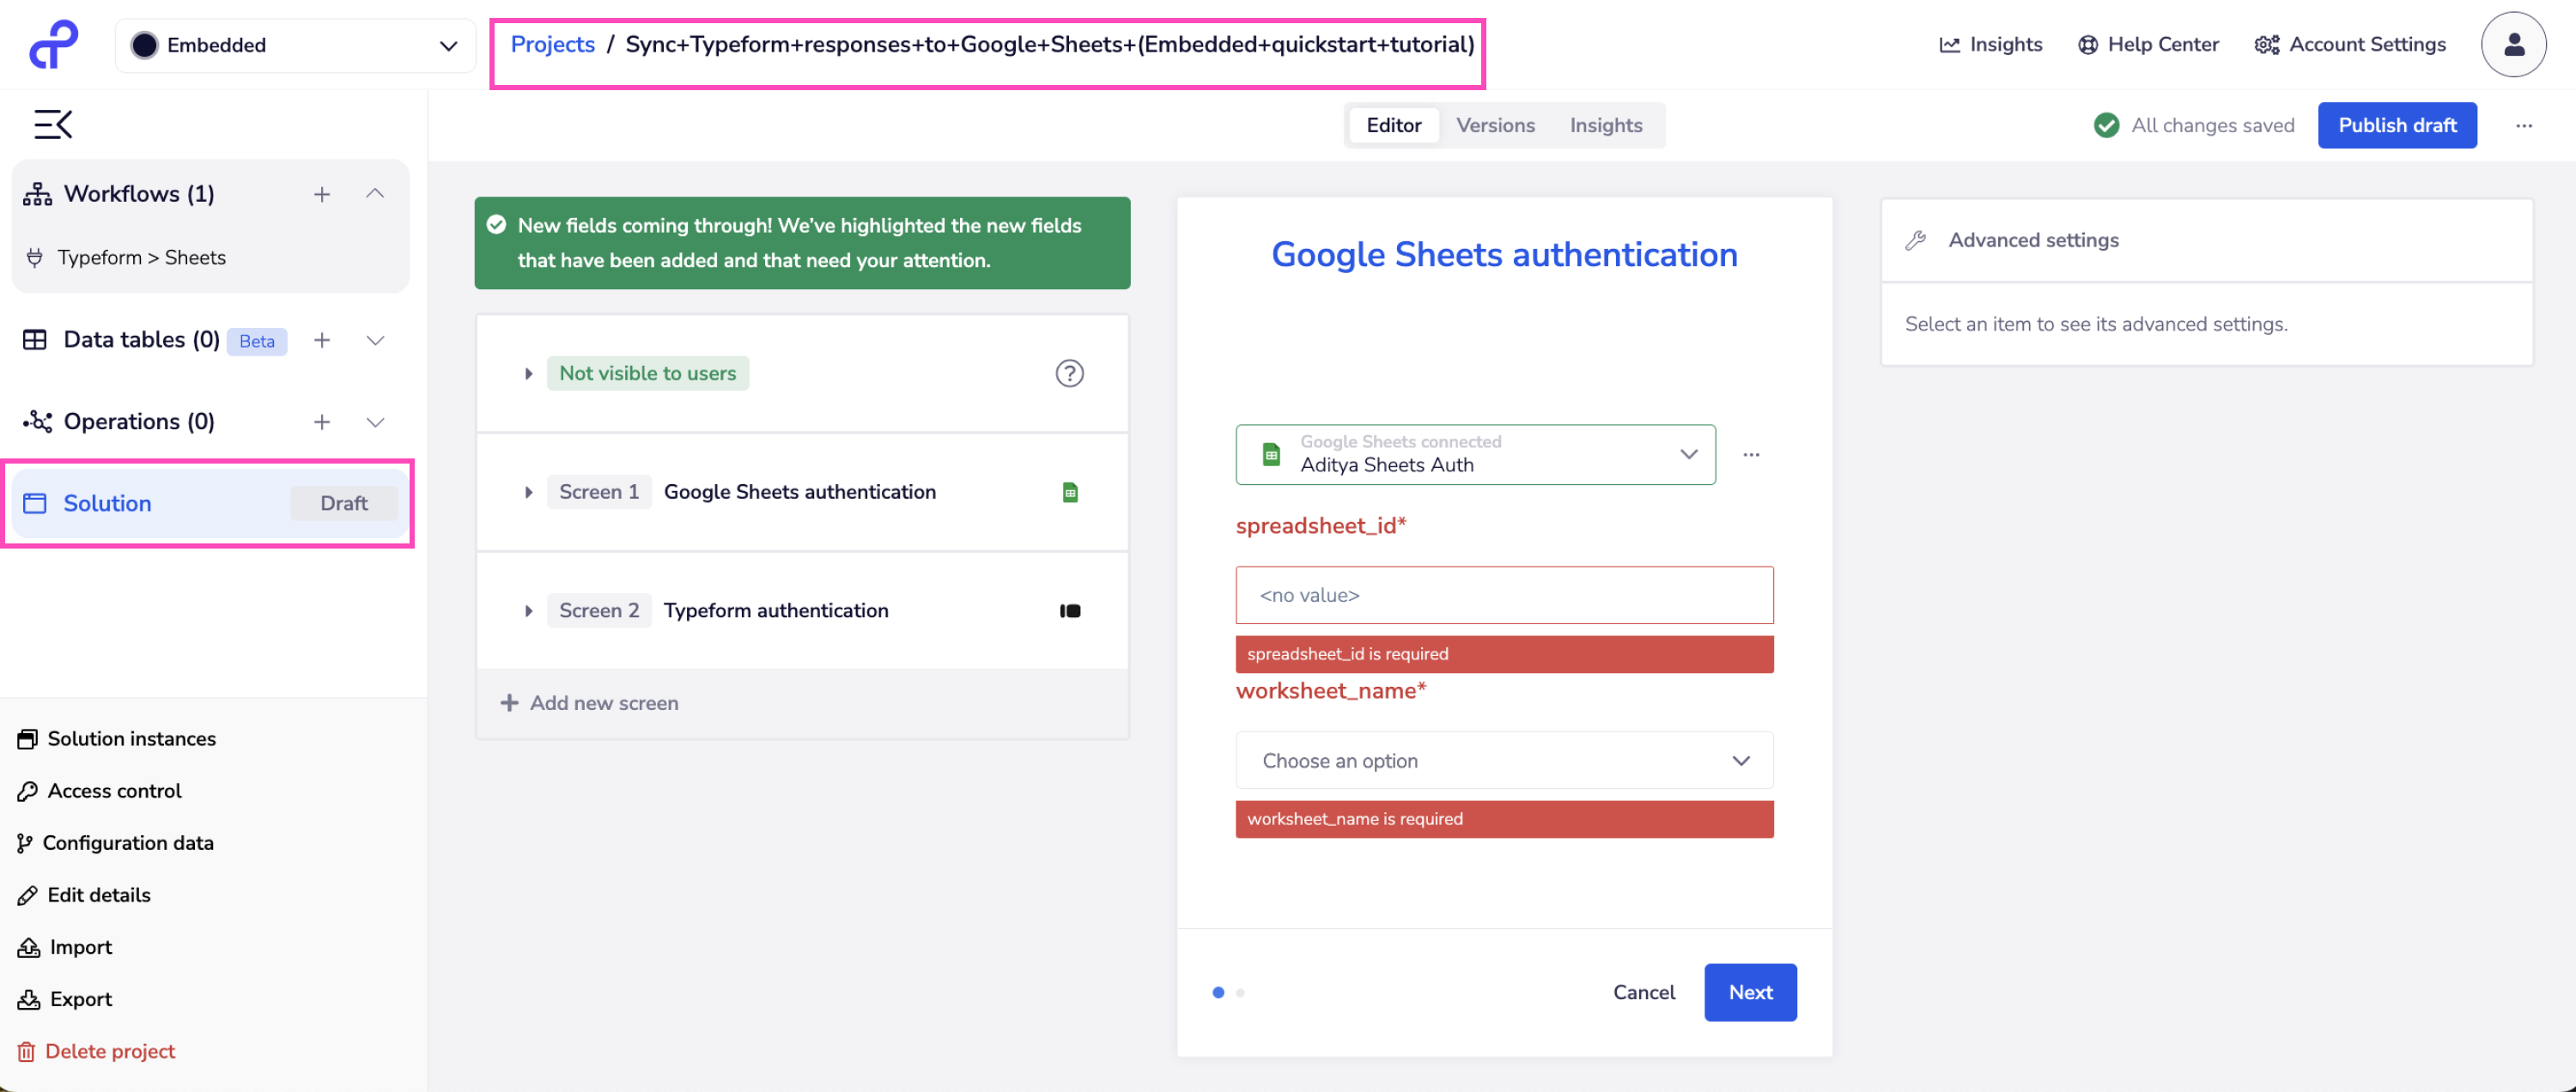
Projects in Tray can be turned into 'Solutions'.
Solutions are basically templatized integrations that End Users can activate for their own use by making config settings and creating their own authentications.
These End Users can be both internal to your org and external customers.
Config WizardCopy
The above screenshot shows how you can use the 'Solution Editor' to set up the Config Wizard which allows End Users to activate their own Solution Instances.
End UsersCopy
The concept of 'End Users' is particular to Embedded integrations.
They are not members of your organization who can log in to Tray and manage assets.
However they do have Solution Instances and 'workflow instances' which contain workflow logs for the data which is running through their configured instance. These can be viewed and debugged in a read-only version of the Tray UI (any corrections must be made in the source workflows found in your Project)
They also have authentications linked to particular 3rd party services (Salesforce, Slack HubSpot) which can be re-used across any integrations, by using our Auth API and Users API
When building and testing your integrations. End Users can be marked as Test Users, which will not go towards your task usage and billing
Your tray organizationCopy
When starting with Tray it is important to be aware of the key components which make up your organization:
Data Region: Where your Tray Organization’s instance is hosted worldwide:
US
EU
APAC
Organization: Your overall Tray instance, where all users, workspaces, projects and workflows exist.
Workspace: an environment where you can create, organize, and secure your authentications and workflows.
User: Anyone with a login to your Tray Organization
Asset: An asset is any usable element within Tray. This includes workflows, authentications, workspaces, custom connectors, snippets, etc