Pipeliner CRM Cloud 1.6
The cloud platform of Pipeliner CRM
OverviewCopy
The tray.io Pipeliner CRM Cloud connector is tray's first GraphQL connector and allows you to interact with Pipeliners cloud service. You can use this connector to create, update and retrieve records.
AuthenticationCopy
Setting upCopy
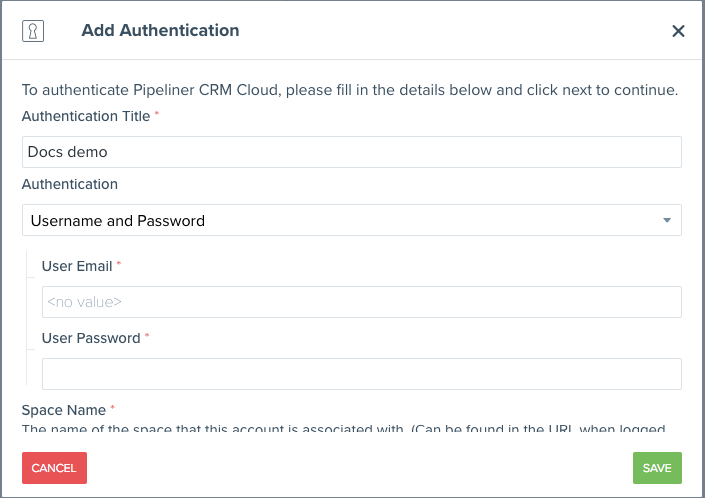
The Pipeliner connector offers two methods of authentication, the first using the email and password of your Pipeliner CRM account.

The second uses an API token and password which is provided on the Pipeliner platform.

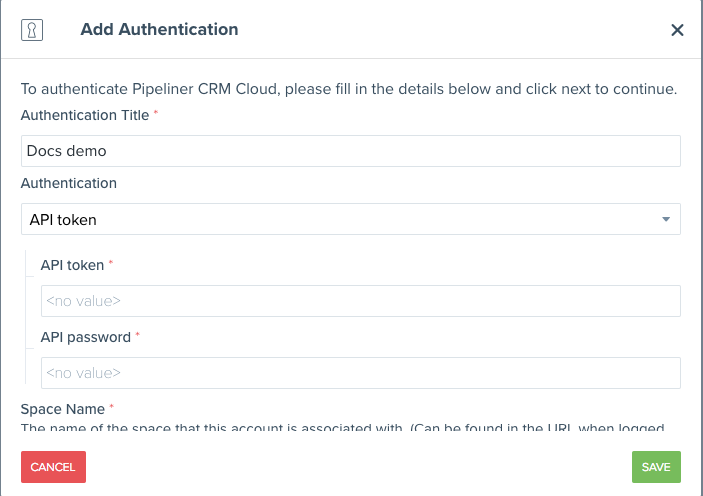
The authentication also requires the space name of your account. This can be found in the URL when you are logged into your Pipeliner cloud dashboard.


Example 1: Create contactCopy
This is a step by step tutorial on how you can create a contact using tray.io and the Pipeliner CRM Cloud connector.
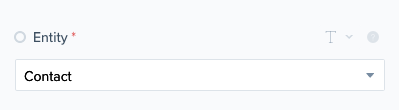
Selecting the contact entity typeCopy
The first stage of this operation is to choose the contact option in the entity dropdown.

Adding fields to the new contact recordCopy
The main body of this request will be the fields we want to add to this new contact record. To add fields to this request, a list of field names and field value objects can be created. The field name refers to the field you want to mutate and the value is its new value.
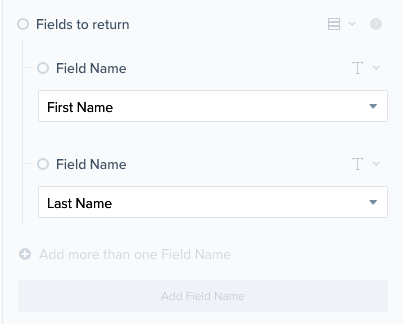
Selecting what fields will be returnedCopy
After generating the fields that you want to be a part of the new contact, you can select what fields you want to be returned by Pipeliner CRM Cloud when the request has been successful. This can be useful if you needed to use any of this information in further workflow steps. As a default, the ID of the newly created record will always be returned.

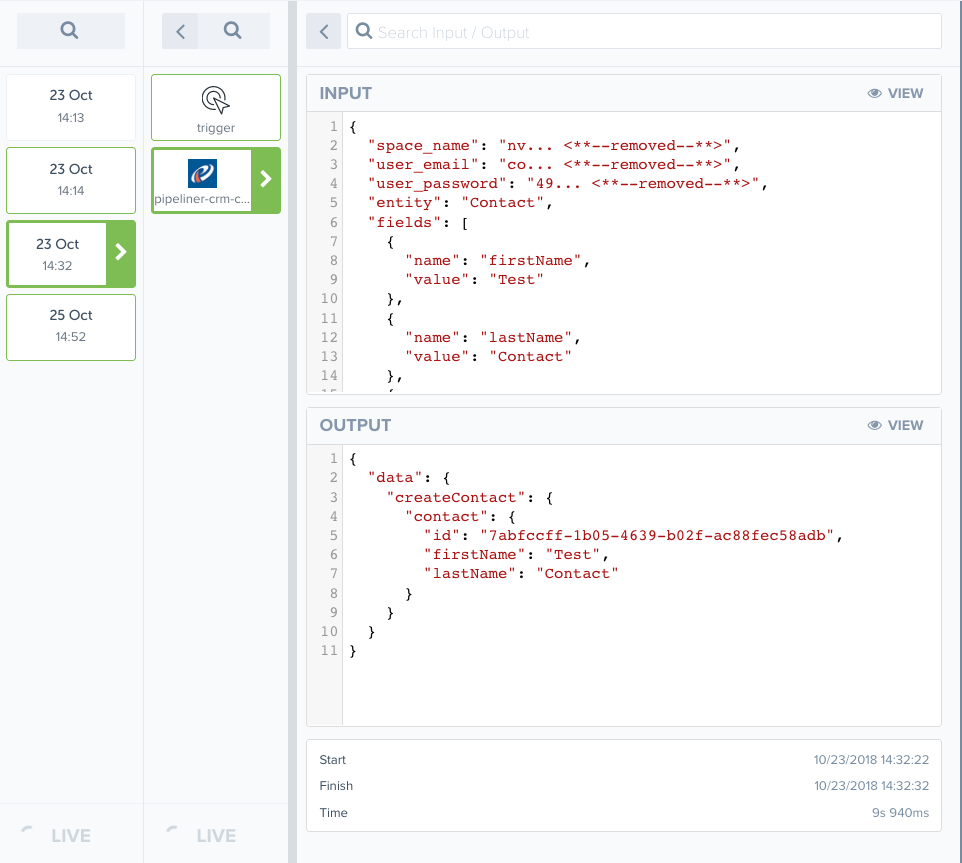
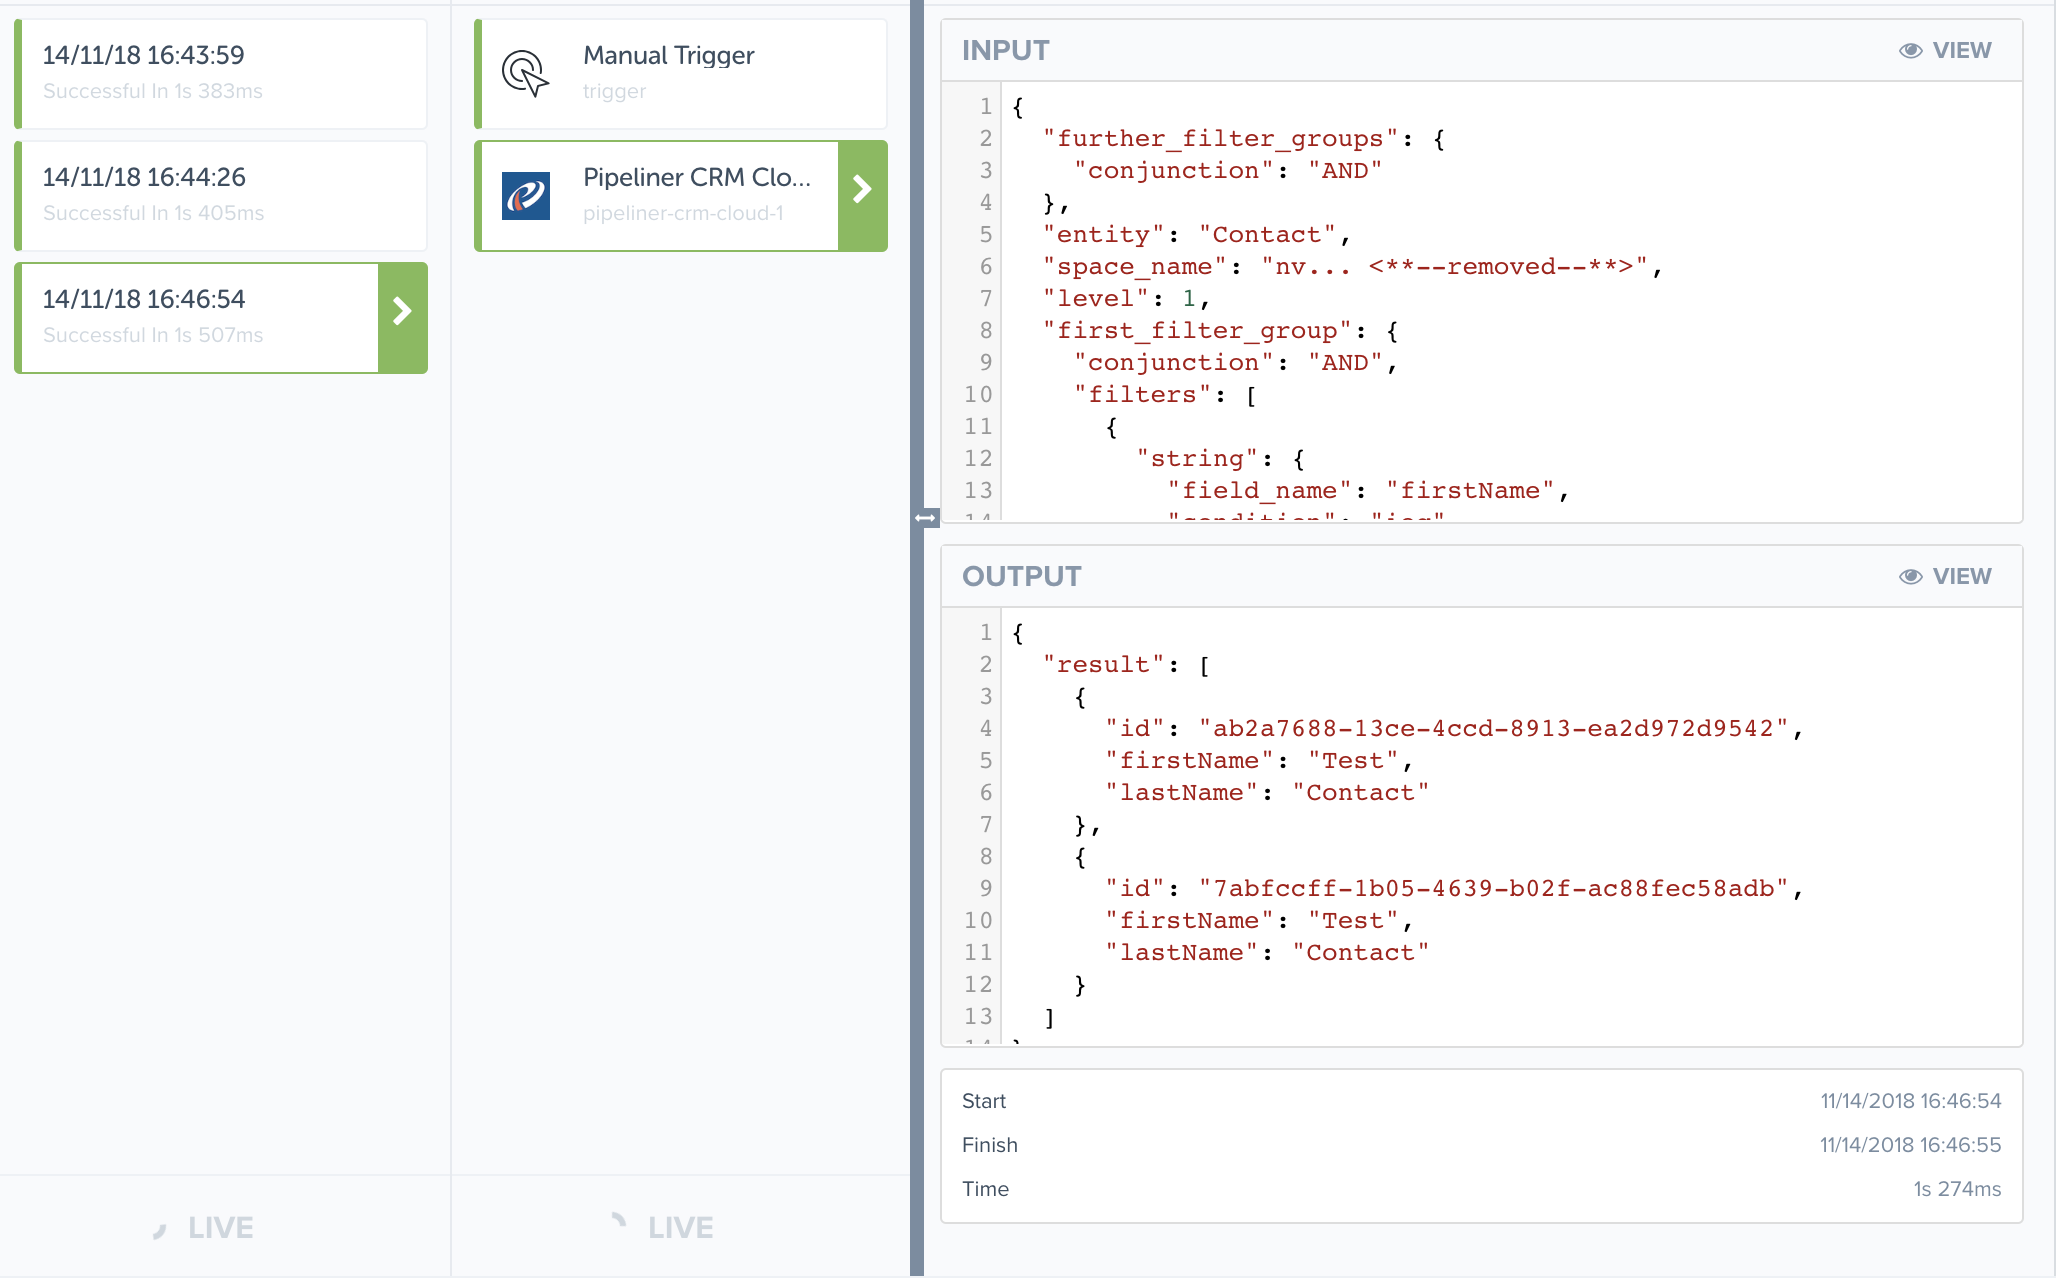
After it's been decided what fields we want returned, the workflow can now be ran. As can be seen in the image below, the operation was a success and Pipeliner returned to us the ID of the new contact as well as the first and the last name of the contact.

Example 2: Find a contactCopy
This will be a step by step tutorial on how to use the 'Find record' operation which allows you to run a criteria based search. We will be finding a contact record based on first name and last name.
Selecting the contact entity typeCopy
The first stage of this operation is to choose the contact option in the entity dropdown.
Selecting what fields will be returnedCopy
The next stage is to specify what fields we want returned from Pipeliner for those contacts that are returned in our search. There are two options to select fields to be returned:
Use the
Get all fieldcheckbox. This will return all the fields associated with any records found. You can use theLevelvariable to specify how much embedded data is returned.Populate the fields to return array with specific fields you want returned.
In this tutorial, we use only return the first name and last name of each contact found.
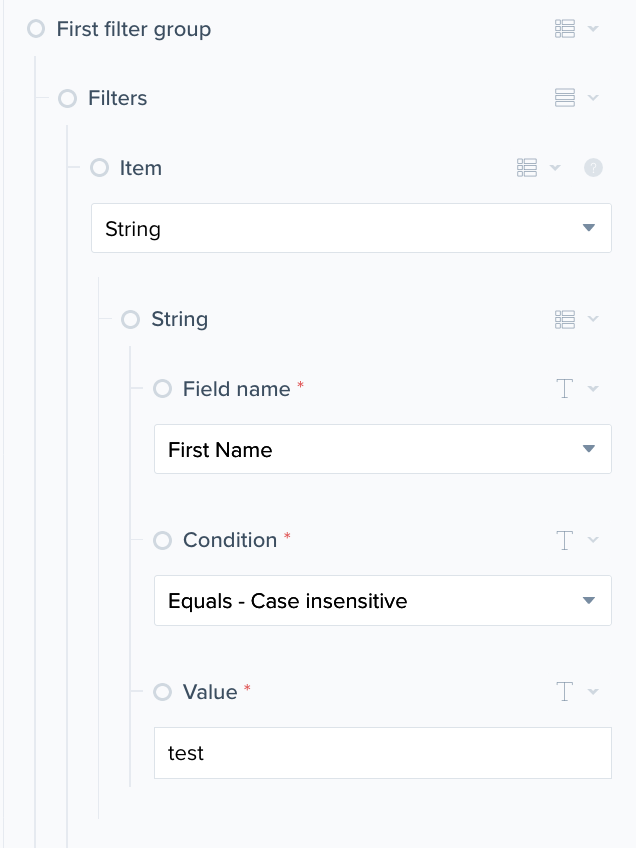
Creating our search filterCopy
The next step is to create our search criteria. The first criteria that needs to be implemented is that the first name of the contacts returned should be 'test'. To do so, we can add this condition to the Filters array in the First filter group object. When creating a condition we have to select the datatype of the field we’re looking to filter, the field name, the condition of the criteria and the value to test the field against.

Another criteria needs to be added so we can do this by adding another filter to the same filters array that we have already added to.

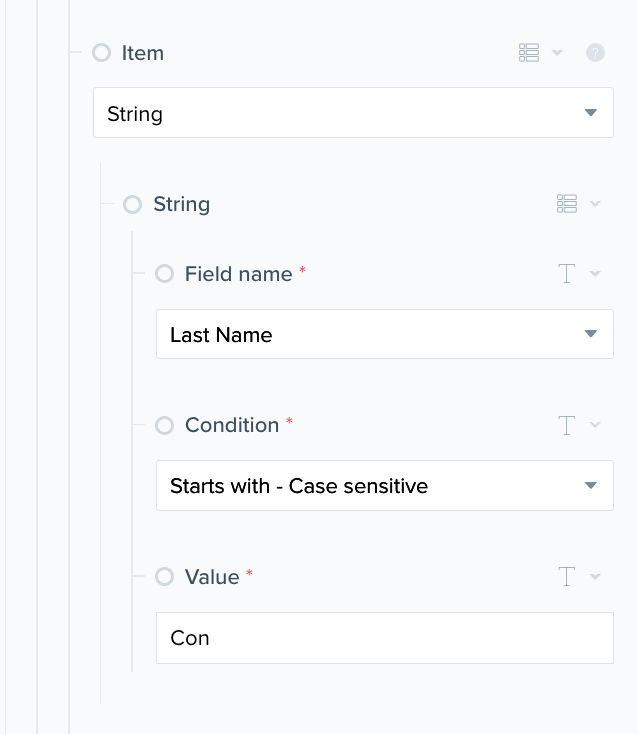
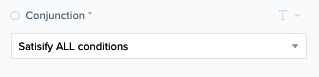
Now the search filters have been set up, the conjunction field needs to be set as 'Satisfy all conditions" as we want the results returned to match both filters created rather than one or the other.

Now that the query is set up, we can now run the workflow. As can be seen in the screenshot below, the operation ran successfully and returned the contacts that we were looking for.

AdvancedCopy
Custom fieldsCopy
To add / modify custom field values for a record, you will need to choose the 'Custom Fields' option as the field name. After this you need to change the field value type to be 'Object'. To provide a value for a specific custom field, you will need to click the 'Add Property to Value' button, this will then bring up a pop up which asks you to specify a key name. This is where you would need to input the custom field key. You can find this key via Pipeliner CRM Cloud admin panel or you can also use the 'List Entity Custom Field' operation which returns a list of custom fields including their key (seen as 'api_name').

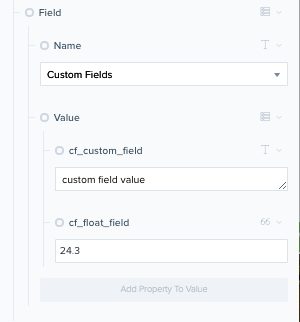
Similar to other fields, you will need to select the correct type for the value based on what type the custom field is. For example, if the custom field type is 'float' , then you will need to change the value on the workflow builder to the type 'Number'.
To add more custom fields value, just add more variables to the object.
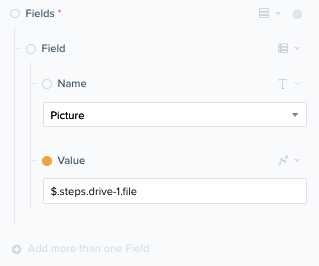
Pictures/FilesCopy
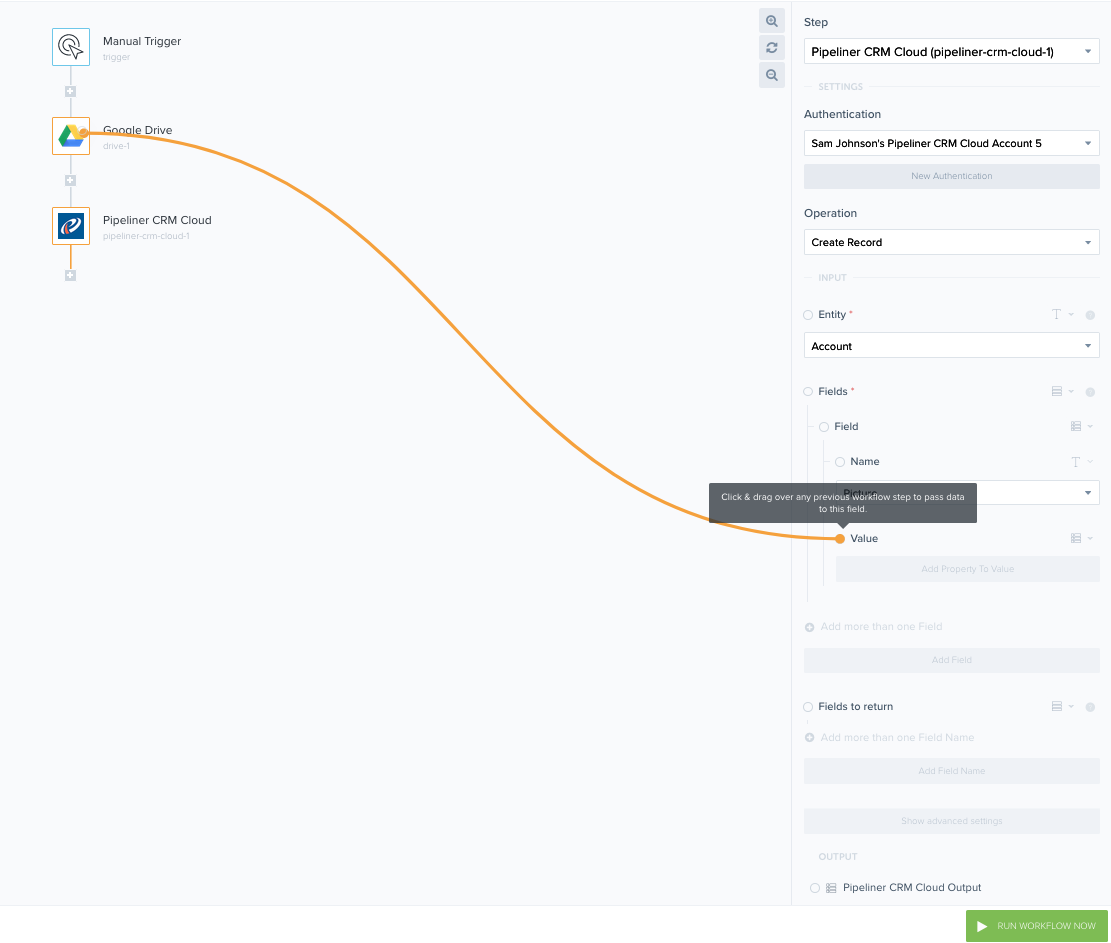
To add files to your request, you will have to provide a file object via a JSON path. This can easily be achieved by using the connector snake in the workflow builder and drag it to where a file is being downloaded in a previous step.


Pipeliner CRM Cloud ValidationCopy
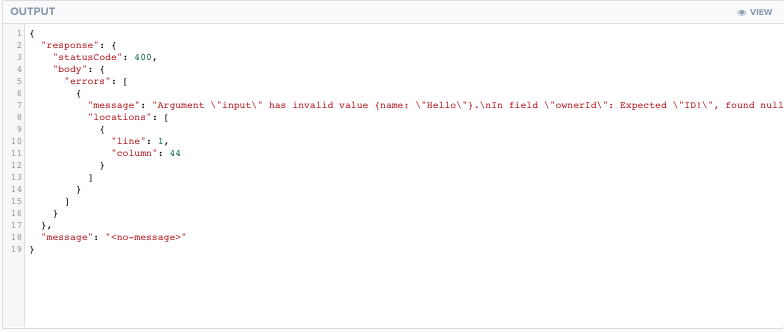
It is also important to note that there are some fields for each entity which are required for Pipeliner CRM to process the request. If the list of fields that has been provided is a missing one of these fields, an error will return from Pipeliner specifying what fields are missing.

Adding fields to the requestCopy
The main body of your request will be the fields you wish to add / update to a record. To add fields to this request, a list of field names and field value objects can be created in the workflow builder. The field name refers to the field you want to mutate and the value is its new value.
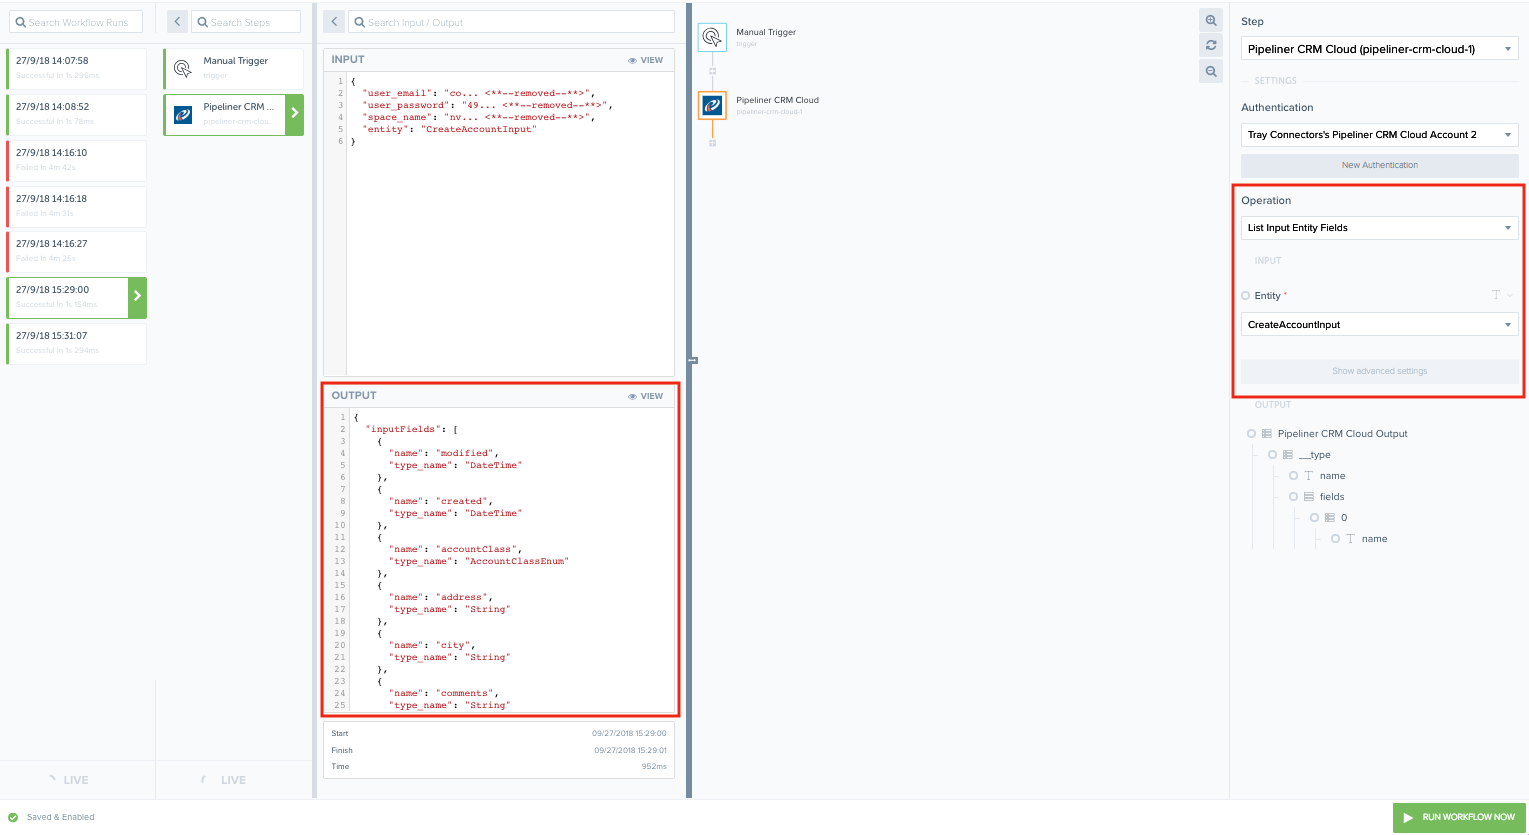
It is important that you select the correct data type for the field you're attempting to populate otherwise the request will not be successful. These data types can range from simple text and number types to complex objects that will need to be built. To get a better idea what might be required, you can use the 'List Input Entity Fields'. This operation lists fields that can be inputted for a certain entity. If a field is a more complex datatype such as an object, it will link you to what the input for that object is called, so you can make another call to get the input format for that object.

PaginationCopy
Pagination can be important if you might be expecting lots of data back from an operation. An example of this is when using the Find record operation and querying for all contact records made after '1900-01-01'. From this we can expect all of the records to be returned. If in your Pipeliner CRM Cloud space you have a lot of records then it's important that you paginate results to prevent the operation from timing out.
Pagination can be achieved in the Find record operation by using the available inputs, first and next, alongside some useful helpers that tray.io provides.
Currently the maximum amount of records allowed to be returned is set at 200. If you are expecting more records than this please use pagination to handle data.
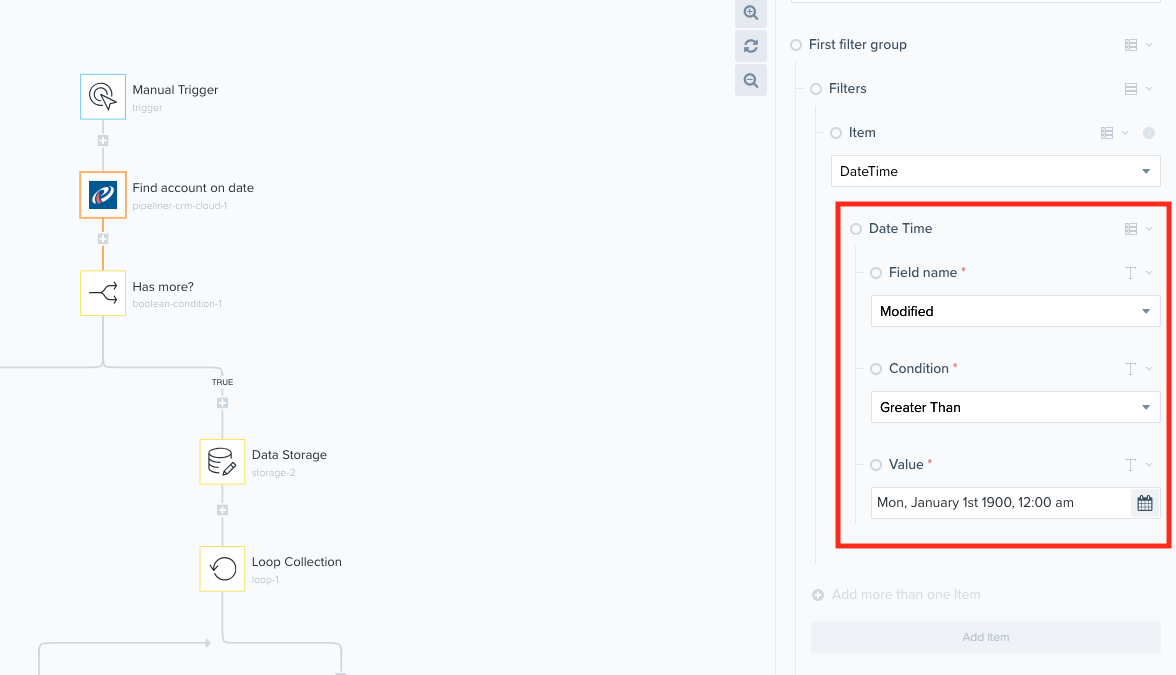
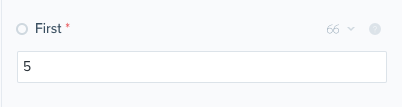
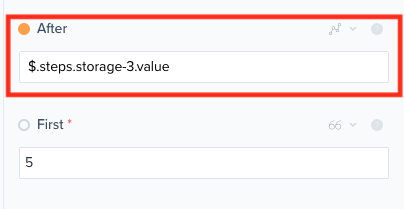
Below we can see the first initial find record query being made with the condition Modified > Jan 1st 1990. In this example the value of the variable first has been set to 5. This means this result will return the first 5 results of the dataset. The other pagination fields such as Before and After can be left blank due to not having any pointers yet.


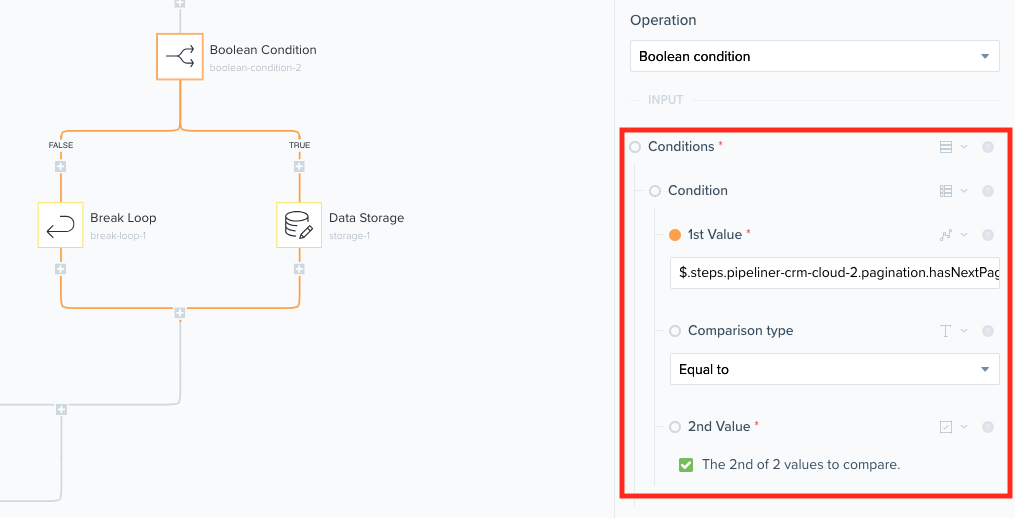
The next stage is using a boolean helper to see if there are any results after the results returned from our first call. This is done by using the hasNextPage variable which will always be returned from a Pipeliner find record operation.

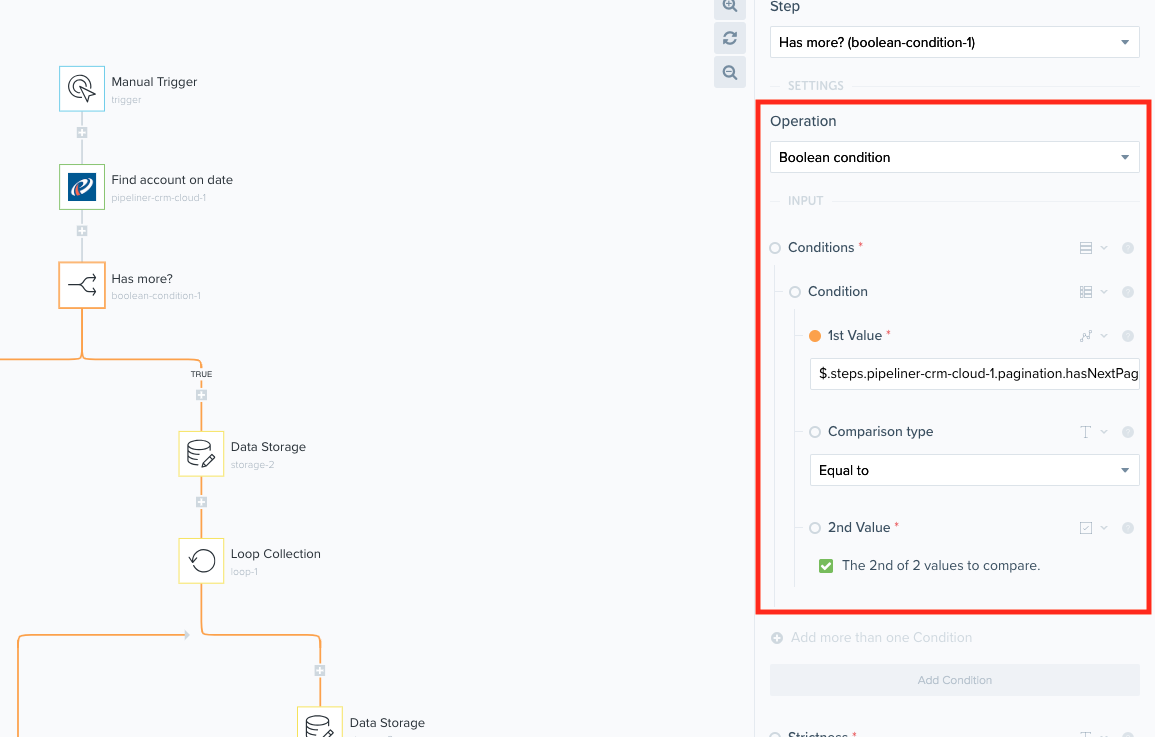
If hasNextPage is true, then we go ahead and enter the true branch. The first stage of this branch is to save the endCursor variable found in the original find record results. This is done using the Data Storage helper where we can save key-value pairs. Using JSONPath we can save the endCursor value in this storage with the key end_cursor. This will be used during the pagination process.

Now we have the next cursor saved, we can now begin our loop which will paginate through the rest of the results we're looking for. Using the Loop connector and selecting it to loop forever we can retrieve results in a manner where the connector will not timeout.

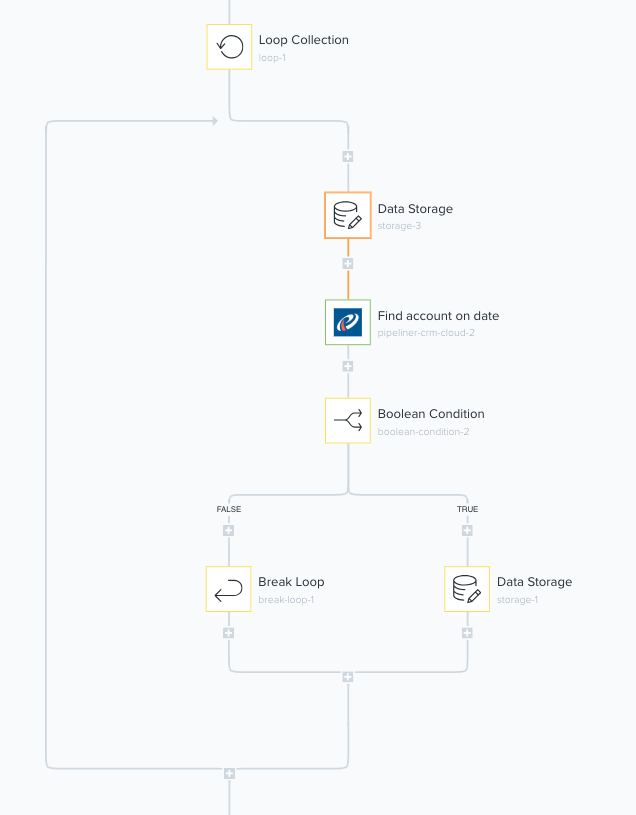
The first part of the loop is to retrieve the nextCursor value we saved in our data storage. This is done using the Get value operation in the data storage helper. This makes the cursor available to us to use in the next step of the loop. Make sure you use the same key to retrieve the cursor as the key you saved it to originally.


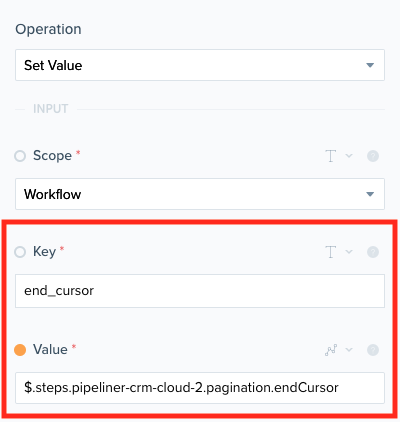
We can now re-query Pipeliner with the same settings. The new change to make however is to set the variable after to equal the value being returned in the previous get value operation from the data storage. This can be achieved using JSONPaths.

Once the query has been returned we then have to check if we can exit the loop or not. This is done using another Boolean condition and checking to see if hasNextPage is true or false. If false then we will exit the loop as we have reached the end of the results. If true then we will then override the data storages end_cursor variable with the new nextCursor value from the loop Pipeliner step in the loop. This means that the next time the loop is executed it will then iterate onto the set of data rather than iterate over the same set of data over and over again.