
RabbitMQ 1.0
RabbitMQ is a message broker, where queues are defined, to which applications connect in order to transfer a message or messages.
OverviewCopy
RabbitMQ is a message broker, where queues are defined, to which applications connect in order to transfer a message or messages.
You can always refer to the RabbitMQ documentaion for more info.
RabbitMQ TriggerCopy
If you wish your workflow to be kicked off by a particular action in RabbitMQ, you can use the RabbitMQ Trigger.
The RabbitMQ trigger allows you to receive notifications and trigger workflows when given events occur associated with the selected trigger operation.
Trigger Operations available:Copy
Subscribe/read
Webhook SetupCopy
Select the RabbitMQ trigger. This can be done either at the create new workflow stage or updated within the workflow builder itself.
To register your workflow to start receiving RabbitMQ messages, you will need create the webhook from within in your RabbitMQ account by adding the Workflow URL from within the instance manager console. In order to do this, first you must copy the Workflow Public URL. This can be found by clicking the 3 dots in the top left corner of the workflow builder and then selecting 'Workflow settings'.

Here you will copy the public URL of the workflow.


Next head over to your RabbitMQ instance manager dashboard and select the relevant instance for which you wish to receive messages for.
From the instance manager page, select Webhooks from the left hand side navigation menu.


Here you can enter the details for creating the webhook. This includes Queue for which message queue you want to subscribe to, Endpoint which is where to paste the Workflow Public URL, Retry Interval and Concurrency which are setup with default values but can be adjusted if required.

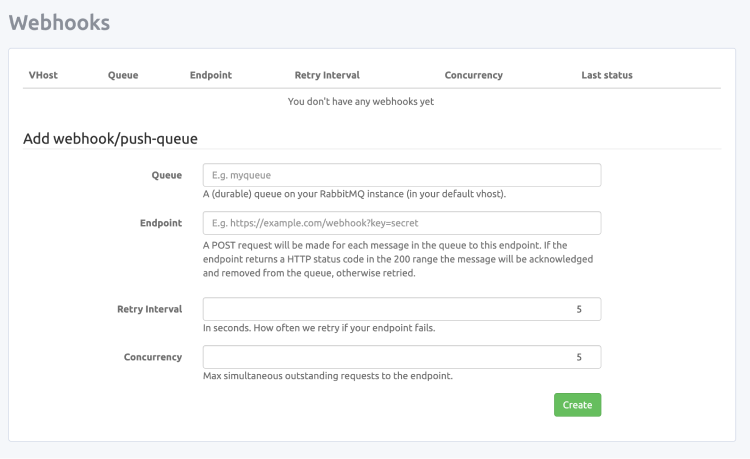
You can also add query parameters to the Endpoint URL here which will be sent with every message. These can be used to verify the request from within the workflow. To add query parameters, simply append the Workflow Public URL with ?. Then each parameter can be added with a key and value like key=value. To add more than one parameter a & can be added between them.
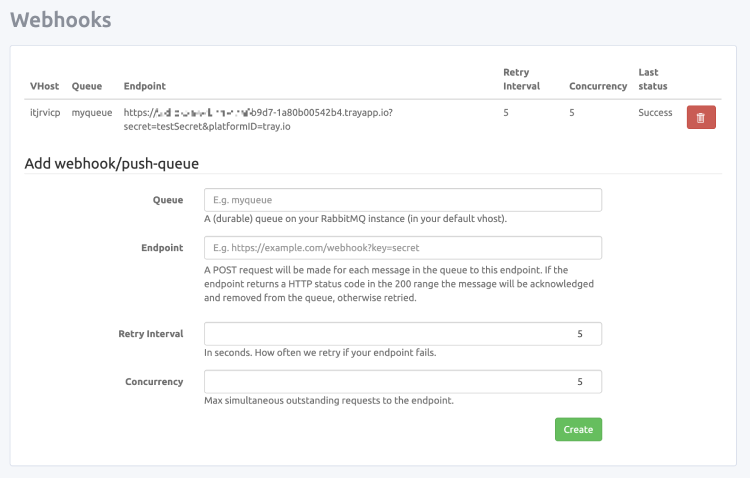
So if you wanted to add two query parameters the URL would look similar to as follows.
Workflow Public URL: https://test-da11-476f-b9d7-workflow.trayapp.io
Query Parameter: Key: secret Value: testSecret
Query Parameter: Key: platformID Value: tray.io
String to append URL with: ?secret=testSecret&platformID=tray.io
Final Example outcome being: https://test-da11-476f-b9d7-workflow.trayapp.io?secret=testSecret&platformID=tray.io
Once you have entered all the details for the webhook, click Create. The webhook will now show as created.

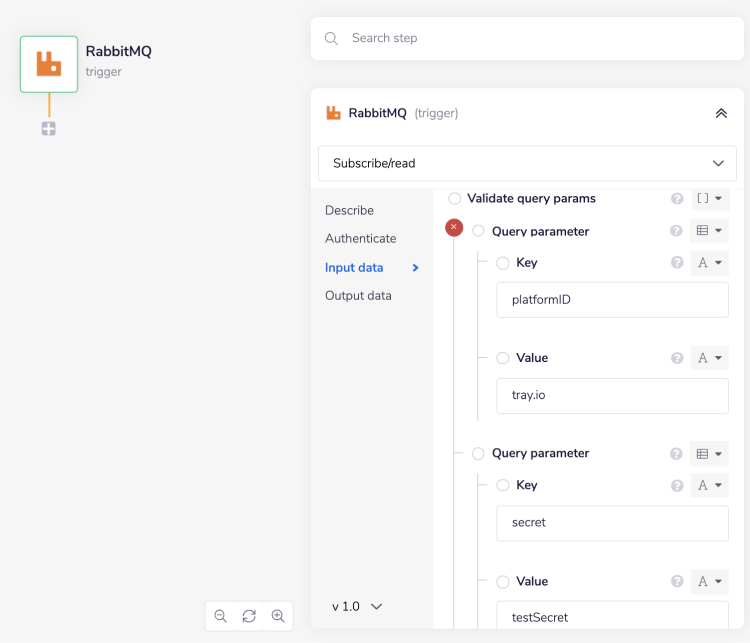
Head back over to your workflow and with the RabbitMQ trigger step highlighted you can configure the trigger from within the input panel.
For security to verify the incoming requests are coming from your RabbitMQ webhook, you can add query parameters to be validated against the query parameters of the incoming request as appened to the URL above. If validating of the query parameters fails, a validation failed message will be returned to the workflow along with the message, stating which parameters were either not found within the request or the values did not match the values within the request. If you would prefer invalidated requests to be filtered and not trigger the workflow, you can tick Ignore invalidated params?. All messages are still acknowledged and deleted from the queue regardless of whether they are ignored or not.

You can also select whether to return headers and query parameters to the workflow by selecting the check boxes. This makes them available for the rest of the workflow.
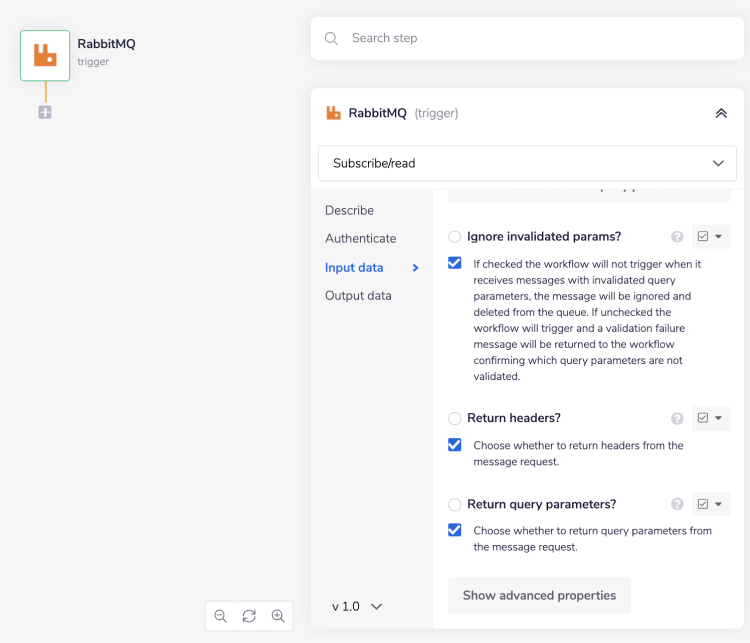
Once this is done, hit 'Enable' and setup is now complete.
WEBHOOKS: As this uses a webhook as its operation type, you will also need to integrate it with your rabbitmq account, in order to complete the authentication process.