Webhook Trigger 2.3
Catch callouts for any service that offers sending a signal to a custom URL using the Webhook Trigger
OverviewCopy
A webhook (otherwise known as a web callback or HTTP push API), is a way for applications to provide other apps with real-time information. A webhook typically delivers data to other applications "as and when it happens", meaning you get data immediately.
The Webhook Trigger is designed to allow users to catch callouts for any service that has the option of sending a signal to a custom URL.
Basic webhook setupCopy
Below is a summary of how the Webhook Trigger is configured.
While remaining as general as possible, occasionally Braintree has been used for demo purposes where need be.
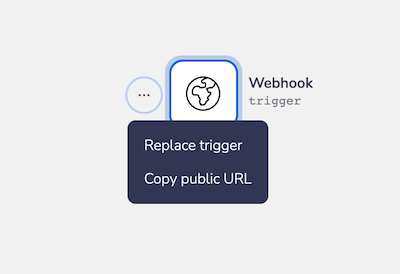
1 - Locate the public URLCopy
The Webhook Trigger's public URL is where all Webhook callbacks are sent. This is what allows Tray.io to receive data from a users service of choice.
The steps to find the Webhook Trigger's public URL are as follows:
Create a new workflow and select the WebHook as your trigger.
Click on the trigger step options and select 'Copy public URL':

2 - Configure settings (service side)Copy
In order to work in tandem with the Tray.io, the Webhook Trigger needs to be associated with the selected service. This is where the Webhook's public URL comes into play.
Please be aware this is only a rough guide as it will vary from service to service.
The steps to send all callouts to your Webhook Trigger are as follows:
Log in to your service of choice.
Select 'Account Settings'. Note that this varies by service. Consider looking under 'Preferences', 'Security', 'API', etc.
Select the relevant 'WebHooks' heading. This may also be under the name 'Apps & Credentials', 'API Links', and so on.
Make sure the parameters needed and necessary privacy settings are selected.
Add the Tray.io Workflow public URL to the target field.
Below is a sample of what users should be looking to achieve depending on their application. I.e, the Webhook public URL registered with the service in quesiton.

3 - Send a test payloadCopy
Once the above steps have been followed, return to the workflow dashboard in order to complete the trigger setup.
The steps to will be as follows:
1. Click the 'Enable' button found at the bottom-right of the workflow dashboard. Tray.io will now be actively listening for calls from any Webhook, whose target is the Workflow Trigger's public URL.
2. Navigate back to the service dashboard and deliberately provoke an event type. This needs to be one that the Webhook Trigger is configured to listen out for. Depending on the service, examples include customer creation, survey completion, declined payments etc. What is important is that regardless of the event type, users only provoke the trigger using a fake/ test event.
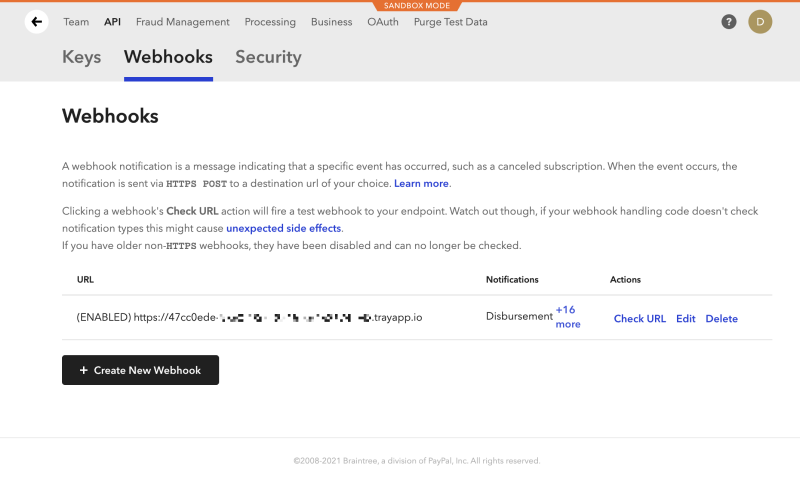
3. Some users may be lucky enough to be using a service which already provides a URL check (such as Braintree below):


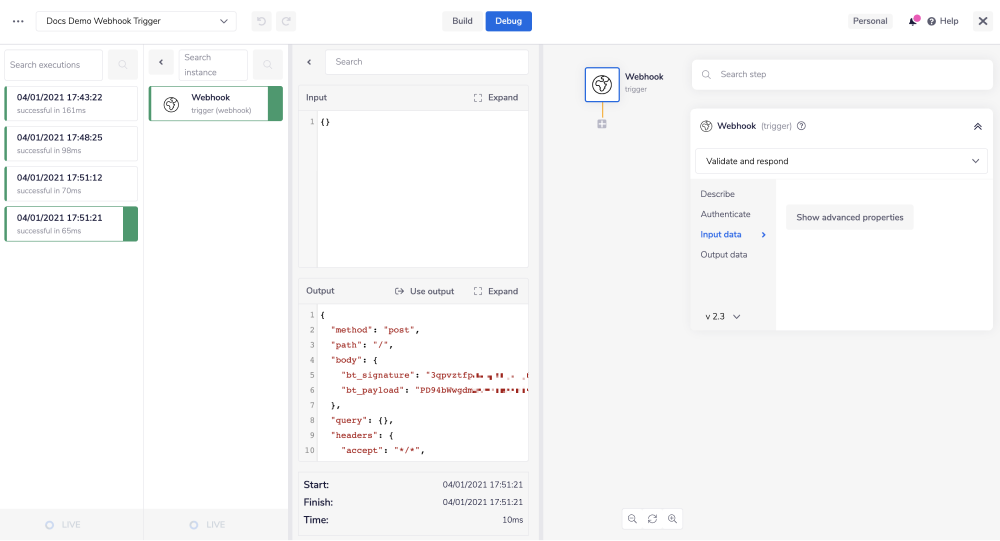
4. Return to the workflow dashboard and click the Debug button. If the configuration is correct, users will be able to see a green entry within the workflow logs, containing the data from the test event:

Once setup is complete, any data which is received by the Webhook Trigger can be used and manipulated else where within the workflow, depending on your needs.
Using webhook dataCopy
Setting webhook outputsCopy
The primary job of a webhook trigger is to parse the incoming data as output for subsequent steps.
To ensure that the output from a webhook trigger is easily accessible you can do the following:
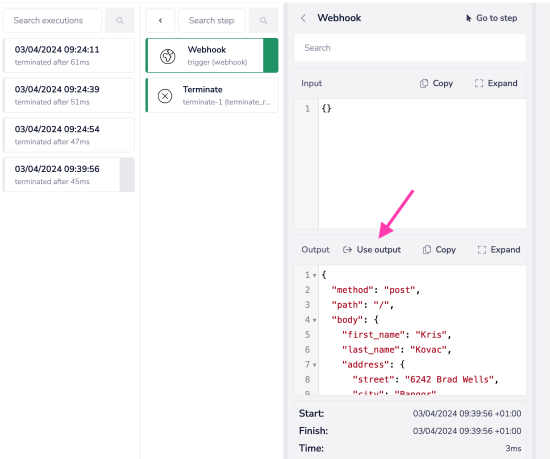
1. Send a test webhook payload with a terminate step immediately after the webhook:

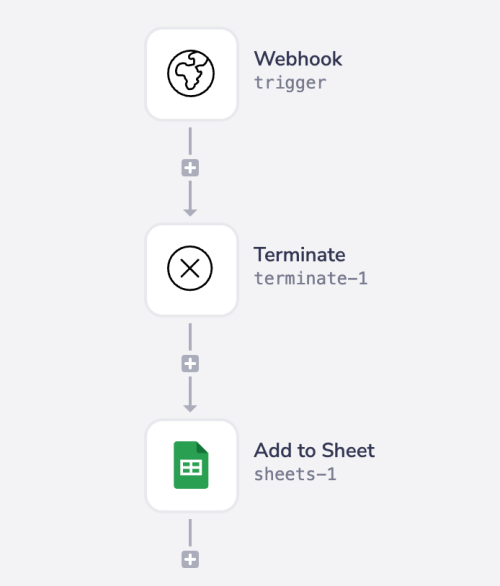
2. View the logs of the terminated run, select the webhook step and click on 'Use output':

Extracting webhook dataCopy
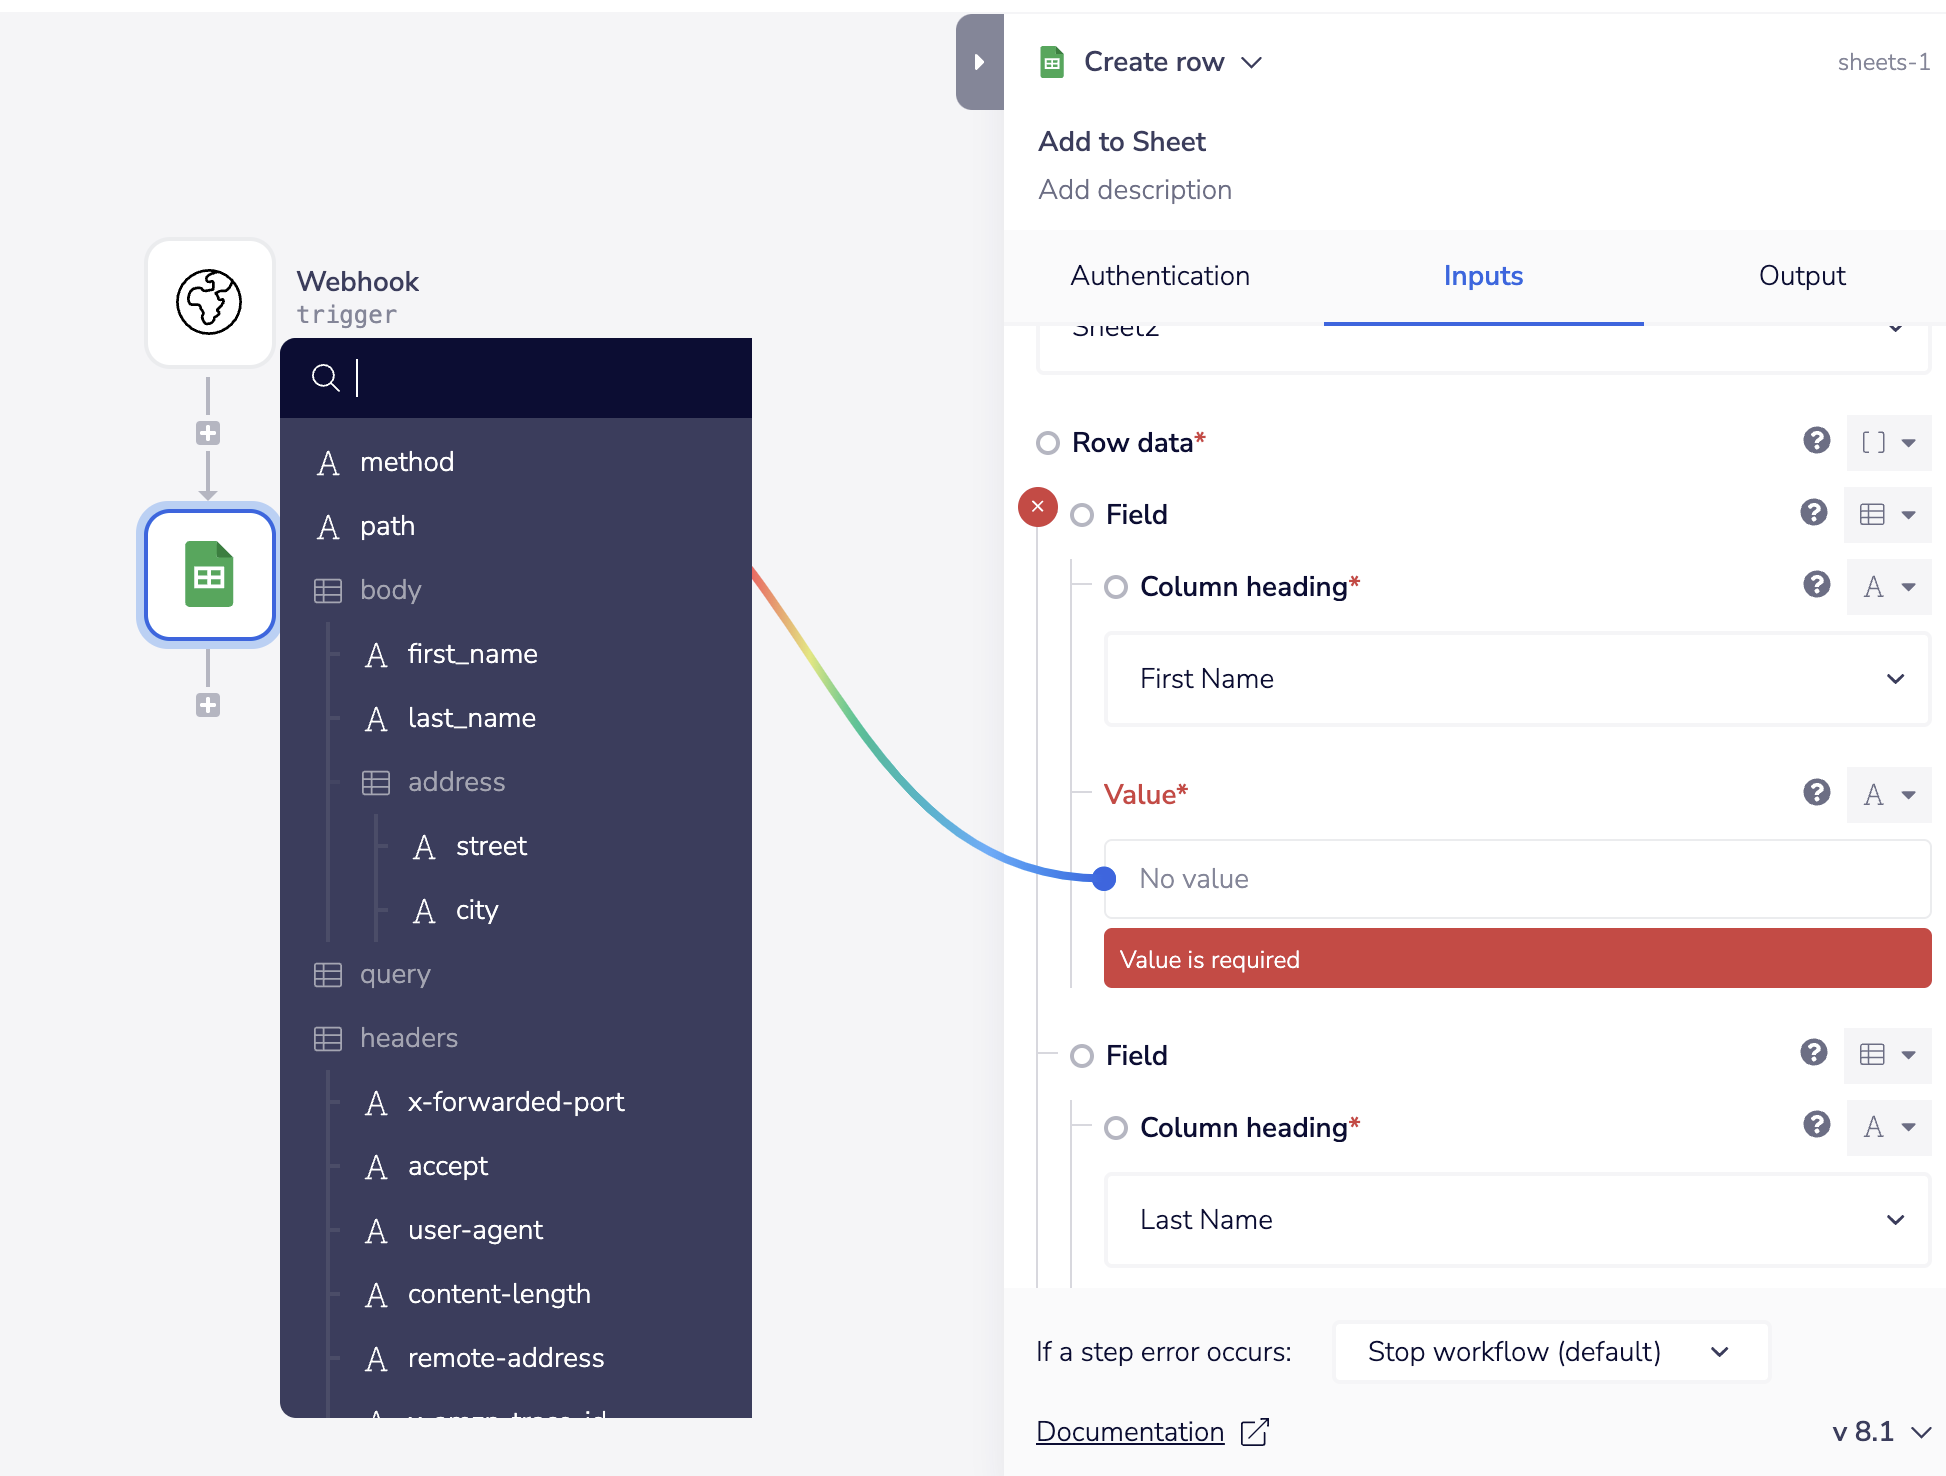
Once you have set the output schema for your webhook, you can then easily use the connector snake to access the webhook data in subsequent steps:

Triggering a webhook event replyCopy
It is possible to send a reply to the service which sent the webhook data to your workflow, by using the 'Await workflow and respond' operation.
For example, after taking steps to process the data received, users may wish to respond with a 200 status and a "Successfully Recorded" message in the body.
Or, after making an unsuccessful boolean check for a user or valid url, you may wish to respond with a 404 'not found' message.
Please see our Trigger Event Reply documentation for details.
There is a limit of 1MB for the total response size
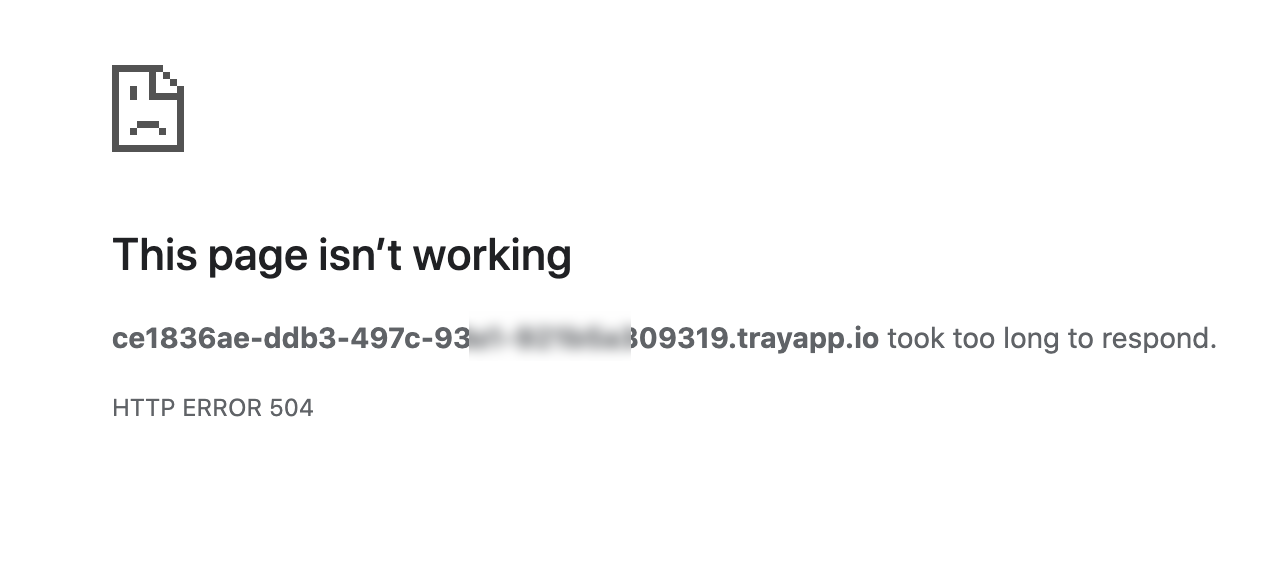
If the combined size of the 'status', 'body and 'header' in a trigger event reply step is larger than 1MB then the request will fail with the following message:
{"message": "Unfortunately, we encountered an internal error. Please contact us if the problem persists. Error ID: 81a6941aae"}
This will result in several retries with an eventual 504 error as the retries will take longer than 5 minutes:

Webhook securityCopy
ServiceCopy
It is highly recommended that you secure your Webhook using the permission settings and unique identifiers available service side. This is to help make sure that you only receive requests from trusted sources and accounts/ individuals.
The options available will vary depending on your use case and the service itself (such as challenge codes, hashes, account IDs etc).
Tray.ioCopy
It is highly recommended that you secure webhooks via the use of a CSRF token.
This is an advanced settings feature, and more details can be found under the below CSRF tokens heading.
CSRF tokensCopy
A CSRF token is a unique hash usually generated by the server-side application (or service). This is then transmitted to the client (aka Tray.io). When the request is made, the service validates that the request includes the expected CSRF token. This is a continuous enabled check.

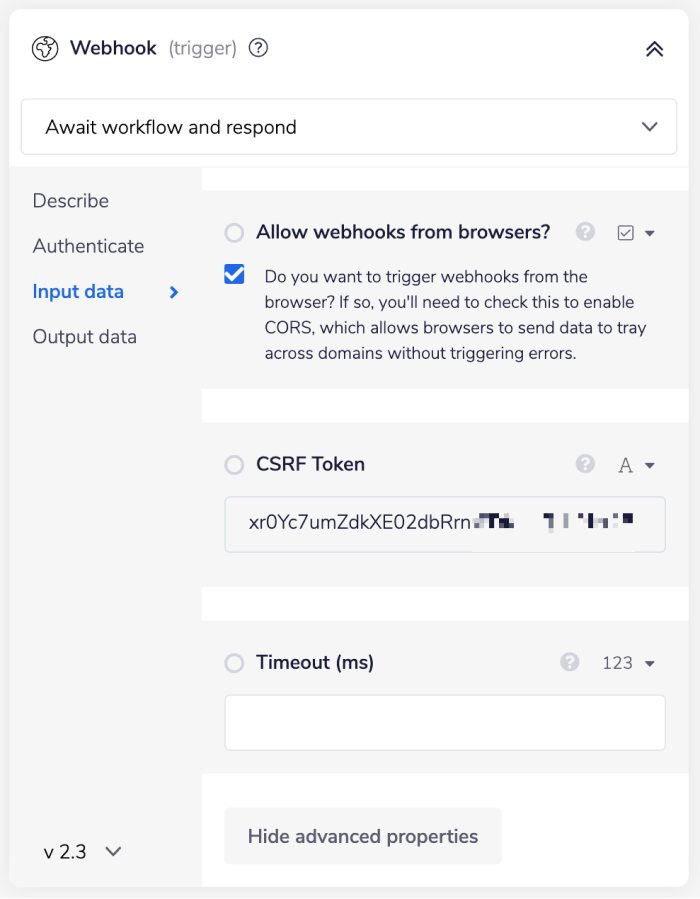
The security token will need to be matched with X-CSRF-TOKEN HTTP header value passed by the client, in order to successfully trigger the workflow.

Any calls which do not contain the X-CSRF-TOKEN header, or contain an incorrect value, will receive an Invalid value for header: X-CSRF-TOKEN response.
As a best practice, CSRF Token should be added by creating a Generic service authentication.
Then you can refer to the token using $.auth jsonpath rather than hardcoding the token in plain text on the Trigger.
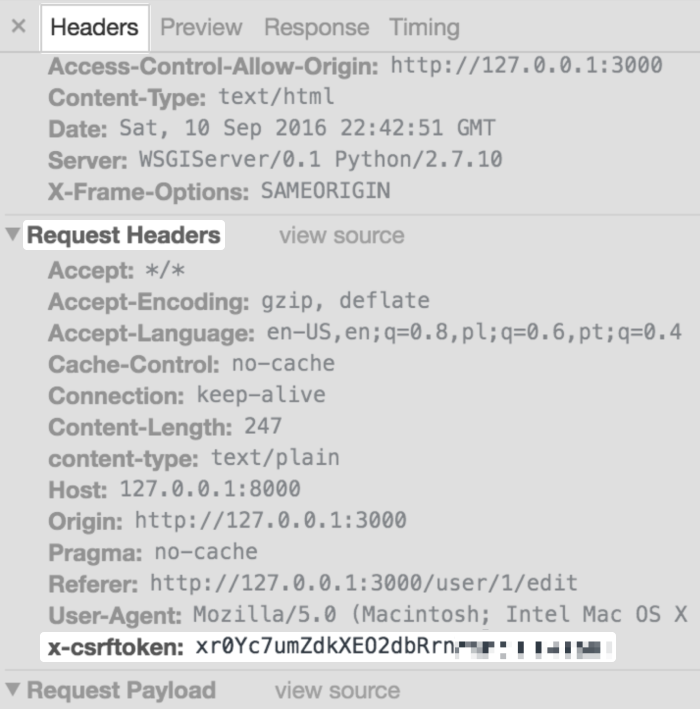
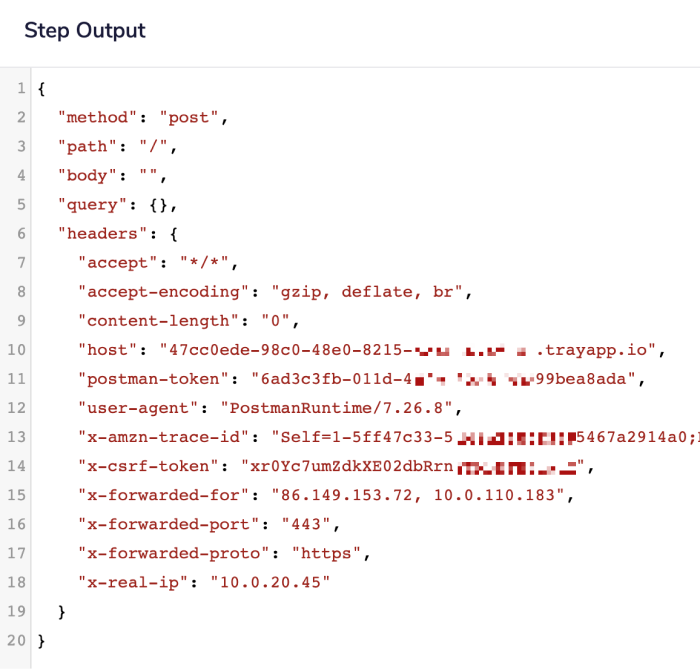
Test your security setup by using an API development environment such as Postman. Make a POST request to your Webhook Trigger public URL and add the same CSRF token as a header:

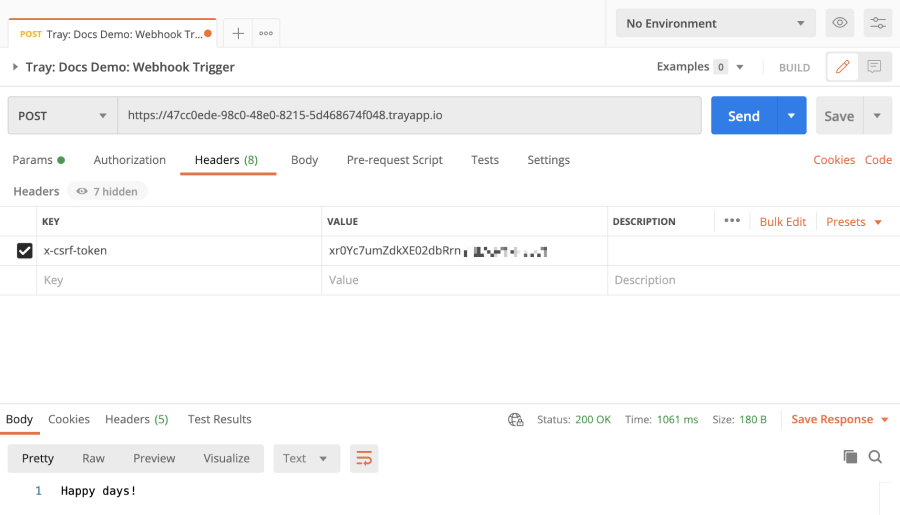
The output in the Debug panel should display the header as expected:

Webhook technical limitationsCopy
Payload size limitationsCopy
The typical size limit for a basic Webhook payload is 1MB.
File content can also be sent as multi-part http requests instead. These would have an overall size limit of 10MB.
Rate limitingCopy
While the basic 'Auto respond with 200' operation is not, the 'Validate and respond' and 'Await workflow and respond' operations are subject to rate limiting.
If too many requests (i.e. several hundred per second) come in to your webhook trigger at once, Tray.io will respond with an HTTP 429 (too many requests) error.
Please be sure to throttle requests appropriately at the source third-party service.
Enabling CORSCopy
For webhook requests originating from within the browser, users need to enable the CORS feature.
CORS is a system that allows browsers to send data to Tray.io across domains without triggering errors. This setting also adds a few headers to the Tray.io response, from the Tray.io webhook.
CORS is automatically turned off on by default. This will have implications on whether or not the webhook is be able to work with other browsers.
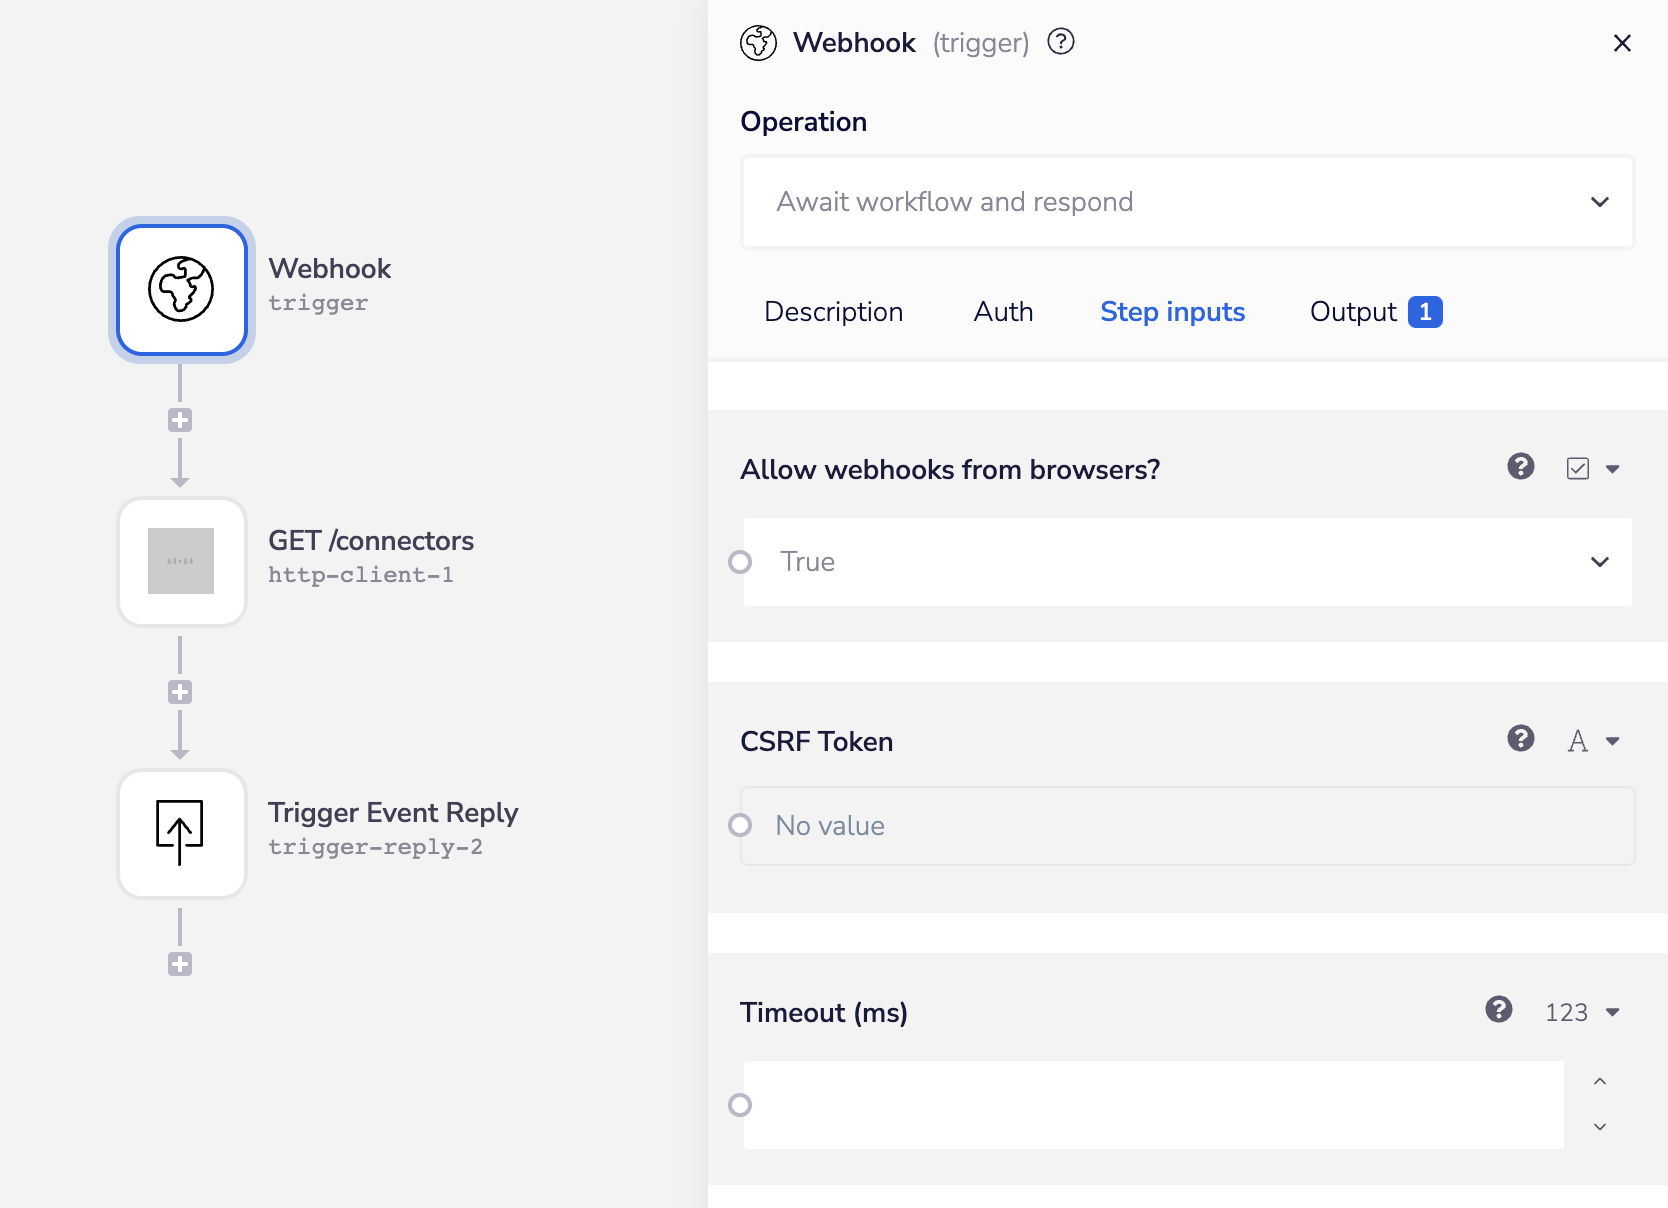
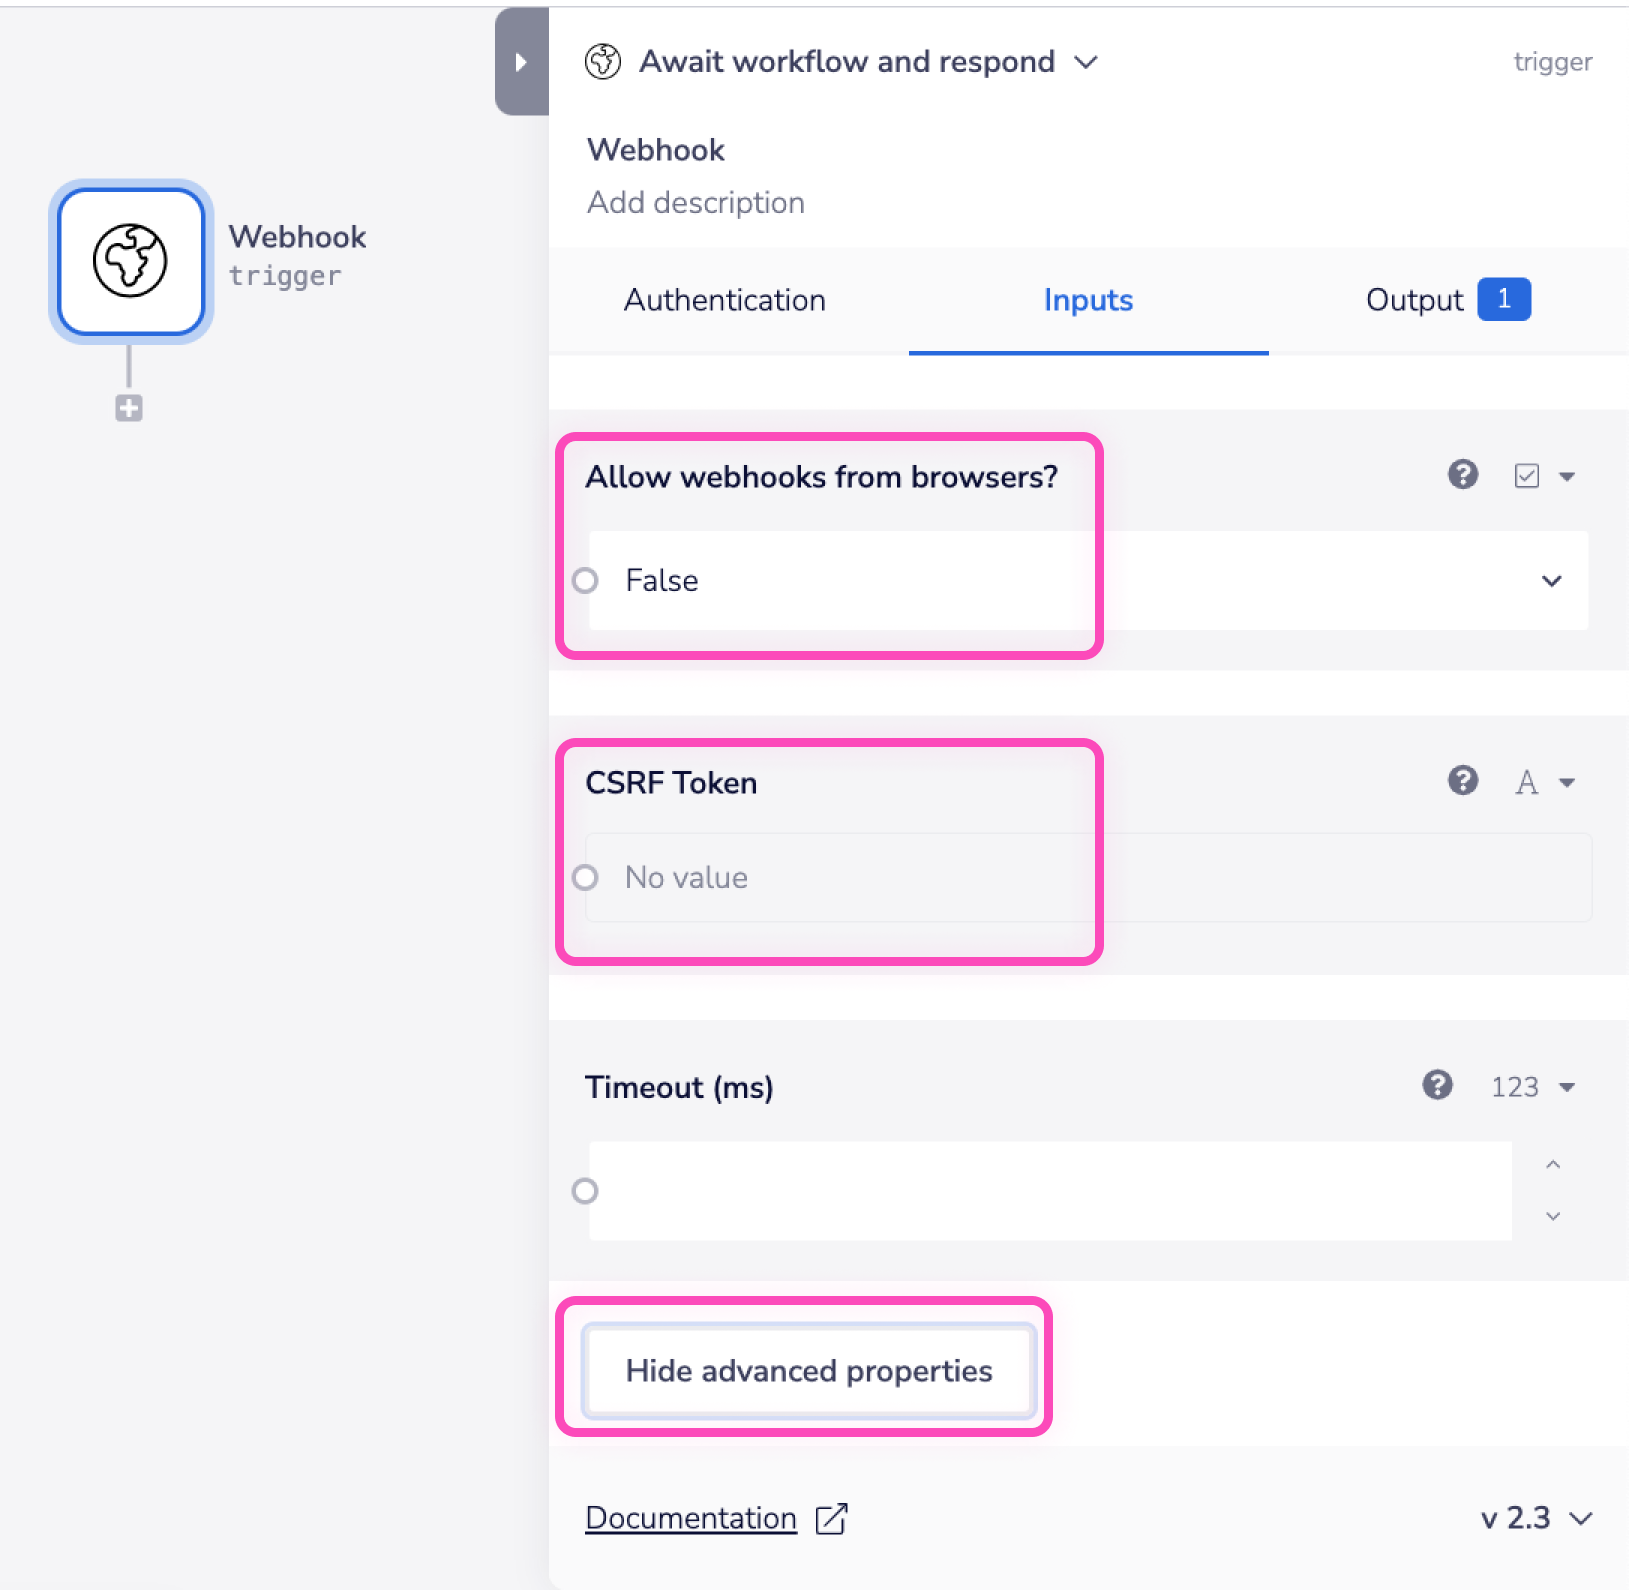
To enable CORS features, users must make sure 'Allow webhooks from browsers?' is checked within the advanced properties section. This is found behind the 'Show advanced properties' button on the input panel.

This option is only available for the following two operations. There is a notable difference between what happens when this feature is enabled, depending on the operation selected.
1. Validate and respond
By enabling CORS with this operation, following three headers are added to the request:
Access-Control-Allow-OriginAccess-Control-Allow-HeadersAccess-Control-Allow-Methods
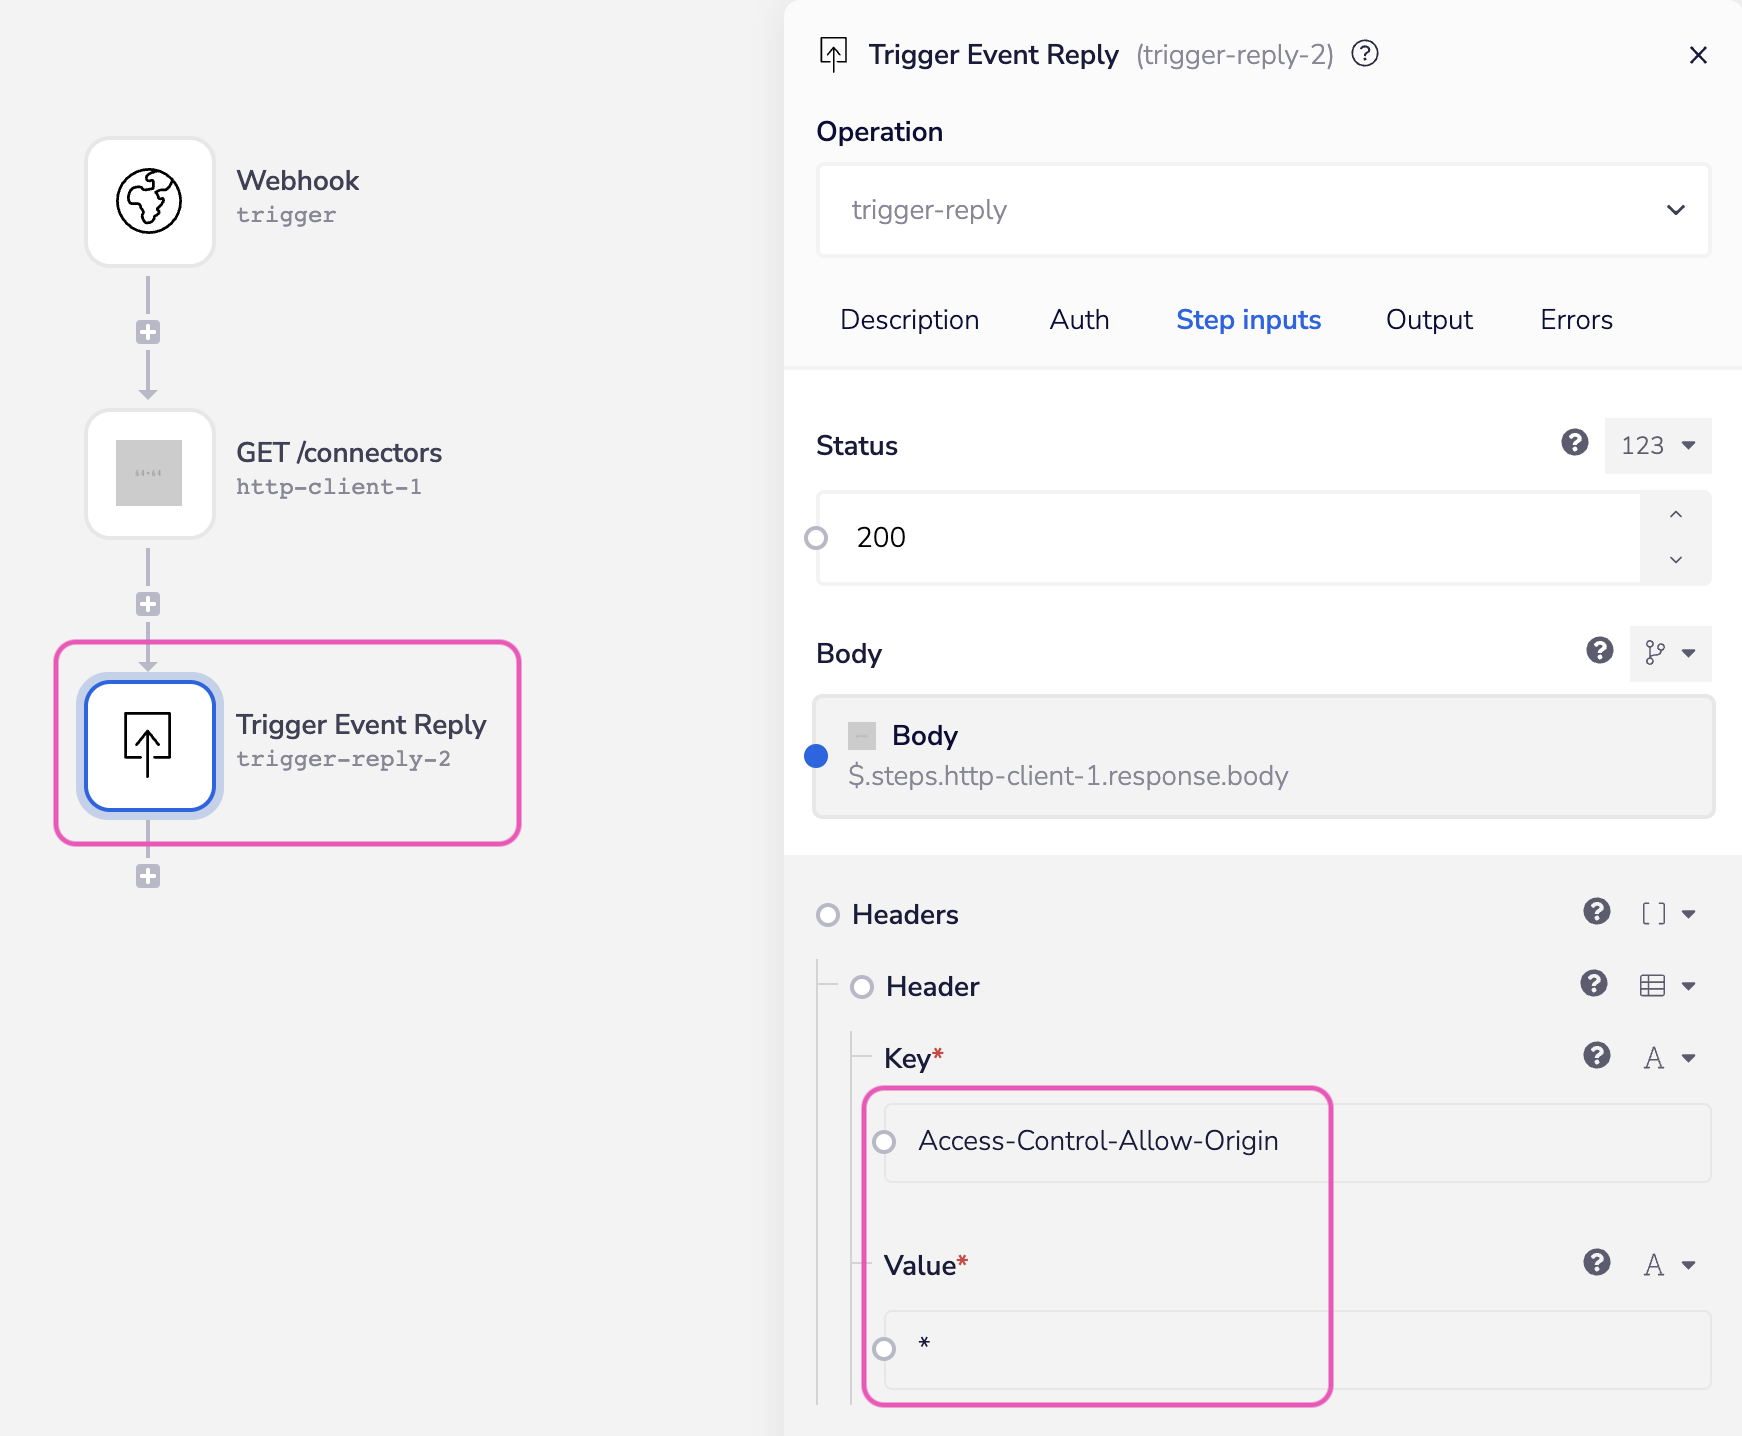
2. Await workflow and respond
When users have the CORS checkbox ticked when using the "await workflow" option, the trigger correctly sends back the response to the browser for a preflight request.
The workflow is kicked off, but the response will not be sent back. You need to add the necessary access control headers manually in the trigger event reply connector.

TimeoutCopy
Users can set the number of milliseconds the Webhook Trigger will wait before timing out the incoming request.
This option is found behind the 'Show advanced properties' button within the input tab.
ProcessingCopy
If your workflow needs to do more than 5 min of processing then you will need to use SQS or the HTTP client to send a final response.
For example, say you have a Webhook trigger set to "Await workflow and respond". One where the processing seems to be moderately heavy. The max wait time before a timeout is 5 mins.
The suggested solution is to auto-respond with a 200 alongside a "Workflow processing" message.
You would then use the HTTP Client to post to a consuming URL when the workflow is complete. Or message SQS.
Essentially you will need to create a 2 step workflow is necessary: a Webhook and a HTTP/ SQS connector will act as your endpoint.
OperationsCopy
Auto respond with HTTP 200Copy
This operation is not subject to rate limiting for requests coming in from a third-party
The Webhook Trigger promptly replies with an HTTP 200 status code, irrespective of the incoming request.
This operation type ensures execution without validation—a fire-and-forget solution, especially beneficial for services without webhook call retry options.
You will still need to ensure that your workflow functions correctly and handles errors gracefully, bearing in mind that none of this will be returned to the original caller of the webhook.
If you need to, use the Await workflow and respond operation.
Validate and respondCopy
This operation is subject to rate limiting. Please be sure to throttle requests appropriately in the source third-party service
The Validate and Respond operation is useful for preliminary testing when setting up a service that will trigger this webhook.
During initial testing, you can configure a CSRF token and authorize calls from the browser.

Send a test payload to the webhook to verify its functionality. Once confirmed, you can transition the operation to the Await workflow and respond operation to setup a more bespoke response system.
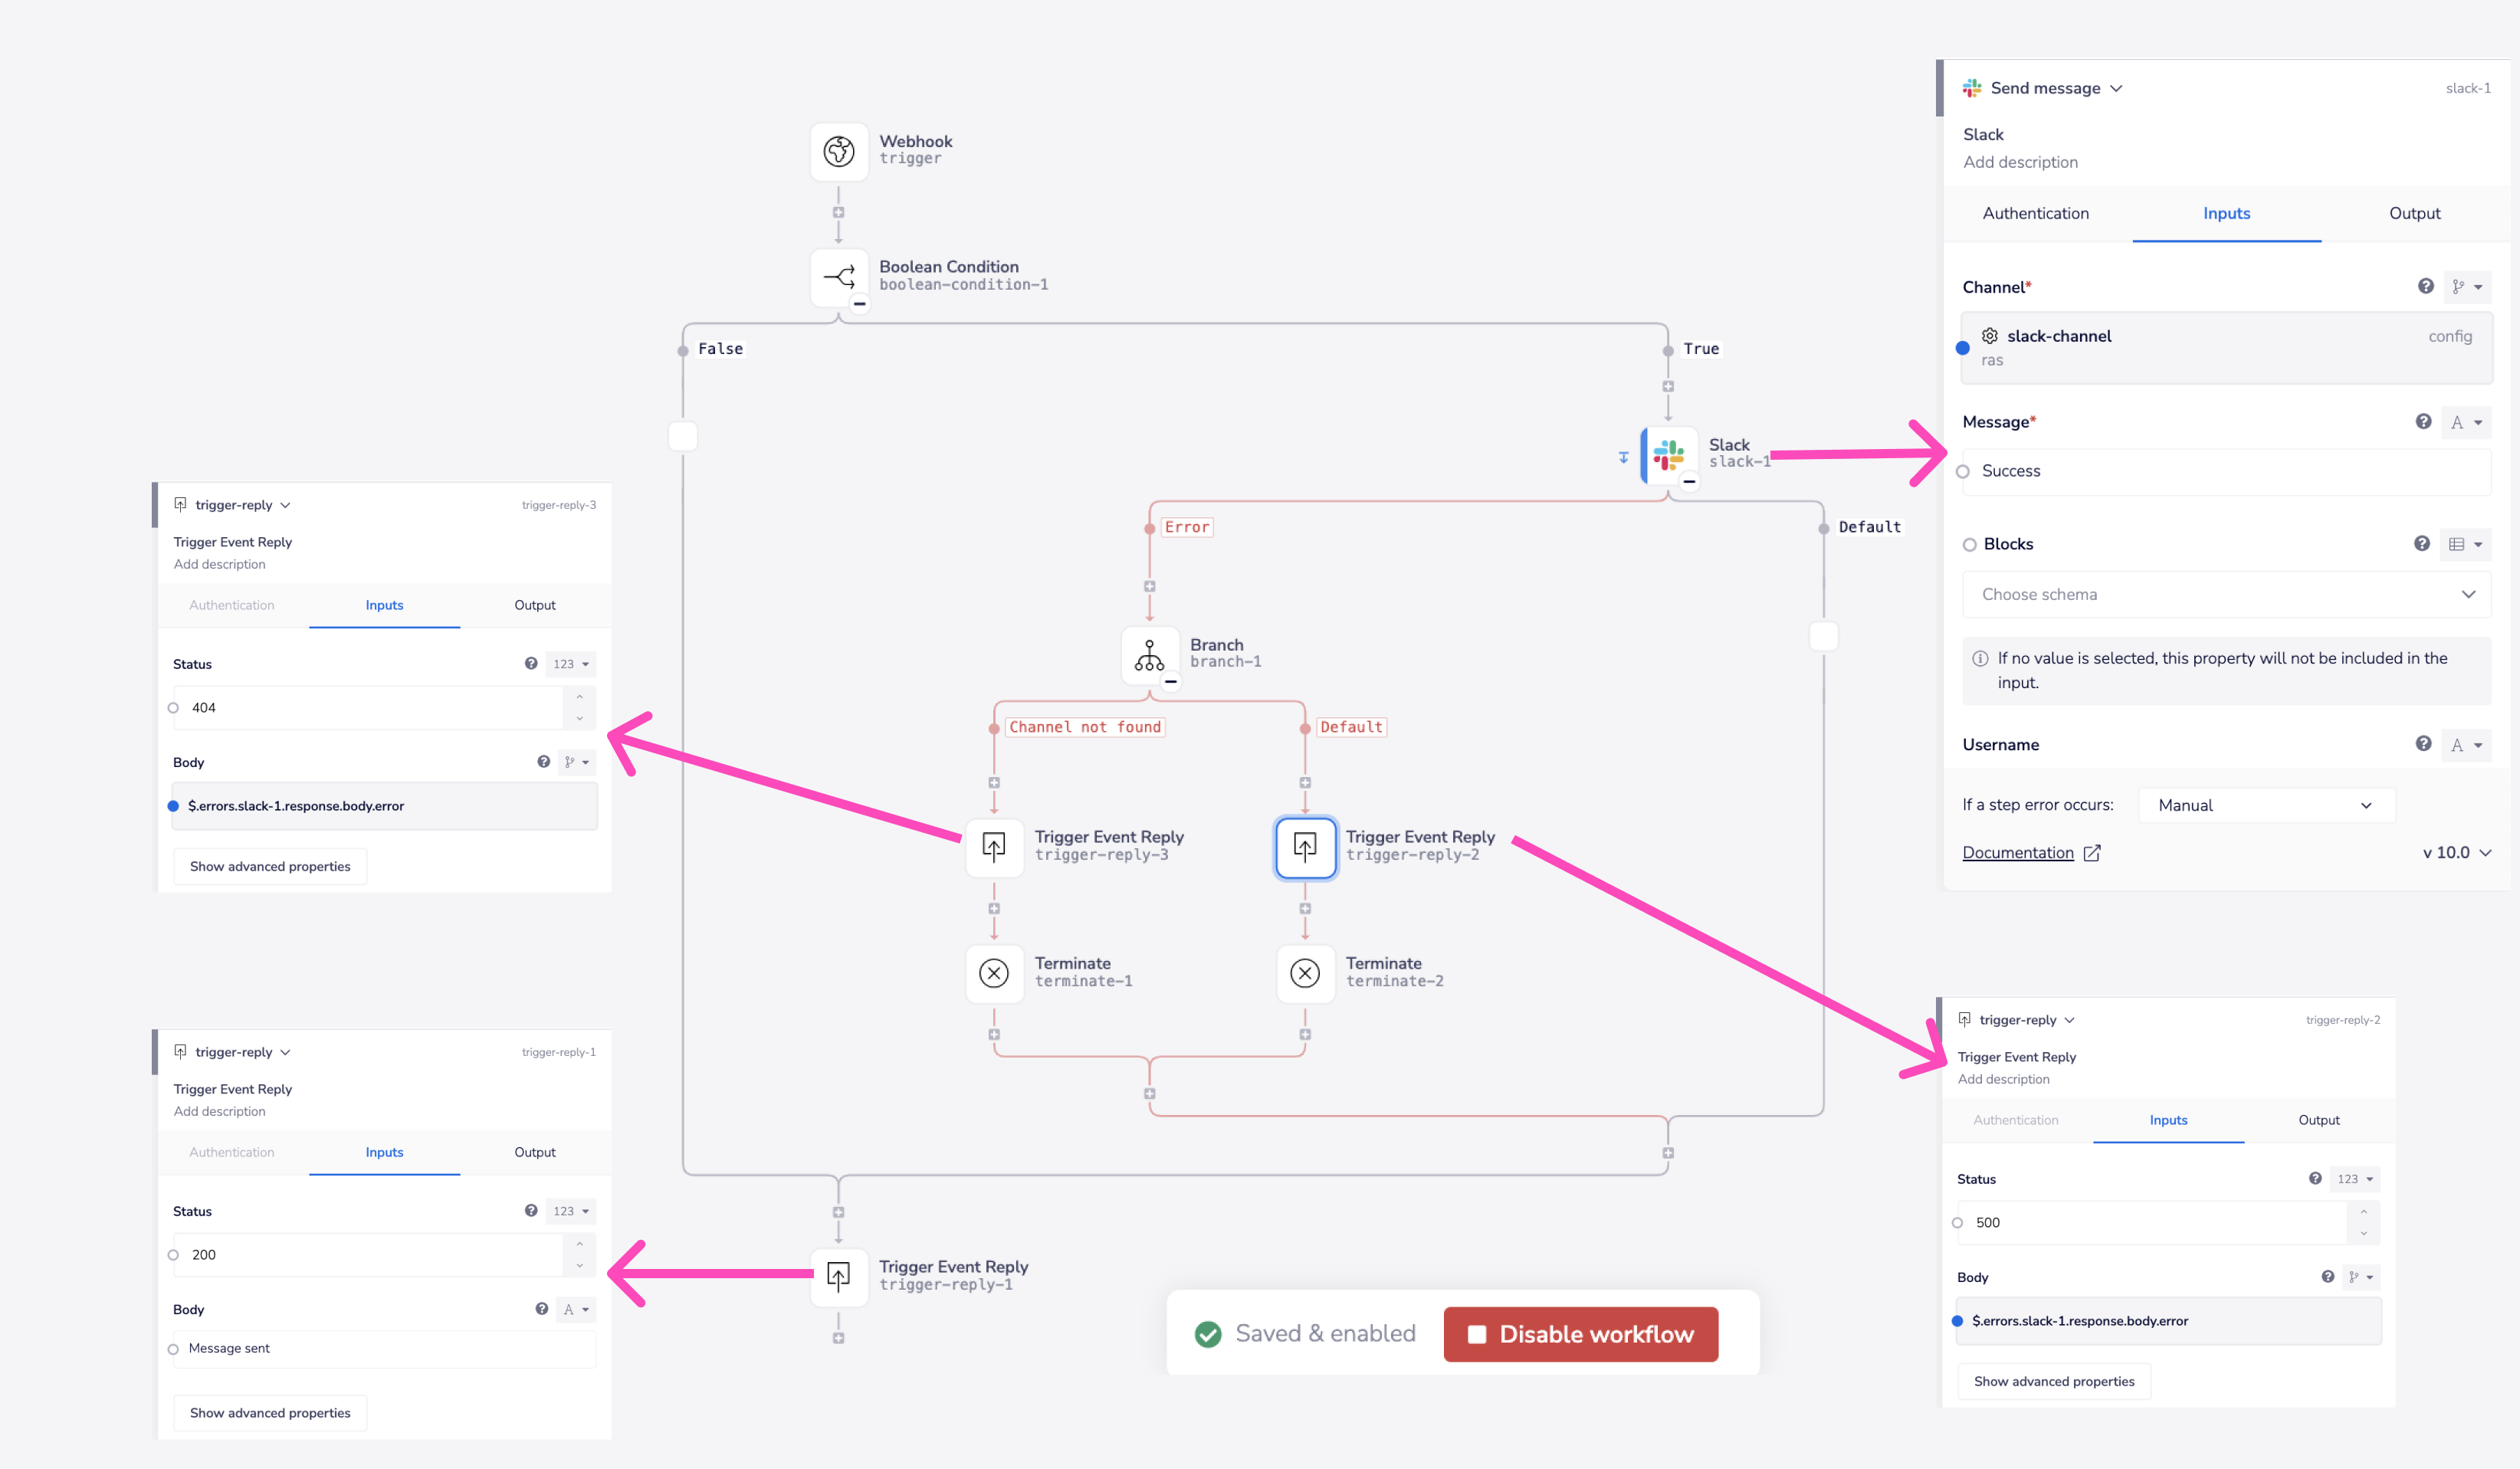
Await workflow and respondCopy
This operation is subject to rate limiting. Please be sure to throttle requests appropriately in the source third-party service.
This operation must be used in conjunction with the Trigger Event Reply connector. The response has to be sent / placed at the end of the workflow so that it is sent upon completion.
Services which are able to re-try webhook calls benefit most from using this operation.
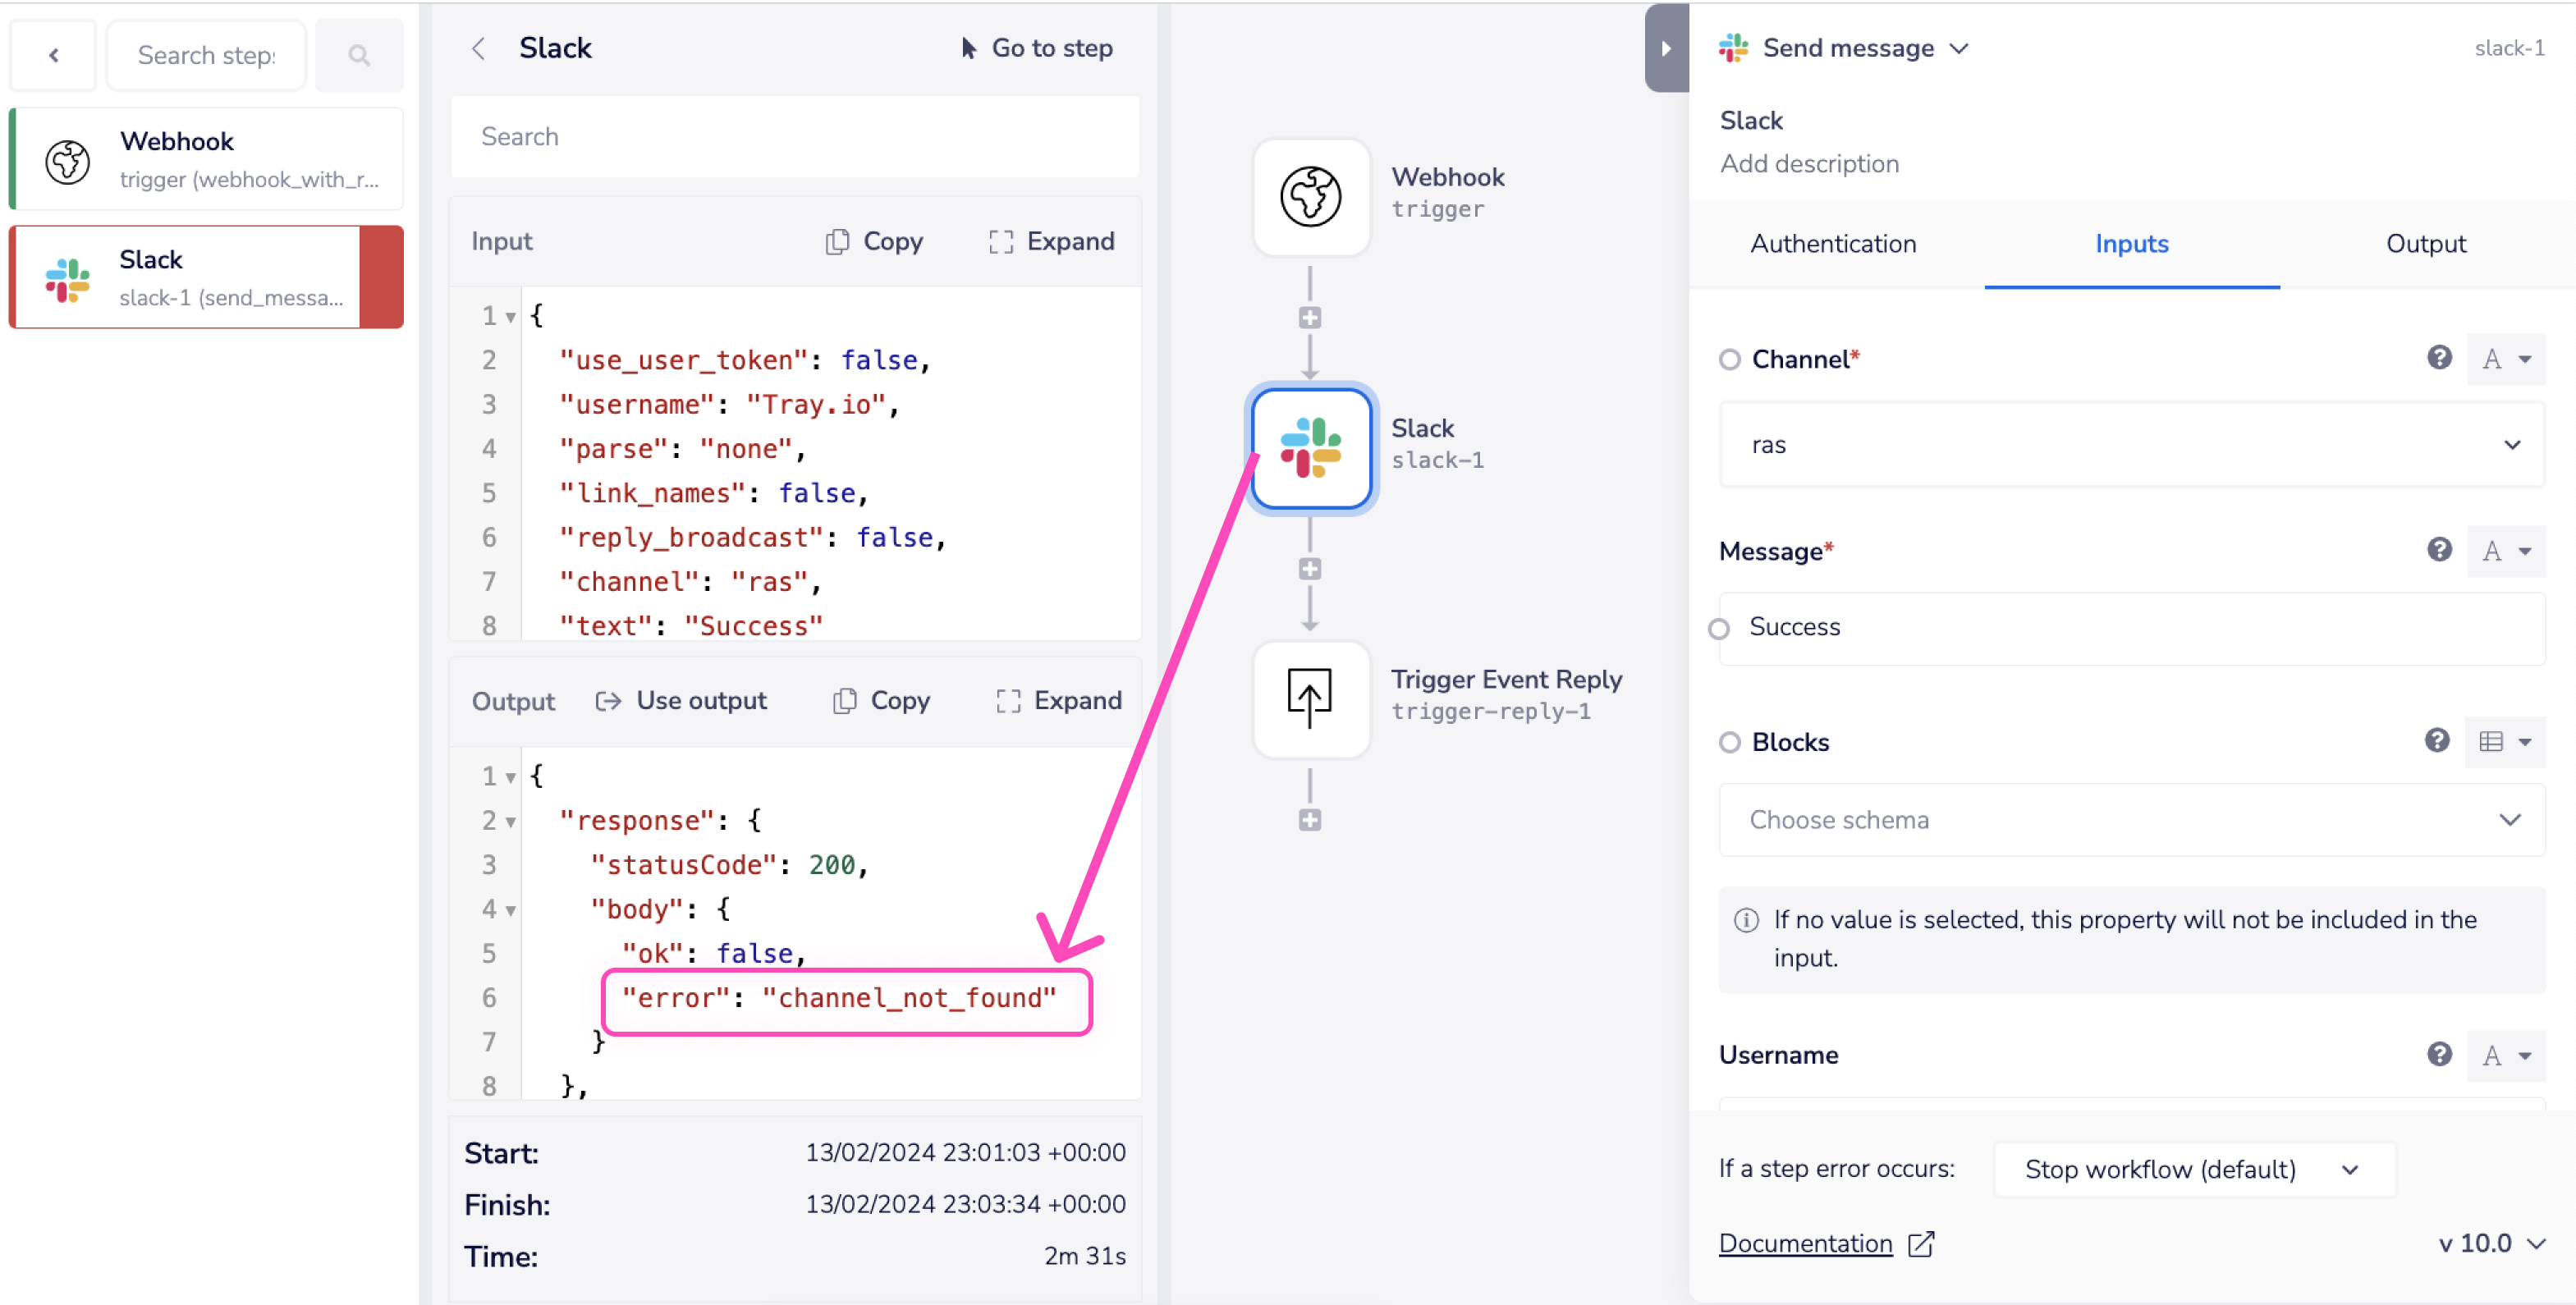
The Await Workflow and Respond operation in Tray.io waits for the workflow to finish before responding.
The operation validates the payload without returning an HTTP status code. Upon workflow completion, an appropriate response is sent.
The Trigger Event Reply connector can be used to reply with a particular code and message:


If the workflow encounters an error, the system manages the error mechanism and generates an appropriate message.
In the below example, a failure in the Slack step triggers the flagging of a "channel_not_found" error message.

You can also set a bespoke system using Manual error handling that provides a flexible system for handling errors in a way that aligns with the unique needs of the workflow.
You can define specific responses for different types of errors.
The response received may be influenced by various factors and you may receive several errors like server errors (500), service unavailability (503), or client request issues (400).
Note that exactly how the service will respond will depend on the service. Please see our documentation on What is an error? and Development tips for more guidance on identifying errors and testing your workflows.