
GraphQL Client 1.1
GraphQL client connector provides a complete description of the data in your API, giving people the power to ask for exactly what they need and nothing more.
- On this page
- GraphQL Client
- Overview
- Authentication
- OAuth2
OverviewCopy
GraphQL is a query language for APIs and a runtime for fulfilling those queries with your existing data. GraphQL provides a complete and understandable description of the data in your API, gives clients the power to ask for exactly what they need and nothing more, makes it easier to evolve APIs over time, and enables powerful developer tools.
AuthenticationCopy
Each method of authentication requires users to select a service before completion of authentication, be it custom made or pre-existing. The first two authentication methods outlined below are for creating custom services to work with Tray.io. These methods will most likely be necessary when using Tray.io with a with a private API service, or because the service connector you require is currently unavailable.
Note that a service within Tray.io is usually referring to a service connector, such as the AWS connectors. They have been specifically built in order to bridge the communication gap between various applications, in a safe a secure manner. Enabling Google to 'talk' to AWS, or Hubspot or Salesforce, etc, with ease.
There are three methods of authenticating with the GraphQL client connector:
Create your own OAuth2 service authentication.
To enable OAuth based authentication for this connector, you'll need to create an "app" with the third party services. This will require you to have access to the client ID, client secret, authentication URL and access token URL of your third party service as a bare minimum.
Create your own Token based service authentication.
To enable Token based authentication for this connector, you'll need access to the token of the third party service you wish to use, as well as knowledge of any additional properties the user may require to authenticate with as they will need to be setup individually.
Select one of the Pre-existing connector authentications already available.
To enable the Pre-existing Tray.io method, setup with the original connector must be completed prior to start.
Your client GraphQL API service requirements will dictate the correct methods to follow in more detail regardless of authentication choice.
Due to the similarity between the GraphQL client connector and the HTTP Client connector, you may wish to visit the course below for a revision in basic concepts.
TRAY ACADEMY: Interested in getting to grips with even more features? Why not check out our academy video on: The HTTP Client connector.
OAuth2Copy
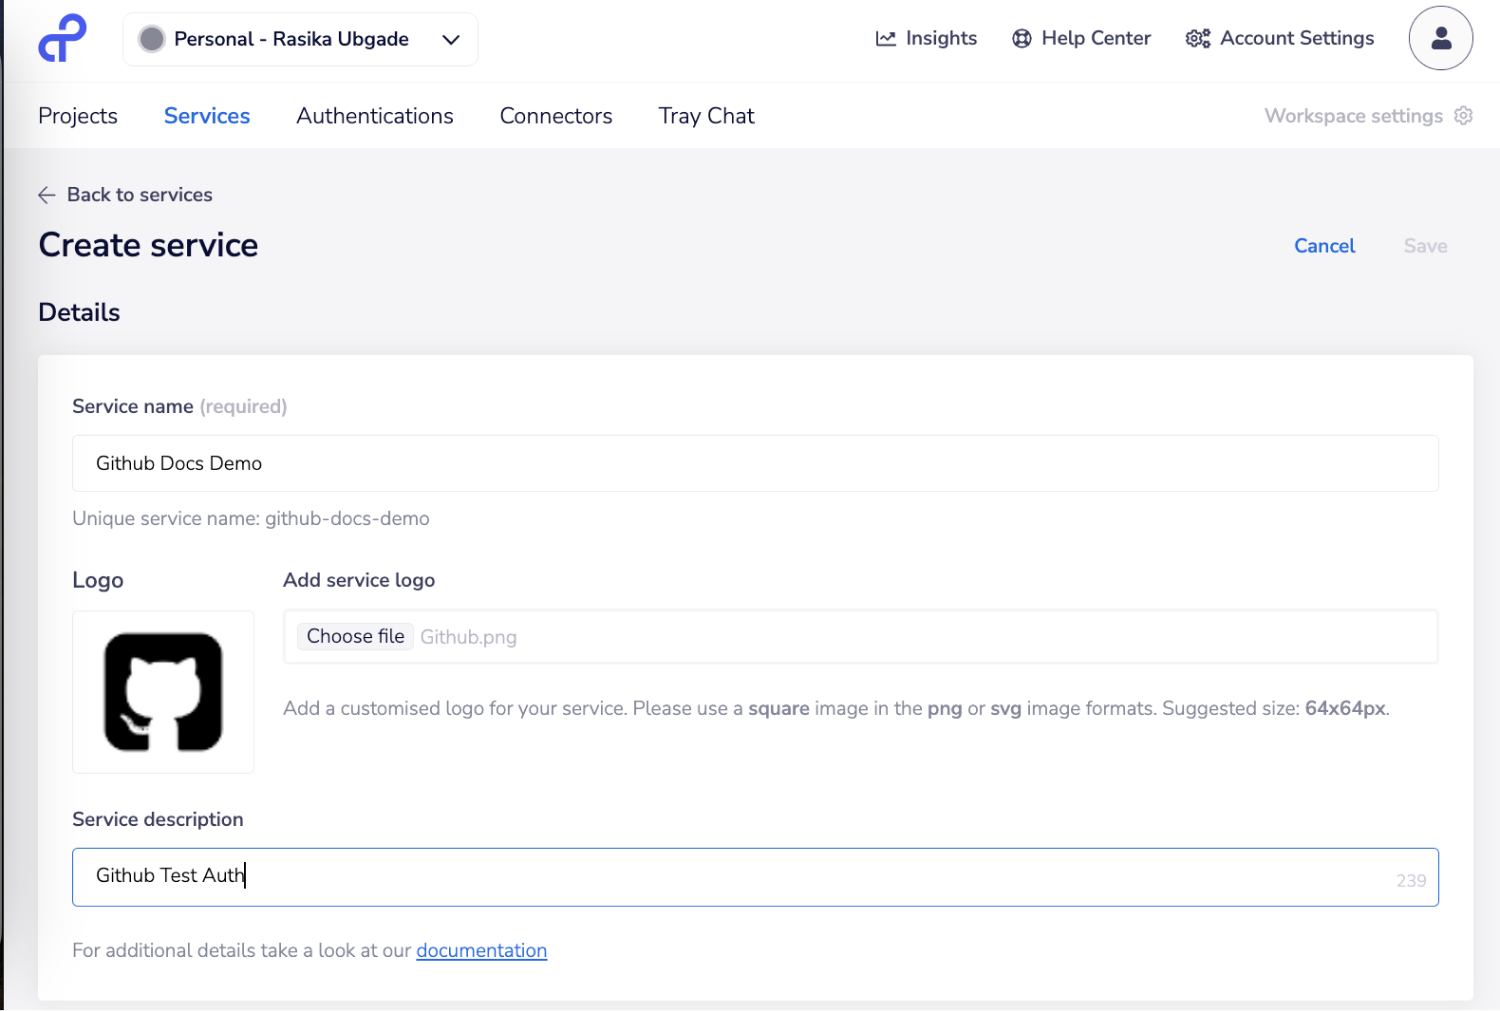
To authenticate with an OAuth2 based service, first go to the main Tray.io account dashboard. On the left hand side, select 'Services' and click on the 'Add new service' button in the top right.


Make sure to fill in all the aspects of the 'Details' panel as each field is required. To demonstrate how to set up an OAuth based service, this demo will use the Github GraphQL API for the remainder of this example. Please follow the steps as displayed where possible, for your own chosen OAuth based API authentication service.

Select 'OAuth2' from the authentication section:


The panel below will change accordingly. With OAuth2 there are several field names required: 'Client ID', 'Client secret', 'Authentication URL' and 'Access token URL'. Fill these in as in accordance with your selected OAuth2 based API service. For the purposes of this demo, the following explanation will use Github for the walk through.


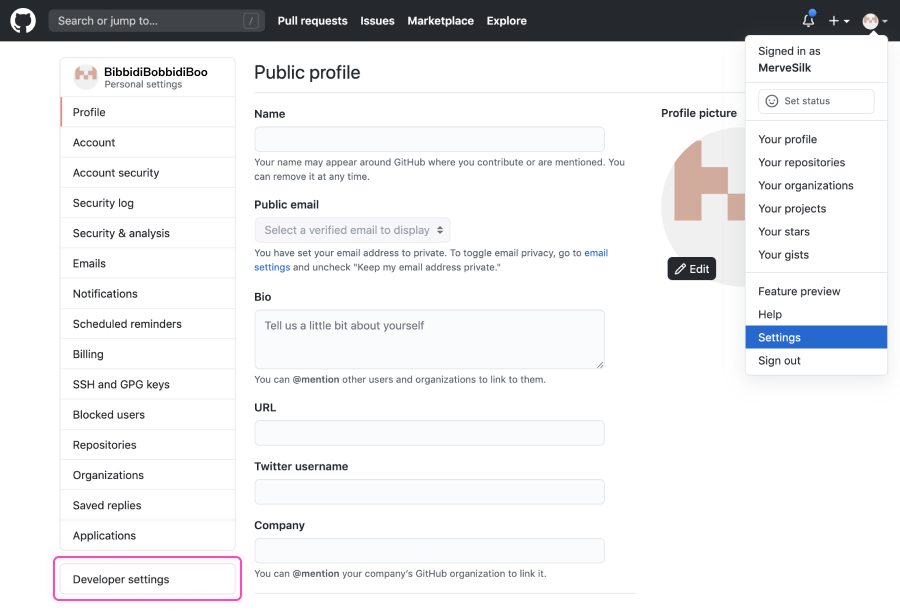
Head to your profile setting page within Github. Click on the 'Developer settings' option in the bottom left corner.

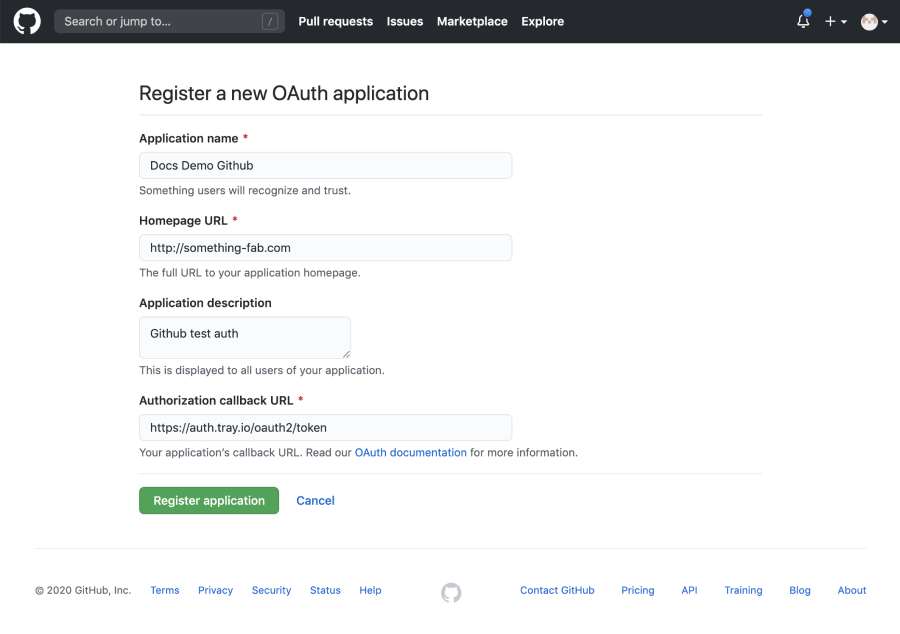
On the new page, choose 'OAuth Apps' and select the 'Register a new application' button.


You will be redirected to a new application registration form. Fill this in and set the 'Authorisation callback URL' as the URL mentioned in your 'OAuth2 Settings' section: If the third party service requires a redirect url then you can use https://auth.tray.io/oauth2/token..

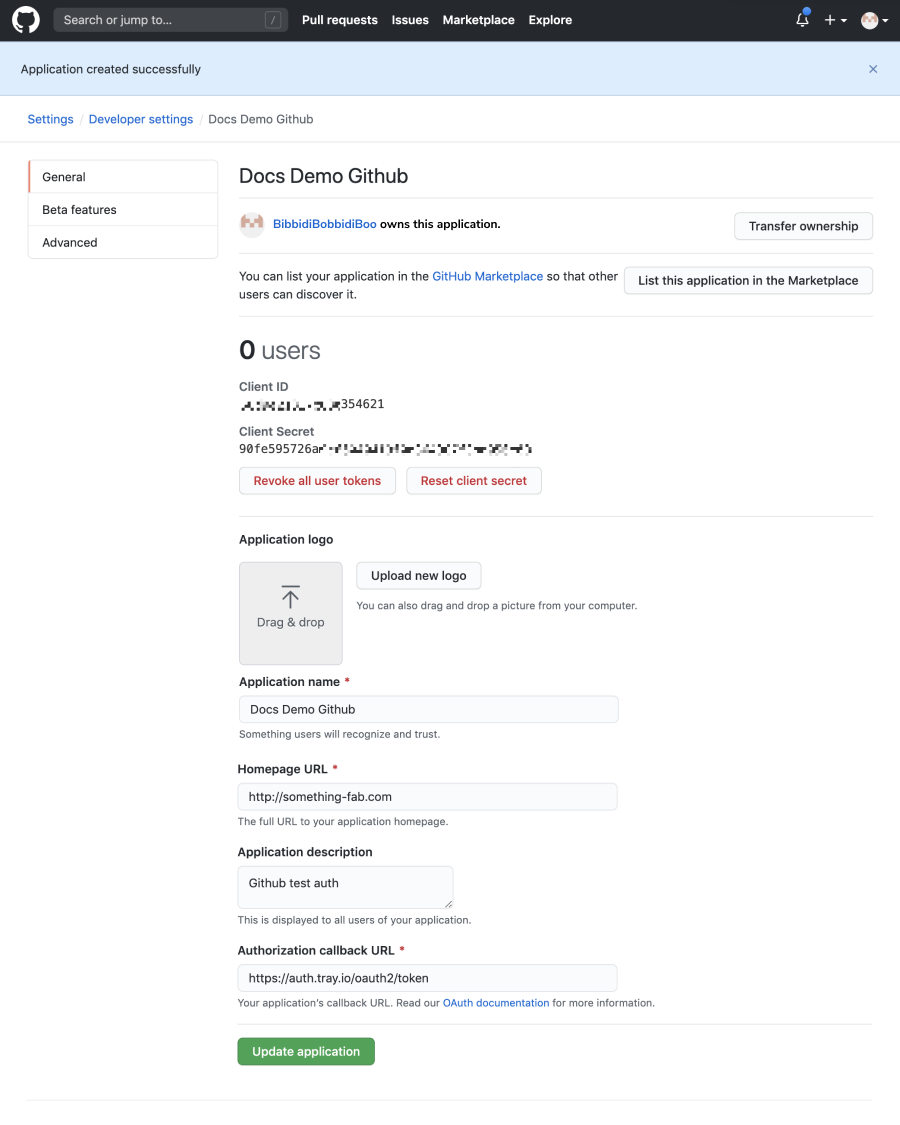
Once you have pressed the 'Register application' button, you will see your application details page. Copy over the 'Client ID' and 'Client secret' into your Tray.io services 'OAuth2 settings' panel.

To find the 'Authentication URL' and the 'Access token URL' you will need to head to the Github Developer Docs: "Authorizing OAuth Apps" section. Here is where you find the 'Authentication URL': https://github.com/login/oauth/authorize
and the 'Access token URL': https://github.com/login/oauth/access_token.


Add these to the rest of your 'OAuth2 settings' panel. The next section asks if there are any 'OAuth scopes' that you wish to set up. These will vary depending on your API (Github is capable of several). To add one, set your cursor in the input field and type in the name of the scope. Press enter. An expended panel will display asking for your scope description. As you can see the previously inputted scope has moved into the name field.
To add a another, repeat the process. A list of available scope should be found within your API Scope docs page. For more details on Githubs please view this link . You can add and delete as you see fit.


The final 'Authentication prameters' section asks if there are any parameters/ properties to add. For demo purposes this has been left blank.


Lastly select the 'Add service' button in the top right hand corner. You will now see the newly created Github service under your Services tab.
Select 'Workflows' from the left hand menu to get back to the main Tray.io account page. Choose or create a workflow and once within the workflow builder itself, search and drag the GraphQL connector from the connectors panel (on the left hand side) onto the workflow.
With the new GraphQL connector step highlighted, in the properties panel on the right, click on 'New Authentication' (located under the 'Settings' heading).


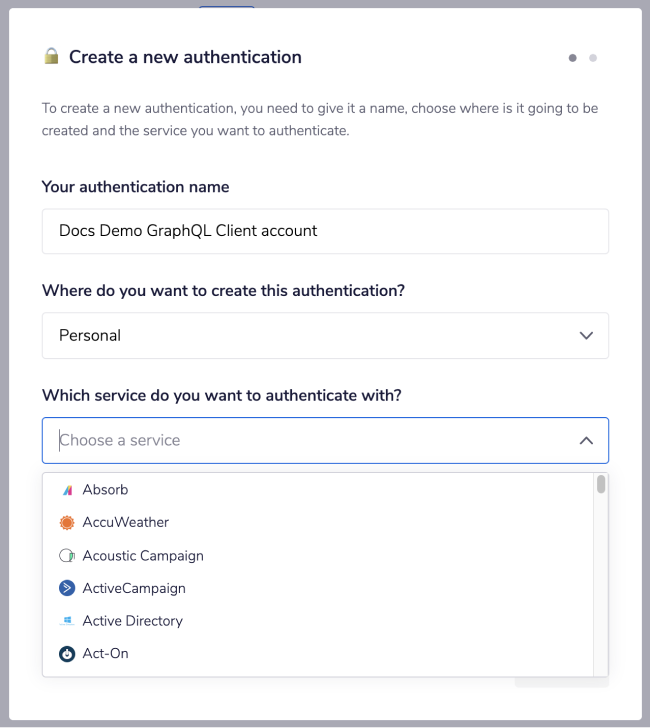
This will result in a Tray.io authentication pop-up window. The first page will ask you to name your authentication, and state which type of authentication you wish to create ('Personal' or 'Organisational').
As you can see, there is also a third option which requires the user to select which service they wish to authenticate with. In this use case, we will be selecting the 'Github Docs Demo' service which was just recently created.
The second page of the popups will display the scope options set earlier.


Once all the relevant scopes have been selected, click on the 'Create authentication' button. Go back to your settings authentication field (within the workflow builder properties panel), and select the recently added authentication from the dropdown options now available.
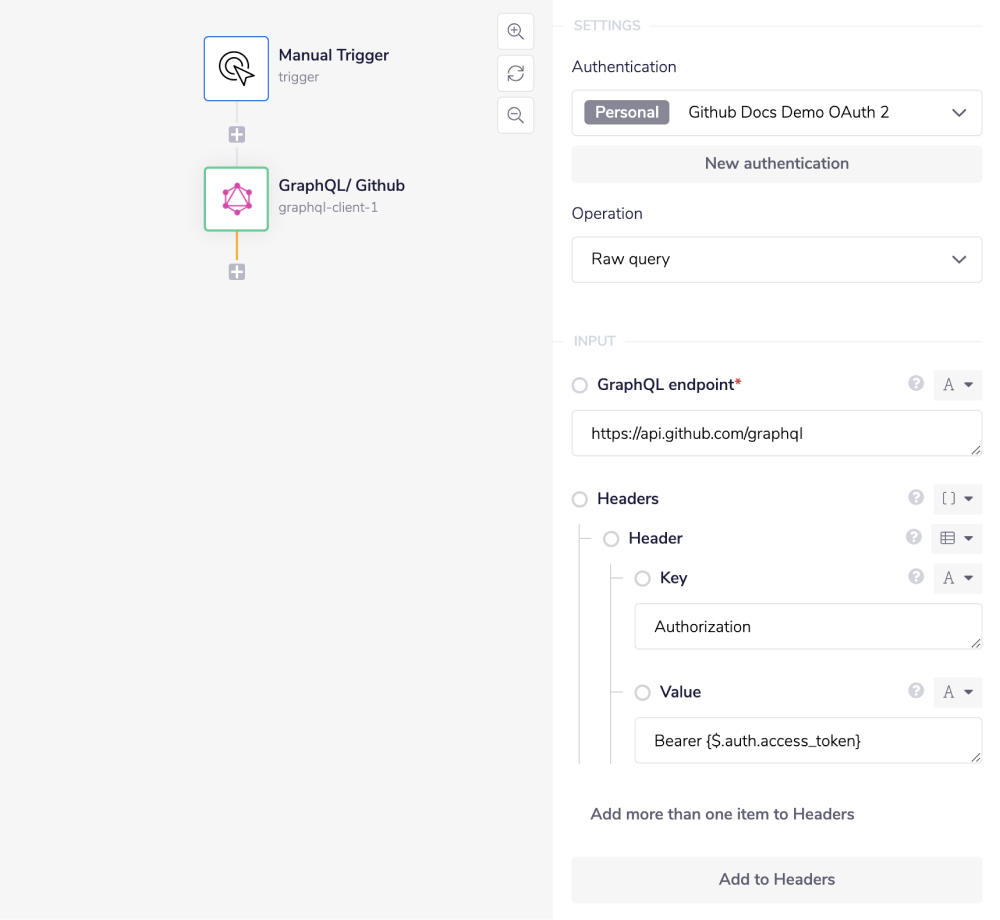
The GraphQL client connector will automatically have the operation set to 'Raw query'. In order to confirm setup is complete, fill in the details for the 'GraphQL endpoint' and add the appropriate 'Header' / key - value pair. These details can be found in the Github service's API docs page as linked to earlier.
For Github completion of setup would look as follows (note that the access_token key is generated from the earlier authorisation parameters step):

Run the workflow. In your Debug panel you will see a green workflow run indicating that the token was accepted and your authentication setup is complete.


Token basedCopy
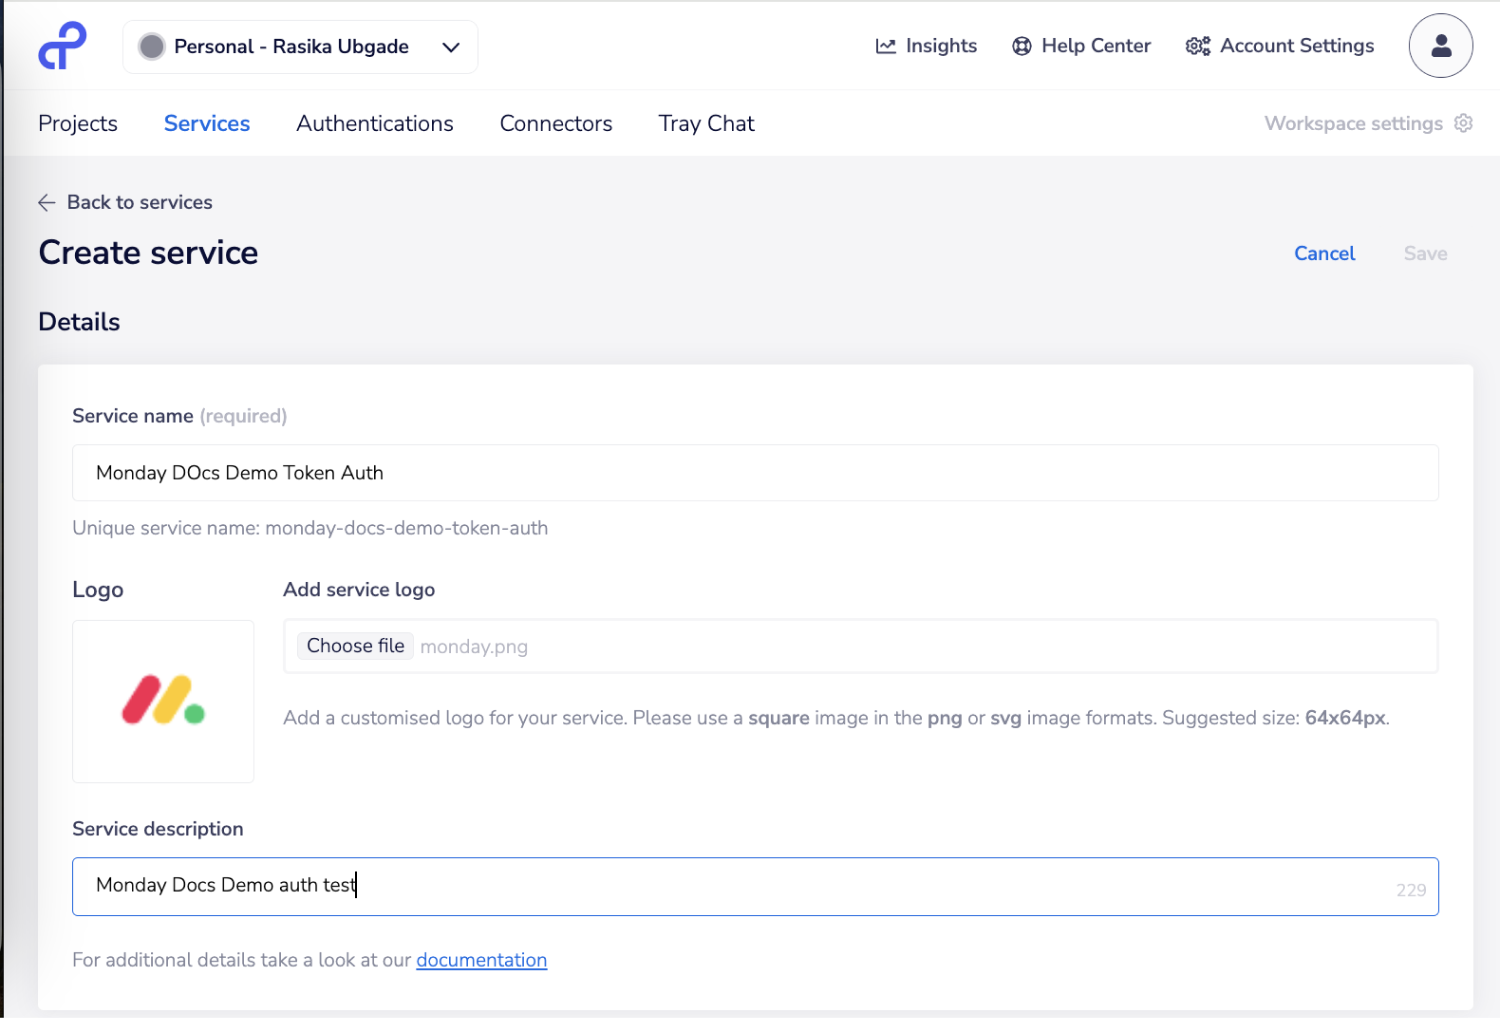
To authenticate with a Token based service, first go to the main Tray.io account dashboard. On the left hand side, select 'Services' and click on the 'Add new service' button in the top right.
Make sure to fill in all the aspects of the 'Details' panel as each field is required. To demonstrate how to set up a Token based service, this demo will use the Monday.com API for the remainder of this example. Please follow the steps as displayed where possible, for your own chosen Token based API authentication service.

Select 'Token-based' from the authentication section. The panel below it will change accordingly.


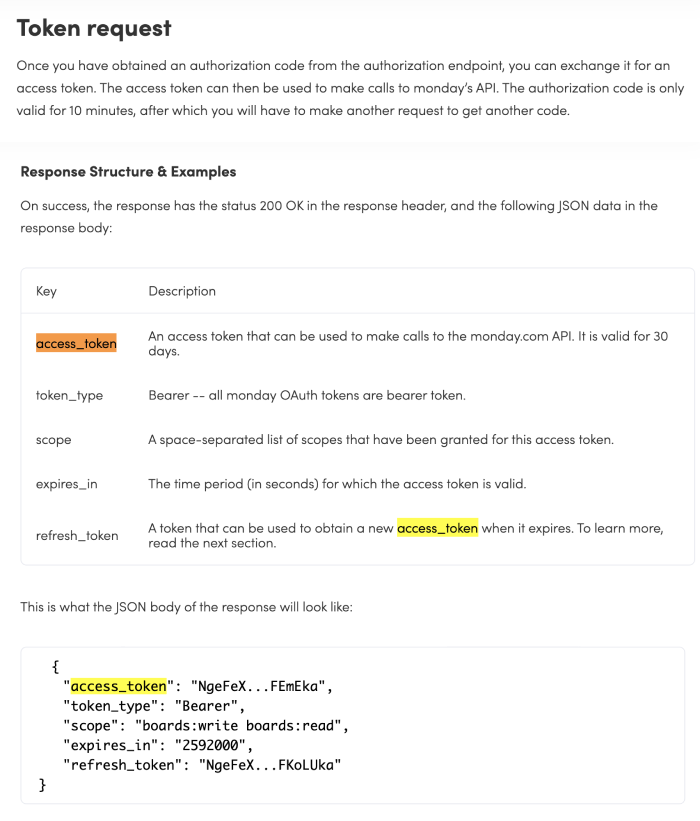
Make sure to add any and all properties to the 'Authentication parameters' section as per your API service documentation specifications. In the case of Monday.com the 'Title' should be Access token'. As you can see, this will automatically generate a unique property key: access_token which is the required key type as specificed in their Monday.com API docs .

Once the 'Type' is set to 'Password', and the tickbox is set to Required, the end result should be as follows:


Select the 'Add service' button in the top right hand corner. You will now see the newly created service under your Services tab.
Select 'Workflows' from the left hand menu to get back to the main Tray.io account page. Choose or create a workflow and once within the workflow builder itself, search and drag the GraphQL connector from the connectors panel (on the left hand side) onto the workflow.
With the new GraphQL connector step highlighted, in the properties panel on the right, click on 'New Authentication' (located under the 'Settings' heading).
This will result in a Tray.io authentication pop-up window. The first page will ask you to name your authentication, and state which type of authentication you wish to create ('Personal' or 'Organisational').
As you can see, there is also a third option which requires the user to select which service they wish to authenticate with. In this use case, we will be selecting the 'Monday Docs Demo' service which was just recently created.


The next page asks for your 'Access Token'. This is a required field and finding it will depend on the account associated with your tokenised service. In order to locate this within Monday.com,
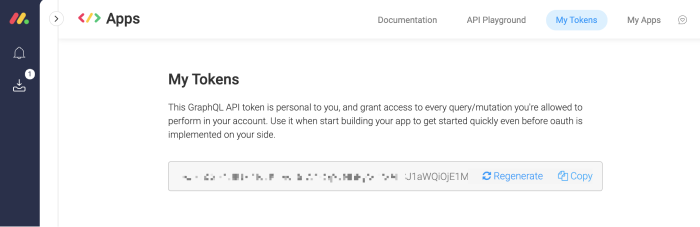
In order to get these fields, head to your Monday.com dashboard and click on the 'GO!' button in the bottom right hand corner. Select 'Developers' from the list displayed.


Once you are in the developers tab, you will see a list of available apps (if you have not yet created any then please do so now else there will be no token options for you). Select 'My tokens' from the top right hand menu bar. Reveal your token in order to copy it, and make sure that you are within the allocated time frame for your token to be of use (10 days) else you should regenerate it before copying it over:

Copy this into the Tray.io second popup authentication window and click on the 'Create authentication' button. Go back to your settings authentication field (within the workflow builder properties panel), and select the recently added authentication from the dropdown options now available.
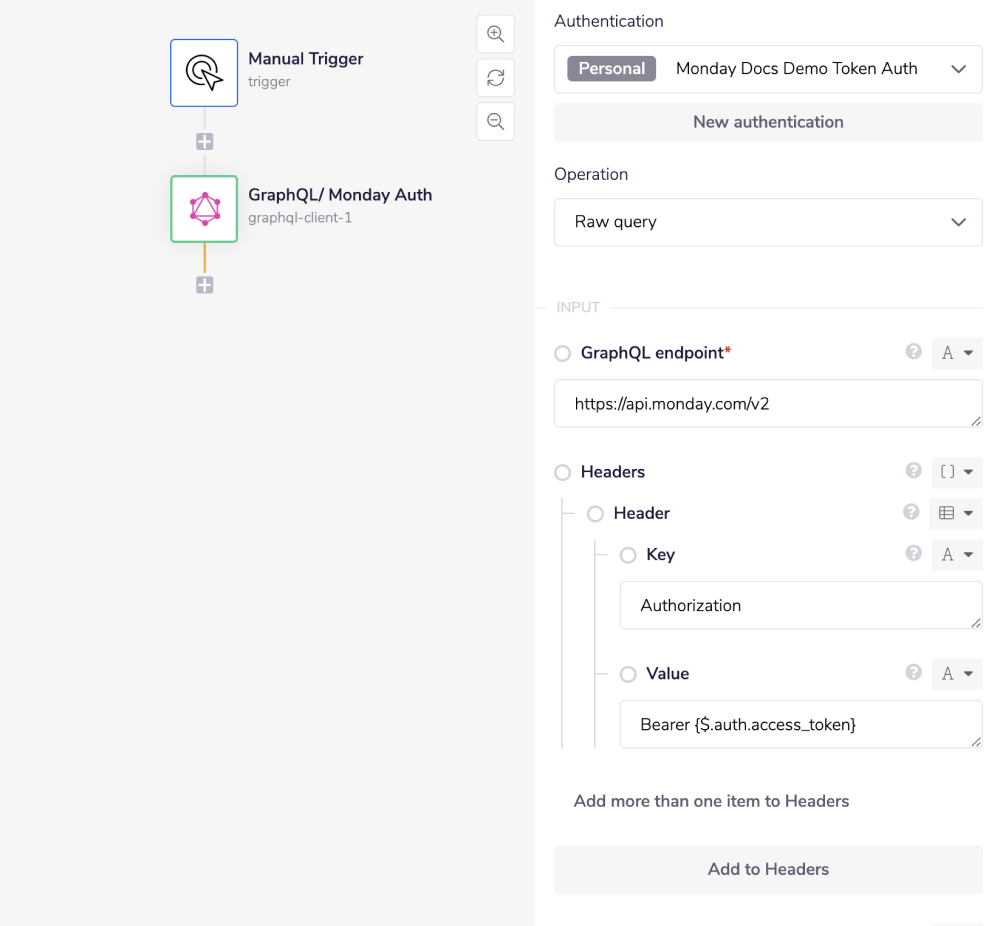
The GraphQL client connector will automatically have the operation set to 'Raw query'. In order to confirm setup is complete, fill in the details for the 'GraphQL endpoint' and add the appropriate 'Header' / key - value pair. These details can be found in the relevant service's API docs.
For Monday.com completion would look as follows (note that the access_token key is generated from the earlier authorisation parameters step):

Run the workflow. In your Debug panel you will see a green workflow run indicating that the token was accepted and your authentication setup is complete.


Pre-existingCopy
From the dropdown options available under the Services heading, select a pre-exsisting Tray.io service connector to connect the GraphQL client connector with; (all connectors currently available on the Service Connectors page will be listed as an option):

The second authentication page will be entirely dependent on what the service selected now requires. You may need to provide scopes, permission settings, client secrets, etc. Please see the relevant Tray.io service page documentation for further details on completion of setup.


Note on Operations UsageCopy
Assumed KnowledgeCopy
SpecificityCopy
The GraphQL client connector works on the basis that you already know what you are looking for. Its strength lies in its specificity.
Basic Coding ExpertiseCopy
It is also assumed that as a user you will have a basic understanding of coding as the language itself needs to be used in sync with the connector.
Bearer TokensCopy
Please be aware that you will need to be familiar Bearer Token authorisation process and how it works, should you wish to use the GraphQL client connector.
Edges & NodesCopy
The final point that users must be aware of is that as a user, you will already have a basic knowledge of how and what Edges and Nodes are in regards to the GraphQL API.
TypesCopy
The GraphQL API comes with a number of 'Types' available, however should the need arise, note that you are also allowed to create your own custom types if need be.
MatchingCopy
The GraphQL API is not capable of "partial matching", please make sure that you are clear in what you are searching for and use the full "term" when searching.
USER TIP: To increase your knowledge on all of the above, please head to the GraphQL website for more details.
Example usageCopy
TRAY POTENTIAL: Tray.io is extremely flexible. By design there is no fixed way of working with it - you can pull whatever data you need from other services and work with it using our core and helper connectors. This demo which follows shows only one possible way of working with Tray.io and the GraphQL client connector. Once you've finished working through this example please see our Introduction to working with data and jsonpaths page and Data Guide for more details.
Below is an example of a way in which you could potentially use the GraphQL client connector with Github in order to retrieve unique user information, create a new repository, list all owned repositories of said user and send a Slack update message to inform your team of the results.
EXTRA AUTHS: In order to complete this workflow, you will also need to be authenticated with the Slack connector.
The steps will be as follows:
Setup using a manual trigger and get the ID of the Github user in question.
Create a new repository within the selected owners profile.
List all repositories owned by said user.
Send list to secondary workflow for sub-processing and set up second (callable) trigger. Loop through and collect repository names.
Gather the names of the repositories into a separate list.
Send a Slack notification detailing the names of the users owned repositories.
The final outcome should look like this:


1 - Setup Trigger & Get Owner IDCopy
Once you have clicked 'Create new workflow' from your main Tray.io dashboard named it, select the Manual trigger from the trigger options available:


After you have been redirected to the Tray.io workflow dashboard, from the connectors panel on the left, add a GraphQL client connector to your second step. Notice that the operation is automatically set to 'Raw query'. As this is the default and only available option, it will be assumed from now on.
As this connector is setup under Github for the sake of this example, it is assumed one of the above methods of authentication has been followed with the necessary scopes in place. Therefore please note that the GraphQL client connector endpoint, will consistently be: https://api.github.com/graphql, along side the 'Header' -> 'Key': Authorization, and 'Header' -> 'Value': Bearer {$.auth.access_token} for each and every GraphQL client connector step.
With this in mind, the purpose of this step is to get the ID of the Github user in question. Therefore it is important to head to the Github GraphQL API docs in order to check what is possible. The query "Viewer" has been selected for this use case as it returns the Type: User!. For more details please see the Query: User section online.
In the Tray.io builder head to the 'Query' field and open the 'Edit' button in order to start using the Tray.io GraphQL IDE. The Documentation Explorer is your friend here as through exploration of GraphQL queries and mutations you will be able to see what is possible to return. Check out the Gif below for more information on how to navigate the IDE Documentation:


As you can see, the User object is capable of returning multiple fields. As we are using the GraphQL client connector we can be more specific and only return the data we need, which in this case is id. You will note having checked the Documentation Explorer that the user object takes the argument login: login: String!. This means we must make sure to declare and use it within our GraphQL code, and in the correct format.
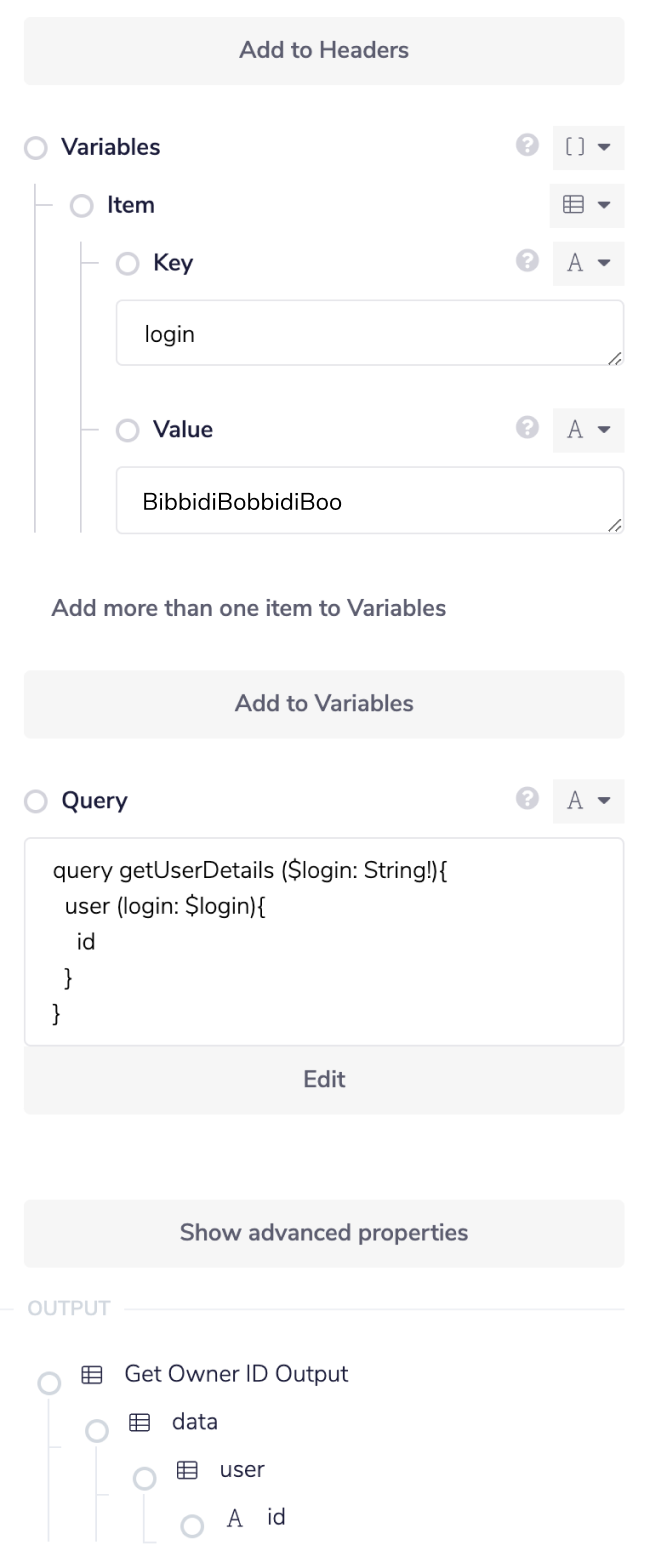
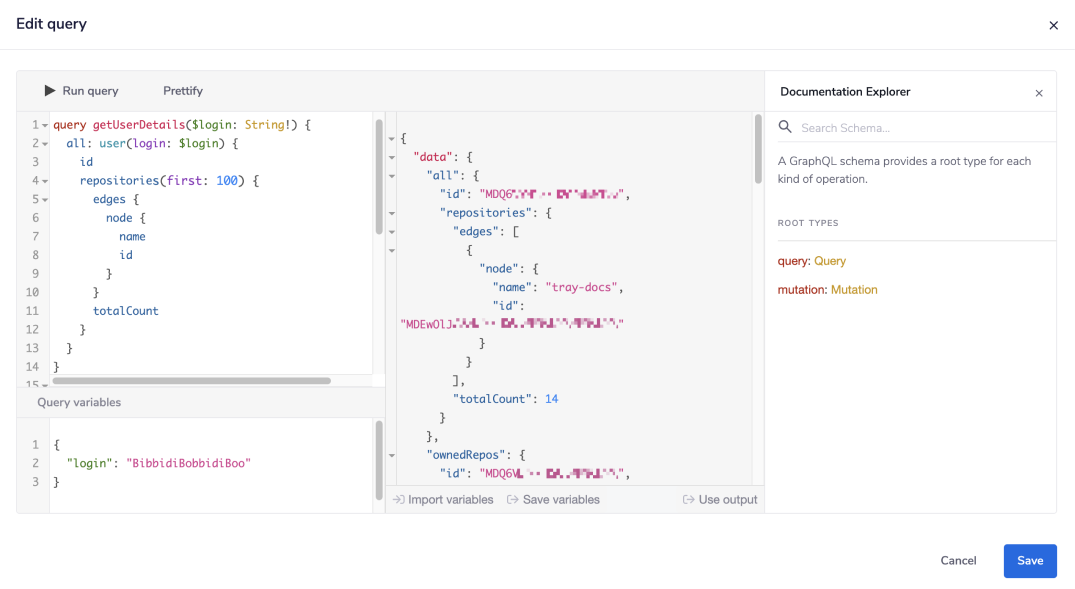
First, create a query and name it appropriately within the Code panel (top left panel): query getUserDetails { }. As the User type is being implemented, the login argument must be included.


Best practices dictate that a variable should be used where possible, so now within the 'Query variables' panel (bottom left panel) of the GraphQL client connector IDE. Using json, create a login variable with your user login details. This is also known as your Github user name and should look similar to the following: { "login" : "username" }.
Now it is time to declare the login argument and variable within the GraphQL code base. You must make sure to state the format that the login type is (aka string) and make sure to include a $ when using your variable.
Once this is done, state the fields you wish to return. As you can see from the documentation no extra arguments etc are required for id: id: ID!. Your code should end up looking similar to the below:
1// Code panel23query getUserDetails ($login: String!){4user (login: $login){5id6}7}89// Query variable1011{12"login": "BibbidiBobbidiBoo"13}14
Press the 'Run query' button upon completion. The expected result will be a user ID hash. Be sure to follow the error messages if your results are not as expected.


Make sure to press the 'Use output', 'Save variables' and 'Save' buttons - in that order, to make sure you can use the results (at a later stage) and save said code and variables to the connector properties panel itself.

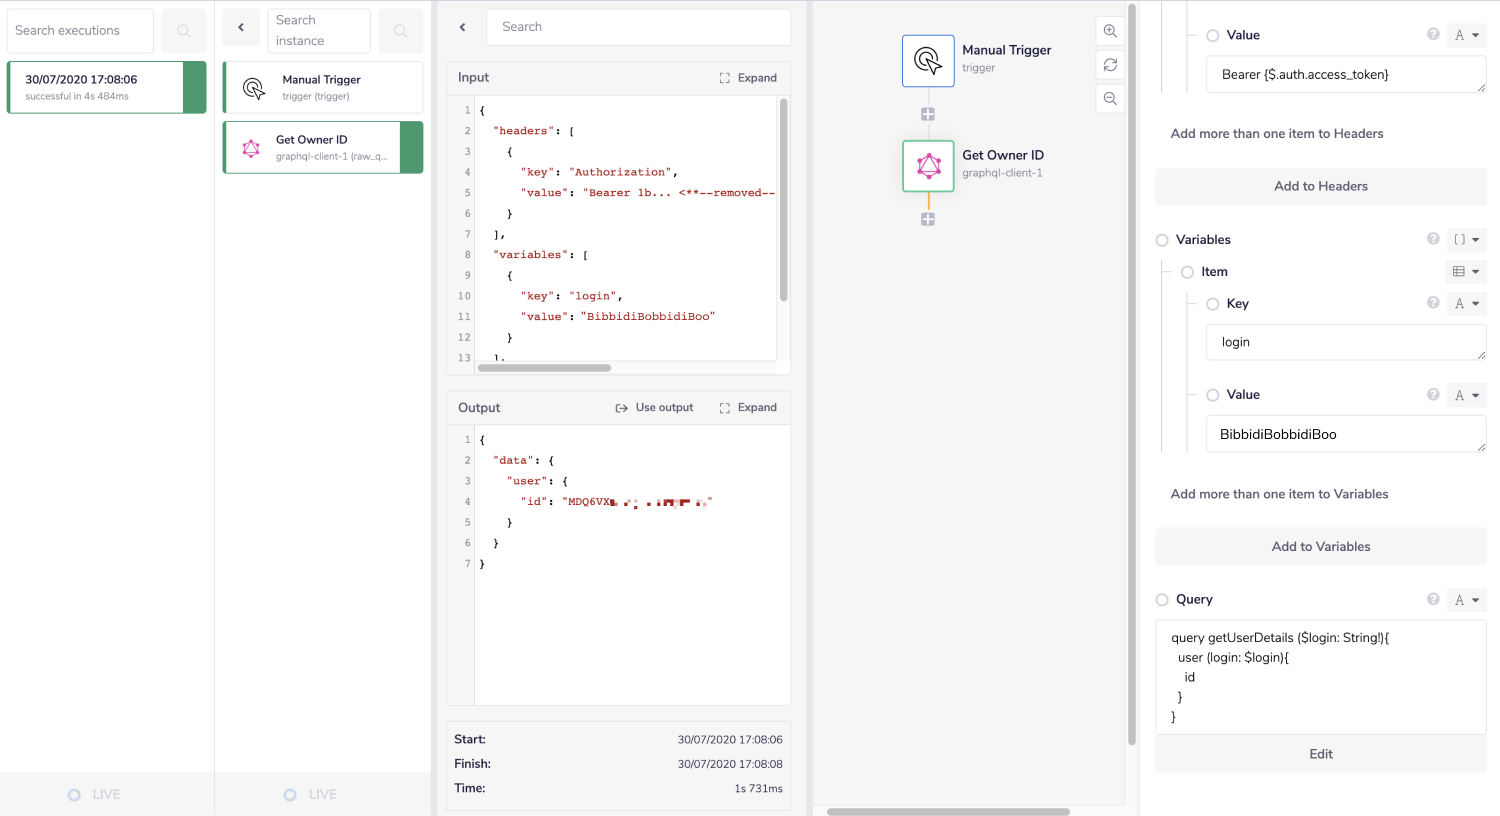
Now when run, your step will return the unique identifier for the user in question. It will output the same information that your query results panel displayed, only this time it will also be available in the Debug output panel as well:

Feel free to re-name your connector steps as you go along to make things clearer for yourself and other users.
2 - Create RepoCopy
Add a second GraphQl client connector as your second step. Once more open the GraphQl client connector IDE by pressing the 'Edit' button within the 'Query' input field.
This time as it is a creation rather than question, the code will need to be based off of a mutation.
As the Documentation Explorer displays, the createRepository mutation requires CreateRepositoryInput fields. In this case the minimum required is repository name and visibility status. In this example, the user ID is also specified for clarification. The payload can return both the new repository name and clientMutationId, but only the ID is necessary for this step.


Once more, create variables where necessary: { "repoName": "example", "ownerId": "XXXXXXXXXXXX" }, declare them making sure to use the $ symbol and set their type on the first line of your code.
1// Code panel23mutation ($repoName: String!, $ownerId: ID!) {4createRepository(input: {5name: $repoName,6ownerId: $ownerId,7visibility: PRIVATE8}) {9clientMutationId10repository {11id12}13}14}1516// Query variables1718{19"repoName": "New_Repo00",20"ownerId": "###example_id###"21}
Again be sure to press the 'Use output', 'Save variables' and 'Save' buttons - in that order, once you know your mutation is working correctly.


In the connector properties panel, under 'Variables' -> second 'Item' -> 'Value' you will see the hard coded ID of the user. To mitigate this, use the 'Value' mapping icon (found next to the value input field, within the properties panel) to generate the connector-snake.
While hovering over the 'Get Owner ID' step (with the tail end of the connector-snake), select id from the list of output properties displayed. This will auto-populate a jsonpath within your 'Value' input field, and update the type selector to jsonpath. This means that should the user be updated in the earlier step, the new value will automatically be picked up.
For more clarification on the pathways you have available, open the Debug panel to view your step's Input and Output.
JSONPATHS: For more information on what jsonpaths are and how to use jsonpaths with Tray.io, please see our pages on Basic data concepts and Mapping data between steps
CONNECTOR-SNAKE: The simplest and easiest way to generate your jsonpaths is to use our feature called the Connector-snake. Please see the main page for more details.


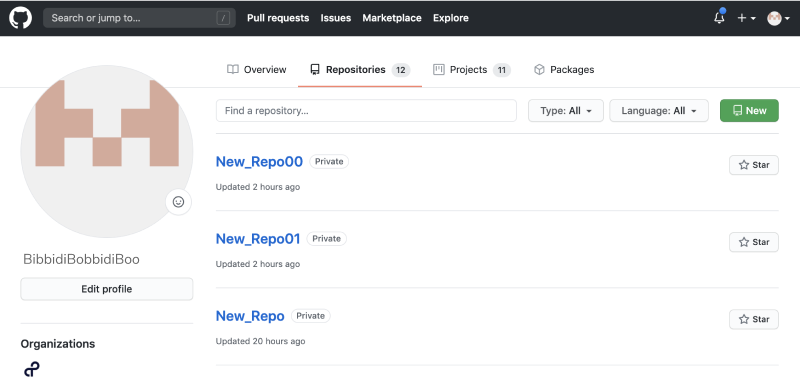
Now when this workflow is run you will create a new repository under your users profile.
IMPORTANT!: Be warned, that if you wish to re-run this step (or query in the IDE), you willneed to set a new name for your repository, as GIthub does not allow for multiple repositorieswith the same name.

3 - List Repos OwnedCopy
Add a third GraphQl client connector as your second step. Open the GraphQl client connector IDE by pressing the 'Edit' button within the 'Query' input field again. Note that this step will involve some conditional logic pre-built into the query itself.
To generate the full list of available repos, a new query will need to be set up based off the user object from earlier. Therefore the same arguments apply (login). The field option used in this step will be repositories as it should return a full list of available repos. As you can see, it requires its own arguments:


We will be using the first argument set to 100 so as to return the first 100 repositories under this users profile:


The repositoryCollection has its own fields. This example focuses on returning the totalCount of the repositories, and therefore the code should include what GraphQL terms "edges and nodes".


The edges in this case being the connection between the repositories and the user, with the nodes referring to the repositories themselves. For more information on the process between edges and nodes please see the GraphQL Docs themselves.
In this example the name and id details for each repository is also being requested. The Query editor should look similar to below:

Now that a full list of repositories has been requested, it is time to filter through said list and collect only the owned repositories instead. Within the query parenthesis, name and create a new query once more building on the previous user object and arguments returned. Within the repositories field, state the affiliations as [OWNER], and set first once more to 100.


Your code panel should look as follows:
1// Code panel23query getUserDetails($login: String!) {4all: user(login: $login) {5id6repositories(first: 1) {7edges {8node {9name10id11}12}13totalCount14}15}16ownedRepos: user(login: $login) {17id18repositories(affiliations: [OWNER], first: 10) {19edges {20node {21name22id23}24}25totalCount26}27}28}2930// Query variables3132{33"login": "BibbidiBobbidiBoo"34}
You properties panel will only have the login variable listed (not including the auth fields). Now when the workflow is run, two separate lists will be evident based on the total repositories available under this user - aka, all repositories and owned repositories.
4 - Send, Loop & Append ListCopy
Drag a Call Workflow connector into the last step of this workflow. Set the operation to 'Fire and forget'. As you can see, the 'Workflow' field is required. This field refers to the workflow you wish to send this information on to, in order to sub-process the data further.
It is as this point that the second workflow setup is necessary. Go back to your main Tray.io account page and create a new workflow, with a Callable Trigger. Set the operation to 'Trigger'.
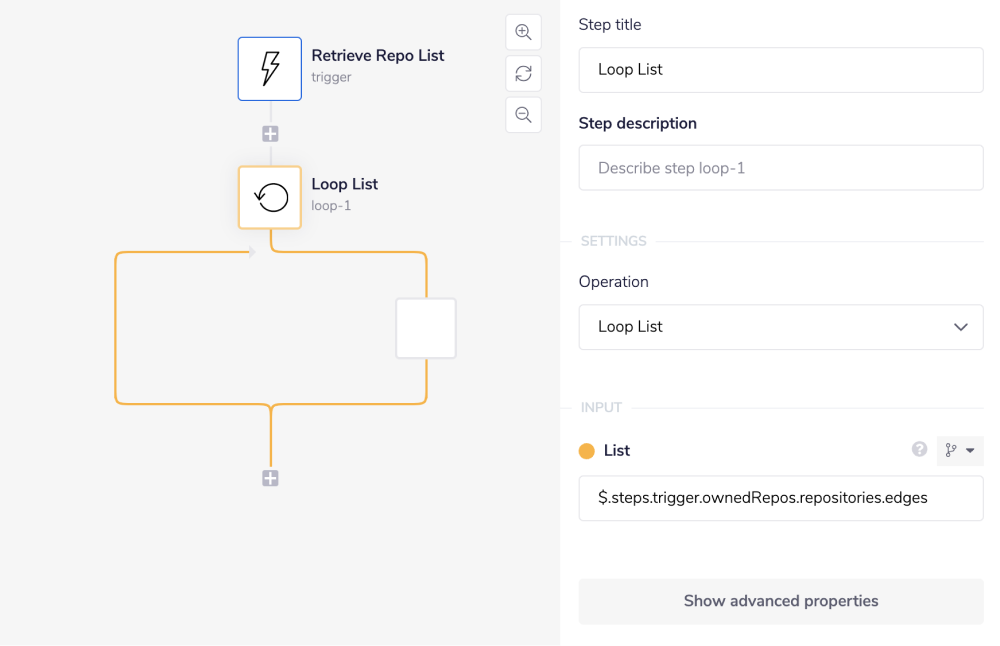
Next, search for the 'Loop collection' connector within your connector panel, and drag it into your workflow as your next step. Set your operations to 'Loop list'.
The Loop Collection connector allows you to iterate through a list of results. In this example, we will use it to iterate through the data found within the previous trigger step.
In order to specify the list you want to loop through, start by using the 'List' mapping icon (found next to the list input field, within the properties panel) to generate the connector-snake.
While hovering over the 'Retrieve Repo List' step (with the tail end of the connector-snake), select edges from the list of output properties displayed. This will auto-populate a jsonpath within your 'List' input field, and update the type selector to jsonpath.

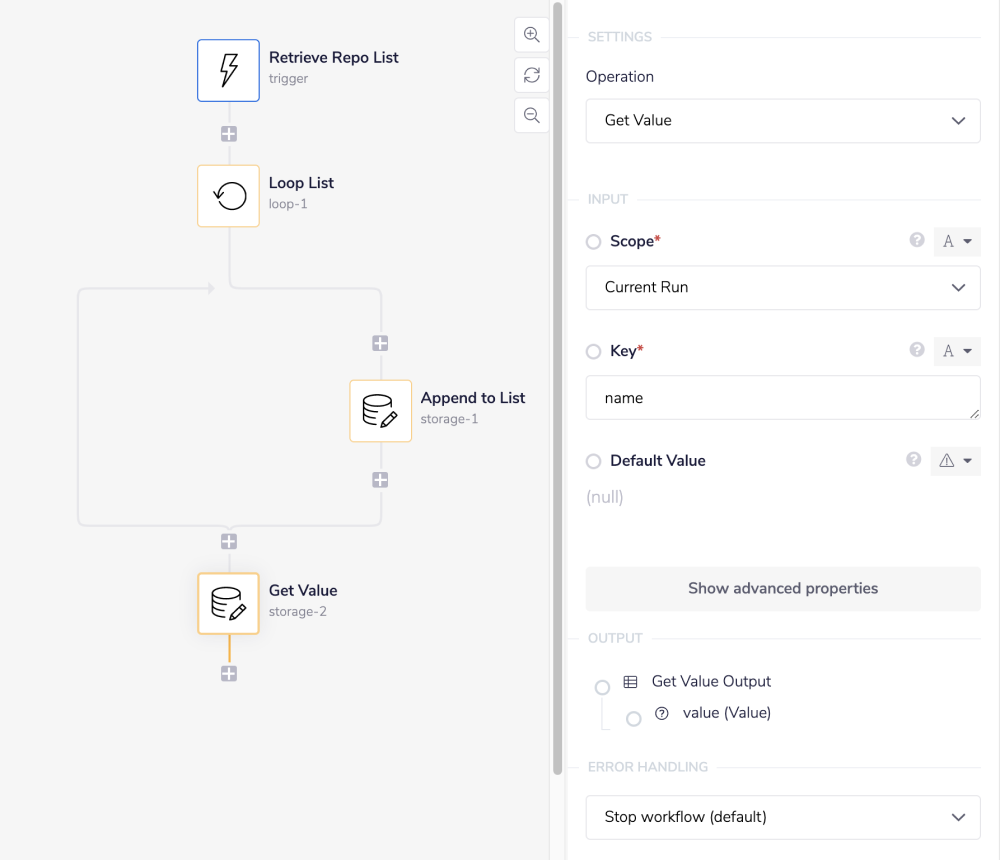
Add a Data Storage connector inside of the Loop List step itself. Set the operation to 'Append to List'. As you can see, there are a number of required fields. Note that the 'Scope' is automatically set to 'Current run'.
Set the 'Key' to name as the name of the repositories are what we require. Use the same connector-snake method to set 'Value' field, from the Loop step, this time selecting name from the dropdown options presented. Make sure you also have the 'Create if missing' checkbox ticked.


Each time the secondary workflow retrieves the repository list from the first workflow, the loop step will iterate through each data item, and the data storage step will gather and the name of each repository.
5 - Create a 'Name based' ListCopy
Add another Data Storage connector outside of the Loop List step itself. Set the operation to 'Get Value'. The 'Scope' field is automatically set to 'Current run' once more. Your 'Key' should be the same as before (name).

Add a List Helper connector after your second data storage connector. Set the operation to 'Join'. Note that while it is possible to authenticate with this connector, it is not necessary.
LIST HELPER: This is just one example of how the List Helper can be utilised. For more ways and uses regarding the List Helper connector, please see the main docs page for more details.
The 'List' field can be set up once more with the connector-snake using the previous 'Get Value' step. Select value from the options presented. You can set your 'Separator' as you see fit - in this case, a comma and new line have been used:

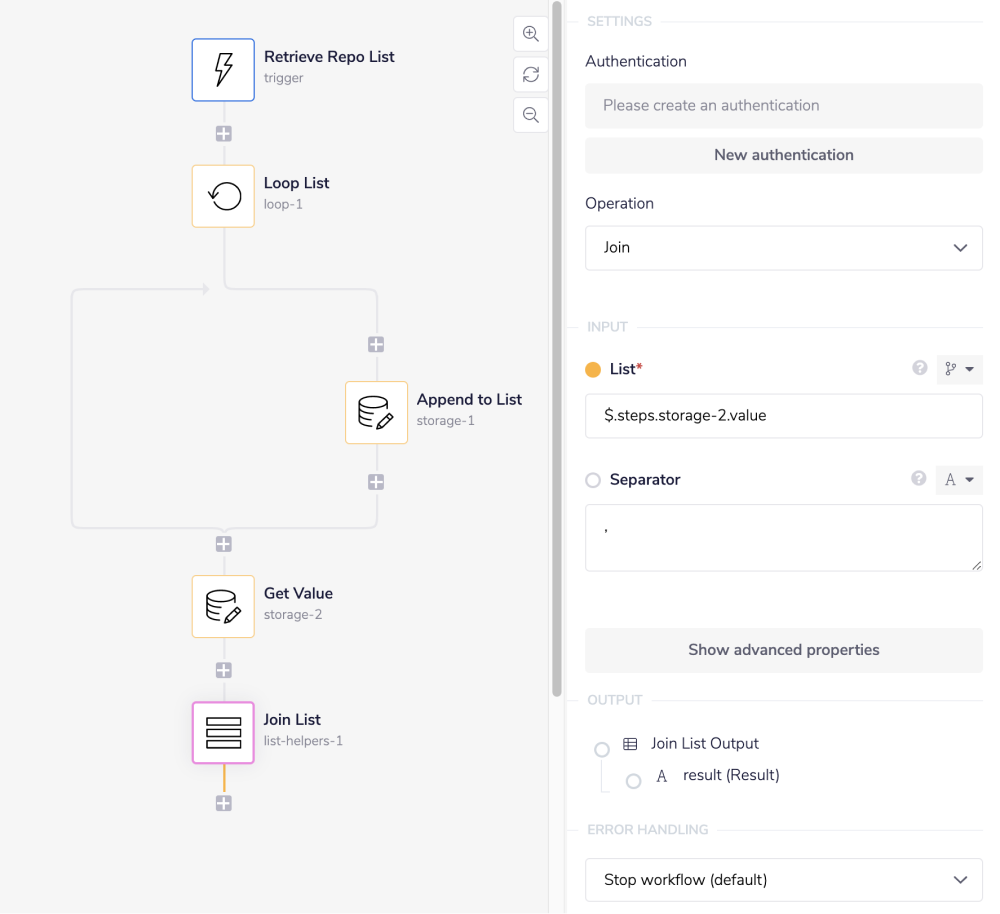
When the workflow gets to these steps, the data storage collections will gather the names found from the previous connector step, and join them together forming a new list of only repository names.
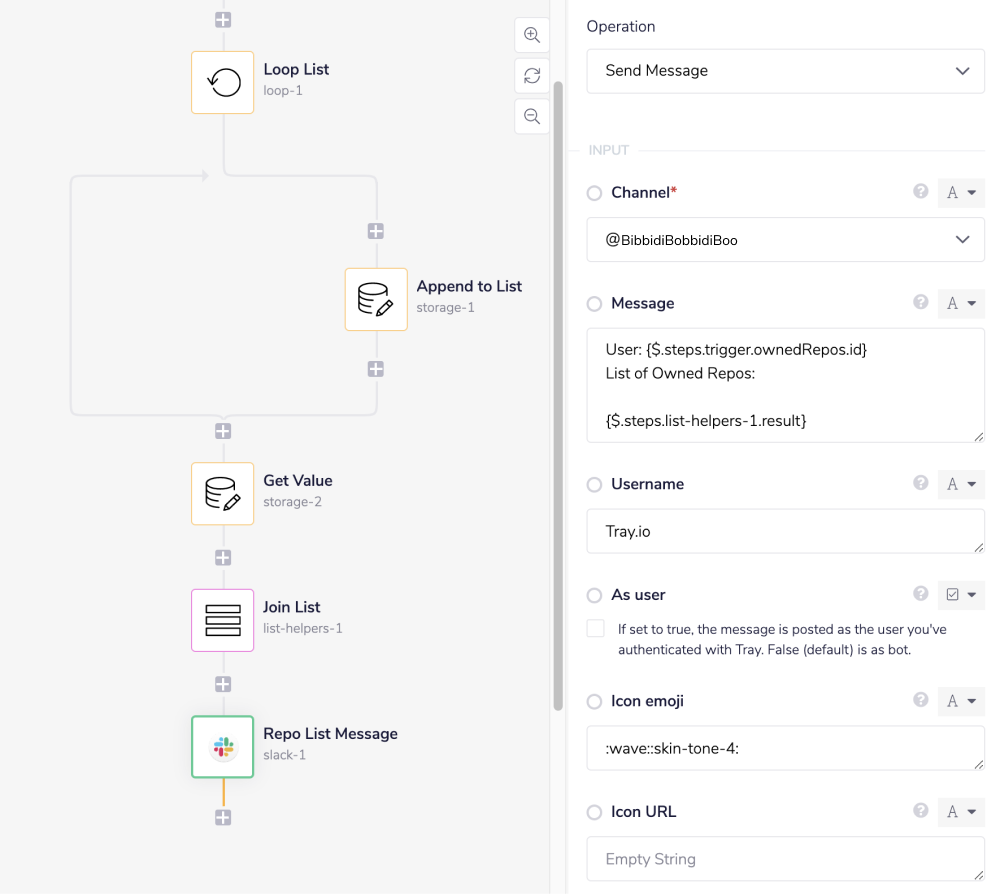
6 - Notify SlackCopy
The last step is to place a Slack connector at the very bottom of the Workflow. Set the operation to 'Send Message'. With your authentication already setup, select the channel you wish to notify. For testing purposes note that you can simply select yourself if you wish to instead of the channel at this stage.
Using Tray.io's interpolation method, gather the jasonpaths required to fill out an appropriate message. Again the connector-snake is your best friend here. Use it to get the information you need, but be sure to set the type selector back to string once you have gathered your necessary paths.
In this case, we will be sending the user ID (gathered from the trigger step: $.steps.trigger.ownedRepos.id) alongside the list of repository names created earlier: $.steps.list-helpers-1.result.
Make sure that your spacing is set carefully here (including new lines and white spacing in general).
INTERPOLATION: When you wish to include JSON generated data within another input/output result, use our Interpolation method as described here.
You can also add a Slack 'Icon emoji', 'Icon URl' etc to make your message appear more appealing once sent.

Go back to your original workflow and on the final connector step ('Call Workflow'), from the dropdown options available in the 'Workflow' field, select the name of your secondary workflow. Run your workflow.
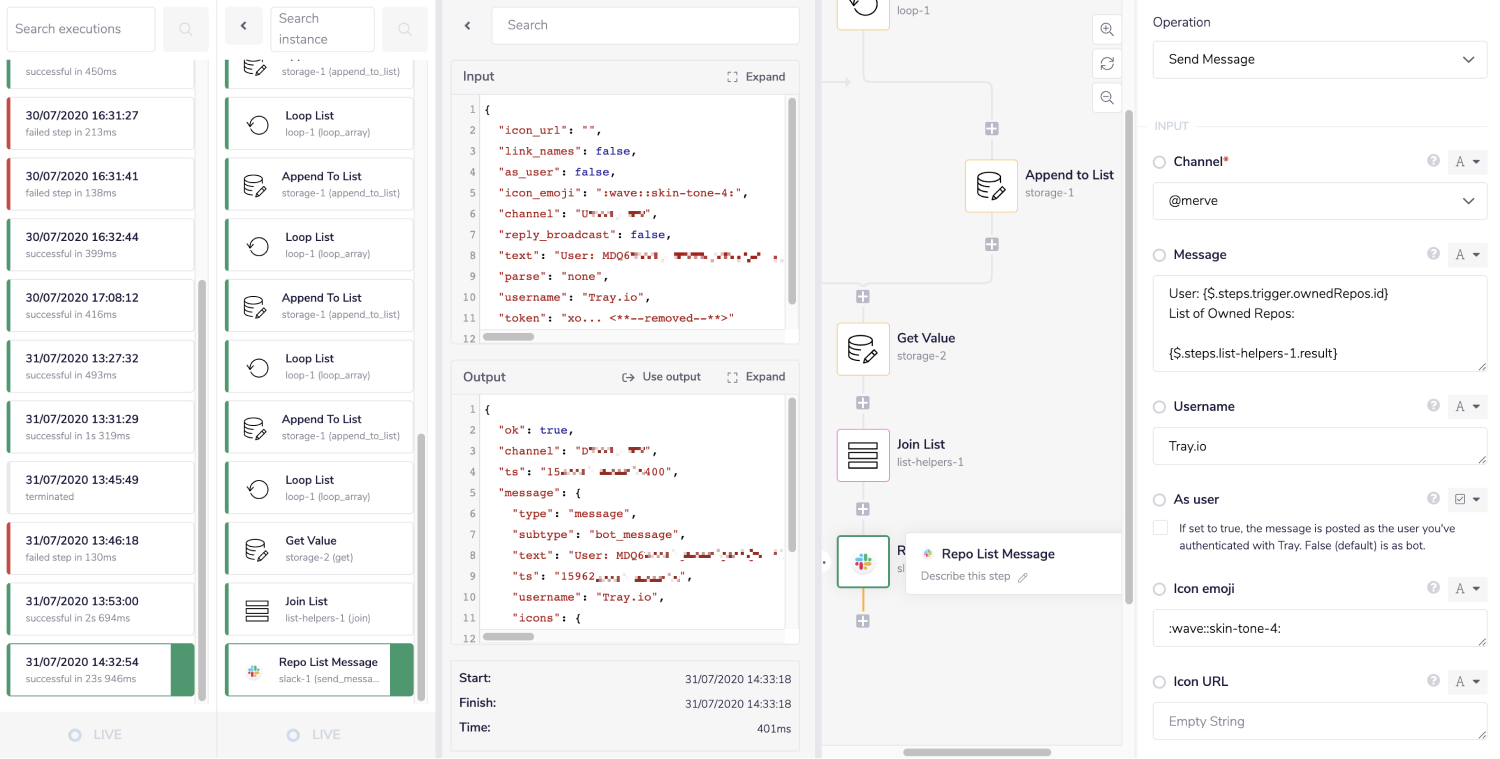
The end result should be similar to below:


As always check your Debug panel for more details:

And there you have it! Your workflows are COMPLETE!
BEST PRACTICES: Whenever you do decide to create your own workflow, be sure to check out some of our key articles such as: