
Cue 1.1
Cue is a platform that simplifies workflows for call centre agents.
- On this page
- Cue
- Overview
- Authentication
- Available Operations
OverviewCopy
Cue makes it easier for call centre agents to quickly read and write data across a multitude of applications, enabling them to be much more efficient when helping customers.
AuthenticationCopy
To begin using the connector, add a Cue connector step to your workflow. With the Cue connector step highlighted, click on the 'New authentication' button that should now be visible in the Properties panel (under 'SETTINGS') on the right hand side:


You will see a new authentication popup window that will require 4 pieces of information:
Access token: Your individual access token
Client ID: The identifier for your Cue application
Organization ID: The identifier for your organization
User ID: Your unique user ID
Start by naming your authentication appropriately, and then begin entering the credentials listed above.
Make sure to specify whether or not you are using the 'Staging API' (as opposed to the Production API) before you complete your authentication:


Click 'Add authentication' and you will be set up and ready to go.
Available OperationsCopy
The examples below show one or two of the available connector operations in use.
Please see the Full Operations Reference at the end of this page for details on all available operations for this connector.
Example usageCopy
Below is a brief example which demonstrates how to iterate through Cue accounts using a trigger and core connector.
The steps are outlined as follows:
Set up your manual trigger and first Cue connector step.
Add a Loop connector to iterate through your accounts.
Add a final Cue step to receive the information gathered.
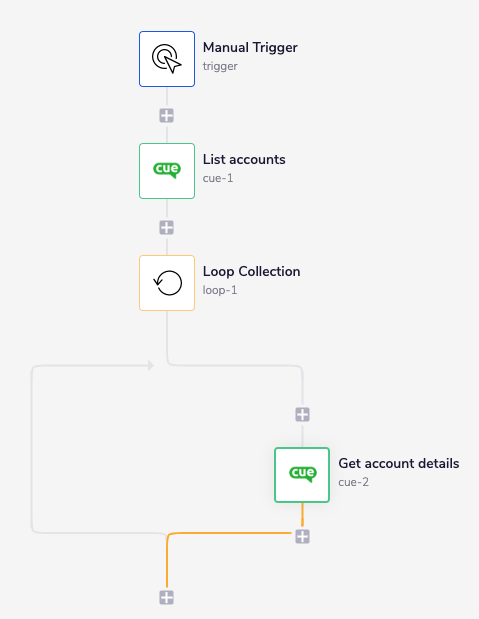
The end result should look something like this:

1 - Setup trigger & List accountsCopy
Once you have created and named your new workflow, select 'Manual Trigger' from the connectors panel on the left, and add a 'Cue' connector in your second step. Set the operation to 'List accounts'.
The fields that are mandatory are 'Per page' and 'Offset' but as they are already pre-filled you need not worry about them at this stage.
Feel free to name your step so that you know what it does.


Now, when this workflow is run, it will pull down a list of accounts from the Cue API which you will be able to view when you click through your debug panel, and expend the output field.
2 - Add a Loop stepCopy
Next, we add a 'Loop Collection' connector to the workflow.
Use the connector-snake to generate the JSON path you will need, by clicking and dragging on the orange circle mapping icon, left of the 'List operation' itself. Once you have dragged iot over to the first Cue step, you will see a dropdown list of options appear. Select results from the options available.
The Loop input panel should then look something like this.

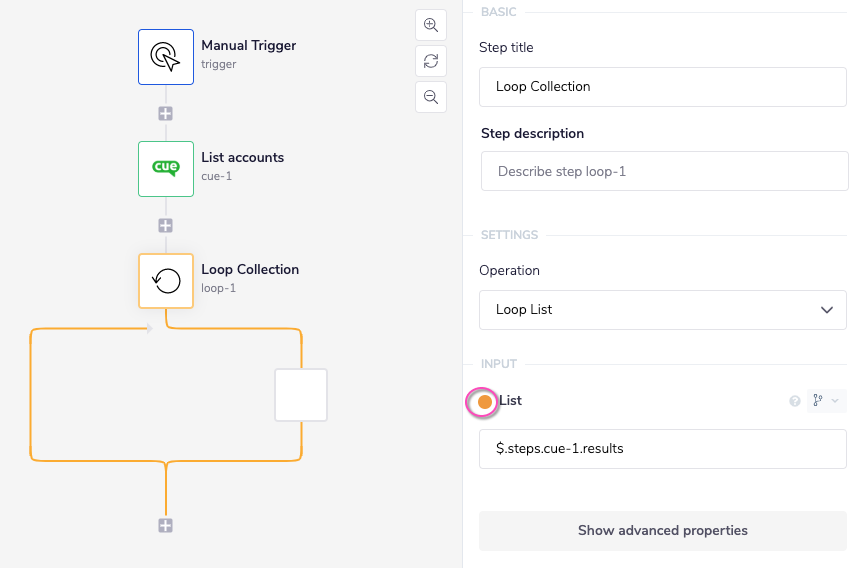
This will enable us to iterate over the list of accounts, and perform operations for each one.
3 - Get account detailsCopy
Finally, drag another Cue connector step into the Loop collection itself, and select the operation 'Get account'.
Use the same connector-snake method for generating the JSON path to get the 'Account ID' field.


From here, you can send the data from each account to another online service, manipulate the data in some way, or change 'Get account' to 'Update account' in order to update each account in turn with some new data.