
AWS Generic Connector 1.1
Interact with AWS services that support the AWS Signature Version 4 mechanism.
OverviewCopy
AuthenticationCopy
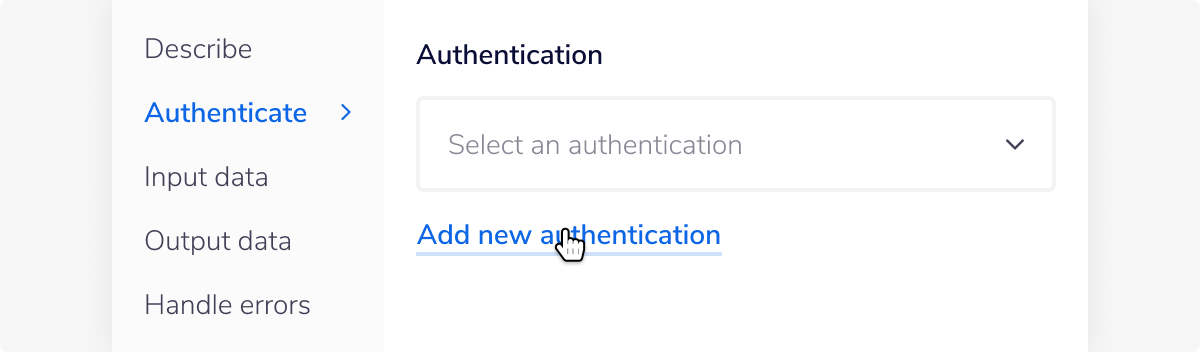
When using the Amazon Web Services connector, the first thing you will need to do is go to your Tray.io account page, and select the workflow you wish to work on. Once in the workflow dashboard itself, search and drag the AWS connector from the connectors panel (on the left hand side) onto your workflow.
With the new AWS connector step highlighted, in the properties panel on the right, click on 'New Authentication' which is located under the 'Settings' heading.

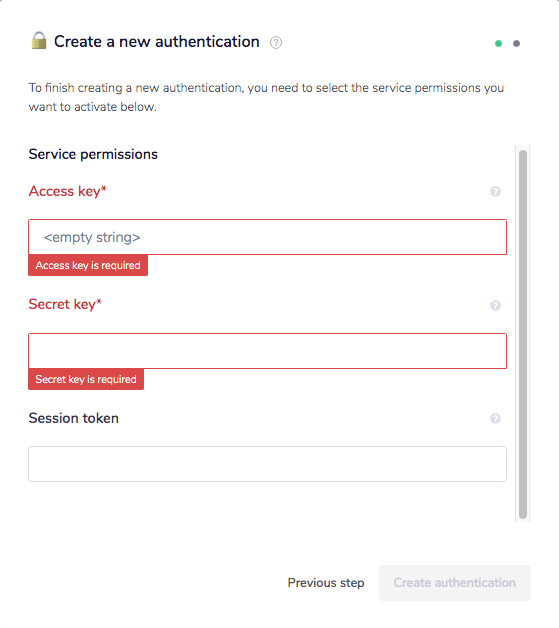
This will result in a Tray.io authentication pop-up window. The first page will ask you to name your authentication appropriately, and state which type of authentication you wish to make ('Personal' or 'Organisational'). Once you click 'Next step' the popup will change to look like the following.
As you can see, the next page asks you for your 'Access key' and your 'Secret key'.
IMPORTANT!: If you are using temporary credentials then you will also need to supply a'Session token'.

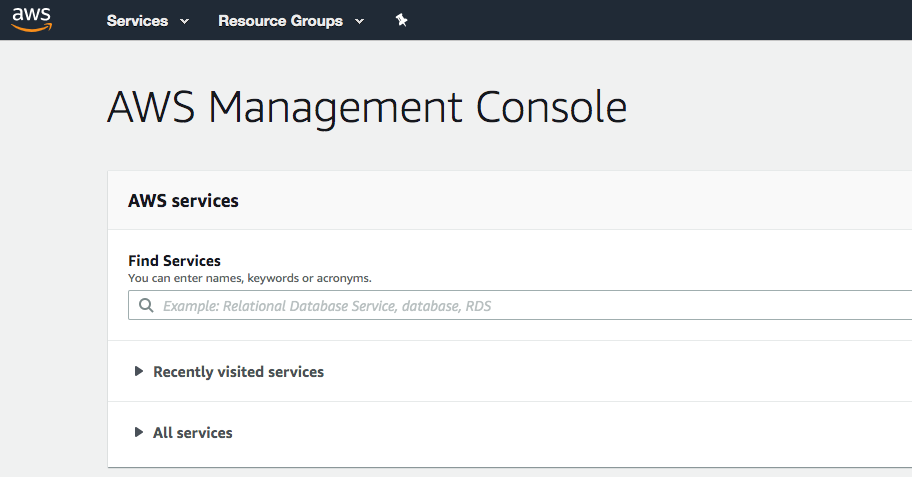
In order to get these fields, log into your AWS dashboard.

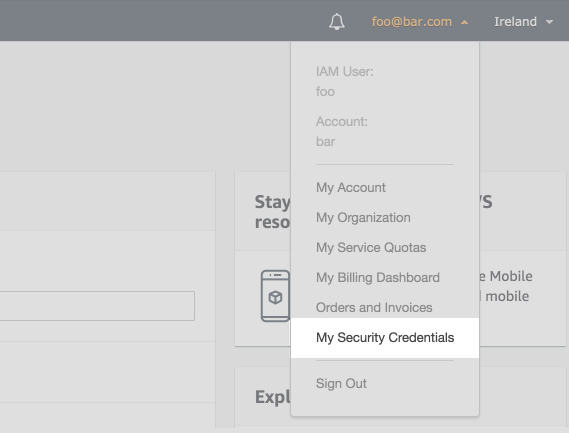
Click on your Username to trigger a dropdown. From the dropdown, click on 'My Security Credentials'.

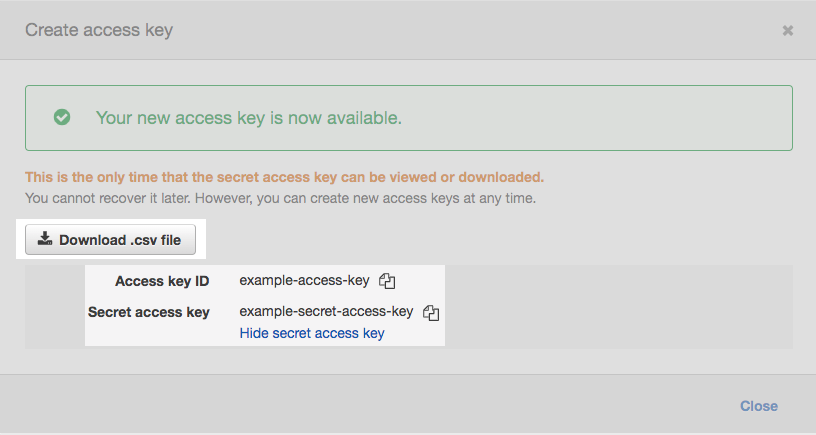
On the Security Credentials page you should see a button named 'Create access key'. If you dont already have one, click on this to generate the access key and secret keys needed for authentication.

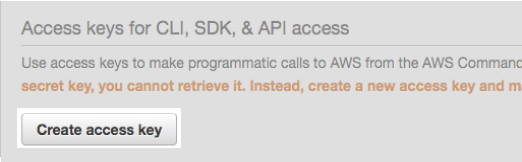
IMPORTANT!: Make sure to copy the secret key accurately as you won't be able to retrieve itonce the window is closed. You can download both the access and secret key in a .csv file if youwanted to keep a copy of these.

Once you have clicked the 'Add authentication' button, go to back to your authentication field (within the workflow dashboard properties panel from earlier), and select the recently added authentication from the dropdown options now available.
Your connector authentication setup should now be complete.
Available OperationsCopy
The examples below show one or two of the available connector operations in use.
Please see the Full Operations Reference at the end of this page for details on all available operations for this connector.
Example usageCopy
TRAY POTENTIAL: Tray.io is extremely flexible. By design there is no fixed way of working with it - you can pull whatever data you need from other services and work with it using our core and helper connectors. This demo which follows shows only one possible way of working with Tray.io and the Amazon Web Services connector. Once you've finished working through this example please see our Introduction to working with data and jsonpaths page and Data Guide for more details.
Below is an example of a way in which you could potentially use the AWS connector to get reviews from an AWS DynamoDB table, and use AWS Comprehend to determine whether the review was positive or negative; then record the result in a Google Sheet.
The steps will be as follows:
Setup your trigger and retrieve the ID of the Google Sheet we want to add our end results to.
List tables in DynamoDB.
Get the rows from the reviews table.
Loop through these rows.
Get the sentiment of these reviews from AWS Comprehend.
Record the results in the Google Sheet we retrieved earlier.
The final outcome should look like this:


IMPORTANT!: The APIs for each AWS Service are all different and mostly do not follow the samestructure.** It is recommended that you look at the services documentation before you begin creating your AWS connector step**. Another way of finding how to form your request is by using the aws-cli -debug option. This willdisplay the HTTP request that is being sent when making the request via your CLI.
1 - Setup trigger & Retrieve Google Sheet IDCopy
Once you have clicked 'Create new workflow' on your main Tray.io dashboard (and named said new workflow), select the Manual trigger from the trigger options available:


Once you have been redirected to the Tray.io workflow dashboard, from the connectors panel on the left, add a Google Drive connector to your second step. Set the operation to 'List files'.
NOTE: Due to security reasons the Google Drive connector is often required when a user actually needs Google Sheet details. Please see both our Google Sheets and Google Drive documentation for more details.
The spreadsheet that we want to add to is called 'Reviews'. To make it easier to find the Google Sheet we can use the 'Filter by name' input for this. This input allows us to search for files by filename and means that only relevant files are returned.


2 - Retrieve Table ListCopy
The next stage is to find a way of listing the tables available within the DynamoDB. This is to make sure we get the correct name of the DynamoDB table, where the review data is stored.
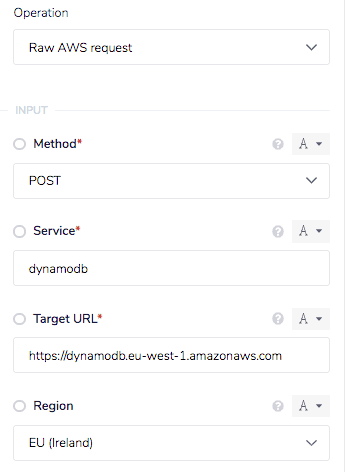
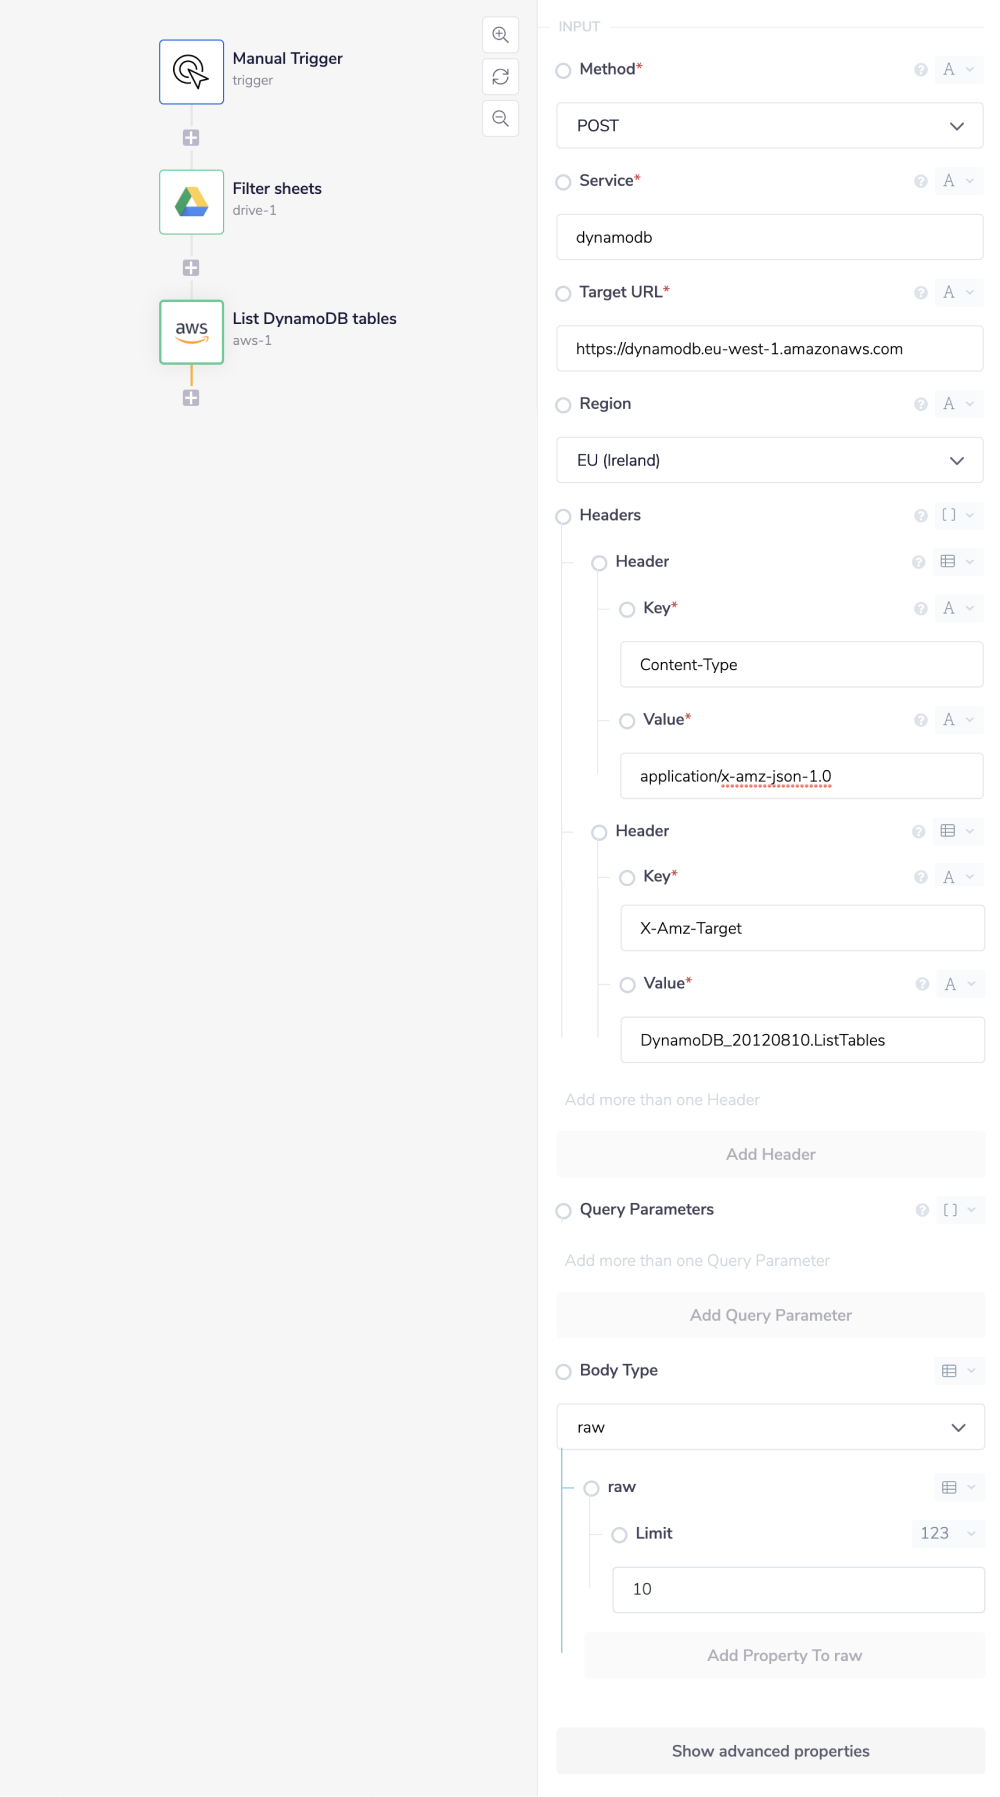
Add an AWS connector to the second step of your workflow and set the operation to 'Raw AWS request'.
There are several fields that require your input, the first being the 'Method' itself. Set this field to POST. The next input field is for the 'Service' you are using, which in this case is: dynamodb.
The DynamoDB table that we want to interact with belongs to the 'eu-west-1' region. So the 'Target URL' will be https://dynamodb.eu-west-1.amazonaws.com while the 'Region' input field you select from the dropdown should be EU (Ireland).
For AWS to know that what content type we want returned add a header field by pressing the grey 'Add Header' button. Set the 'Header' -> 'Key' to Content-Type and the 'Header' -> 'Value' to application/x-amz-json-1.0.
For AWS to know we want to list the tables, follow a similar process by including another header with the 'Key' set to: X-Amz-Target and the 'Value' as: DynamoDB_20120810.ListTables.
Finally set the 'Body Type' to raw and the 'raw' -> 'Limit' to 10.
For more details about other parameters that can be included, please checkout the
The full operation input used in this step can be found below:
1{2"method": "POST",3"service": "dynamodb",4"target_url": "https://dynamodb.eu-west-1.amazonaws.com",5"region": "eu-west-1",6"headers": [7{8"key": "Content-Type",9"value": "application/x-amz-json-1.0"10},11{12"key": "X-Amz-Target",13"value": "DynamoDB_20120810.ListTables"14}15],16"body": {17"raw": {18"Limit": 1019}20}21}
Your completed properties panel should look similar to the Gif and image below:


3 - Scan the review tableCopy
The third step will scan the DynamoDB table, named 'reviews', for entries.
Add another AWS connector to your workflow and once more set the operation to 'Raw AWS request'. While most of the input fields will remain the same, the main difference here lies in the second 'Header' and 'Body Type' fields.
Within the second 'Header' field (where the 'Key' is X-Amz-Target), a different operation is specified with the body of the request. Please update your secondary 'Value' to be: DynamoDB_20120810.Scan.

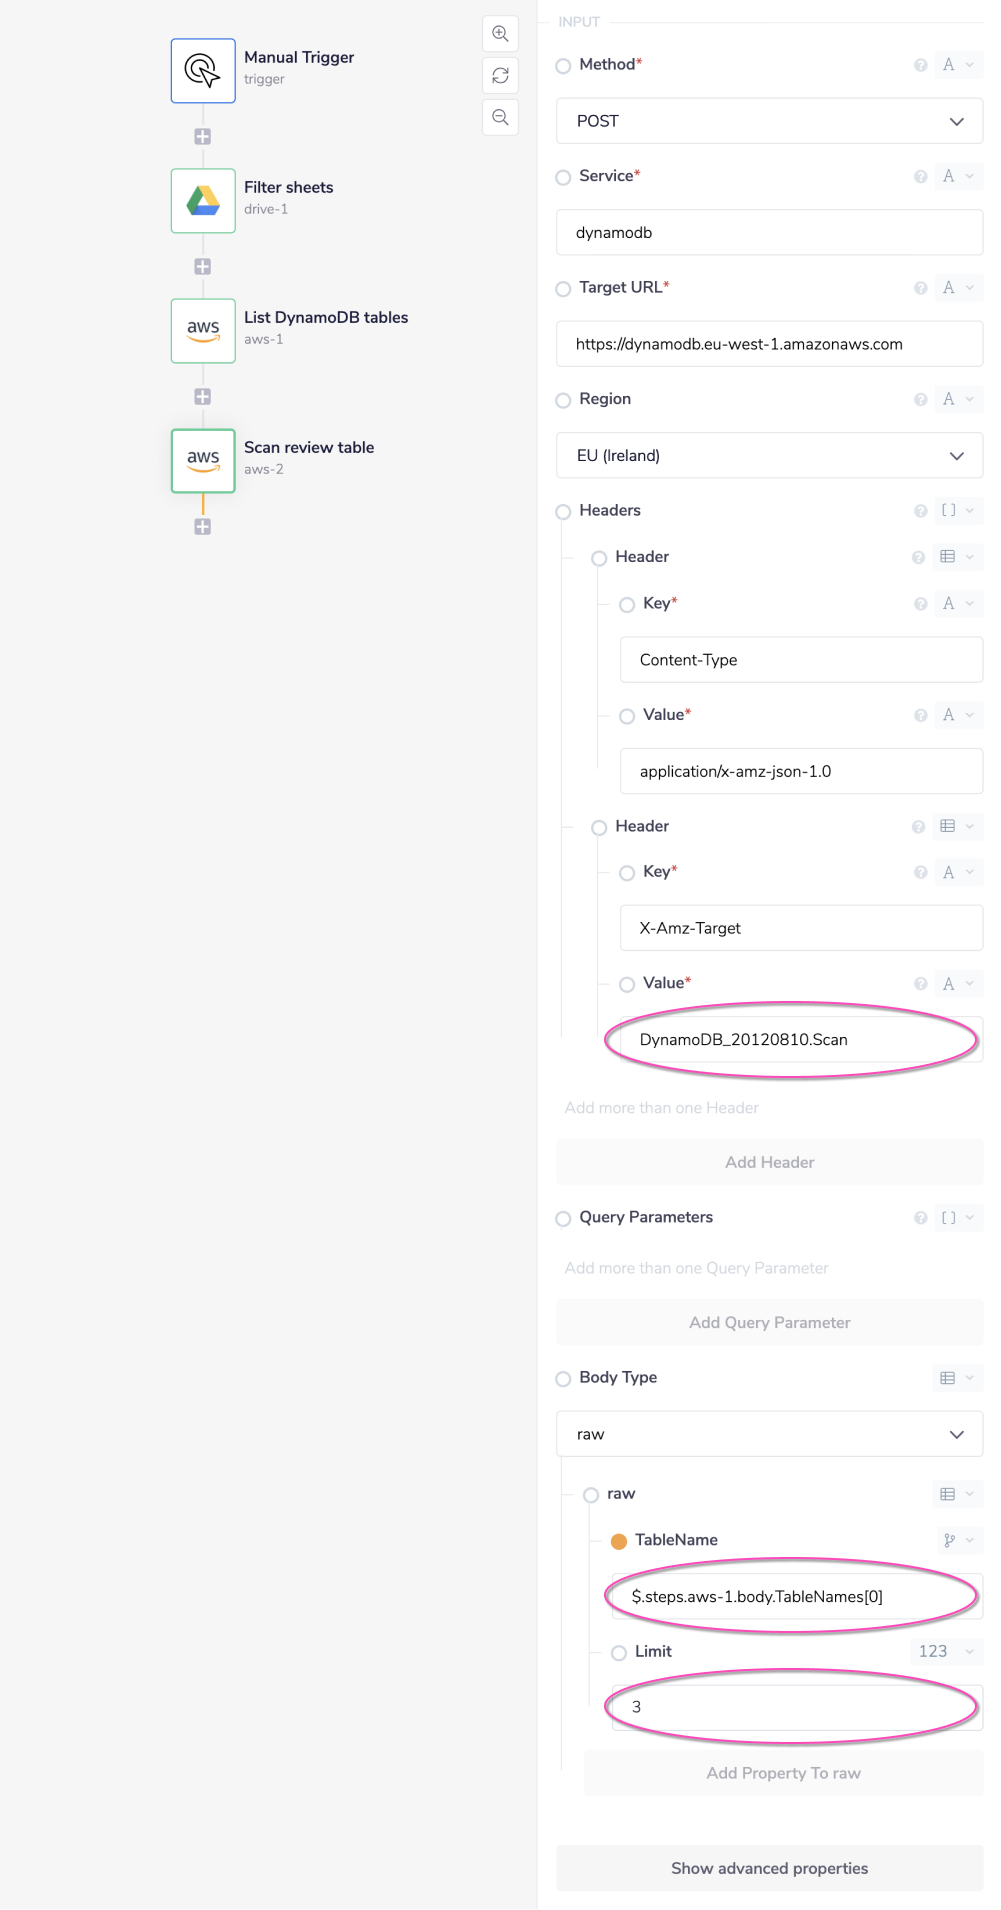
While we still want the 'Body Type' to be raw the 'raw' -> 'Limit' has changed to 3 with an added property called 'TableName'. In order to retrieve the table name from the previous step data, you can use the connector snake to form a jsonpath.
CONNECTOR-SNAKE: The simplest and easiest way to generate your jsonpaths is to use our feature called the Connector-snake. Please see the main page for more details.
JSONPATHS: For more information on what jsonpaths are and how to use jsonpaths with Tray.io, please see our pages on Basic data concepts and Mapping data between steps


The full input of this operation can be found below:
1{2"method": "POST",3"service": "dynamodb",4"target_url": "https://dynamodb.eu-west-1.amazonaws.com",5"region": "eu-west-1",6"headers": [7{8"key": "Content-Type",9"value": "application/x-amz-json-1.0"10},11{12"key": "X-Amz-Target",13"value": "DynamoDB_20120810.Scan"14}15],16"body": {17"raw": {18"TableName": "$.steps.aws-1.body.TableNames[0]",19"Limit": 320}21}22}
We will be expecting a list back from this step where each element in the list represents a row in the 'reviews' table.
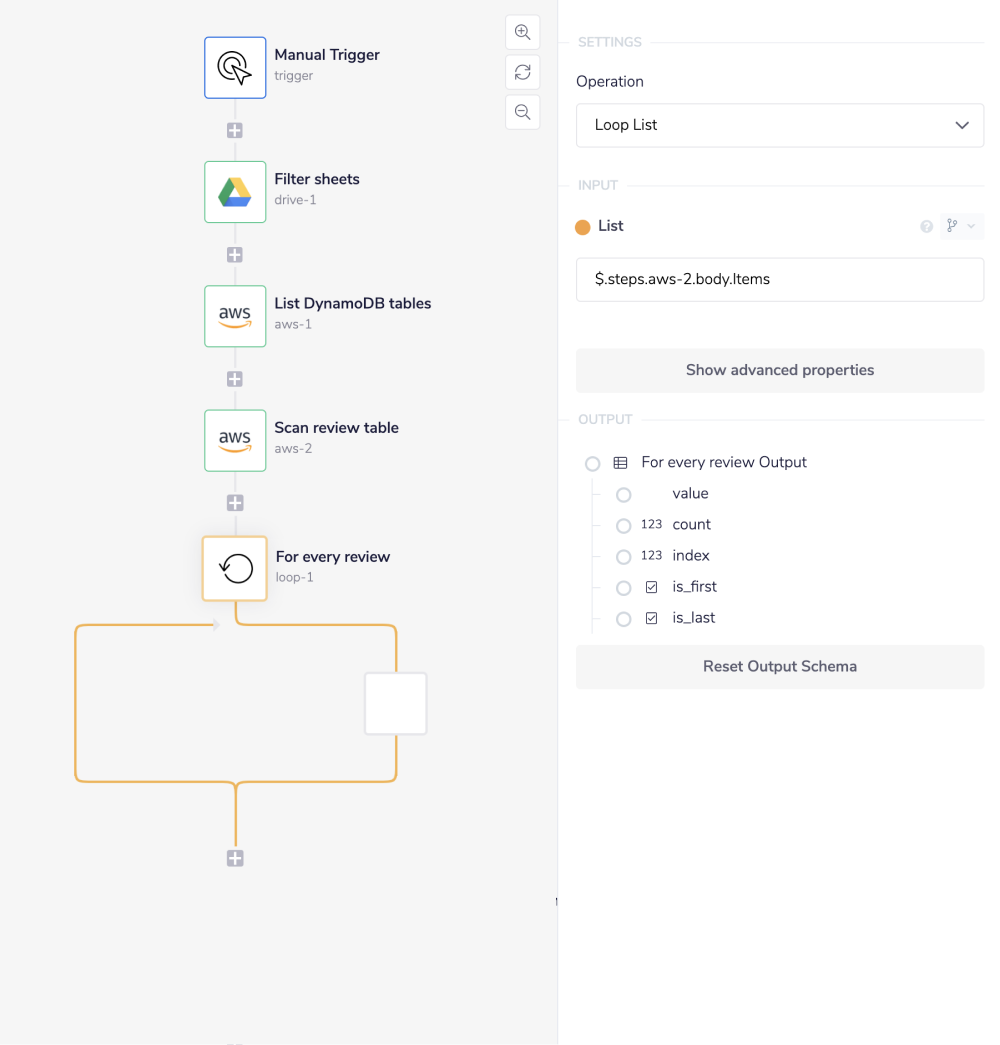
4 - Loop through entries within tableCopy
This next step will loop through the list returned from the previous step.
The input here is referencing the list of rows that is returned in the previous step. In each loop sequence we will be going through each review and checking whether they were positive or negative. After which we will then store the result in a new row in a Google Sheet.
Get a 'Loop collection' connector from the connectors panel and place it in the next step of your workflow. Set the operation to 'Loop List'.
Auto-generate the jsonpath required by dragging the field name 'List' over the previous connector step, and select items from the options available:

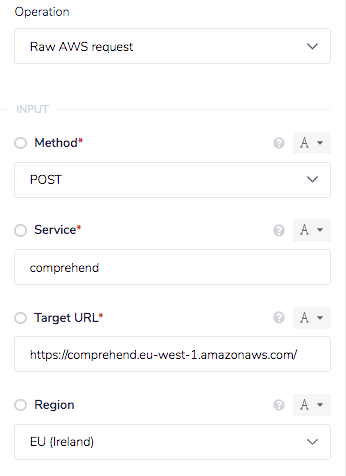
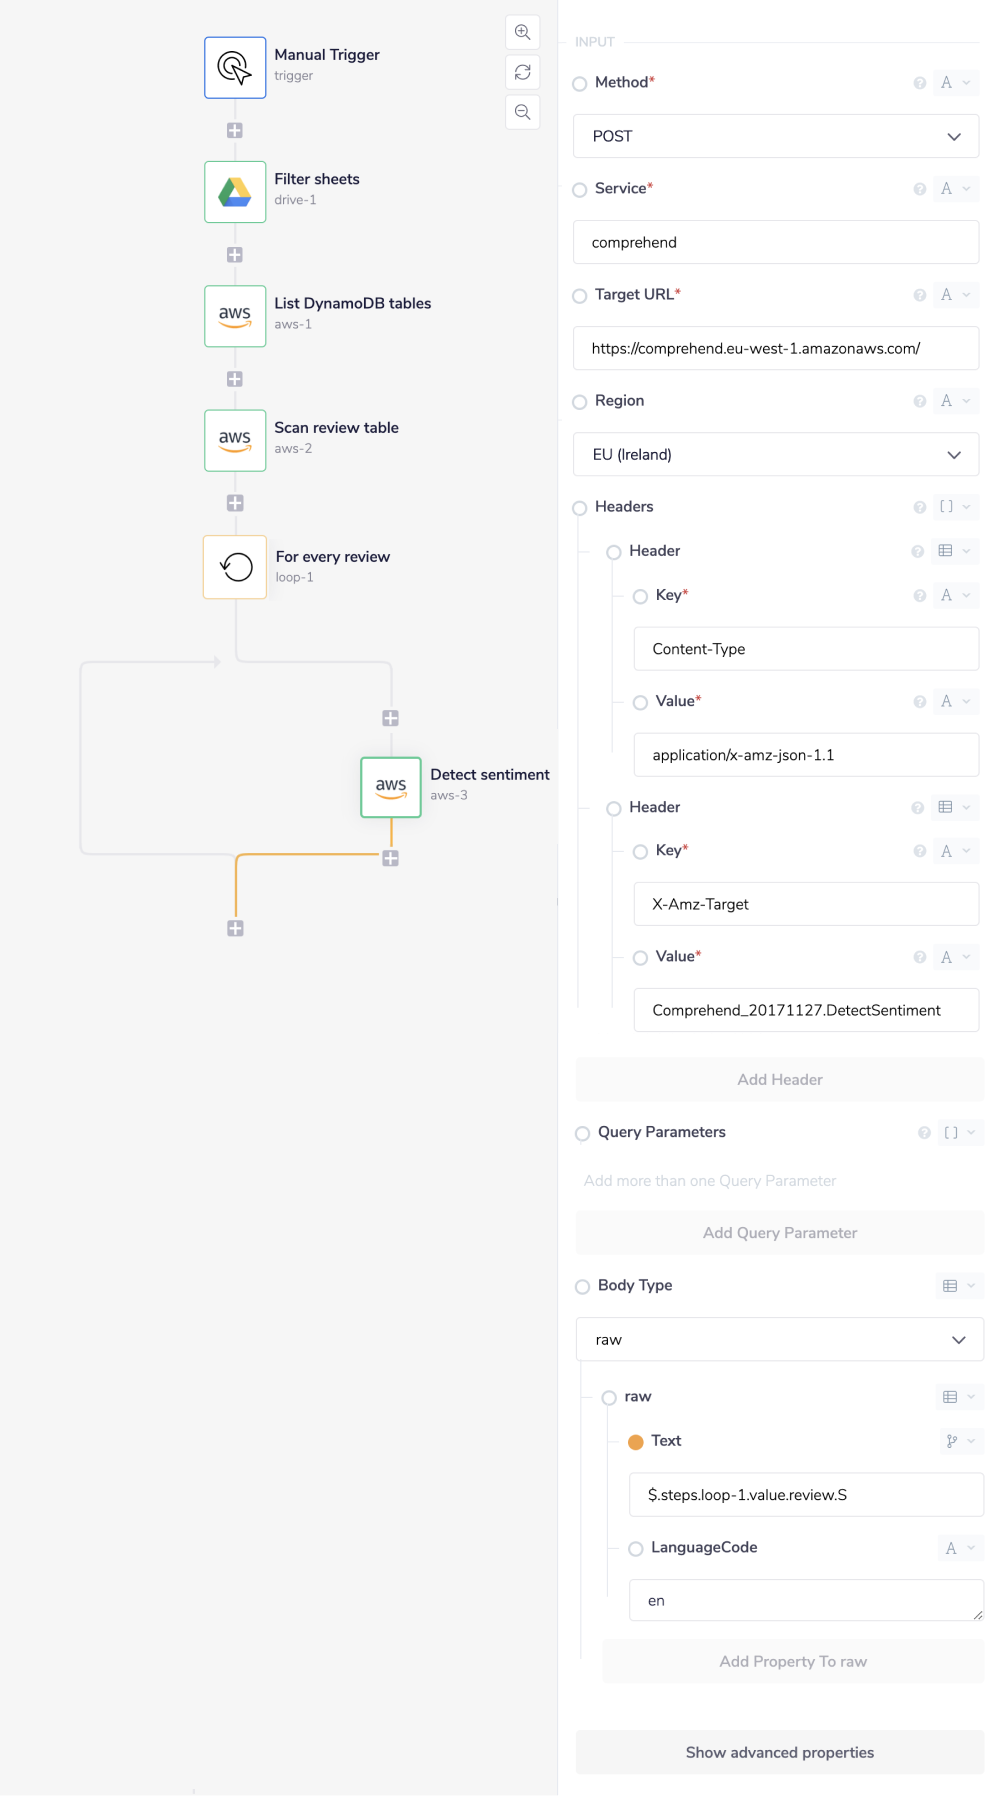
5 - Retrieve sentiment of the reviewCopy
The fourth step interacts with a different service, AWS Comprehend. A request will be sent to its API to detect whether the review that we are currently iterating with is positive or negative.
Add another AWS connector to your workflow this time WITHIN the Loop connector step itself, and once more set the operation to 'Raw AWS request'. While most of the input fields will remain the same as previously, the main difference here lies once more in the second 'Header' and 'Body Type' fields.
Within the second 'Header' field (where the 'Key' is X-Amz-Target), a different operation is specified with the body of the request. Please update your secondary 'Value' to be: Comprehend_20171127.DetectSentiment.
While we still want the 'Body Type' to be raw both of the properties within the 'raw' input field has changed. Set the 'Text' field to the following jsonpath: $.steps.loop-1.value.review.S. Again, you can generate this yourself by utilising the connector-snake. The 'LanguageCode' property should be en.

The full input of this operation can be found here:
1{2"method": "POST",3"service": "comprehend",4"target_url": "https://comprehend.eu-west-1.amazonaws.com/",5"region": "eu-west-1",6"headers": [7{8"key": "Content-Type",9"value": "application/x-amz-json-1.1"10},11{12"key": "X-Amz-Target",13"value": "Comprehend_20171127.DetectSentiment"14}15],16"body": {17"raw": {18"Text": "$.steps.loop-1.value.review.S",19"LanguageCode": "en"20}21}22}

6 - Add row to Google SheetCopy
The last step of the workflow is to add a new row to a Google Sheet. A new row will contain the information that has been retrieved in the previous steps - the raw review gathered from the DynamoDB table and the classification of whether the is positive or negative from AWS comprehend.
Add a new Google Sheet connector once more WITHIN the Loop connector step, and set the operation to 'Create row'.
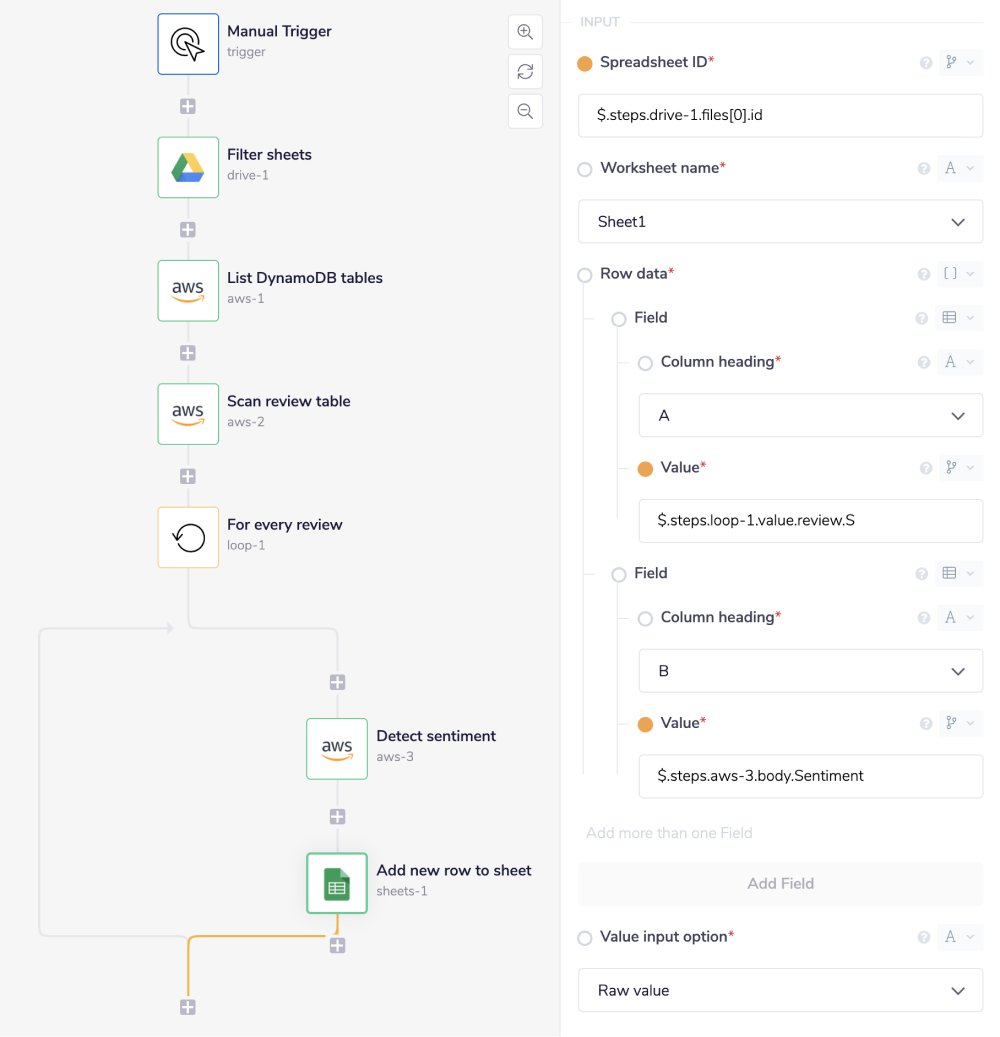
The ID of the Google Sheet we are adding to is also needed. This can easily be retrieved by using the connector-snake and dragging the 'Spreadsheet ID' field over to the first step, where we listed files with the name 'reviews' within Google Drive.
Make sure to click on the grey 'Add Field' button in your 'Row data' property, so that you can specify the 'Column heading' and 'Value' you wish to set. Set the both 'Value' fields with the connector-snake, the first utilising the Loop connector step: $.steps.loop-1.value.review.S and the second with your final AWS connector step: $.steps.aws-3.body.Sentiment. The 'Value input option' is again Raw value.
Your properties panel should be similar to the below:

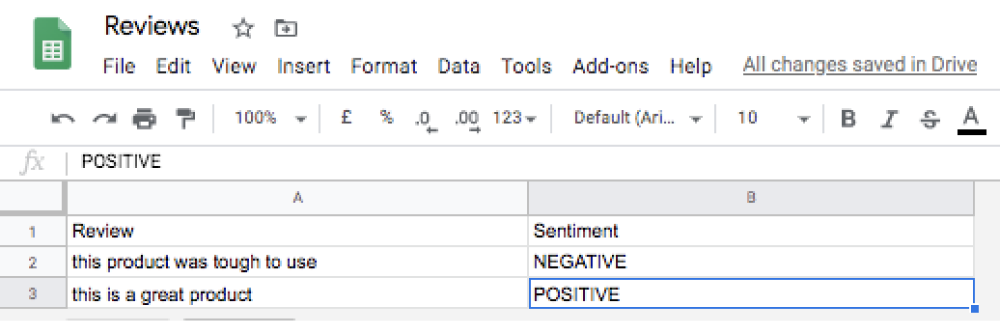
Once the workflow has been ran, we can see that the reviews and the sentiment of the reviews have been stored within the Google Sheet 'reviews' as was the plan all along.

Congratulations! You've finished your set up.
BEST PRACTICES: Whenever you do decide to create your own workflow, be sure to check out some of our key articles such as: