
ArcGIS 1.1
ArcGIS provides contextual tools for mapping and spatial reasoning so you can explore data & share location-based insights.
OverviewCopy
ArcGIS is a spacial mapping connector. It allows for the updating and removal of existing features for a given map layer within an ArcGIS instance.
AuthenticationCopy
When using the ArcGis connector, the first thing you will need to do is go to your Tray.io account page, and select the workflow you wish to work on. Once in the workflow dashboard itself, search and drag the ArcGIS connector from the connectors panel (on the left hand side) onto your workflow.
With the new ArcGIS connector step highlighted, in the properties panel on the right, click on 'New Authentication' which is located under the 'Settings' heading.


This will result in a Tray.io authentication pop-up window. The first page will ask you to name your authentication and state which type of authentication you want to make ('Personal' or 'Organisational'). The following page will look like this:

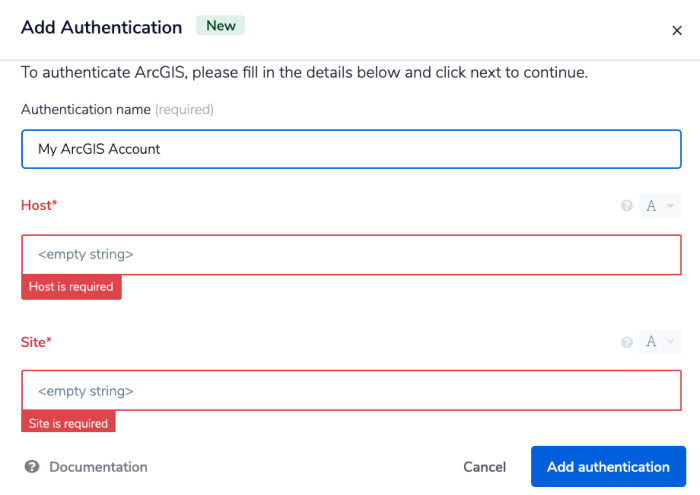
As you can see, you will need your 'Host', 'Site', 'Username' and 'Password'.
The method to obtain the value for both the 'Host' and 'Site' varies depending on whether or not you are using an Enterprise instance with ArcGIS.
Default ArcGIS InstanceCopy
In order to get both the host and site field values, head to your ArcGIS layers dashboard . Login with your 'Username' and 'Password'.
You should be directed to a page similar to below. To get the 'Host' name, click on any of the layers displayed:


On the right hand side of the newly displayed dashboard, you will see a field name called 'Service URL'. Copy this somewhere where you can edit the URL.


The Host name is the value after: https:// and includes .com : example.arcgis.com.
The Site name is the hash after the host name, and includes /arcgis : xyz123/arcgis.
Just to clarify things, here is an example were your Service URL as follows:
Service URL: https://examplesite.arcgis.com/xyz123abc456lmn789/arcgis/rest/services/test/FeatureServer
Host: examplesite.arcgis.com Site: xyz123abc456lmn789/arcgis
Enterprise InstanceCopy
IMPORTANT!: If you are using an Enterprise accountyou will need to have some prior knowledge of your Independent Instance.
Both the host and site names are different under Enterprise Instances.
Host: is your ArcGIS 'Webadaptorhost' value and Domain name combined.
This value could look like example.com or webadaptorhost.example.com depending on your configuration instance.
Site: is your ArcGIS 'Webadaptorname' value.
This is the name of your ArcGIS Web Adaptor; arcgis is the default name, but you may have used a different name when you installed ArcGIS Web Adaptor.
For more information, please refer to the official ArcGIS documentation . The specific use case for this can be found under the sub-heading 'ArcGIS Server user connections'.
The 'Username' and 'Password' is the same as the ones you use when logging into your ArcGIS instance.
Once you have clicked the 'Add authentication' button, go to back to your authentication field (within the workflow dashboard properties panel from earlier), and select the recently added authentication from the dropdown options now available.
Your connector authentication setup should now be complete.
Available OperationsCopy
At the bottom of this page will find a complete, detailed list of all the available operations that can be used with this connector (including their version history).
Please see the Full Operations Reference for more details.
Example usageCopy
TRAY POTENTIAL: Tray.io is extremely flexible. By design there is no fixed way of working with it - you can pull whatever data you need from other services and work with it using our core and helper connectors. This demo which follows shows only one possible way of working with Tray.io and the ArcGIS connector. Once you've finished working through this example please see our Introduction to working with data and jsonpaths page and Data Guide for more details.
Below is an example of a way in which you could potentially use the ArcGIS connector, to apply an edit to an existing feature layer for a non-Enterprise account.
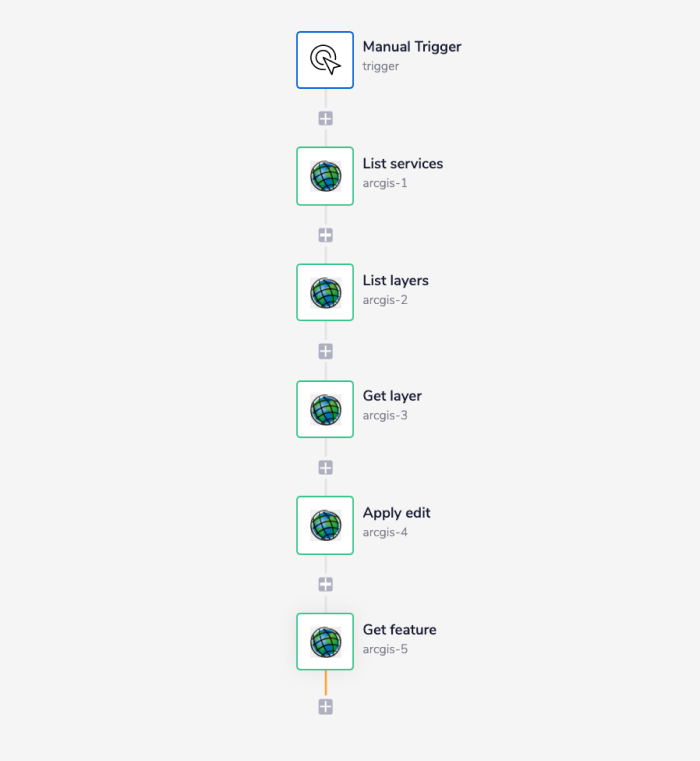
The steps will be as follows:
Setup your trigger and List services available.
List layers.
Get layer.
Apply edit.
Get feature.
The final outcome should look like this:

1 - Setup Trigger & List ServicesCopy
Once you have clicked 'Create new workflow' on your main Tray.io dashboard (and named said new workflow), select the Manual trigger from the trigger options available:


Once you have been redirected to the Tray.io workflow dashboard, from the connectors panel on the left, add an ArcGIS connector to your second step. Set the operation to 'List services'.
Feel free to re-name your steps as you go along to make things clearer for yourself and other users.
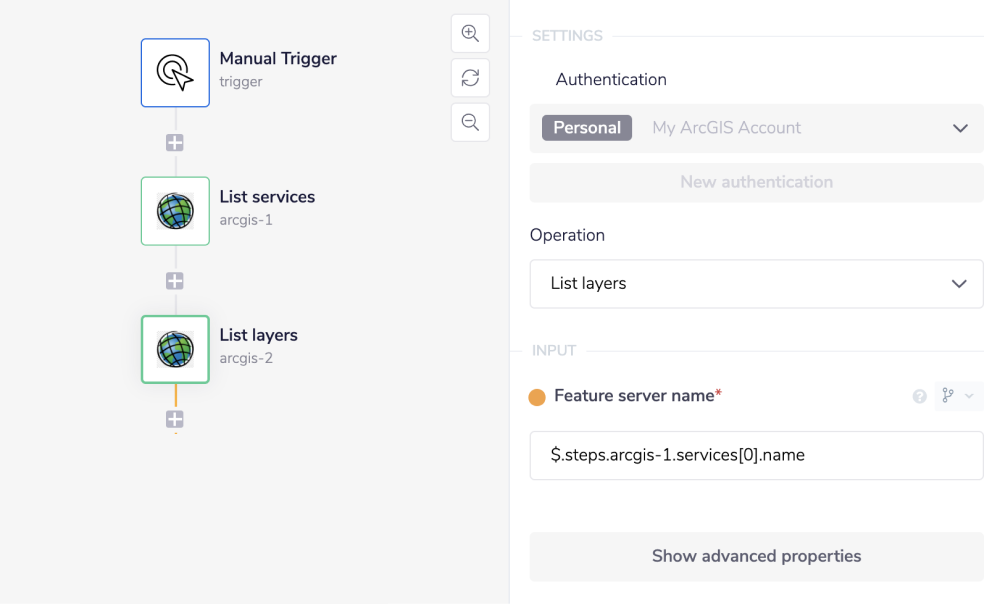
2 - List LayersCopy
Add a second ArcGIS step to your workflow and select the 'List layers' operation.
You can then use the connector-snake to jsonpath the 'Feature server name' field from the 'List services' step in order auto-generate an accurate input:
JSONPATHS: For more information on what jsonpaths are and how to use jsonpaths with Tray.io, please see our pages on Basic data concepts and Mapping data between steps
CONNECTOR-SNAKE: The simplest and easiest way to generate your jsonpaths is to use our feature called the Connector-snake. Please see the main page for more details.

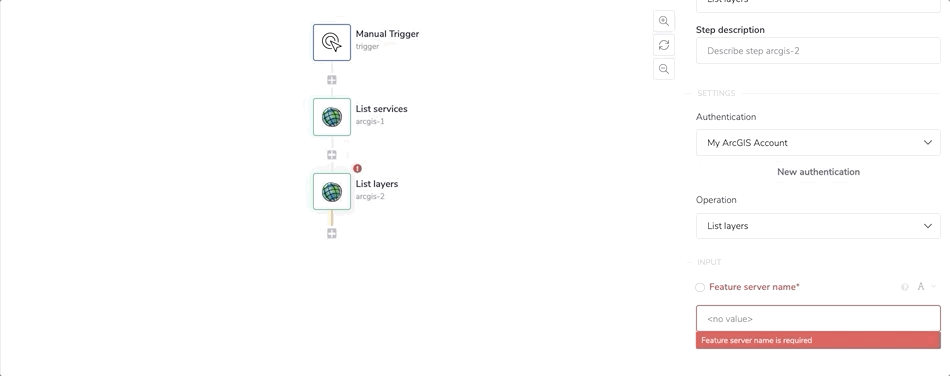
This step will retrieve a list of available layers in which you can edit the features for. Note that this result is specific to the Feature server that you specify in the input panel of the operation.


3 - Get LayerCopy
Add another ArcGIS step to the workflow. Set the operation to 'Get layer'.
Use the connector-snake once more to jsonpath the 'Feature server name' input from the previous 'List services' step.
Obtaining the value for the 'Layer ID' can be done in the same fashion. Simply use the connector-snake this time in conjunction with the first ArcGIS step, 'List layers'.

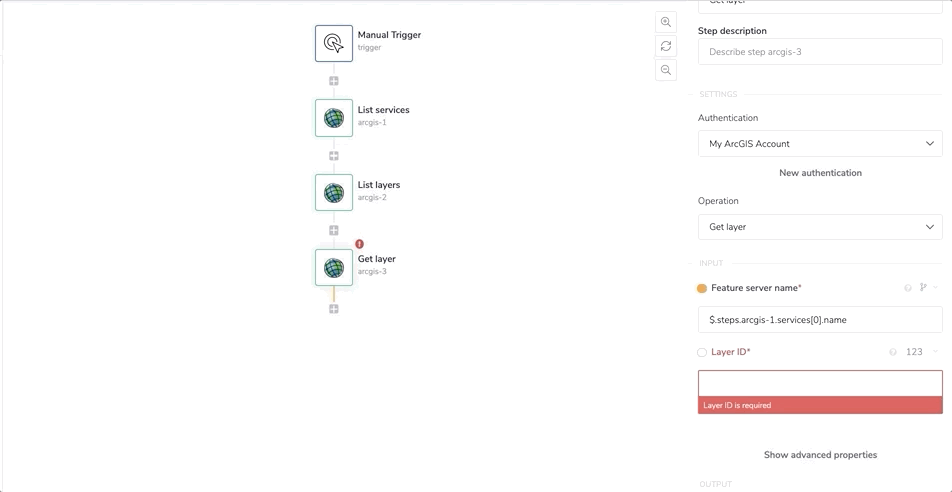
This step will retrieve a specific layer from the list of available layers within the given Feature server. We can then apply an edit to that layer in the following step.

4 - Apply EditCopy
Add an additional ArcGIS step to your workflow. Set the operation to 'Apply edits'.
Set the 'Feature server name' using the connector-snake with the 'List services' step, and do the same for the 'Layer ID' but this time from the 'Get layer' step.
Now that the ID of the layer we want to edit is available, we can add a feature.
Click the 'Add Feature' button to add a new feature object. Look for the greyed out button within your field options.


The layer we are applying an edit to accepts Polyline geometric features to be added, so in this example we are selecting Polyline from the dropdown options available.
Select the appropriate geometry type (for your layer) from the dropdown and add a set of coordinates.

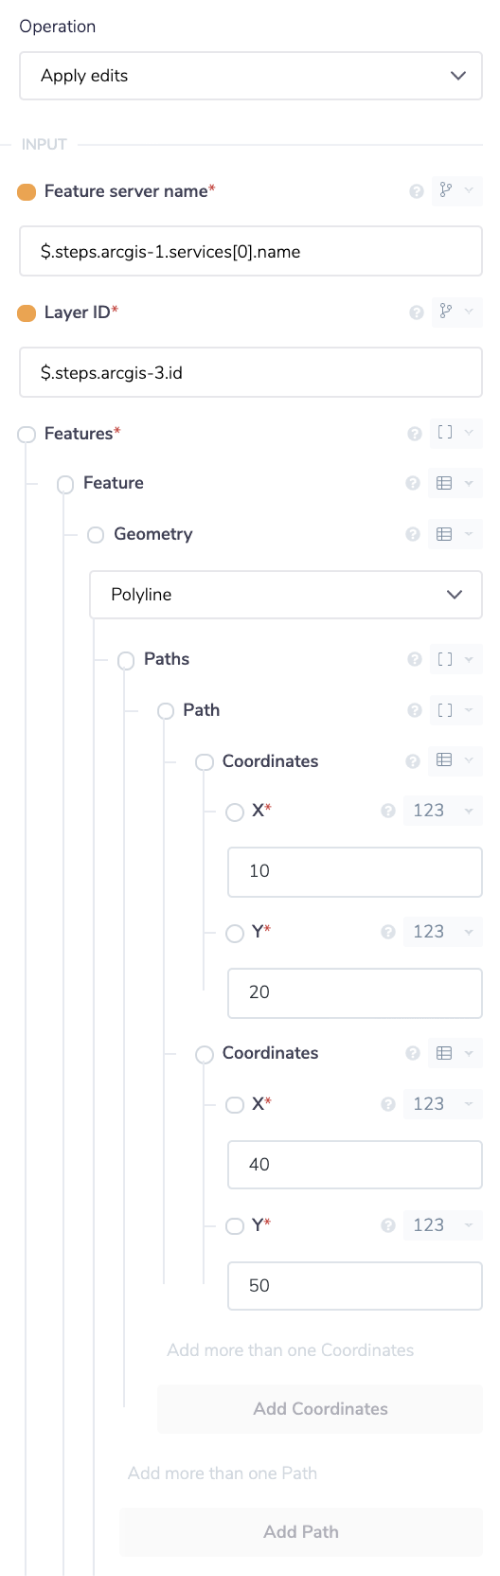
Next, you can add custom attributes that have been defined as part of the layer config when this was created in your ArcGIS UI/instance. We are only adding a 'Name' attribute for our feature. Yours will differ depending on the layer's configuration.
Select the 'Add Property to Attributes' button in the 'Attributes' input. When the popup appears, add the name of the attribute you wish to add. Once added, give a value for the attribute.


We can now successfully add our edit. In the next step, we can obtain the feature to view the data for our new feature.


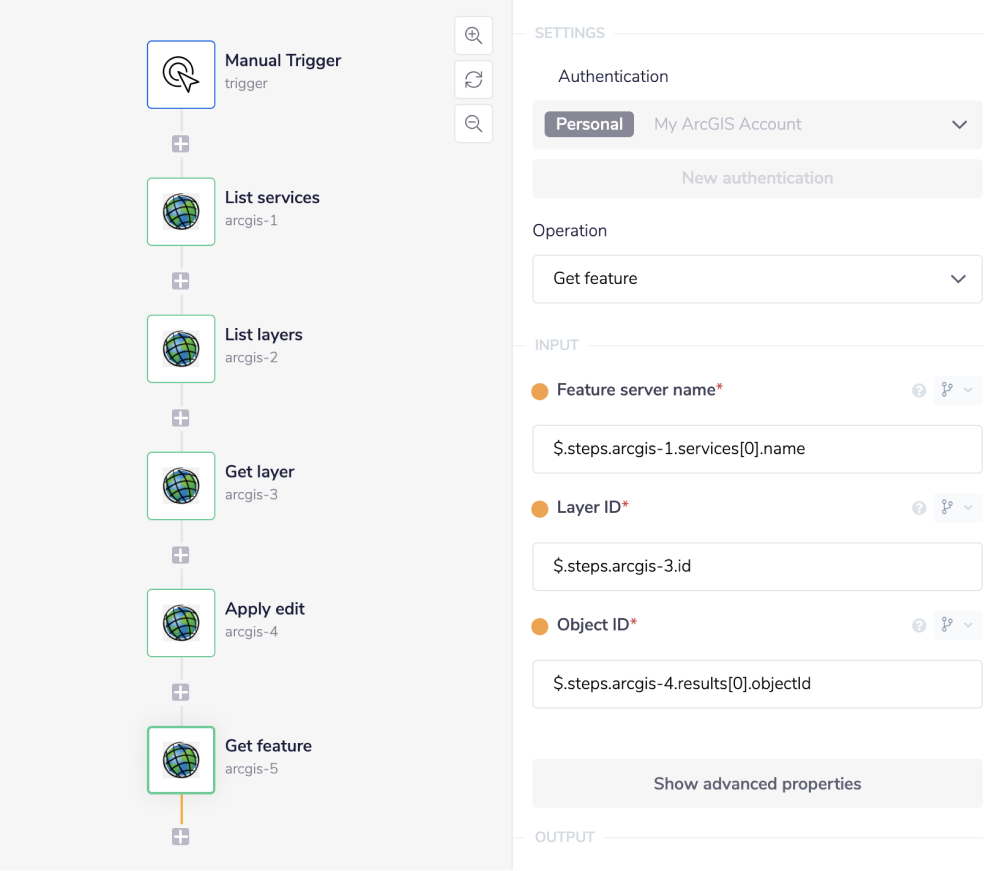
5 - Get featureCopy
Add your final ArcGIS connector step to the workflow. Set the operation to 'Get feature'.
Use the connector-snake to jsonpath the 'Feature server name' from the 'List services' step, then do the same for the 'Layer ID' but from the 'Get layer' step.
Finally, do the same for the 'Object ID' but from the 'Apply edits' step.

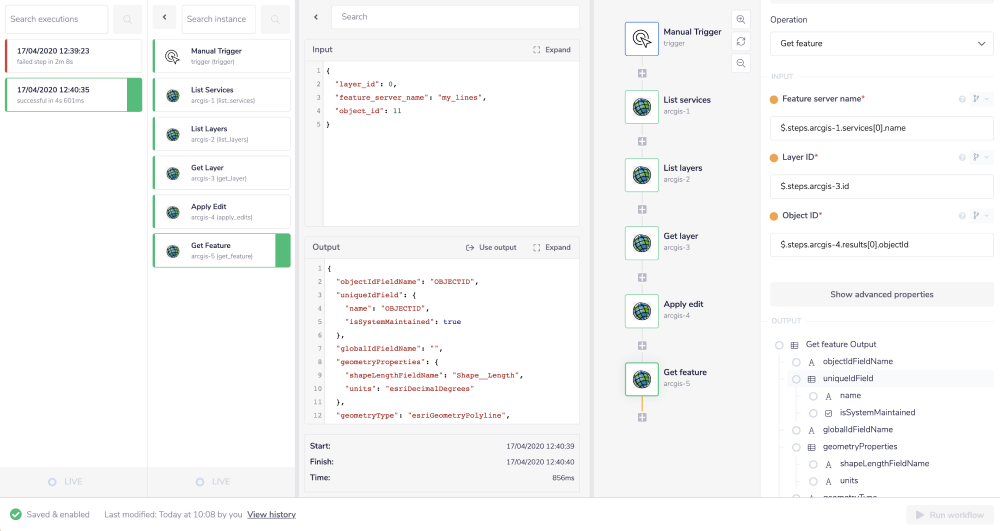
Once we run our workflow, we can then view the output by selecting the 'Debug' panel at the top of the builder panel.
On the debug panel, select the execution step then select the 'Get feature' step. In the output section, we can scroll down and see that our feature now exists inside our ArcGIS layer, with the 'Name' attribute and coordinates that we have given it.

BEST PRACTICES: Whenever you do decide to create your own workflow, be sure to check out some of our key articles such as: