Custom OAuth apps
OverviewCopy
To fully whitelabel the Config Wizard there are two things to address:
Config Wizard and auth dialog URLs by default use:
the
embedded.tray.iodomain (US region)the
embedded.eu1.tray.iodomain (EU region):


When authenticating with a service, the dialog will display Tray.io branding:


For OAuth2 services, you can address both of these by creating a custom OAuth app in the service admin UI.
The rest of this document will talk you through setting up custom domains and creating a custom auth app.
Custom url domainsCopy
US RegionCopy
In the US region, it is possible to overwrite the default embedded.tray.io domain by using the wildcarded domains:
*.integration-configuration.com*.integration-authentication.com
These domains can be prefixed with your company name e.g.
acme.integration-configuration.comacme.integration-authentication.com
You will then be able to open the Config Wizard with https://acme.integration-configuration.com/external/solutions/${embeddedId}/configure/${solutionInstanceId}?code=${authorizationCode}
Instead of: https://embedded.tray.io/external/solutions/${embeddedId}/configure/${solutionInstanceId}?code=${authorizationCode}
And you will be able to use http://acme.integration-authentication.com/oauth2/token as a second redirect url when people are authenticating with the services involved in your integration.
If the service does not support the entry of multiple redirect urls for custom apps in the US, it will be more difficult to use custom whitelabelled url domains
This is because Tray.io will only authorize apps which use the default https://auth.tray.io/oauth2/token redirect url.
Please see the 'Single Redirect URL issue' section below for how to deal with this
EU RegionCopy
Likewise in the EU region, you can overwrite the default embedded.eu1.tray.io domain:
*.eu1.integration-configuration.com*.eu1.integration-authentication.com
These domains can be prefixed with your company name e.g.
acme.eu1.integration-configuration.comacme.eu1.integration-authentication.com
You will then be able to open the Config Wizard with https://acme.eu1.integration-configuration.com/external/solutions/${embeddedId}/configure/${solutionInstanceId}?code=${authorizationCode}
Instead of: https://embedded.eu1.tray.io/external/solutions/${embeddedId}/configure/${solutionInstanceId}?code=${authorizationCode}
And you will be able to use http://acme.eu1.integration-authentication.com/oauth2/token as a second redirect url when people are authenticating with the services involved in your integration.
If the service does not support the entry of multiple redirect urls for custom apps in the EU, it will be more difficult to use custom whitelabelled url domains
This is because Tray.io will only authorize apps which use the default https://auth.eu1.tray.io/oauth2/token redirect url.
Please see the 'Single Redirect URL issue' section below for how to deal with this
Setting up a Custom auth appCopy
Please note that the examples below show urls for the US region.
If you are in the EU please adjust the urls as explained above
In order for a solution to leverage your Oauth app, we will create an environment for the service on our end. You will then need to create an authentication that uses the environment (see the 'Using custom OAuth apps in your Solutions' step below).
The basic steps for setting up a custom auth app are:
1. Create the Oauth app (in e.g. Zendesk, Salesforce etc.):
Give it a name
Include your company logo
Set the main redirect / callback url to the default - `https://auth.tray.io/oauth2/token`
Set a second redirect / callback url as e.g. `https://acme.integration-authentication.com/oauth2/token` (if you are whitelabelling the urls, and the service supports entering multiple urls)
2. When creating an auth in your source workflow click 'Use own OAuth app' and enter your app details, as per the example below
3. Publish the solution
The last step is crucial in ensuring that your Oauth app is used in the config wizard for your solution.
Using custom URLsCopy
If you are also using a custom public URL for the Config Wizard you will need to add two redirect URLs in the app details screen in the third-party service admin UI:
The first one for the default
https://auth.tray.io/oauth2/tokenA second one for your custom URL
https://acme.integration-authentication.com/oauth2/token
For some Oauth services such as Salesforce (see below), you are allowed to specify multiple redirect URLs which means you can set both URLs during the app creation.
Single Redirect URL issueCopy
However a lot of Oauth services, such as Zendesk, only allow you to specify a single redirect url.
Solution 1Copy
One solution for this:
Define the custom app settings to use the default tray.io redirect URL
Create an auth for the service in your Tray workflow
Change the authorized redirect URL to your custom one before publishing the solution
This approach does raise an issue with maintenance - if for any reason you need to reauthenticate, you will need to revert the authorized redirect URL setting back to the default one while you reauth and then revert to the whitelabelled one.
Solution 2Copy
If this presents a problem, an alternative (but not 100% whitelabelled workaround) is to use the authBaseUrl query parameter, e.g.:
https://acme.integration-configuration.com/solutions/configure….?code=${authorizationCode}&authBaseUrl=auth.tray.io
This will then instruct the config wizard / auth dialog to request a redirect from the third party service back to the address https://auth.tray.io/oauth2/token.
You will only need to authorize the default redirect URI in their OAuth app settings.
Creating a Custom auth app example (OAuth2)Copy
1 - Create an app in third-party serviceCopy
2 - Using custom OAuth apps in your SolutionsCopy
When you add e.g. a Salesforce connector to a workflow, you must create an authentication (as you usually do when configuring and testing the workflow)
When doing so you can add your OAuth app details by clicking on 'Use own OAuth app':

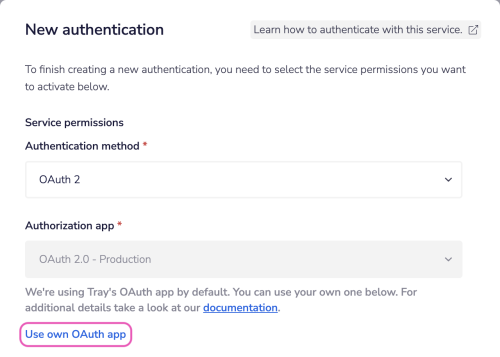
Then add the app details as per the following:
Then go ahead and create an authentication with your new OAuth app selected, including the appropriate scopes you wish to be available to your End Users.
Once this is done don't forget to publish your solution!
3 - Final re-branded Config WizardCopy
The key outcome here is that, when End Users are creating an authentication for this service they will automatically be logging into the correct environment and therefore the Tray.io branding will be removed:

