Auth-only dialog
OverviewCopy
It is possible to allow your users to complete the authentication step using an auth-only dialog, instead of the Configuration Wizard.
This is useful for integrations that do not require End Users to carry out any personalization beyond authenticating with services.
You can see an example of this being put to use in our demo app with onCreateAuth at https://github.com/trayio/embedded-edition-sample-app/blob/master/src/components/Instance.js
Note on whitelabellingCopy
Whitelabelling the urlCopy
Note that you can use an iFrame to present this if you wish to 'whitelabel' and hide the https://embedded.tray.io url. If you wish to do this your domain will need to be added to our whitelist. Please contact support to arrange this.
You can also whitelabel the url using a custom domain as explained in our page on whitelabelling public urls
Whitelabelling the dialog CSSCopy
Please see our guide to whitelabelling auth-only dialog CSS for instructions.
Using auth-only dialogCopy
In order to use an auth-only dialog you will need to:
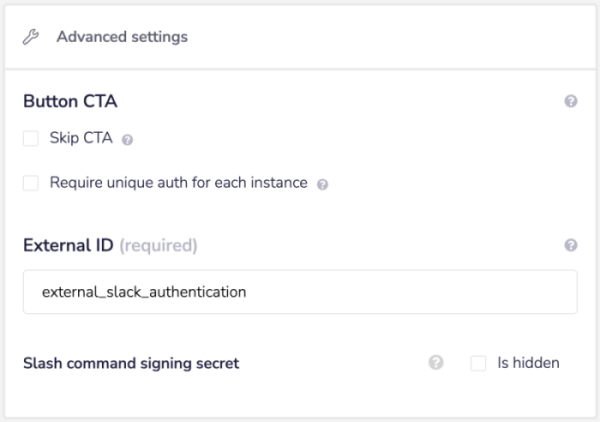
When editing your Solution, pick up the External ID for the authentication from the Configuration section:

2. Use the Create Solution Instance mutation to generate a solutionInstanceId for the End User (this requires an access token for your End User as per Create User Token)
3. When the End User clicks the relevant button in your app UI, the auth-only dialog is then initiated with a url which contains the externalAuthId and solutionInstanceId obtained in steps 1 and 2:
https://embedded.tray.io/external/auth/create/{embeddedId}/{solutionInstanceId}/{externalAuthId}?code={authorizationCode}
Please note the auth dialog URL could be different for you if you are in a different region.
If you are in the EU region, the auth dialog URL for you would be:
https://embedded.eu1.tray.io/external/auth/create/{embeddedId}/{solutionInstanceId}/{externalAuthId}?code={authorizationCode}
If you are in the APAC region, the auth dialog URL for you would be:
https://embedded.ap1.tray.io/external/auth/create/{embeddedId}/{solutionInstanceId}/{externalAuthId}?code={authorizationCode}
Remember that embeddedId is set in the Profile section of the dashboard, as explained here.
authorizationCode is the one-time use code that must be generated as per Create Config Wizard Authorization Code
An example url would then be:
https://embedded.tray.io/external/auth/create/acme/8b4fc48f-9fcd-43dw-ufu1-1b7a788983c6/external_slack_authentication?code=37d1a4fa990fb412efuh232310ad44ddbc5caed5d
The End User will then be presented with an authentication dialog for the service being authenticated with.
You can remove the Tray.io domain and whitelabel the Config Wizard url. If you have done so then embedded.tray.io will be replaced with e.g. acme.integration-configuration.com
4. Final step is to use the Update Solution Instance mutation to update the solutionInstanceId with authValues for the End User (this requires an access token for your End User as per Create User Token)
Auth-only dialog eventsCopy
The auth-dialog popup posts some events to the global window object that can be captured by your user facing application to take further actions.
You can attach a message event listener to the window where user's click on create auth button.
window.addEventListener("message", onmessage);
By doing this, you will be able to capture the messages sent by the auth popup window.
The three events you would want to capture from the window are:
tray.authPopup.errorThis event is fired when the auth dialog runs into unexpected errors (ex. mismatched service environment ID and service ID)
tray.authpopup.closeThis event is fired when the auth dialog is closed by the user abruptly
tray.authpopup.finishThis event is fired when the user provides the auth details and the popup window closes by itself. This event would contain the authId of the newly created auth. Here's how this event's data would look.
1{2"type": "tray.authpopup.finish",3"authType": "oauth",4"authId": "1209xxxx-xxxx-xxxx-xxxx-xxxxxx8d3779"5}
Here is a sample code on how you could structure your authWindow function:
1export const openAuthWindow = (url) => {2// Must open window from user interaction code otherwise it is likely3// to be blocked by a popup blocker:4const authWindow = window.open(5undefined,6"_blank",7"width=500,height=500,scrollbars=no"8);9const onmessage = (e) => {10console.log("message", e.data.type, e.data);11if (e.data.type.toLowerCase() === "tray.authpopup.error") {12// Handle popup error message13alert(`Error: ${e.data.error}`);14authWindow.close();15}16if (17e.data.type.toLowerCase() === "tray.authpopup.close" ||18e.data.type.toLowerCase() === "tray.authpopup.finish"19) {20authWindow.close();21}22};23window.addEventListener("message", onmessage);2425// Check if popup window has been closed26const CHECK_TIMEOUT = 1000;27const checkClosedWindow = () => {28if (authWindow.closed) {29window.removeEventListener("message", onmessage);30} else {31setTimeout(checkClosedWindow, CHECK_TIMEOUT);32}33};3435checkClosedWindow();36authWindow.location = url;37};3839const authDialogURL = `https://${AUTH_DIALOG_URL}/external/auth/create/${PARTNER_NAME}?code=${json.data?.generateAuthorizationCode?.authorizationCode}&serviceId=${serviceId.current}&serviceEnvironmentId=${selectedServiceEnvironment.id}&scopes[]=${scopes}`;4041openAuthWindow(authDialogURL);
You can also check the code of the embedded demo app to see how it's implemented there.