Solution instances
What is a Solution Instance?Copy
A Solution Instance is an instance of a Solution that an End User has activated for their own use - having used the Configuration Wizard to authenticate with the services included in the Solution and entered any personalized Config Data:

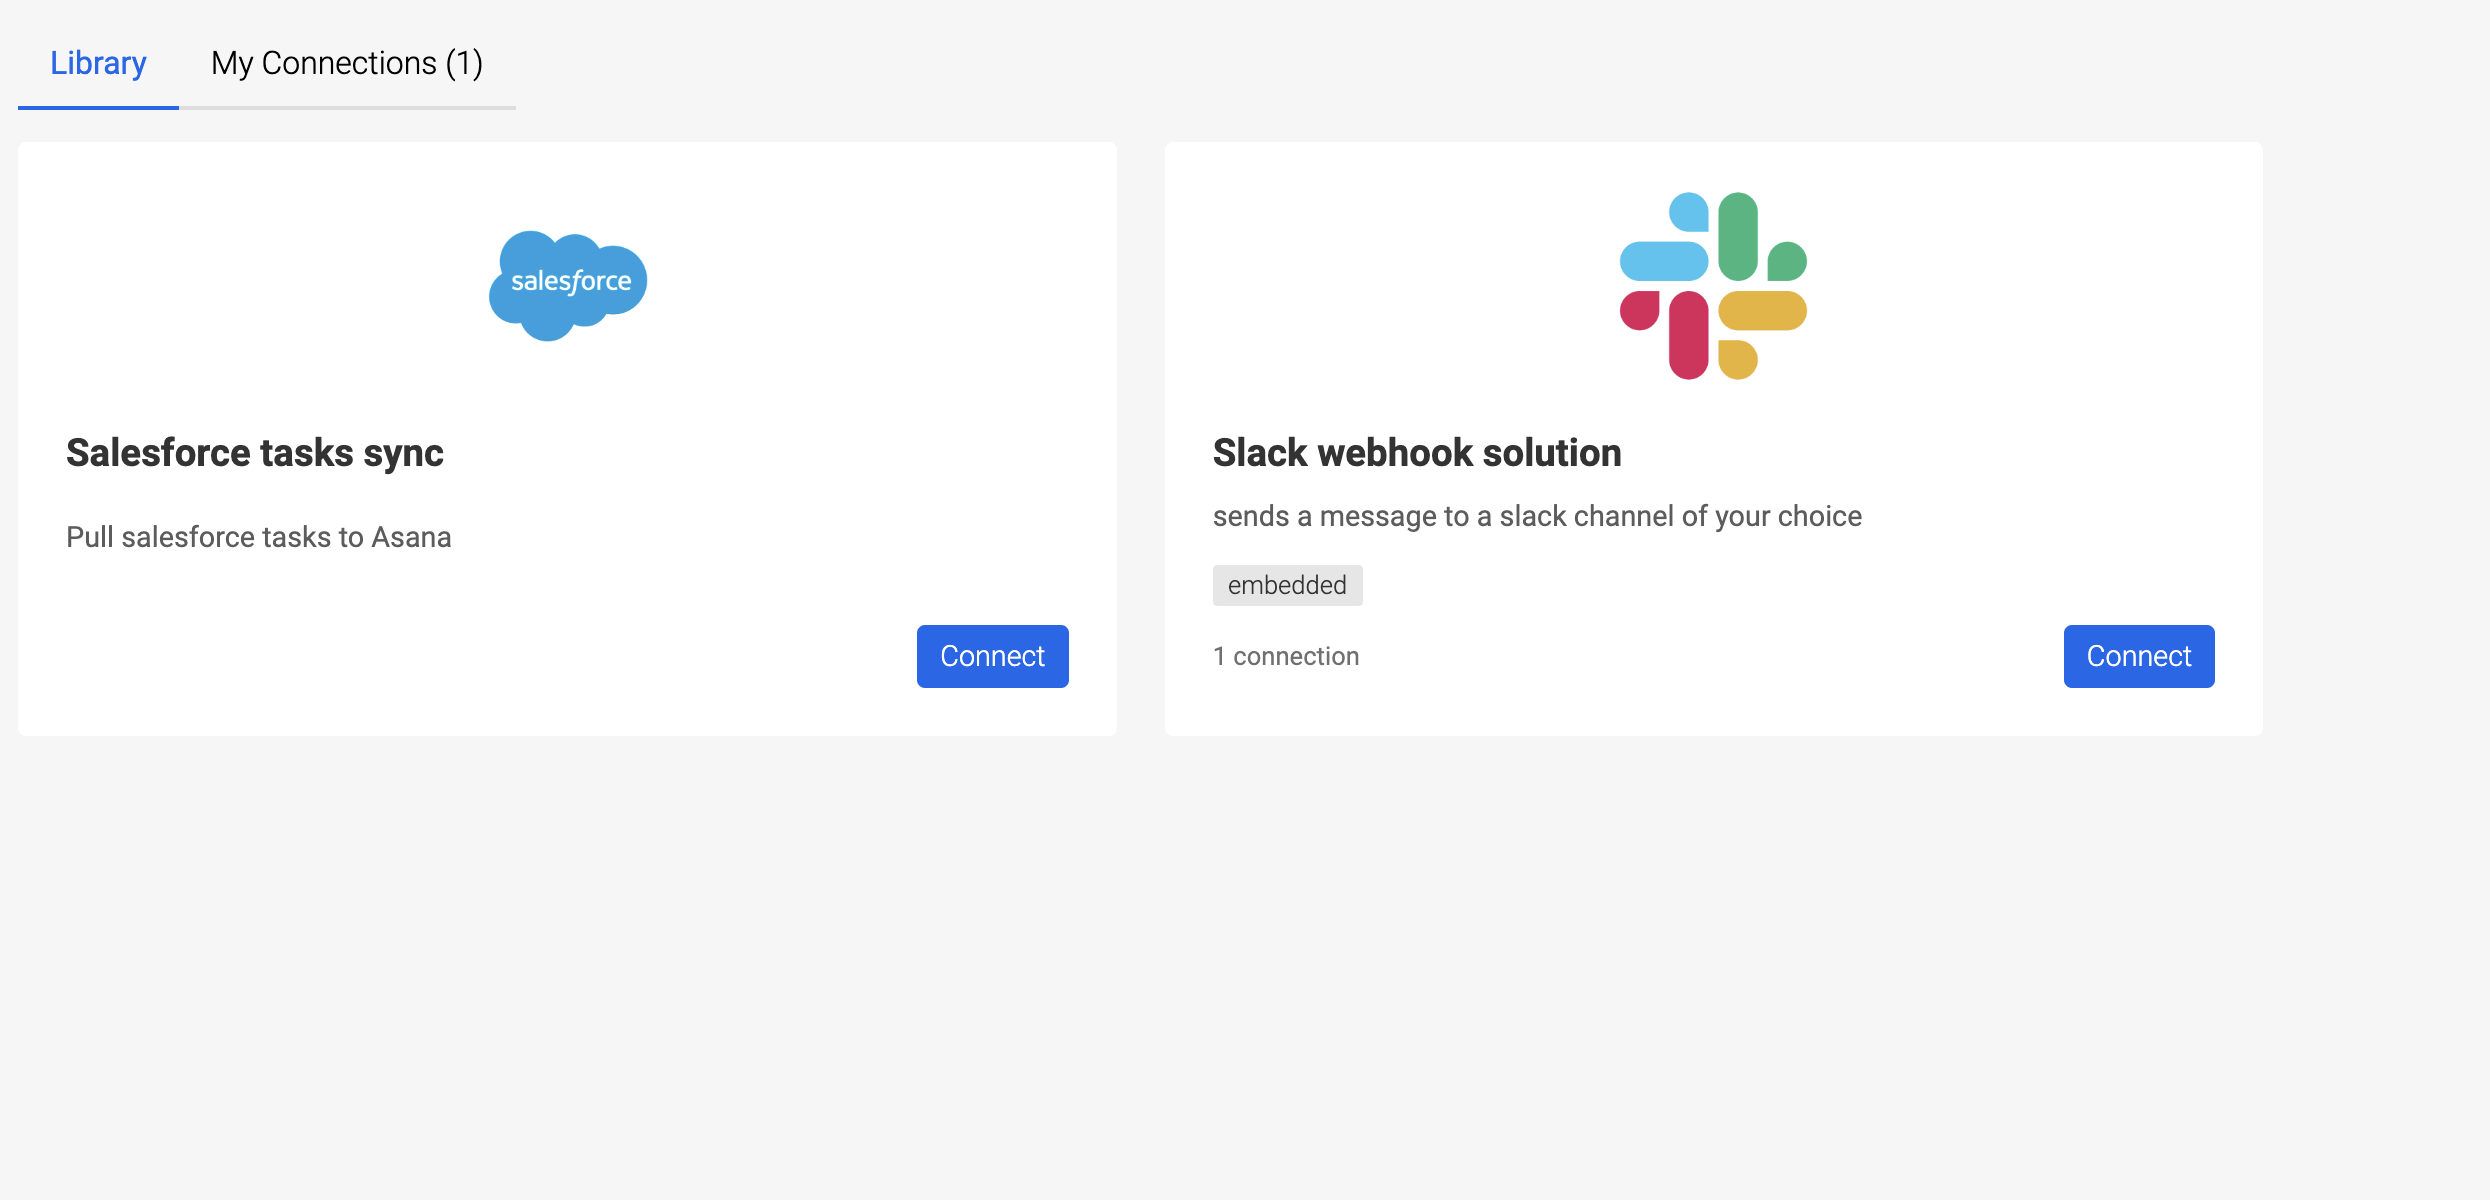
The above screenshot shows a simple mockup of how you might display an End User's Solution Instances (exactly how you do this is up to you).
It is important to know that, after a user has completed the configuration, the Solution Instance is not yet enabled (this is to allow you to make any checks or changes before an Instance is activated). So it will need to be enabled.
A Solution Instance is also subject to updates in that, when you want to add new application features, fix bugs etc. you will have to edit the Source Workflow(s) in the underlying Solution and publish a new version of that Solution.
These updates will then need rolled out to your End Users' Solution Instances. As in the above mock application screenshot, this may be enabled with an 'Update' or 'Edit' button on your End Users' list of Instances which re-triggers the Configuration Wizard. Read more on Updating Solution Instances.
It is important to note that each End User will have their own Workflow Instance for each workflow that is contained within the Solution, whereby the data which passes through that workflow instance will be specific to that End User (i.e. it will show how many times their activated Instance has been triggered, what data has been affected in their Salesforce, Dropbox etc.)
Key dataCopy
As per the Get Solution Instances API some of the key data available for a Solution Instance is:
id is the unique id of that Solution Instance, which is returned when an instance is first created. It is needed for the Config Wizard url and when enabling, updating and deleting Instances
authValues is a list of the authentications the End User has made for each service in this Instance, including an authId for each one
configValues is a list of the Config Data that has been set by the End User, to personalize the Instance for their own use
enabled is a True / False value which indicates if the Instance has been enabled or disabled
owner is the unique id of the End User the Instance belongs to
solutionVersionFlags indicates if a new version of the original Solution is available which will require updating
Viewing / debugging Solution Instances in the Tray UICopy

Clicking on the Debug link for any workflow will take to you to a read-only version of that user's Workflow Instance:
Any data you see in the logs/debug panel will then be the data associated with that particular End User.
Please see our docs on Debugging and Error Handling for more information on how to handle problems which may arise with workflows.
Creating Solution InstancesCopy
There are two ways of creating and configuring solution instances:
| Solution Instance Creation | Who creates? | Scalable? | Ideal For? |
|---|---|---|---|
| via Tray UI | You | No, as you are manually creating each instance | Integration Managers who lack development resources for a fully native experience Enables end to end testing by taking the role of an end user |
| via API | End users | Yes, as your End Users configure their own instances | Embedded native users who want to provide end users the flexibility to create their instances |
Creating in the Tray dashboardCopy
Once you have published a Solution, you will be able to create instances from the dashboard:

This will activate the Config Wizard which will allow you to create the auths and config data necessary for that End User's instance.
Creating in your native applicationCopy

You can make use of our Embedded APIs to build your own 'integrations marketplace'
The application can use the createInstance mutation when the user clicks configure button for a Solution.
Our demo Integration Marketplace app can be set up in minutes to get you started.
You can either customize this application to follow your branding schema and embed this in your portal or build your own Marketplace app.
There are three options to choose from when building end-user experience:
Config wizard experience: This is the standard way of building an experience where users can provide auths and configs.
Auth-only dialog experience: Ideal when you only want the end user to provide auth and data mappings and configs are static.
Custom Form experience: Your custom wizard where you can leverage Tray's auth dialog for capturing auths and Call Connector API to build config dropdowns.
You can decide which experience to present to your End Users as per your Integration use case you can also have a combination of these experiences by choosing a suitable type for each Integration/solution that you build. Check the decision table on this page here.
Enabling Solution InstancesCopy
Enabling in the Tray dashboardCopy
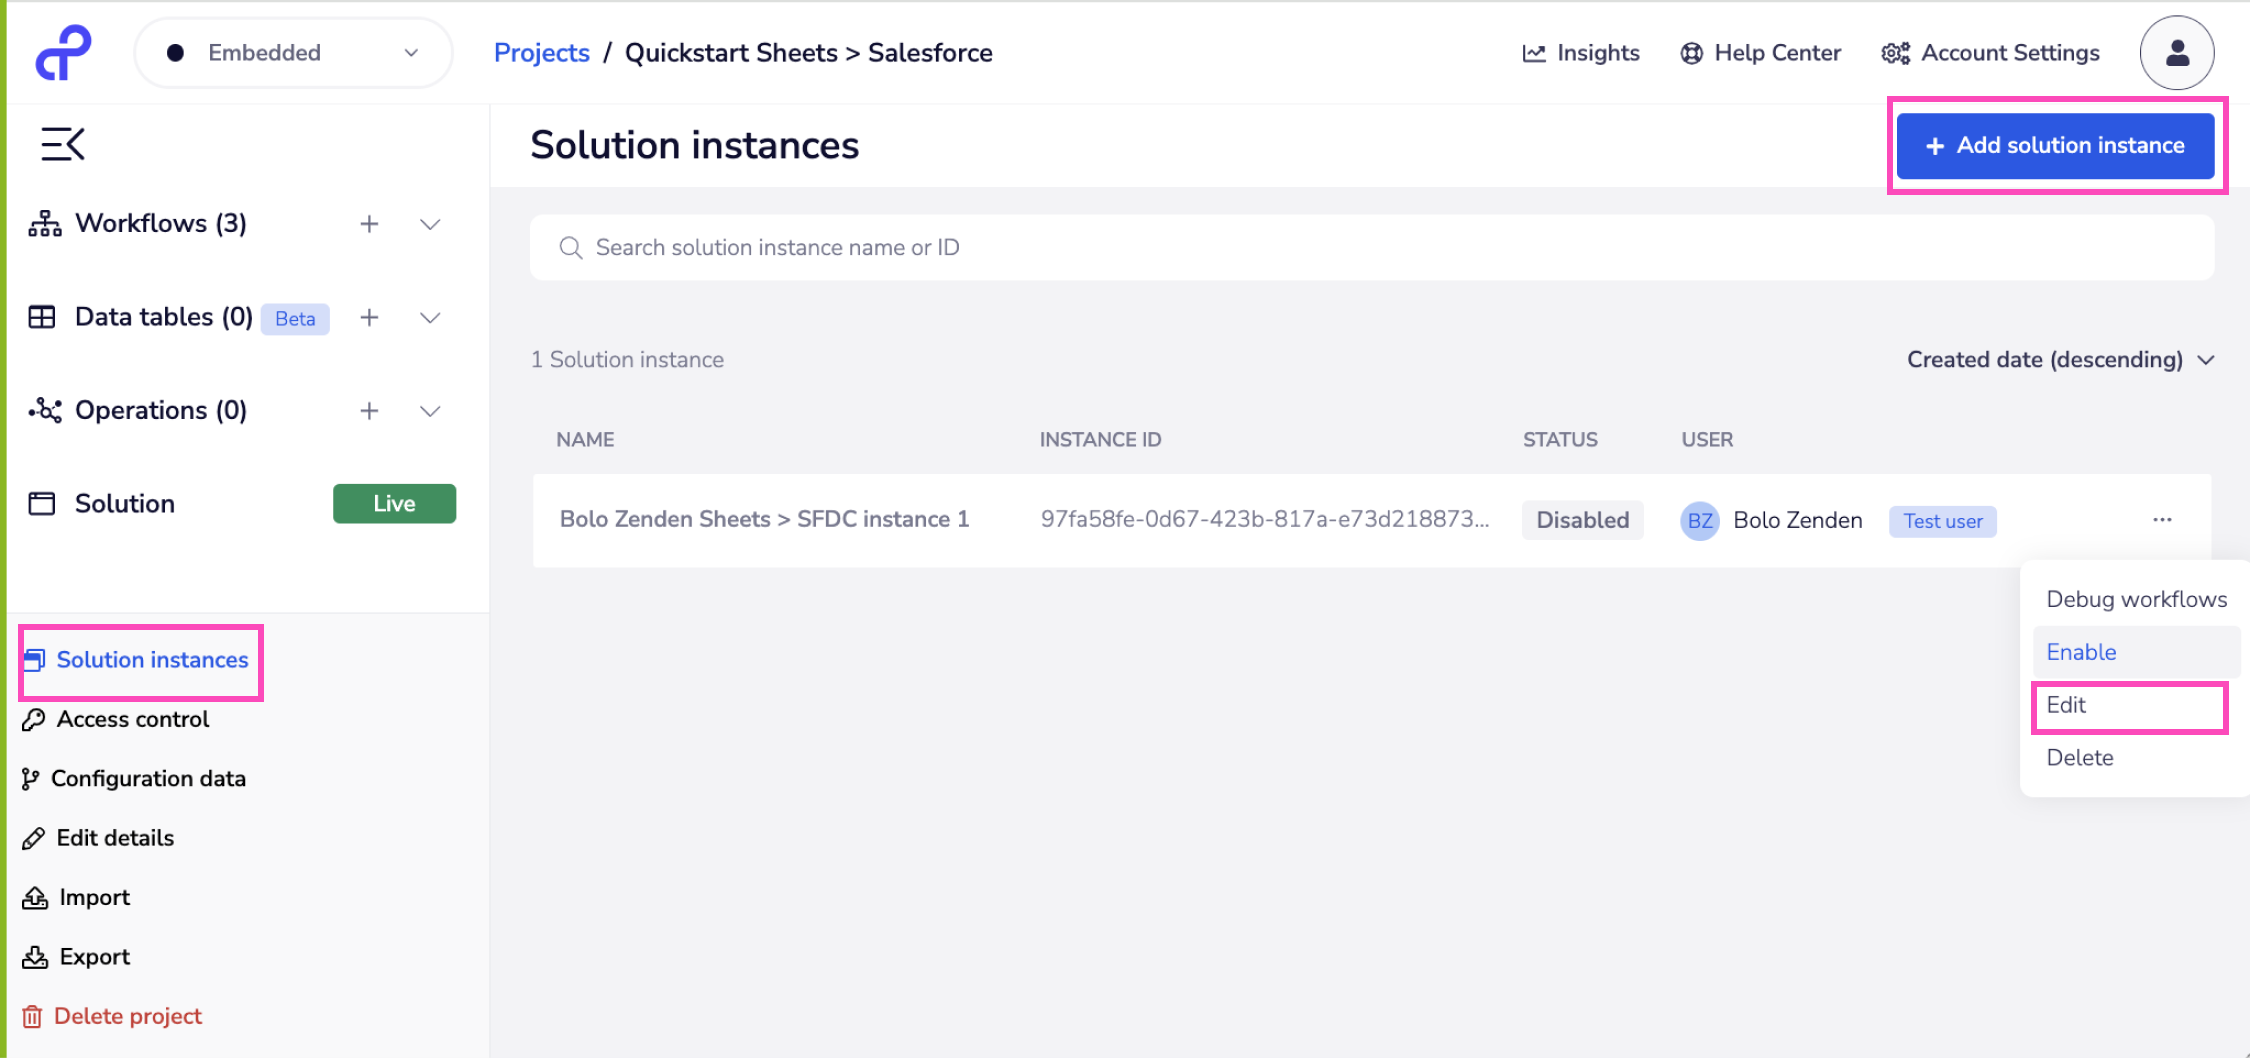
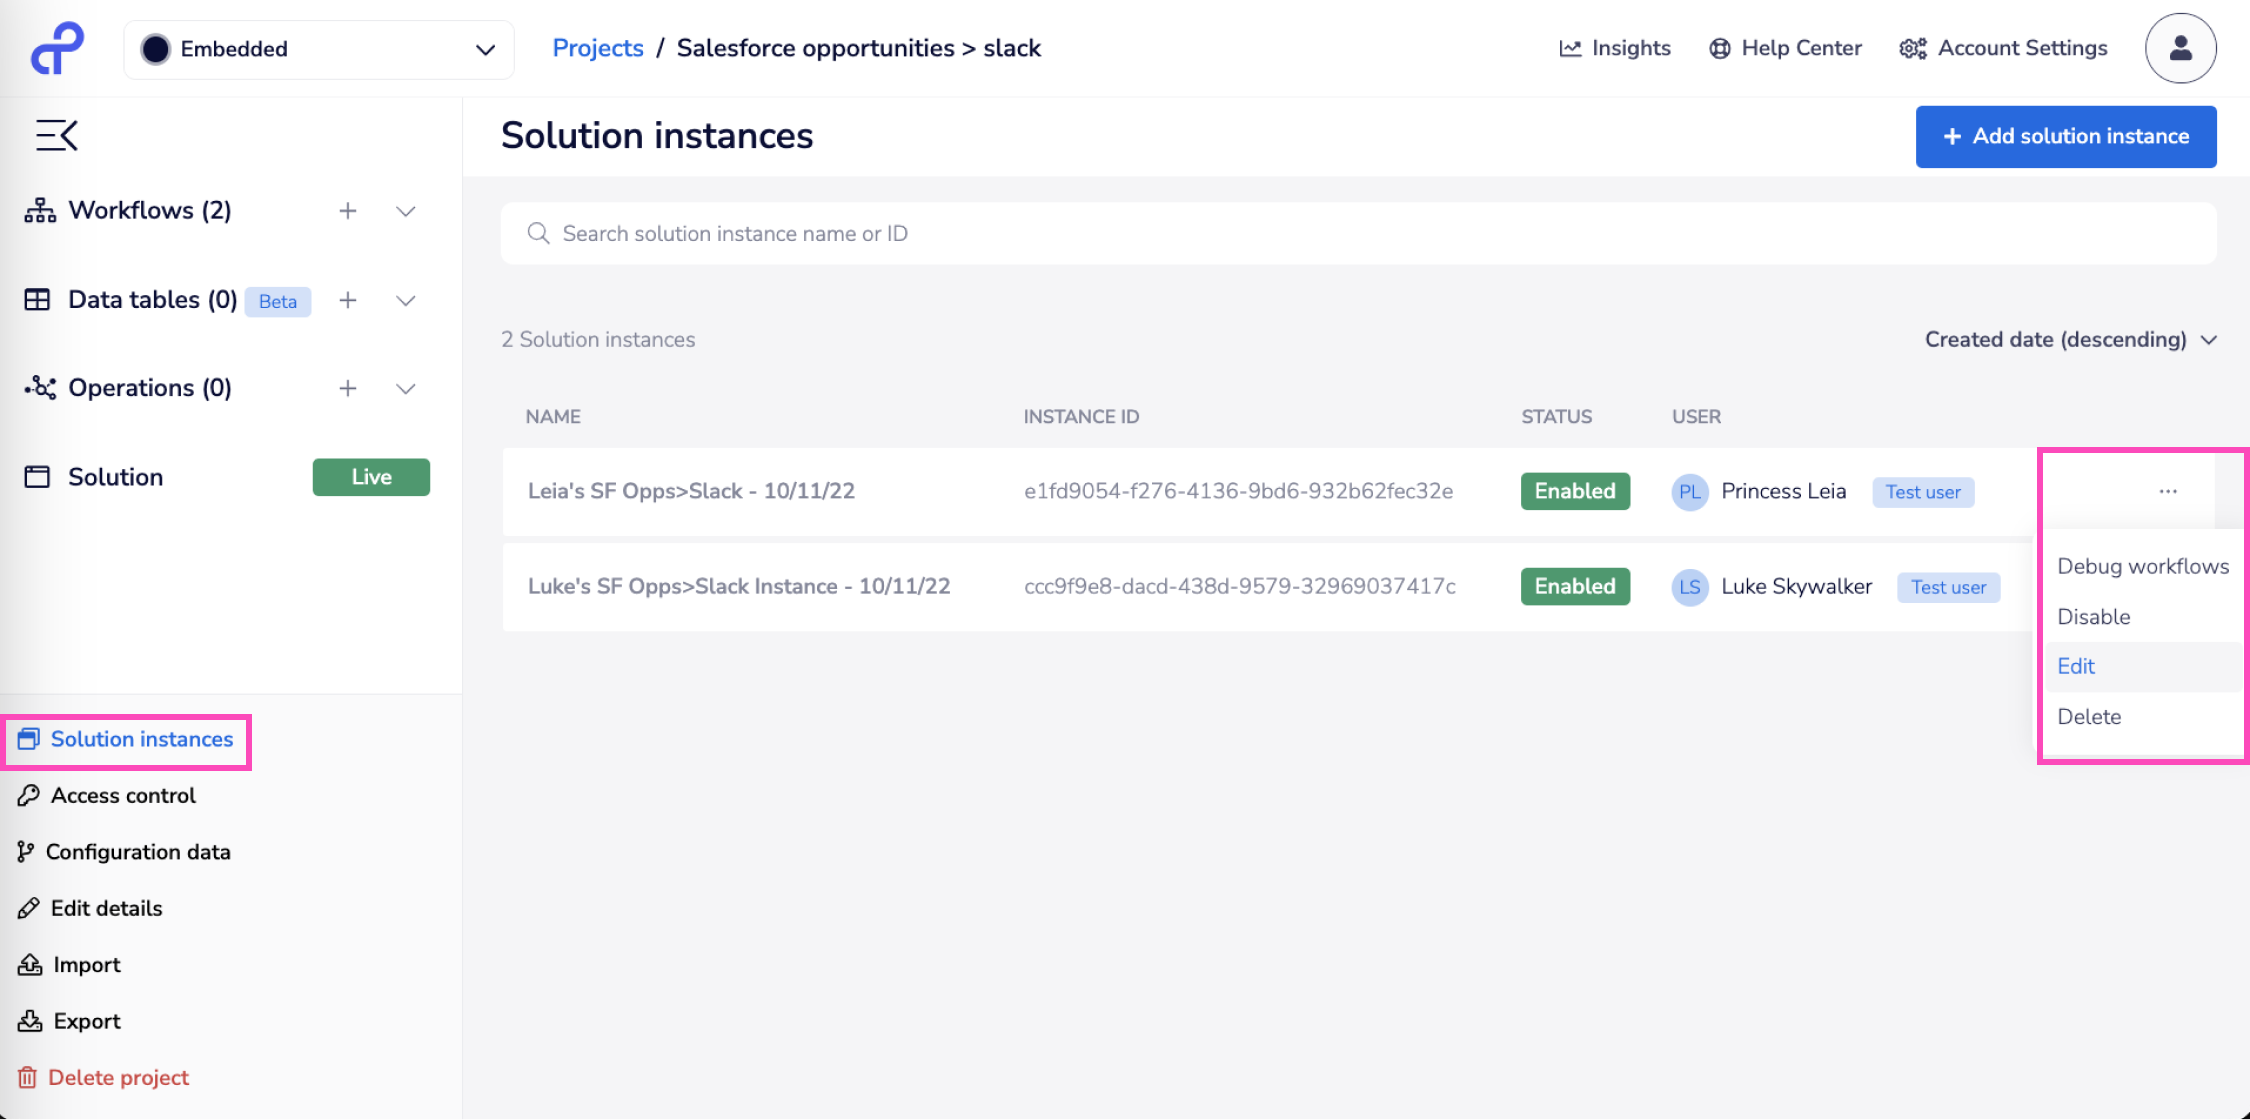
Navigate to the project you want to enable instances for. Open the project and click on the Solution Instances tab.
You will find all Solution Instances linked to this project:

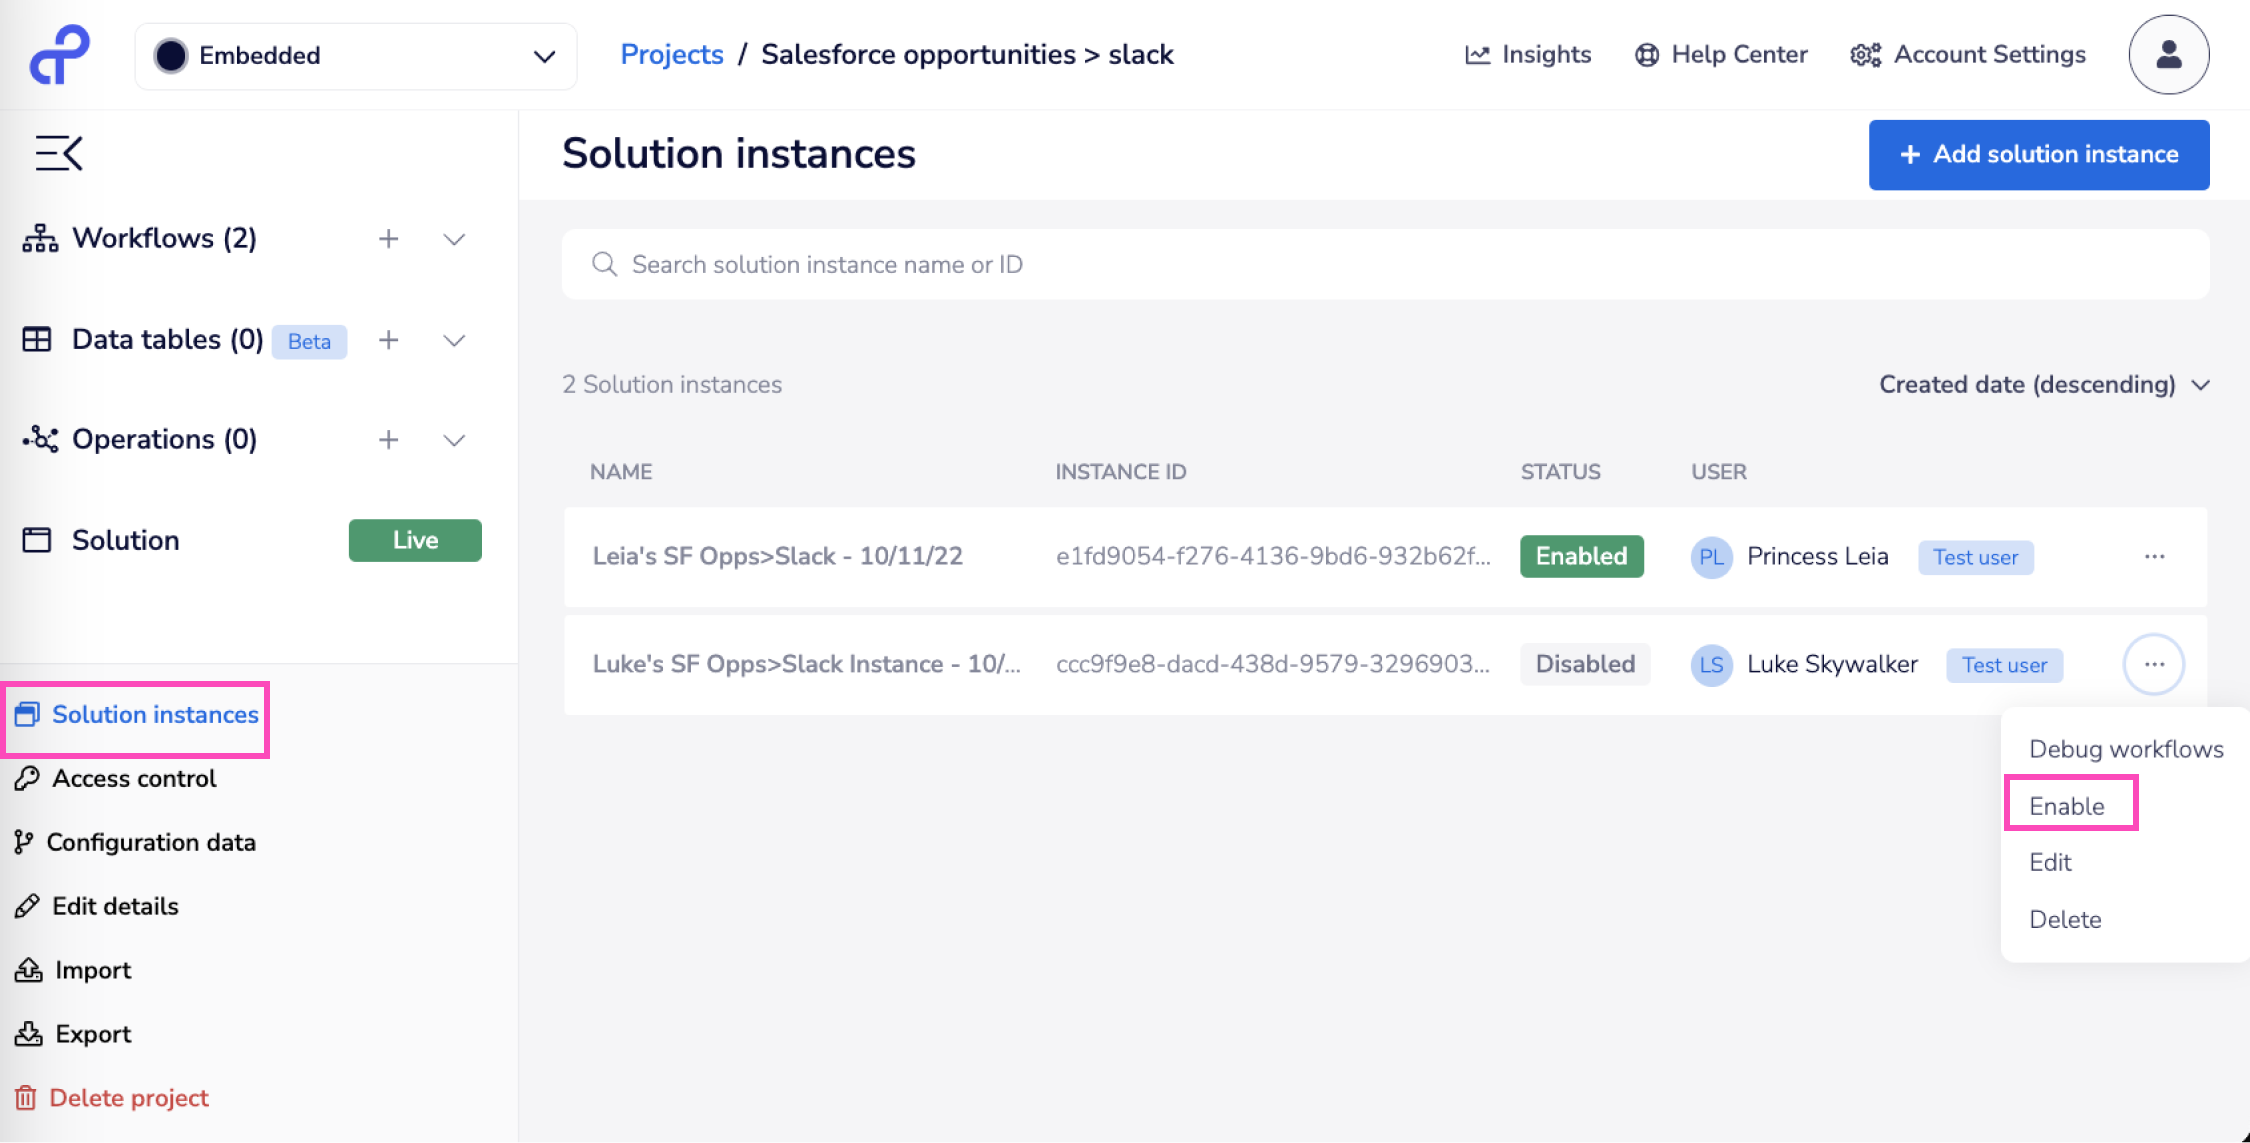
You can click on enable as shown above and the instance would be enabled.
Once an instance has been enabled you will find a 'disable' option, if needed.
Enabling in your native applicationCopy

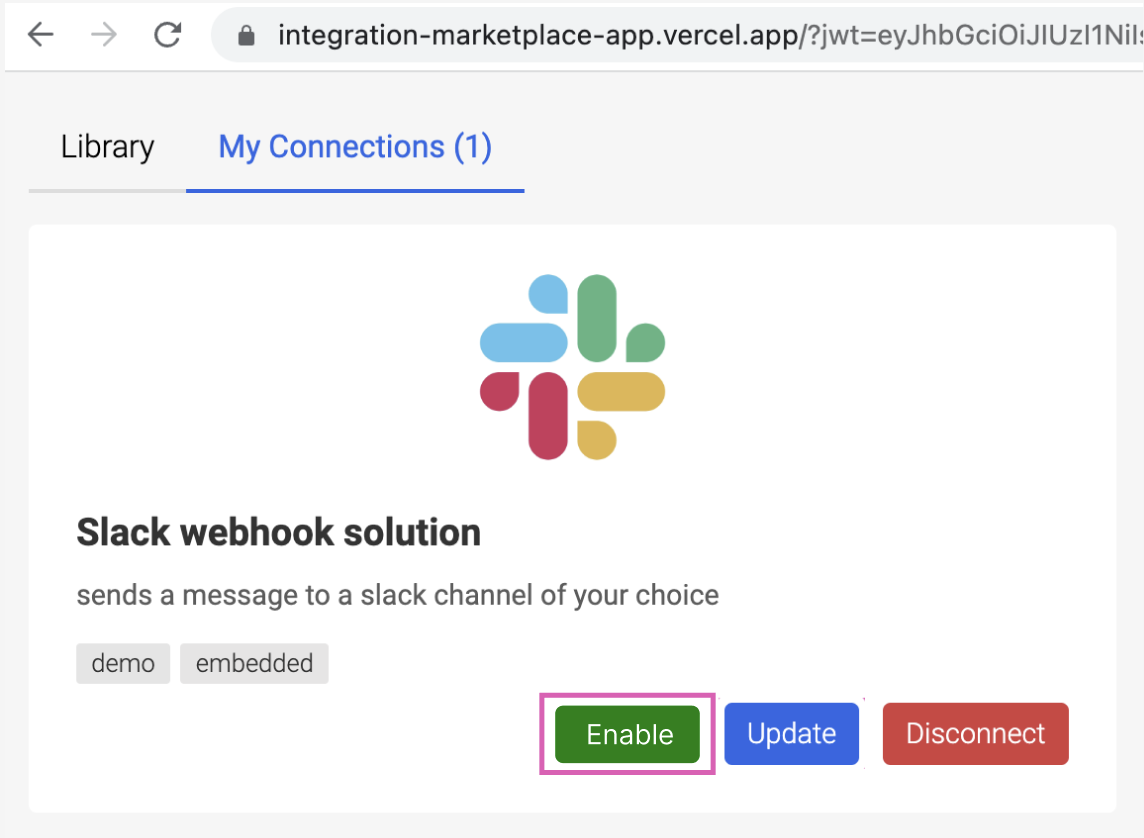
You can provide an option to end users to enable the instance using the updateSolutionInstance - Enable (User token) mutation.
If you are auto-enabling the instances for your end users after they create the solution, your code should be configured to delay this call by at least 2 seconds after Create Solution Instance is complete.
Note that it is best practice to set errorOnEnablingWithMissingValues to true when passing the arguments with this mutation:
1updateSolutionInstance(input: {2solutionInstanceId: $solutionInstanceId,3instanceName: $instanceName,4errorOnEnablingWithMissingValues: true,5enabled: true6})
This will prevent you from enabling misconfigured Instances.
When using config wizard experience, You can also enable the instance for them by immediately calling the above API right after the wizard is completed.
For this, You can listen for the tray.configPopup.finish event to know when was the wizard finished successfully. Check other config wizard events to handle any errors.
If you are using a custom form experience, you will have to use your own workaround.
Retrieving webhook URLsCopy
For cases when it is necessary to directly send messages to a specific Workflow in an End User's Solution Instance (e.g. when using Amazon SQS), it is possible to retrieve the webhook URL for the Workflow Instances which underlie their Solution Instance.
When talking about a Workflow in an End User's Solution Instance, it is important to understand that there are effectively two Workflows:
The original Source Workflow which you built in the UI (in Dashboard > Create New Workflow). It can be found in the url when using the workflow editor
https://app.tray.io/workflow/<sourceWorkflowId>/edit/In the API example results below this is identified by sourceWorkflowIdThe End User-specific copy of the Workflow (the Workflow Instance) which exists within their Solution Instance (in the UI you can see this by going to Users > Click 'Instances' for End User > Click 'See Workflows' for Instance > Click 'Debug Workflow' for the relevant Workflow) In the API example results below this is identified by id
You can also choose to make the webhook URL available to the End User in the COnfig Wizard
Before using the GraphQL mutations below you should identify the sourceWorkflowId of the workflow you want to pinpoint for a specific user. This is so that, in your external application, you can filter out the other workflows in the solution which you are not concerned with.
The ultimate aim here is to get the triggerUrl for the relevant End User-specific Workflow Instance.
Retrieving webhook URL when creating a Solution InstanceCopy
When using Create Solution Instance you can expose the webhook urls for a Solution Instance by including workflows as data to be returned:
1mutation {2createSolutionInstance(input: {3solutionId: "2bexxx-xxxx-xxxx-xxxx-xxxxxxf3491",4instanceName: "some instance name",5authValues: [{ externalId: "external_sqs_authentication", authId: "aaa67786-xxx-xxx-xxx-97dedd1519b3" }],6configValues: [{ externalId: "external_user-email" , value: "\\"me@example.com\\"" }]7}) {8solutionInstance {9id10name11enabled12created13workflows {14edges {15node {16id17triggerUrl18sourceWorkflowId19}20}21}22}23}24}
This will produce a result such as:
1{2"data": {3"createSolutionInstance": {4"solutionInstance": {5"id": "625xxx-xxx-xxx-xxx-xxx111f",6"name": "Gene Slack star instance 2",7"enabled": false,8"created": "2019-02-25T11:02:21.884Z",9"workflows": {10"edges": [11{12"node": {13"id": "98099de2-xxx-xxx-xxx-xxxxxb8ff7",14"triggerUrl": "https://6a4xxx-xxx-xxx-xxx-xxx-xxxe8eaa2.trayapp.io",15"sourceWorkflowId": "378xxx-xxx-xxx-xxx-xxx-xxx4fd6"16},17"node": {18"id": "83774e4-xxx-xxx-xxx-xxxxxvur88f",19"triggerUrl": "https://9s3xxx-xxx-xxx-xxx-xxx-xxxe5iuu2.trayapp.io",20"sourceWorkflowId": "593xxx-xxx-xxx-xxx-xxx-xxx9du4"21}22}23]24}25}26}27}28}
Retrieving webhook URL after Instance creationCopy
After a Solution Instance has been created it is also possible to return the webhook url with a list instances query (remember you must use the End User's token for this query):
1query {2viewer {3solutionInstances {4edges {5node {6id7name8enabled9created10workflows{11edges {12node {13id14triggerUrl15sourceWorkflowId16}17}18}19}20}21}22}23}
Updating InstancesCopy
Updating in the tray dashboardCopy
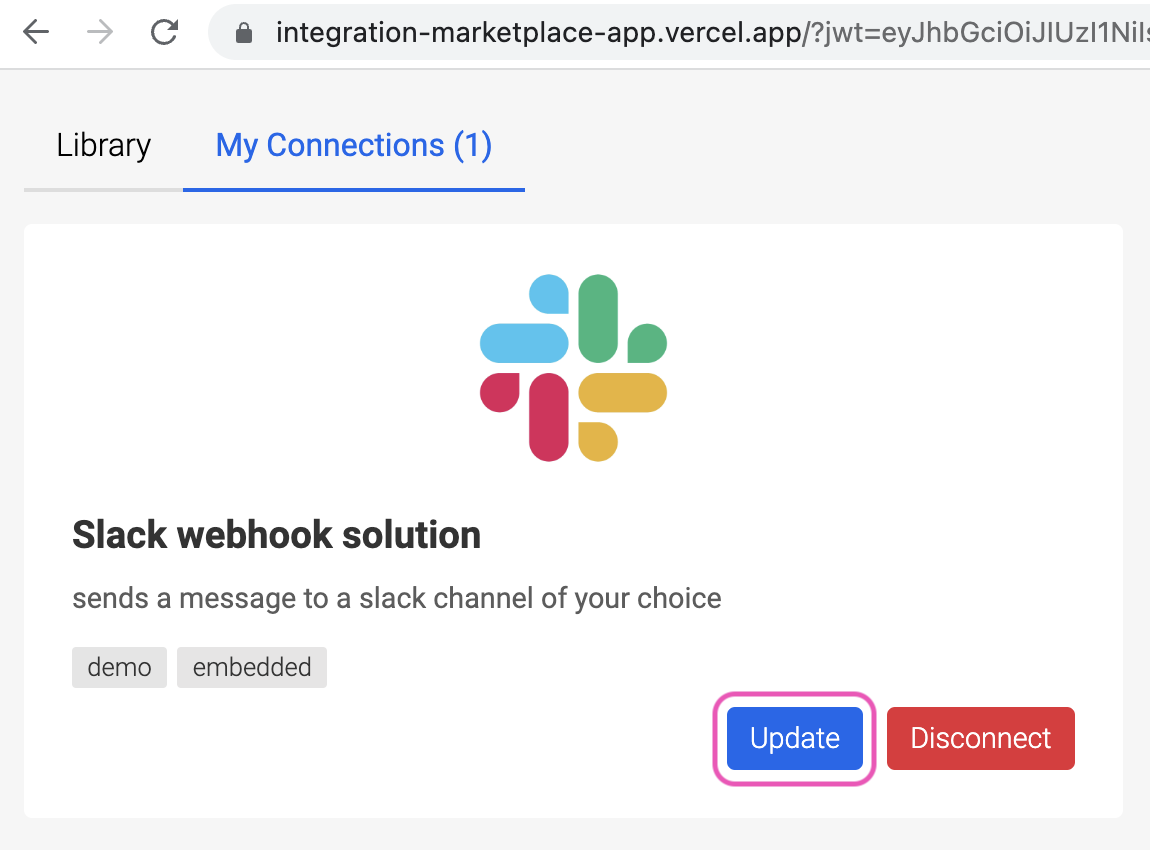
Once you have published a Solution, you will be able to update instances from the dashboard.
Navigate to the project you want to update instances for. Open the project and click on the Solution Instances tab. You will find all Solution Instances linked to this project.

You can click on update as shown above and it will open a modal with options to run config wizard either by yourself or through a shareable link with the end user
Note that the shareable link is valid for 5 minutes.
The config wizard needs to be closed manually after clicking on 'finish' if the wizard runs through the 'Shareable Link' option.
The window does not close by itself after clicking finish, as the wizard is designed to run as a pop up.
Updating in your native applicationCopy

Your application can call the updateSolutionInstance mutation when the user clicks update button for an Instance.
Updating vs upgrading Solution InstancesCopy
After publishing, solutions can be edited to fix bugs, provide additional functionality, optimize effiency etc.
In any case, you will edit or add new source workflows to the solution.
Whenever you publish a new version of a Solution, the Solution Instances that have been activated by your End Users will need to be updated for each End User.
The entire process with the steps you need to take has been explained in this tutorial:
The basic Solution Instance update processCopy
The process here is:
1. Update Workflow
Make any necessary changes to your Workflow(s) (new connector steps, use of config data etc.)
2. Edit and publish new Solution Release
Make any necessary edits (add new screens etc.) to the Solution in the UI and publish a new release of the Solution which contains the Workflow:


When you hit the 'Publish draft' button, you could get one of the two popups as shown in the next step, depending on the edit you made in the solution.
3. Update / upgrade Solution Instances
The Solution Instance will then be:
Automatic (lazy) updated if there no breaking changes
'upgraded' if there have been breaking changes (new/edited auths and/or config data requirements)
The sections below explain this in more detail:
Automatic (lazy) updatesCopy


When a new version of a Solution is published it will be rolled out automatically to End Users if no extra configuration is required from them:

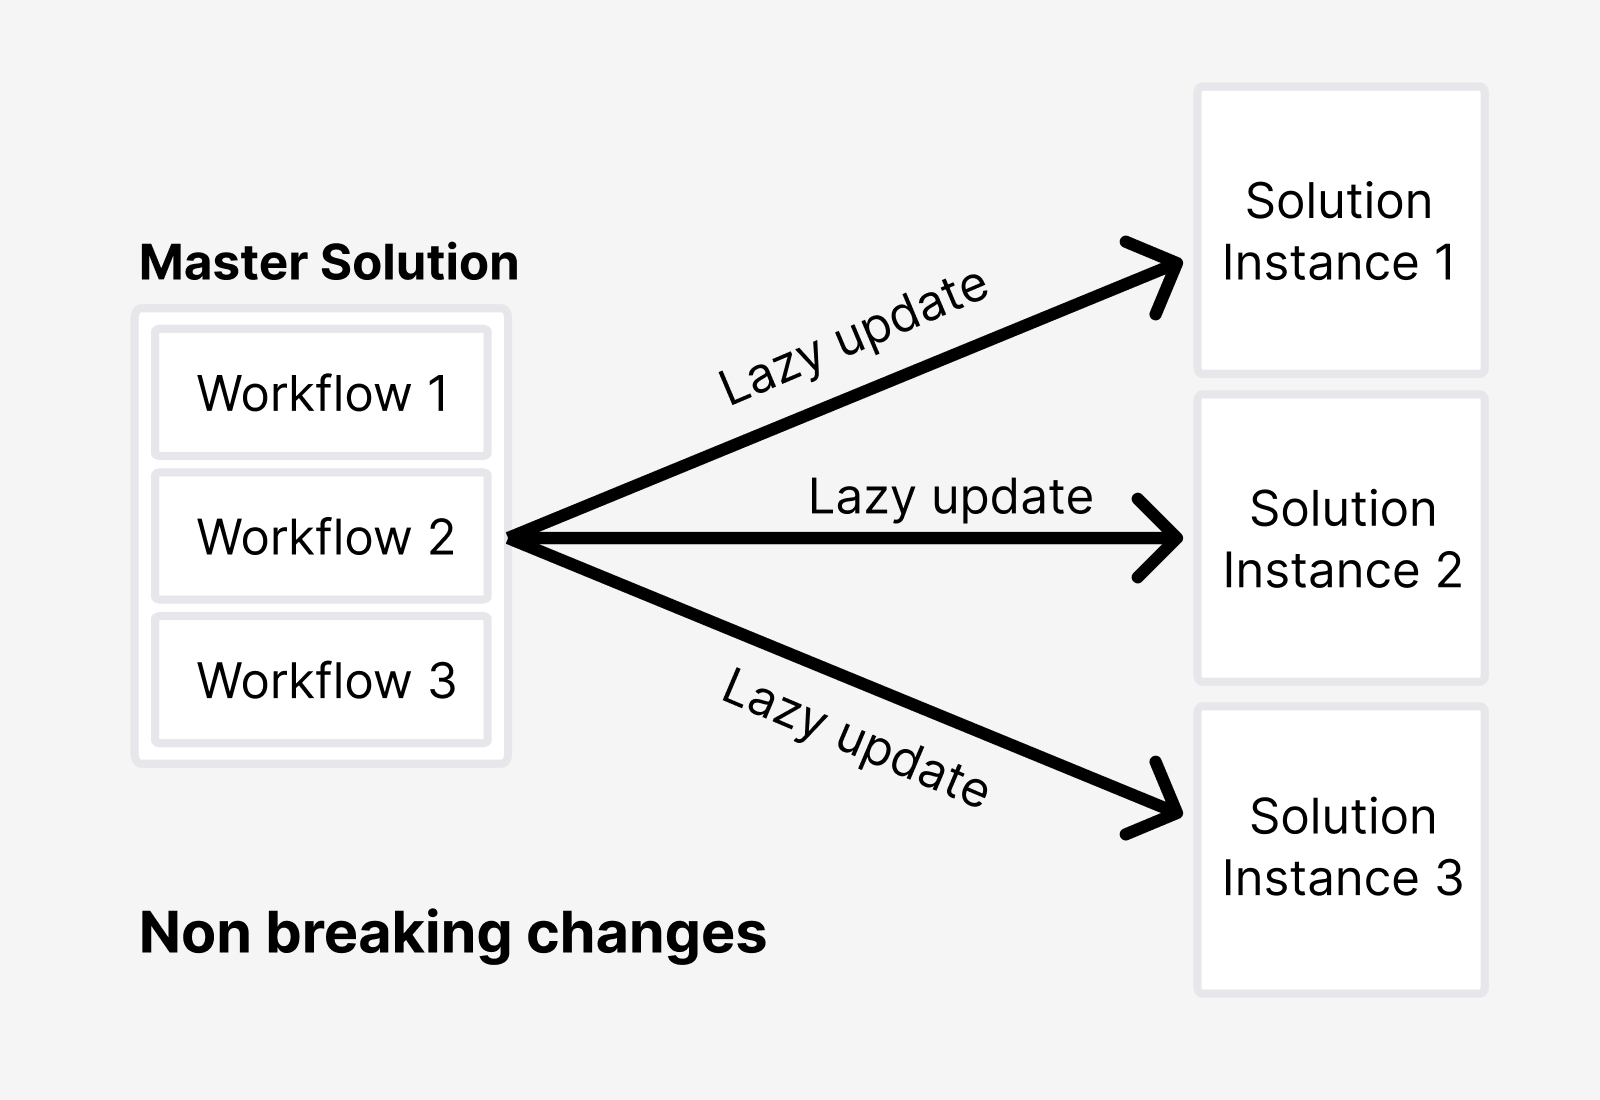
This will work as a 'lazy update', with a delay of approx 2 minutes from release. If a source workflow runs on a scheduled trigger it won't happen until the next scheduled run.
Non-automatic updates (upgrades)Copy

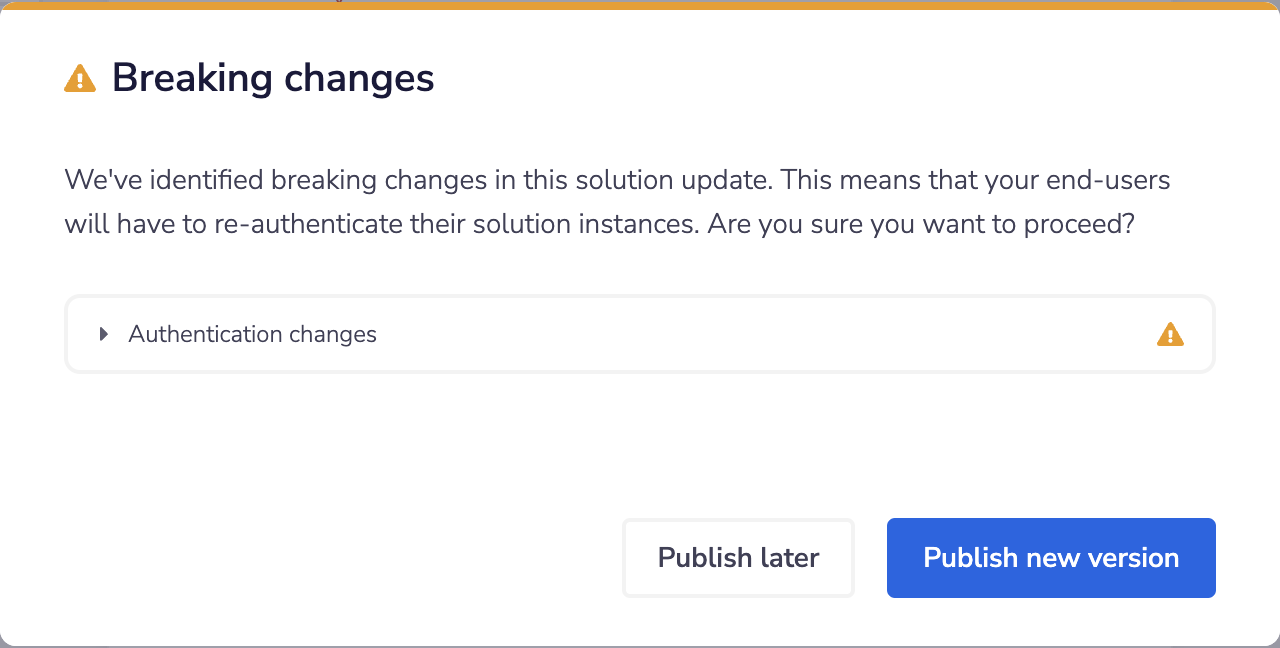
Breaking changes require an 'upgrade', and you will need to follow one of the two steps outlined below.
What comprises a breaking change:
Authentication changes requiring upgrade
An upgrade is required if one or more of the following conditions are true:
The authentication linked to the auth slot has been updated and it has additional scopes
The authentication linked to the auth slot is linked to a new service version or environment
The authentication linked to the auth slot has been re-created for a different service environment
A connector might use a new service version when there is a new version of the connector itself.
A connector might use a different service environment when you have created a new Custom Oauth app for whitelabelling purposes
Config changes requiring upgrade
An upgrade is required if one or more of the following conditions are true:
The config slot type property has changed
DDL properties have changed (e.g. uses a different operation)
The config slot is a DDL and the linked auth slot ID has changed
Sometimes, the new config data might be hidden from the End User (as detailed in Importing external data).
To upgrade Solution instances, check whether you would be needing new configs and auth as mentioned above from the end user.
If Yes:

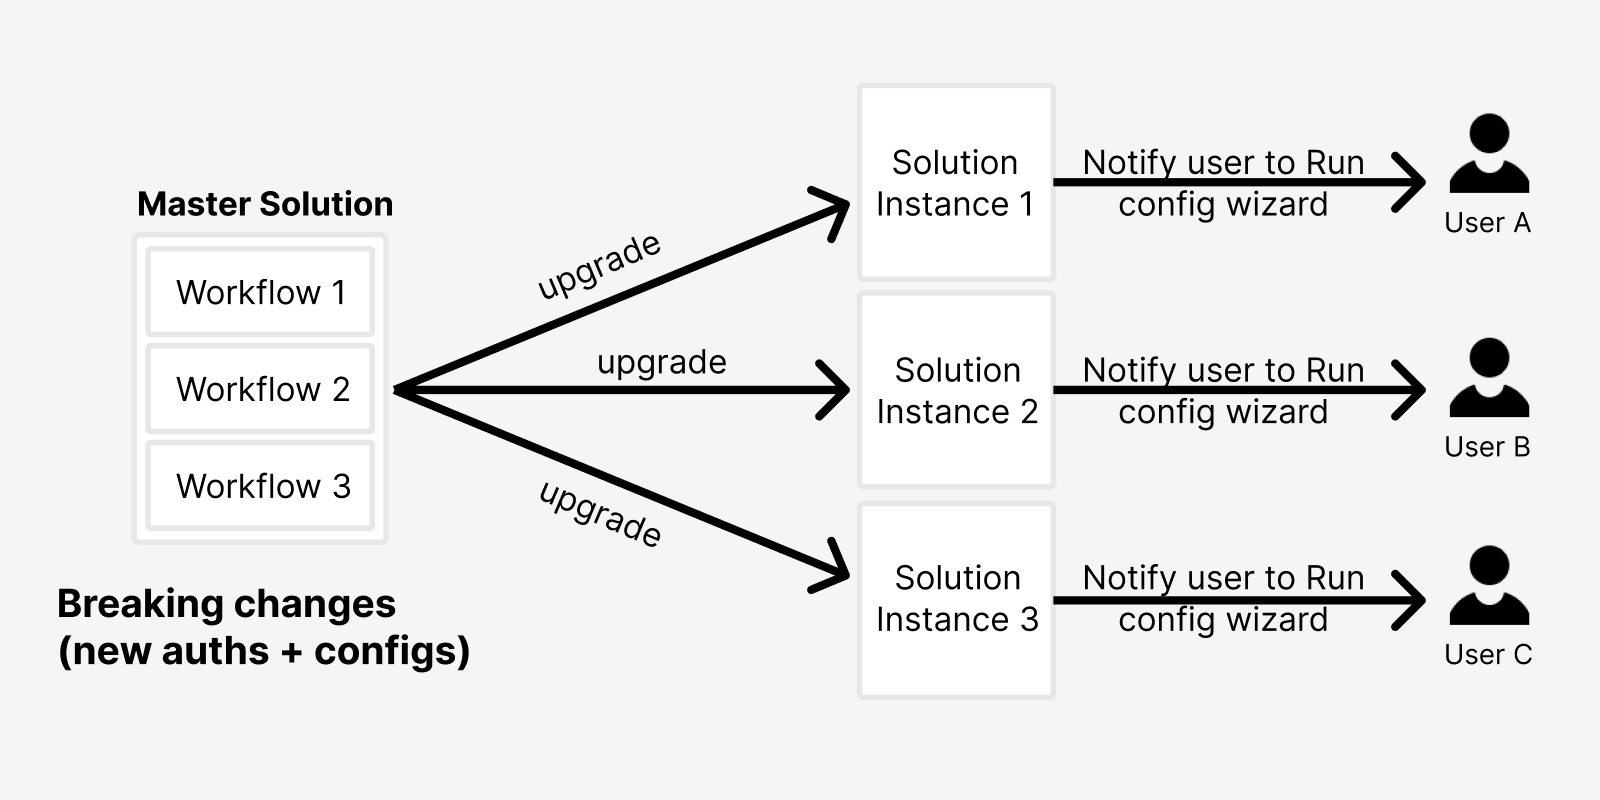
1. Query all the instances of the solution using Get Solution Instances
2. Loop and upgrade each one using the upgradeSolutionInstance mutation (pass the solutionInstanceId parameter only as the end user would be running the wizard to provide config and auth values.)
Notify the end users of these instances to run the config wizard
If No:


1. Query all the instances of the solution using Get Solution Instances
2. Loop and upgrade each one using the upgradeSolutionInstance mutation (pass values for any new config data as part of configValues object)
Here, you have essentially bypassed the Config Wizard as you didn't need inputs from your end user.
You cannot use the updateSolutionInstance mutation for this purpose.
In the example below, this mutation was used to add a value for the external_support-email which is a piece of external config that was not included in the previous version of the Solution (please see the Upgrade Solution Instance API docs for a more detailed example):
1mutation {2upgradeSolutionInstance (input: {3solutionInstanceId:"5f85b697-xxx-xxx-xxx-5d7dabe22634",4configValues: [{ externalId: "external_support-email" , value: "\"support@example.com\"" }]5})6{7solutionInstance {8id9}10}11}
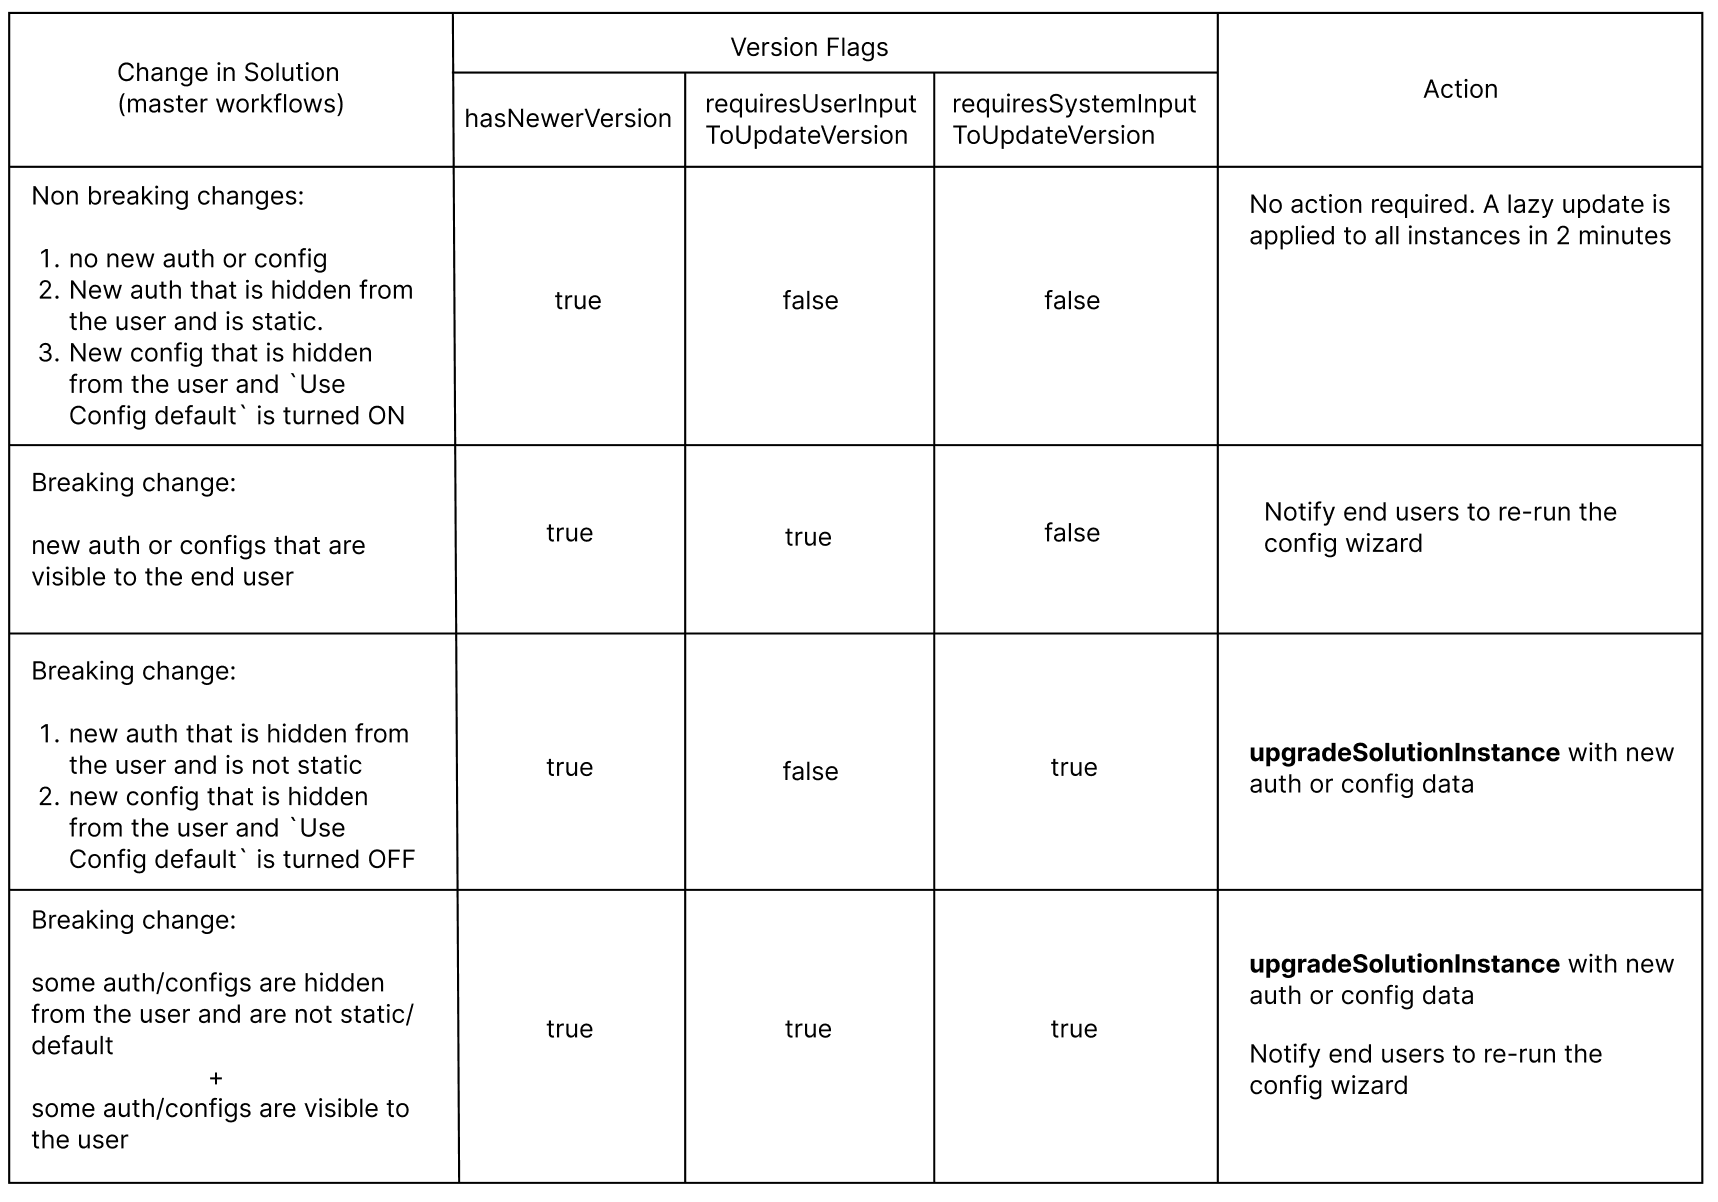
Instance flags to indicate a new Solution version is availableCopy
When using the solutionInstance query to list an End User's Solution Instances, you can use solutionVersionFlags to indicate if a new solution release is available and if an instance upgrade might be required.
In the below sample query and response, you can see the following flags are available:
hasNewerVersion: if True this indicates that a new version of a Solution is available. This will run as a 'lazy update' (no action required) unless one of the other flags also returns true
requiresUserInputToUpdateVersion: if True this indicates that new config or auth data is available which requires the End User to run the Config Wizard again
requiresSystemInputToUpdateVersion: if True this indicates that new config or auth data is available which is hidden to the End User and must be imported with upgradeSolutionInstance as per the external_support-email example above.
In the sample query below remember that, if using a master token, instances can be filtered by the owner, original solutionId, or both. If a user token is used the results will only return instances belonging to that user.
It also shows how you can query the parent solution as a node, in order to return the solutionId so as to use List Solutions to pick up the external ids required for importing external data and/or authentications.
For all criteria, input, and returned data options please see List Solution Instances
Sample queryCopy
1query {2viewer {3solutionInstances (criteria: {4owner: "ccfbbxxx-xxx-xxx-xxx-xxx0aee5c"5}){6edges {7node {8id9name10enabled11created12solutionVersionFlags {13hasNewerVersion14requiresUserInputToUpdateVersion15requiresSystemInputToUpdateVersion16}17solution {18id19}20}21}22}23}24}
Sample responseCopy
1{2"data": {3"viewer": {4"solutionInstances": {5"edges": [6{7"node": {8"id": "68b645xxx-xxx-xxx-xx0319bf354f",9"name": "Slack channel > Trello > Dropbox Project",10"enabled": false,11"created": "2019-09-26T10:03:28.902Z",12"solutionVersionFlags": {13"hasNewerVersion": true,14"requiresUserInputToUpdateVersion": false,15"requiresSystemInputToUpdateVersion": false16},17"solution": {18"id": "83674exxx-xxx-xx-xxx-xxb61c2d3a407"19}20}21}22]23}24}25}26}
Decision table for solutionVersionFlagsCopy
You can decide the course of action for every solution instance using the table below: