
Toggl 2.0
The simplest time tracker to help you get things done. Ideal for teams, freelancers & agencies.
- On this page
- Toggl
- Overview
- Authentication
- Available Operations
OverviewCopy
Toggl is a time tracking app that allows you to track your daily activities across different platforms; providing you with detailed insights and an opportunity to optimise your workflow by identifying areas where you can improve.
AuthenticationCopy
When using the Toggl connector, the first thing you will need to do is go to your Tray.io account page, and select the workflow you wish to work on. Once in the workflow dashboard itself, search and drag the Toggl connector from the connectors panel (on the left hand side) onto your workflow.
With the new Toggl connector step highlighted, in the properties panel on the right, click on 'New Authentication' which is located under the 'Settings' heading.


This will result in a Tray.io authentication pop-up window, that should look like this:


As you can see, besides from naming your authentication appropriately and selecting the purpose, you will need your 'API Token'. This can be found within your main Toggl dashboard profile settings.
Head to the bottom of your dashboard, and click on the "More options" button, which will look like your email details and account name. From there, a popup list of further options will appear, one of which is "Profile settings". Once you are on your profile page, scroll to the very bottom to get to the API section. Here You will have your token displayed.


Copy and paste said token into the Tray.io auth window.
Once you have clicked the 'Add authentication' button, go to back to your authentication field (within the workflow dashboard properties panel from earlier), and select the recently added authentication from the dropdown options now available.
Your connector authentication setup should now be complete.
Available OperationsCopy
The examples below show one or two of the available connector operations in use.
Please see the Full Operations Reference at the end of this page for details on all available operations for this connector.
Note on Operations usageCopy
Paid PlansCopy
Please note some fields on operations on the toggl connector will only be available on the paid plans. Features found in operations that are not available on a non-paid plan are:
Tasks
Billable projects and time entries
Report rounding
PaginationCopy
An additional field, 'Page' exists on this operation which can be used for pagination. Regardless of the time period chosen or how many time entries will be fetched for the report, only 50 items will be returned at a time. This only applies when 'Format' is set to JSON. If requesting CSV or PDF reports, then all items are returned.
When requesting the report as JSON, the property total_count shows how many results in total are to be returned. The output property per_page will always show 50.
For example, if there a total of 200 time entries in the result set, the first call will fetch the first 50. By incrementing the 'Page' field to 2, the next 50 items (items 51-100) can be retrieved.
Retrieving a weekly reportCopy
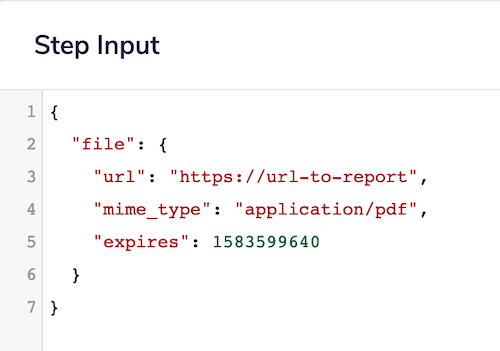
A weekly report of time entries can be retrieved in JSON, CSV or PDF format. This can be selected in the 'Output format' field. Please be aware that choosing CSV or PDF format will result in a file object being returned.


If JSON is returned, then this will return the data that will be visible directly in the debug logs (see below, bottom screenshot).


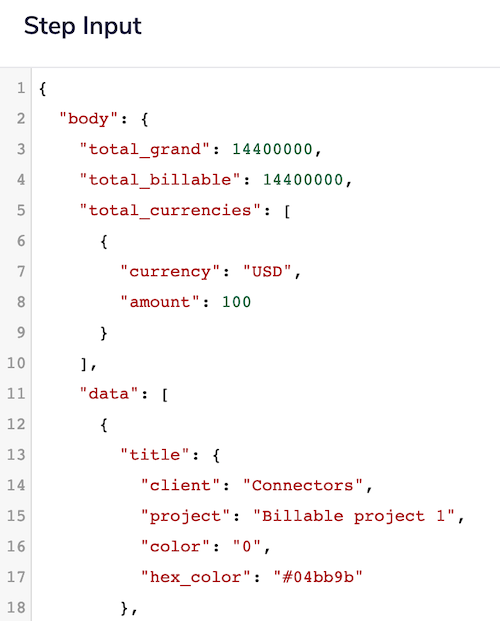
Output of JSON is structured by providing lists (arrays) of days. In each list there will be 8 items, for 7 days of the week plus the total for the week. Where no time entries occurred on a certain day, the value will be null.

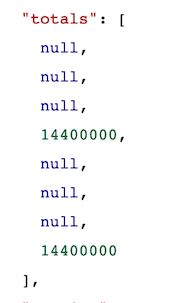
In the screenshot above, there was a time entry only on one day. The value at the bottom is the total for the week.
The time period that is selectable for weekly reports will always be 7 days. The 'Since' date field can be set to specify when from. If this is left blank it defaults to a week ago from today.
Time entry results can be grouped by project or users in the 'Grouping' field.
The values of time entries can be shown as duration or earnings (earnings only available for billable time entries) by setting the 'Calculate' field.
Results can be filtered by adding the IDs of entities (such as projects or users) to the corresponding input fields.
The 'User IDs' list can be limited or extended by the 'Members of group IDs' and 'All members of group IDs' fields.
'Members of group IDs' will mean that only users that belong to the provided group ID will be returned. If a user ID is provided in 'User IDs' that doesn't belong to a specified group ID in this field, that user will not show in the results.
'All members of group IDs' means returning results for all members (users) that belong to the group IDs specified in this input field, regardless of what is entered in the 'User IDs' field.
'Display hours' only takes effect when retrieving results as CSV format.
Retrieving a detailed reportCopy
A detailed report returns a list of time entry items that have more detailed than the summary or weekly reports.
Many of the filtering options are the same as the weekly report operation, with the ability to also set an 'Until' date, which together with the 'Since' date field allows for fetching of data over a custom time period.


Example UsageCopy
TRAY POTENTIAL: Tray.io is extremely flexible. By design there is no fixed way of working with it - you can pull whatever data you need from other services and work with it using our core and helper connectors. This demo which follows shows only one possible way of working with Tray.io and the Toggl connector. Once you've finished working through this example please see our Introduction to working with data and jsonpaths page and Data Guide for more details.
Below is an example of a way in which you could potentially use the Toggl connector, to get a detailed report on our available projects. We have also added in a create/ list latest time entry section just for the sake of practice.
The steps will be as follows:
Setup a manual trigger and list all available projects.
Create a time entry and get a detailed report of said entry.
List all time entries available (including the newest one).
The final outcome should look like this:


1 - Setup trigger & List all ProjectsCopy
Once you have clicked 'Create new workflow' on your main Tray.io dashboard (and named said new workflow), select the Manual trigger from the trigger options available:


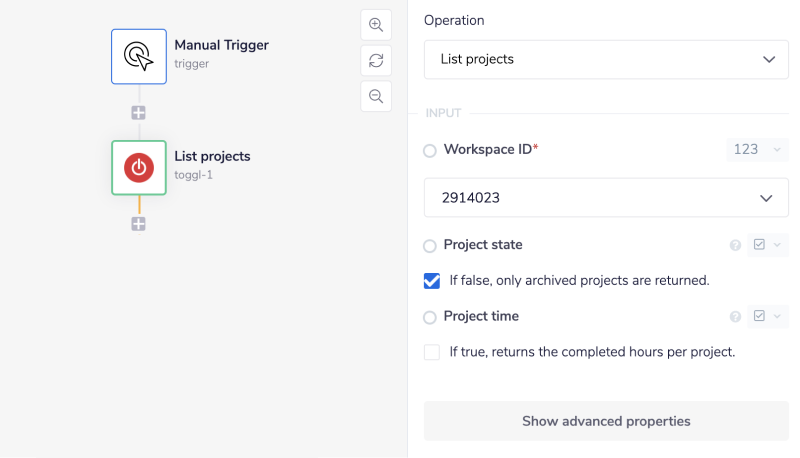
Once you have been redirected to the Tray.io workflow dashboard, from the connectors panel on the left, add a Toggl connector to your second step. Set the operation to 'List projects'.
You will need to provide your 'Workspace ID'. To get a workspace ID, open the workspace in your browser and look at the URL in the address bar. ID is the integer after edit/. It should be about 7 numbers in total.
Example: https://www.toggl.com/app/workspaces/edit/{workspaceID}/
Make sure to tick the 'Project state' box option, and 'Project time' if you want to be even more specific about what is returned from your project list.

Feel free to re-name your steps as you go along to make things clearer for yourself and other users.
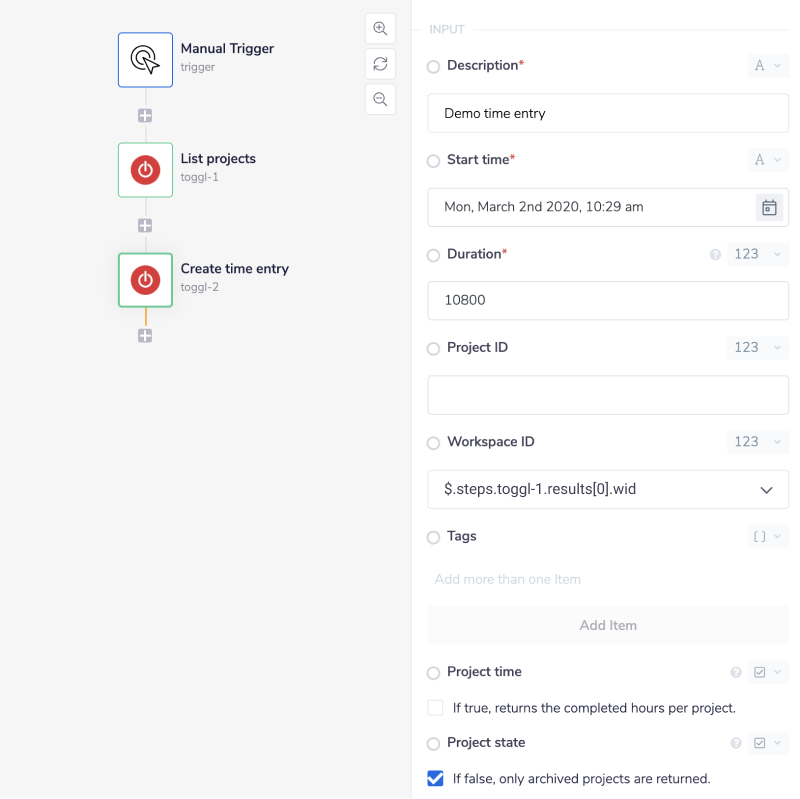
2 - Create a time entry & get Report DetailsCopy
Add another Toggl conenctor to your workflow and set the operation to 'Create time entry'.
You will notice that both a 'Description', 'Start time' and a 'Duration' are required fields. Make sure to enter your fields appropriately, aka, use the dropdown calendar to make sure your time is in the correct format and that your duration is input in SECONDS.
You will again need your 'Workspace ID', only this time you can have it auto-generated by using the connector-snake to create the jsonpath required.
JSONPATHS: For more information on what jsonpaths are and how to use jsonpaths with Tray.io, please see our pages on Basic data concepts and Mapping data between steps
CONNECTOR-SNAKE: The simplest and easiest way to generate your jsonpaths is to use our feature called the Connector-snake. Please see the main page for more details.

The third Toggl connector step is very similar to the previous one. Make sure to set the operation to 'Get detailed report', and generate your workspace ID in the same fashion. The required field here is the 'User agent' in question. You will need the individual's email address in this case.
The 'Project ID' is taken from the first project off of the list we created earlier. This is why the connector-snake's output here references the first in the array: [0].
_If you are interested in getting the results from all of the listed projects, you could expand this workflow by adding a 'Loop collection' connector step. For more details please visit the Loop docs page.


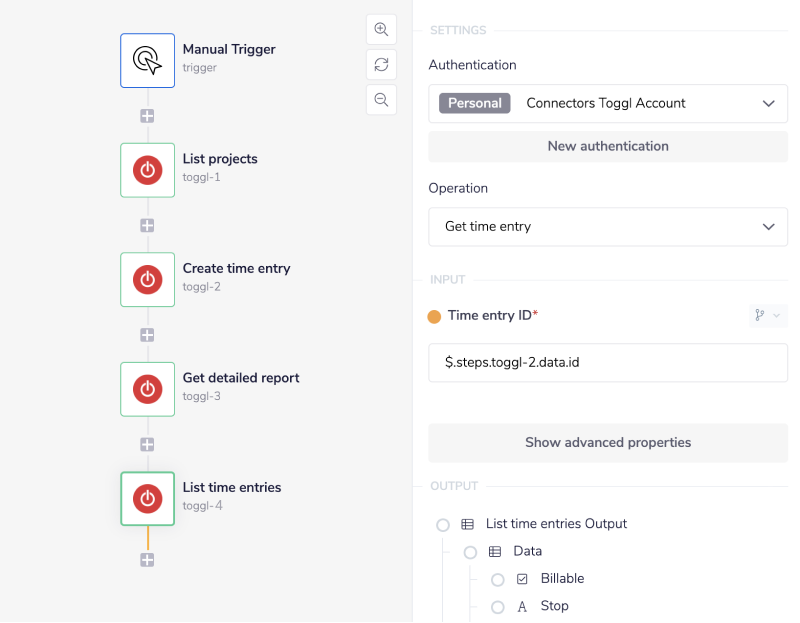
3 - Get Time EntryCopy
Finally, on your last Toggl connector step, set the operation to 'Get time entry'. Here you will once more use the connector-snake to auto-generate the jsonpath, this time connecting it to the second Toggl connector within the workflow.

BEST PRACTICES: Whenever you do decide to create your own workflow, be sure to check out some of our key articles such as: