
Talkdesk 3.0
Talkdesk is a cloud contact center solution, helping organizations around the world build brand love and loyalty by delivering exceptional customer experiences.
OverviewCopy
Talkdesk is an end-to-end solution for delivering great customer experiences. Talkdesk CX Cloud is a new kind of cloud contact center – an end-to-end solution on a single platform, delivering everything you need to make customer experience your competitive advantage while optimizing operational efficiency and reducing cost.
IMPORTANT!: This is currently a BETA API.
AuthenticationCopy
IMPORTANT!: The Talkdesk connector currently only works with using the signed JWT method of sign in (with a set algorithm of ES256). To obtain these credentials you must have a Partner Account with Talkdesk. Said Partner Account will provide you with the following authentication fields that you will need for authentication with Tray. For more information on the JWT method of authentication, please refer to the detailed Talkdesk documentation which can be found at the following link.
When using the Talkdesk connector, the first thing you will need to do is go to your Tray.io account page, and select the workflow you wish to work on. Once in the workflow builder itself, search and drag the Talkdesk connector from the connectors panel (on the left hand side) onto your workflow.
With the new Talkdesk connector step highlighted, in the properties panel on the right, click on the ‘Authenticate’ panel followed by ‘Add new Authentication’ (located under the Authentication input field)


This will result in a Tray.io authentication pop-up window, that should look like this:

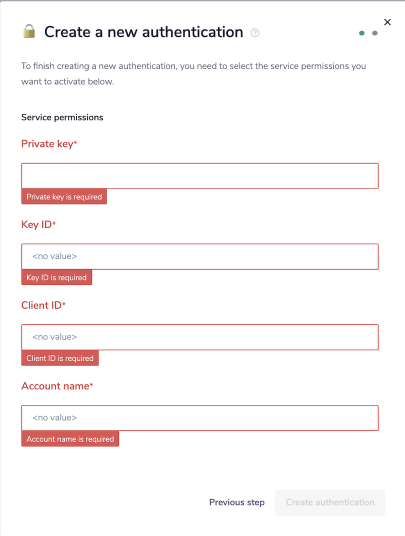
Once you have added these fields to your Tray.io authentication popup window, click on the 'Create authentication' button. Go back to your settings authentication field (within the workflow builder properties panel), and select the recently added authentication from the dropdown options now available.
Your connector authentication setup should now be complete.


Available OperationsCopy
The examples below show one or two of the available connector operations in use.
Please see the Full Operations Reference at the end of this page for details on all available operations for this connector.
Example usageCopy
TRAY POTENTIAL: Tray.io is extremely flexible. By design there is no fixed way of working with it - you can pull whatever data you need from other services and work with it using our core and helper connectors. This demo which follows shows only one possible way of working with Tray.io and the Talkdesk connector. Once you've finished working through this example please see our Introduction to working with data and jsonpaths page and Data Guide for more details.
This brief tutorial will explain how to use the Talkdesk connector in order to create a report job, get said report details, and finally download the report in question.
The steps will be as follows:
Setup using a manual trigger and use the Talkdesk connector to create a report job.
Retrieve said report job information details.
Locally download the report job in question.
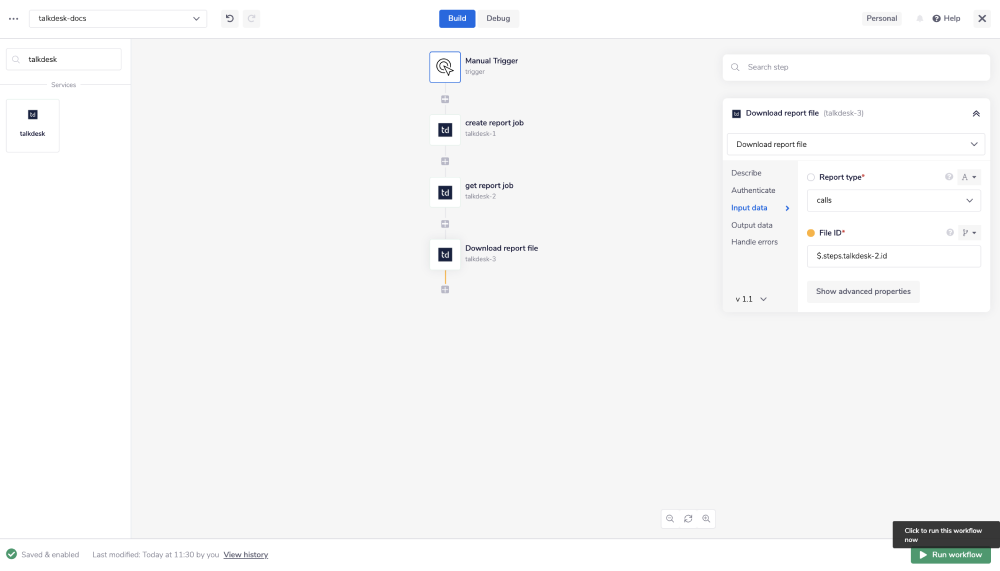
The final outcome should look like this:
1 - Setup Manual trigger & Create reportCopy
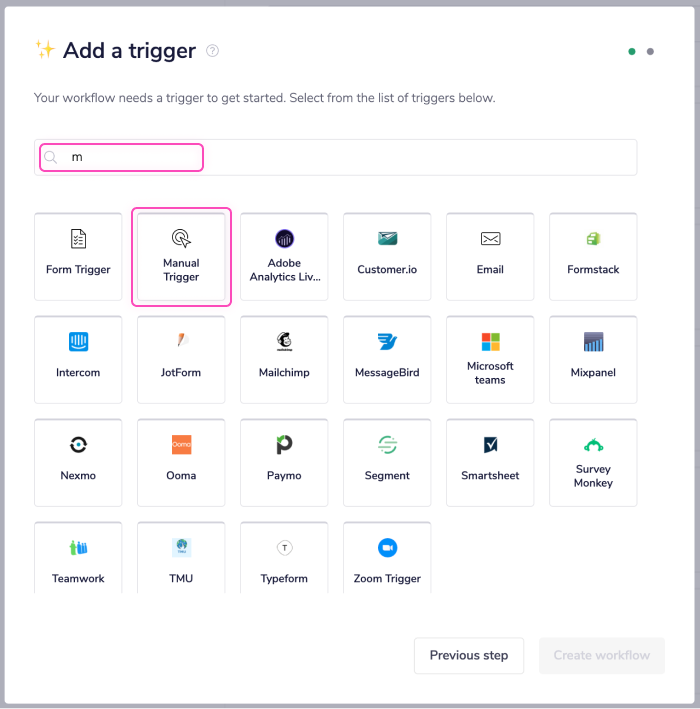
Once you have clicked 'Create new workflow' on your main Tray.io dashboard (and named said new workflow), select the manual trigger from the trigger options available:

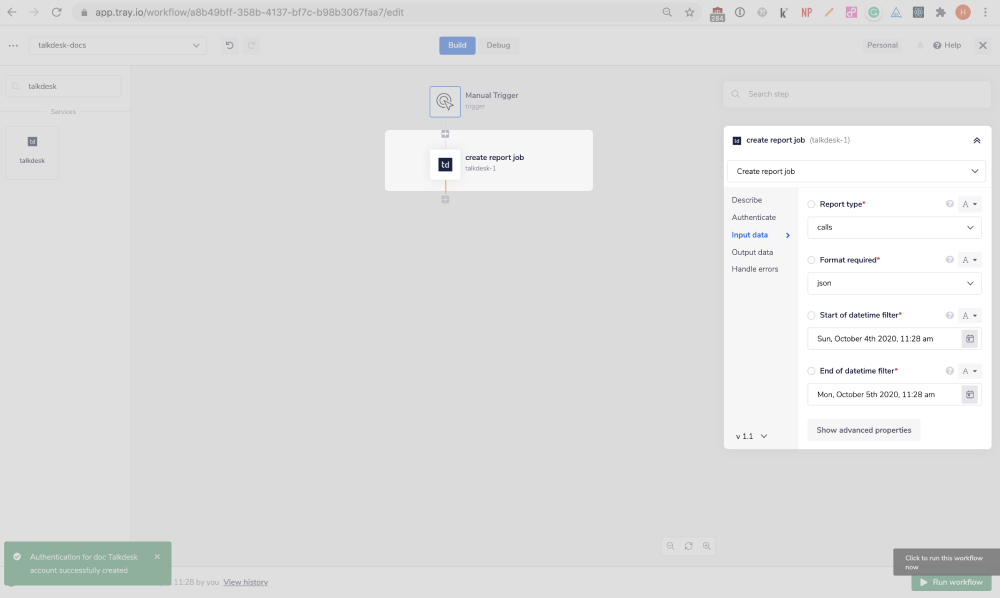
Once you have been redirected to the Tray.io workflow dashboard, from the connectors panel the left, add a Talkdesk connector as your second step.
Once authentication is complete, and you have highlighted your Talkdesk connector; on the right hand side there will be an input panel asking for various configuration methods.
Set the operation to 'Create report job', then select the inputs tab. You should see a list of fields that you can populate in order to send the request. You will notice that all field types are marked as required by the red *.
This example selects the 'Report type' to 'calls' and 'Format required' to 'json' from the dropdown options available. The start and end of the 'Datetime filter's are chosen in a similar fashion.

Feel free to re-name your steps as you go along to make things clearer for yourself and other users.
1 sentence summary of what this step does/ has achieved
2 - Get a report jobCopy
Awesome! So lets now test out wether we can retrieve the file we just created. Just like before, lets search within the connector search panel to find and drag across another Talkdesk step. Set the operation to 'Get report Job'.
Again in the input panel you will see a list of inputs for you to fill in, asking you as a user to choose the 'Report type' and 'Job ID' in order to specify which type of report to look for.
If for example you created project1 as a user_status, then you wouldn't be able to retrieve it in the 'get operation' if you search with in the 'calls' directory.


Here we will use the connector snake, to JSON path a result from an earlier step in as the file ID to look for.
JSONPATHS: For more information on what jsonpaths are and how to use jsonpaths with Tray.io, please see our pages on Basic data concepts and Mapping data between steps
CONNECTOR-SNAKE: The simplest and easiest way to generate your jsonpaths is to use our feature called the Connector-snake. Please see the main page for more details.
1 sentence summary of what this step does/ has achieved
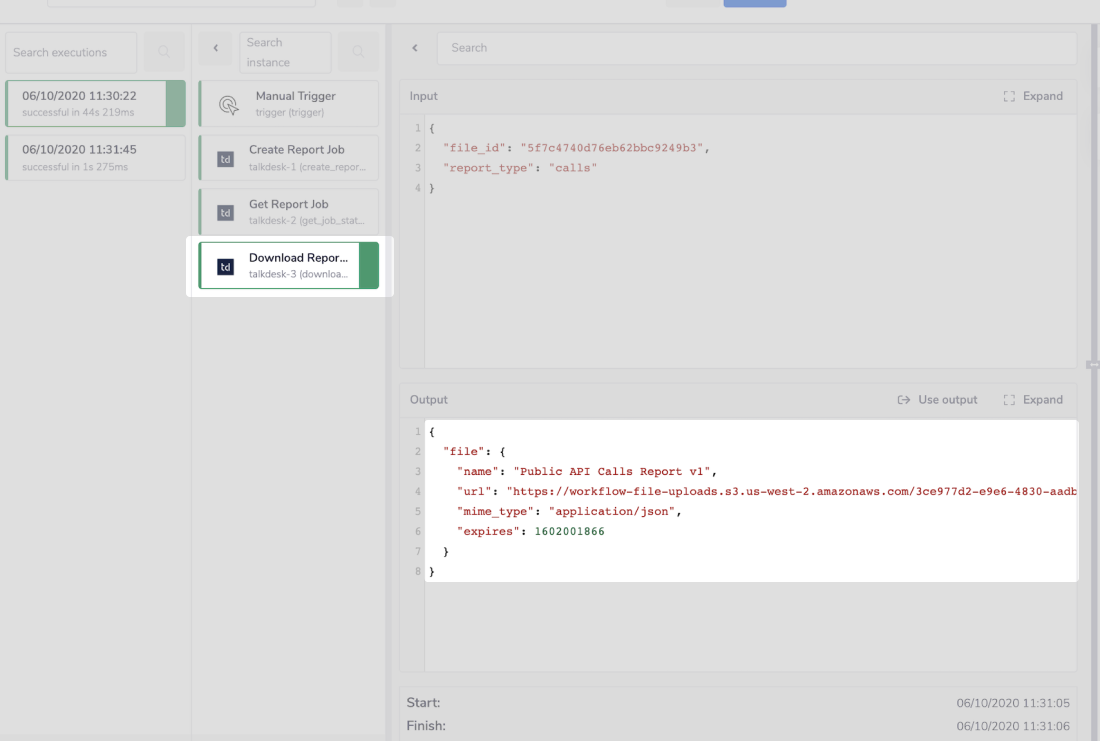
3 - Download a report jobCopy
Lastly lets download this report. Add a final Talkdesk step and set the operation to 'Download report job'.
As you can see, this operation requires the 'Report type' and 'File ID' be specified. Once more select 'calls' from the dropdown list available and set your 'File ID' using the connector-snake method outlined above. That is to say, while hovering over the 'XXXstepTitleXXX' step (with the tail end of the connector-snake), select XXXXXX from the list of output properties displayed.
Open the Debug panel. A successful run will result in the file object itself being displayed within the Input panel of the successful Log and resulting step.
Within this panel a URL path will be present which can be used in order to download the file directly.
USER TIP: As we have wrapped this URL within a file object specific to Tray, it means that you as a user can also use a jsonpath in order to get to this object when in use with other connectors within Tray. Ones that specifically work with files of this type such as Google Drive service connector, CSV core connector, or the File helpers connector.
Resulting workflow:
File object within our debug panel:

1 sentence summary of what this step does/ has achieved
BEST PRACTICES: Whenever you do decide to create your own workflow, be sure to check out some of our key articles such as: