
Snowflake 2.0
The only data warehouse built for the cloud.
OverviewCopy
Snowflake makes it easy to amass all your data, enable rapid analytics, and derive data-driven insights for all your business users.
IMPORTANT!: Snowflake has the option of implementing a Network Policy in order to restrict access based on IP addresses.
If you are not using a Network Policy, then your database is publicly accessible.
If you have enabled a Network Policy, then you will need to enable Tray.io to connect to your database by white listing ALL the Tray public IP addresses based on your region.
Refer to the Tray public IPs document for complete list of the Tray public IP addresses.
Please also be aware of our other on-prem options.
AuthenticationCopy
PLEASE NOTE: You can now also authenticate the Snowflake connector using Okta. Please refer to the Snowflake (Okta) documentation for instructions on how to set this up.
IMPORTANT: Before proceeding, please ensure that your authentication setup includes a user who has been assigned a role granting the necessary privileges for both Warehouses, Databases, Schemas, and Tables.
When operating in the context of ACCOUNTADMIN within your Snowflake account dashboard, you will need to have run a sequence of commands such as follows:


Please note that the privileges granted are to a warehouse, then to the databases, then their schemas and individual tables.
This must be done to allow access to the tables. The exact table permissions (select, insert etc.) can be set according to what tasks you wish to carry out with the Tray.io connector.
When using the Snowflake connector, the first thing you will need to do is go to your Tray.io account page, and select the relevant workflow. Once in the workflow dashboard itself, search and drag the Snowflake connector from the connectors panel (on the left hand side) onto your workflow.
With the new Snowflake connector step highlighted, in the properties panel on the right, click on 'New Authentication' which is located under the 'Settings' heading.

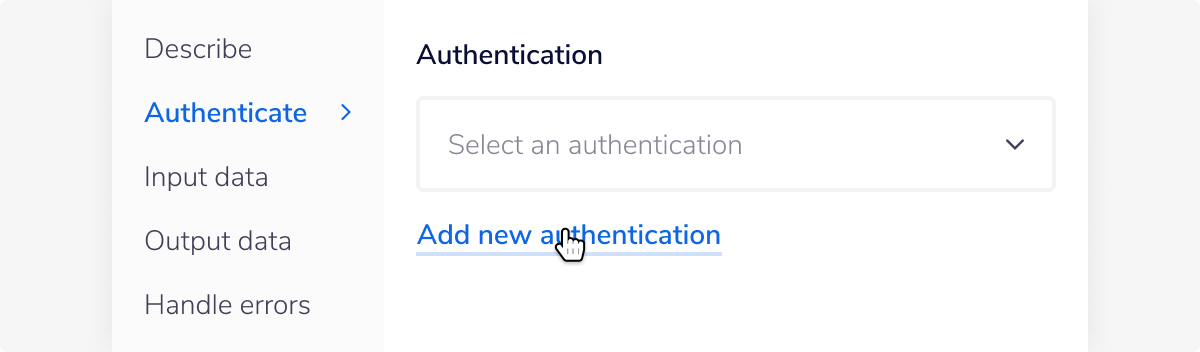
This will result in a Tray.io authentication pop-up window. The first page will ask you to name your authentication appropriately, and state which type of authentication you wish to make ('Personal' or 'Organisational').
As you can see, the next page asks you for your 'Account', 'Username' and 'Password' credentials, which are required. You will also be asked for your 'Warehouse', 'Database', 'Schema', 'Role', and 'Access URL' values should you choose to provide them.


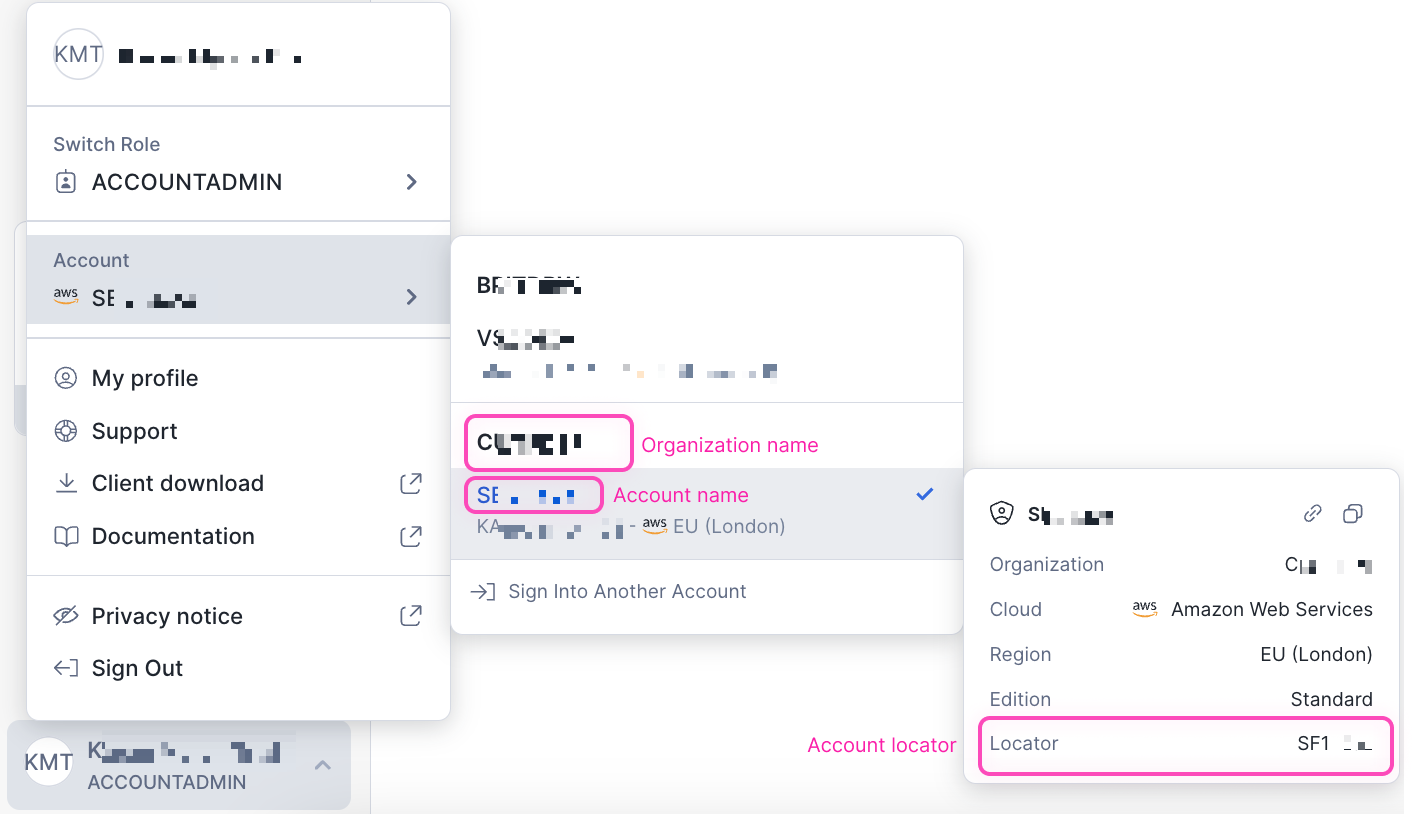
Account and Access URLCopy
There are two ways you could fill in the 'Account' and 'Access URL' authentication fields within the authentication modal.
Preferred Copy
Account: The preferred method is '
<organisation_name>-<account_name>'. Note that when using this format you do not need to provide an access URL, but should use a global, region-less URL if providing one. For SQL commands/operations the format is '<org_name>.<account_name>'. You can view more information on these endpoints here.Access URL: Providing an access URL should not be required, but if providing one the preferred URL format is a global region-less format, '
https://<org_name-account_name>.snowflakecomputing.com'.
LegacyCopy
For accounts created before the release of 'Organizations'.
Account: The use of 'Account locators' continue to be supported, but this is no longer the preferred method. For regions other than AWS US West (Oregon), the format is '
<account_locator>'.For all other regions, the format is '<account_locator>.<region>'or '<account_locator>.<region>.<cloud>'.You can view more information on this here.Access URL: Where ‘account locator’ is used in the account name, the format for AWS US West (Oregon) is '
https://<account>.snowflakecomputing.com'though this will be automatic so providing it is not required. For all other regions, the format is 'https://<account>.<region>.snowflakecomputing.com'.

Other authentication inputsCopy
The 'Username' and the 'Password' are the same as the username and password for your Snowflake account.
There are several other authentication settings you can set up, while most are use case specific, be sure to set a default Warehouse for your authentication, as this needs to be picked up automatically when you are running Snowflake operations.
A Warehouse in Snowflake terms is a set of computing resources you have assigned to manage your databases and tables, which can be adjusted depending on the power and capacity that is required.

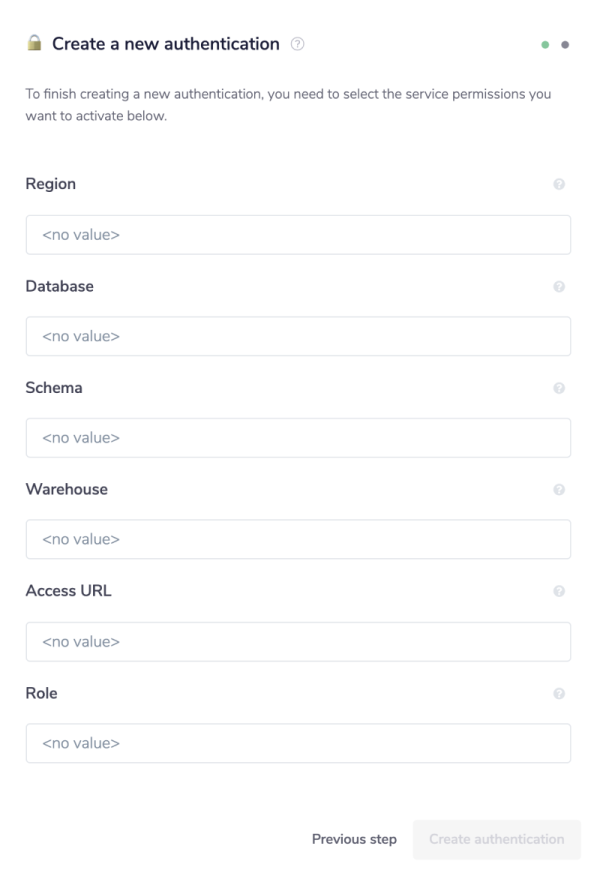
If you set a default 'Database' and 'Schema' then you can run queries and statements by directly referencing the table themselves:


If you do not set a default 'Database' and 'Schema' then you will need to enter them "fully-qualified", something in the form of the following: <db_id>.<schema_id>.<object_id>:

Once you have clicked the 'Create authentication' button, go to back to your authentication field (within the workflow dashboard properties panel from earlier), and select the recently added authentication from the dropdown options now available, if not already selected.
Your connector authentication setup should now be complete.
Notes on using SnowflakeCopy
Load data to tableCopy
The Load data to Table operation has files as an input field.
What is required here is a list / array of filenames to load.
It is not possible to use this operation to stream files to a Snowflake data warehouse.
Insert rows in tableCopy
When using the Insert rows in table operation, it is important to note that, for all String/Varchar values in a table, Snowflake will only accept them enclosed in single quotes ' '. Please see the example below for instructions on doing this correctly using interpolated mode
Available OperationsCopy
Please see the Full Operations Reference page for details on all available operations for this connector.
Example usageCopy
TRAY POTENTIAL: Tray.io is extremely flexible. By design there is no fixed way of working with it - you can pull whatever data you need from other services and work with it using our core and helper connectors. This demo which follows shows only one possible way of working with Tray.io and the Snowflake connector. Once you've finished working through this example please see our Introduction to working with data and jsonpaths page and Data Guide for more details.
Below is an example of a way in which you could potentially use the Snowflake connector to insert new records into the Snowflake table and read all the records from said table.
This scenario imagines a situation whereby you have received some customer data via the Webhook trigger and now need to process it into Snowflake. However users may have received this data in any number of other ways such as from the Salesforce or SurveyMonkey connector, through the CSV Editor, and so on.
Upon receiving the records, the workflow checks whether the table in which we want to add these records already exists in the Snowflake database. If it does not exist, then the workflow creates a new table and then adds the received records to that table. Once the records are added, the workflow continues to read the records from the selected Snowflake table.
This example demonstrates the following operations of the Snowflake connector:
Custom query: Executes a raw specified SQL query on the chosen warehouse.
Insert rows in table: Inserts one or more rows based on your chosen warehouse, database, table schema, and table combination.
List table rows: Finds and reads the rows based on your chosen warehouse, database, table schema, and table combination.
The steps will be as follows:
Pull the client records from the source (a webhook trigger in this example) and create the table (if doesn't exist) in the Snowflake database.
Push the records one by one into the Snowflake table using the Loop connector.
Read the records from the Snowflake table.
Your complete workflow should look similar to this:

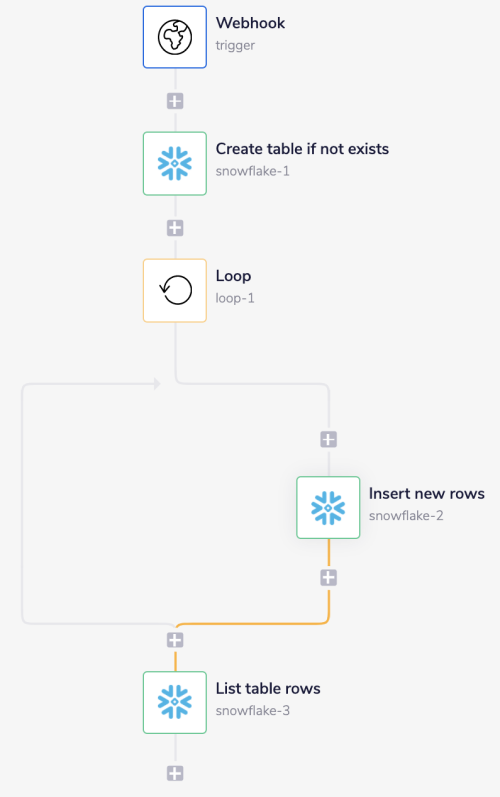
1. Pull records & create a tableCopy
Select the Webhook trigger from the trigger options available, and set the operation to 'When webhook is received, auto-respond with HTTP 200'. Be sure to click the 'Enable' button before continuing. This makes the workflow ready to receive incoming calls.
The records received by the Webhook are in JSON format and is as follows:
1[{2"client_id": 82,3"name": "Renaldo Castaignet",4"email": "rcastaignet0@slashdot.org",5"contact_no": "578-493-4455"6},7{8"client_id": 79,9"name": "Arlen Grumbridge",10"email": "agrumbridge1@instagram.com",11"contact_no": "292-491-7708"12},13{14"client_id": 57,15"name": "Veronika Fitter",16"email": "vfitter2@google.com.au",17"contact_no": "457-411-5533"18},19{20"client_id": 68,21"name": "Tirrell Gladbach",22"email": "tgladbach3@discuz.net",23"contact_no": "714-514-0108"24},25{26"client_id": 90,27"name": "Emmalynne Gibbard",28"email": "egibbard4@accuweather.com",29"contact_no": "625-905-3040"30}31]
Remember that the format in which you receive data will vary depending on where it is coming from - pulling records from Salesforce, Webform, etc., will have different results/views.
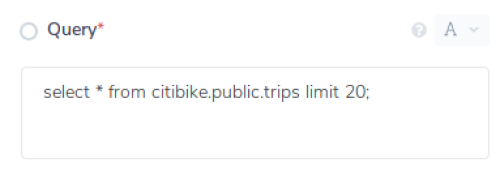
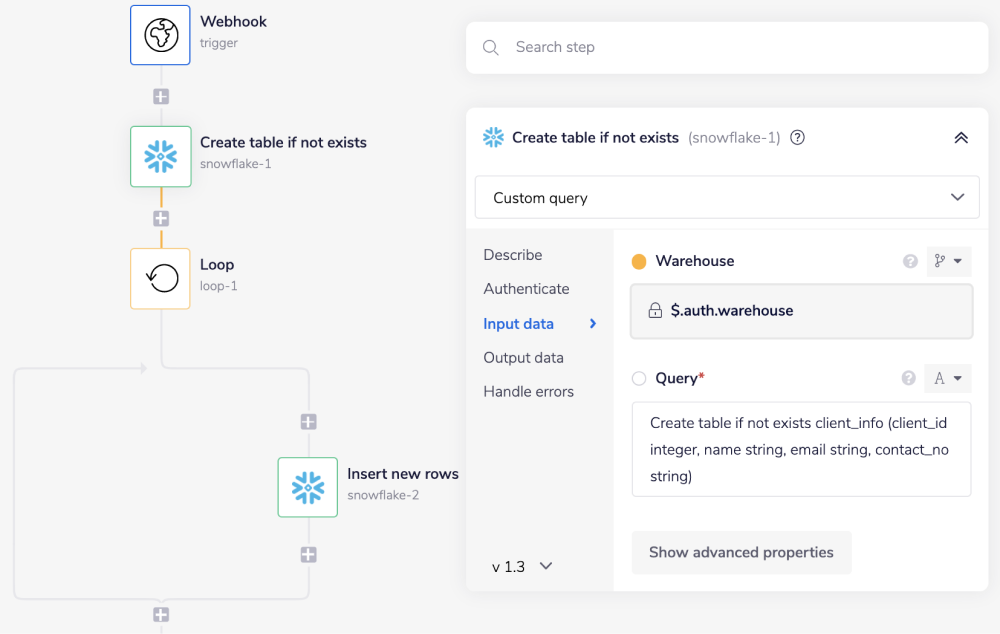
Next, add the Snowflake connector and set the operation to 'Custom query'. Add the following query in the 'Query' field.
Create table if not exists client_info (client_id int, name varchar, email varchar, contact_no varchar)
The above query will verify if the specified table (in this case, client_info) exists in the Snowflake database. If it exists, then the workflow proceeds. If it doesn't, then it creates the table based on the table information provided in the above SQL query.

2. Add recordsCopy
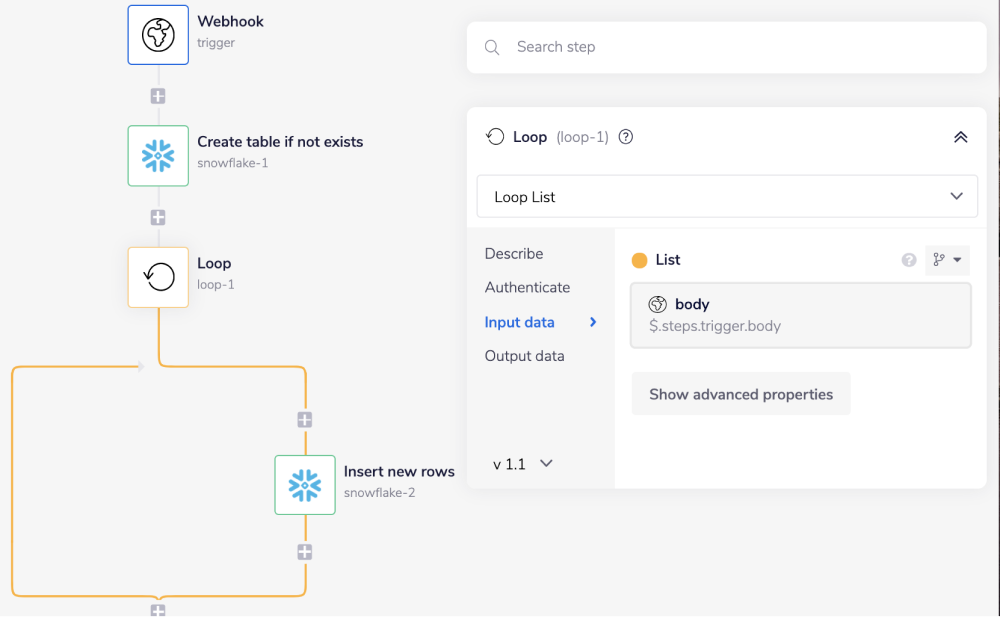
Add a Loop connector with operation as 'Loop List' and the 'List' field set to $.steps.trigger.body. You can use the connector-snake to generate this automatically.
JSONPATHS: For more information on what jsonpaths are and how to use jsonpaths with Tray.io, please see our pages on Basic data concepts and Mapping data between steps
CONNECTOR-SNAKE: The simplest and easiest way to generate your jsonpaths is to use our feature called the Connector-snake. Please see the main page for more details.

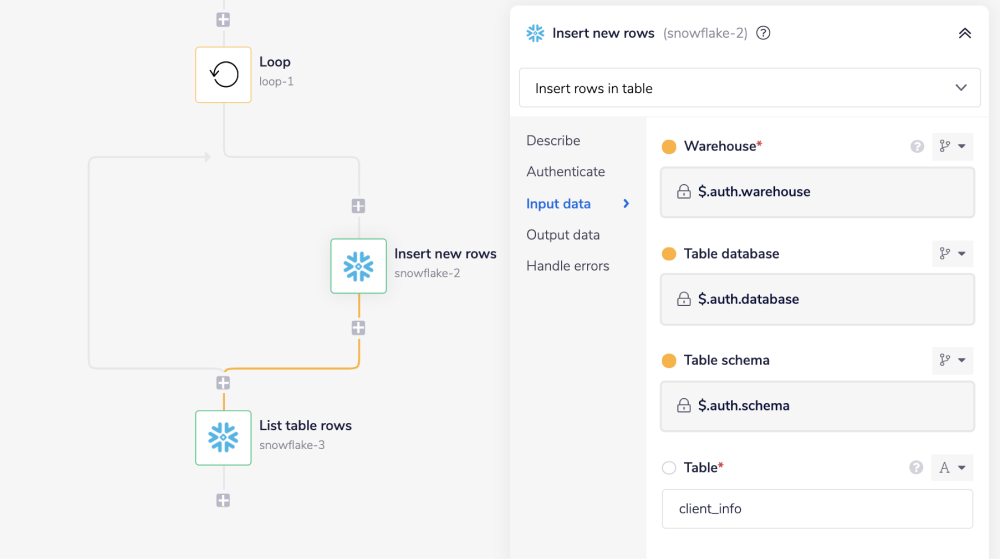
Next, add a Snowflake connector inside the Loop connector and set the operation to 'Insert rows in table'.
In the 'Table' field, add the name of the table that you created in the previous step i.e. client_info in this example.
'Table' does not need to be hard-coded. For example, you may have pulled it from a custom data field in your trigger, such as $.trigger.table or $.trigger.snowflake_table

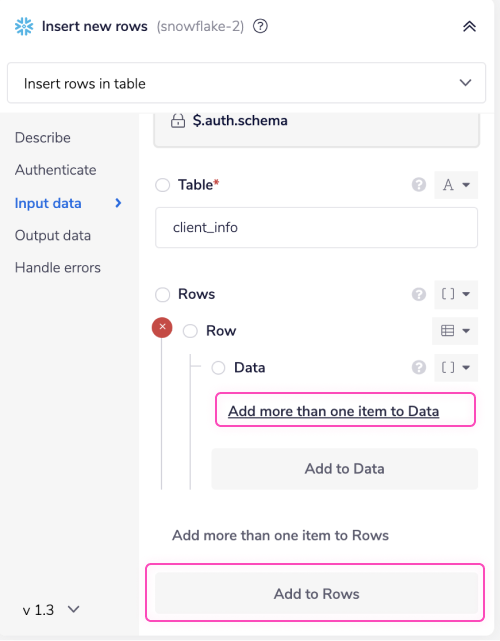
Click the 'Add to Rows' button available under the 'Rows' field to add a single 'Row'. To this Row, you can add multiple data using the 'Add more than one item to Data' link.

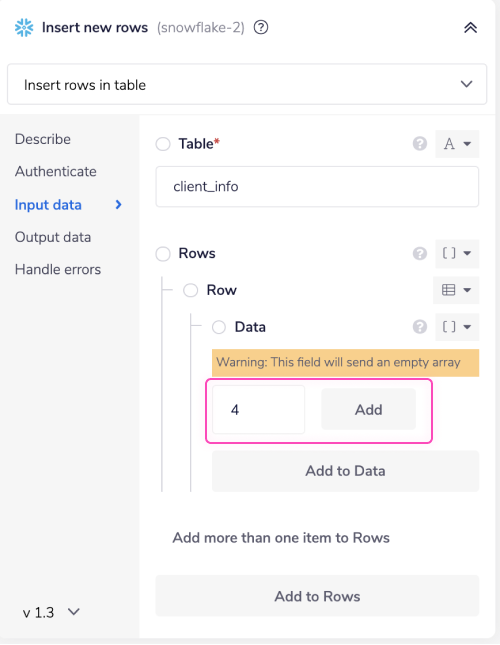
Select the number here. The number represents the number of columns you have in your selected table. The client_info table in this example has four columns, as you can see based on the query used in the first 'Create table if not exists' step. Once done, click the 'Add' button.

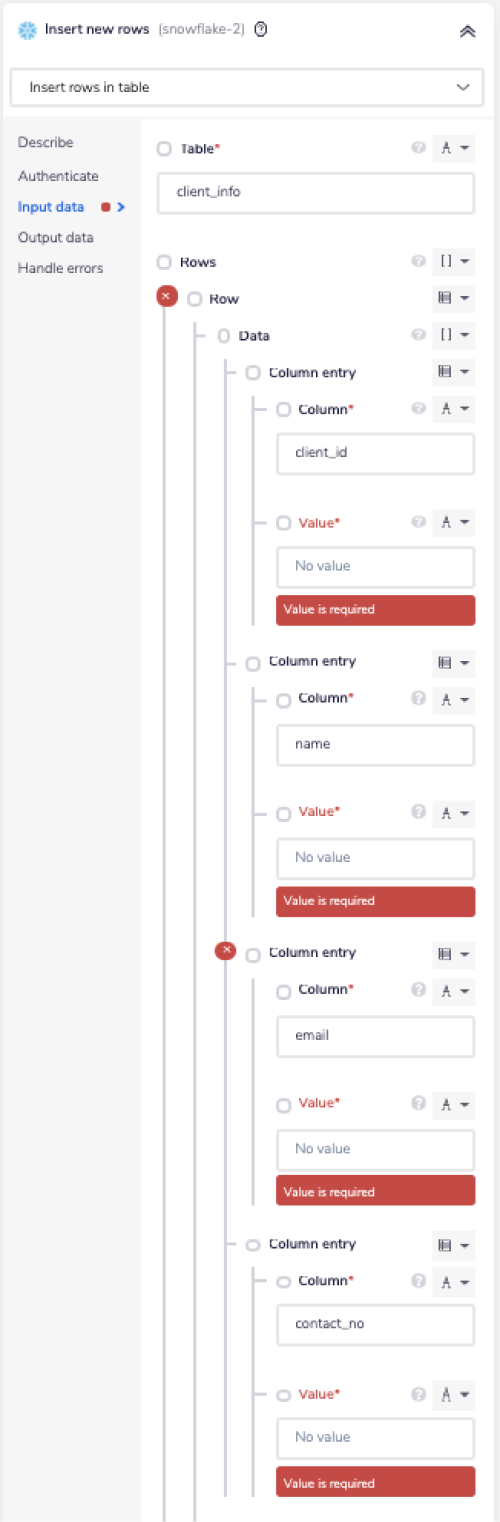
Now, you have four 'Column' and 'Value' pairs available under the 'Column entry' section. Add all the 'Column' names one by one in the 'Column' field. As you can see in the image below, we have added the following four column names: client_id, name, email, and contact_no.

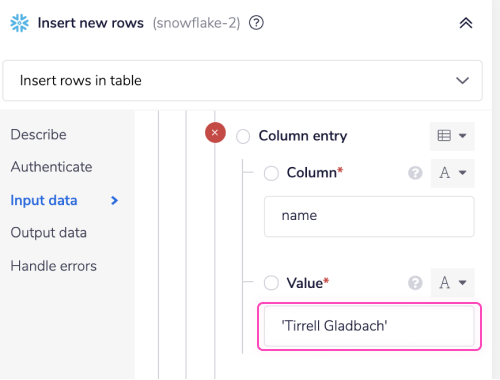
For all String/Varchar values in a table, Snowflake will only accept them enclosed in single quotes ' '.
If you are hardcoding string values this is simple.
If you wish to provide the 'Value' Tirrell Gladbach for the 'name' column then you simply put it in single quotes as shown in the image below.

However we are not hardcoding the values here, we are dynamically passing them in as jsonpaths - looping through the webhook's data to insert it one-by-one into the Snowflake table.
To do this with the required ' ', we need to use interpolated mode.
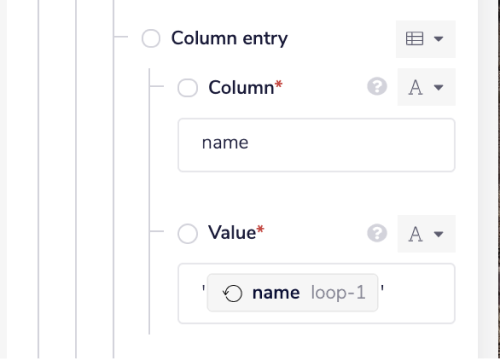
We can use the connector-snake to find the jsonpath for each column from the loop step. Note that by providing the jsonpath the type selector for each 'Value' field is auto-set to 'jsonpath':


Follow the below steps for all the 'Value' fields with column data type String/Varchar. From the create table query used in the first step, you can identify that the columns 'name', 'email', and 'contact_no' are of data type 'string'.
For all the above fileds, change the type selector back to 'String'. This will show the entire jsonpath for the particular 'Value' field. If we consider the jsonpath for the name column it should appear similar to:
$.steps.loop-1.value.name.Now we need to add single quotes to this jsonpath. To do so, enclose the jsonpath in open and close curly brackets, and add single quotes at both ends. The result should look similar to this:
'{$.steps.loop-1.value.name}'.

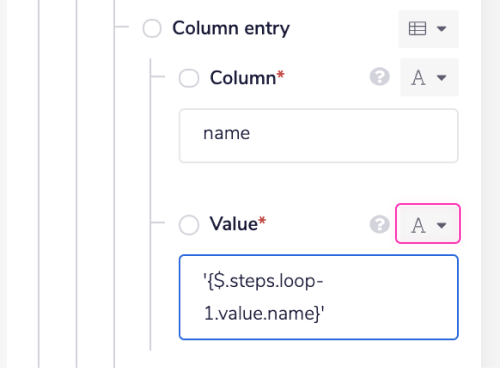
Click anywhere else on the builder to remove the focus from the field. On doing so, the jsonpath should look as shown in the image below.

Make sure to repeat the above steps for all the fields with column's data type as String/Varchar.
3. Read recordsCopy
Add another Snowflake connector outside the loop as a next step and set the operation as 'List table rows'.
In the 'Table' field, add the table name of the table you created in the first step and added the record to the same in the previous step, i.e., client_info.

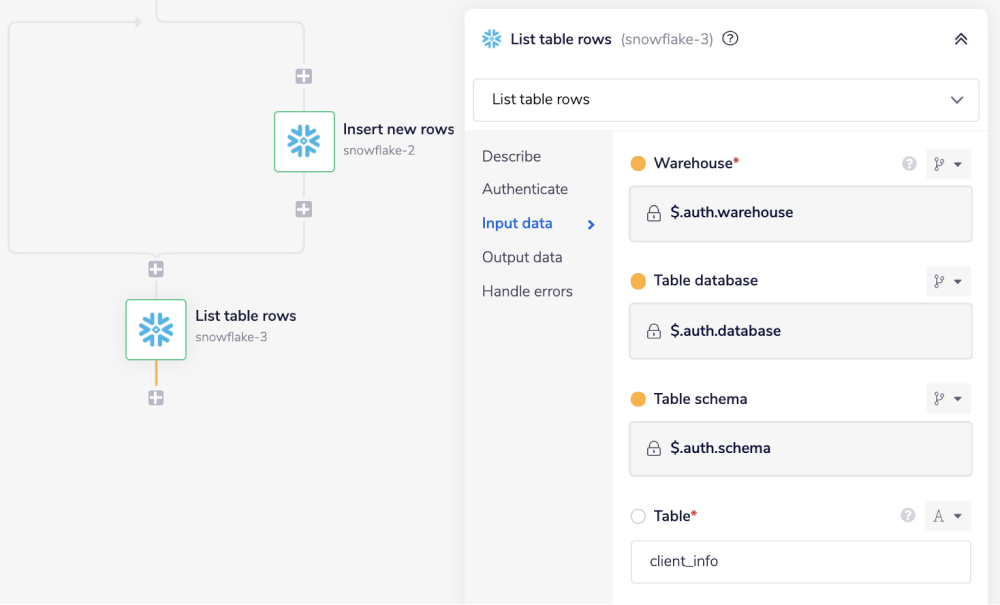
This List table rows operation in this step will list all the rows from the selected table. This will ensure that the intended data is inserted into the selected table.
You can always check the ‘Debug’ tab to inspect your logs at each step of the workflow to check it's progress.
The fetched records in the last step should look similar to this:


BEST PRACTICES: Whenever you do decide to create your own workflow, be sure to check out some of our key articles such as: