
Simpli.fi 1.1
Simpli.fi is a comprehensive RTB platform built for localized campaigns.
OverviewCopy
Simply.fi is a programmatic advertising and marketing platform.
AuthenticationCopy
When using the Simply.fi connector, the first thing you will need to do is go to your Tray.io account page, and select the workflow you wish to work on. Once in the workflow dashboard itself, search and drag the Simply.fi connector from the connectors panel (on the left hand side) onto your workflow.
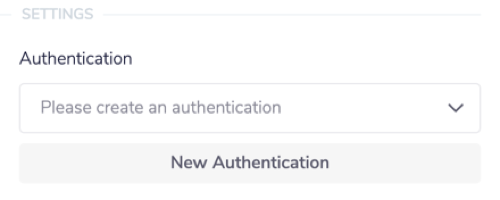
With the new Simply.fi connector step highlighted, in the properties panel on the right, click on 'New Authentication' which is located under the 'Settings' heading.

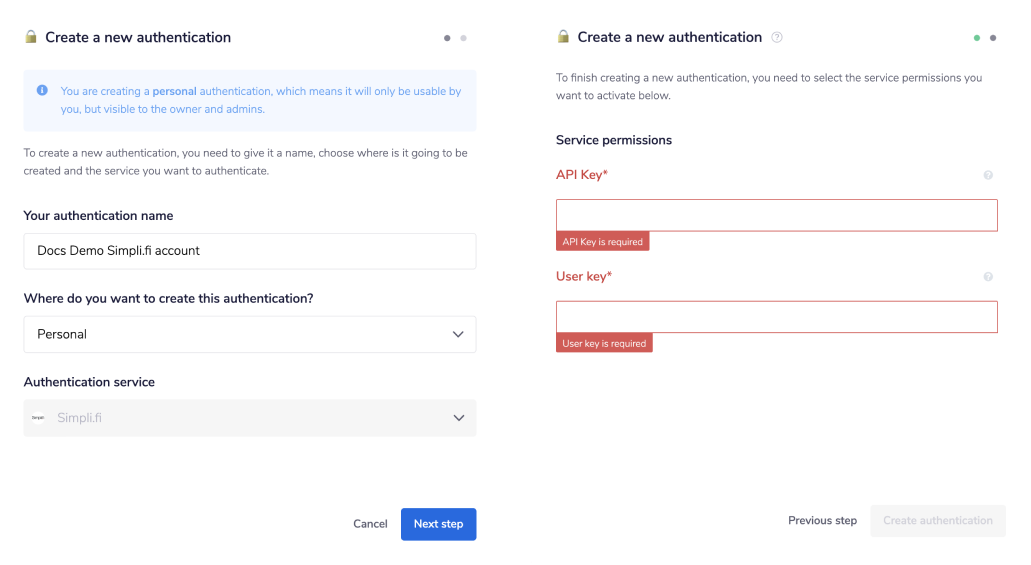
This will result in a Tray.io authentication pop-up window. The first page will ask you to name your authentication appropriately, and state which type of authentication you wish to make ('Personal' or 'Organisational').
As you can see, the next page asks you for your 'API Key' and 'User Key'.

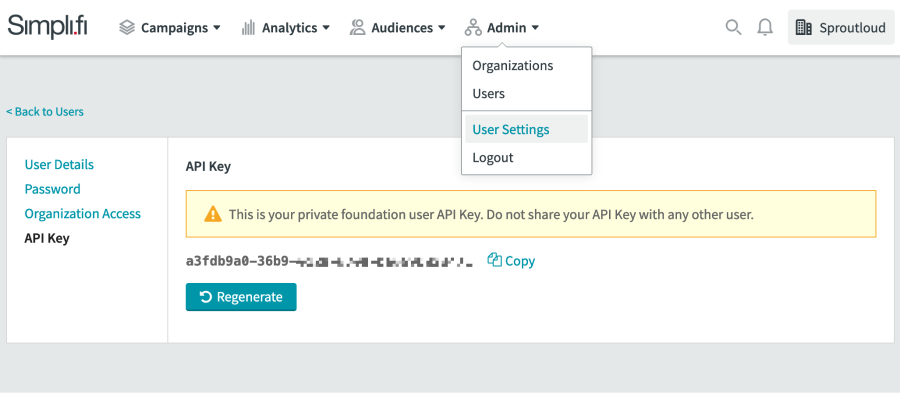
In order to get these fields, head to your Simply.fi dashboard. Click on the "Admin" button at the top, and select "User Settings" from the dropdown options available.
Select "API Key" on the left hand menu, and copy/ paste it into your Tray.io authentication popup.

You'll also need to have a user's API key that you will be acting on behalf of. Generate one in the "My Account" section of your Simpl.fi dashboard. PLease ask your Simpli.fi representative to help you should you need further assistance.
Once you have clicked the 'Add authentication' button, go to back to your authentication field (within the workflow dashboard properties panel from earlier), and select the recently added authentication from the dropdown options now available.
Your connector authentication setup should now be complete.
Available OperationsCopy
The examples below show one or two of the available connector operations in use.
Please see the Full Operations Reference at the end of this page for details on all available operations for this connector.
Note on Operations usageCopy
Please note that the 'Include' field can be used in the list operations in order to retrieve data about related resources such as Ads.
The pagination options vary depending on each operation. 'List campaigns' has a max result limit of 500 whereas 'Get campaign stats' is limited to 50 only and cannot be changed.
Using the Raw HTTP Request ('Universal Operation')Copy
As of version 1.0, it is now possible to effectively create your own operations.
This is a very powerful feature which you can put to use when there is an endpoint in Simpli.fi which is not used by any of our operations.
To use this you will first of all need to research the endpoint in the Simpli.fi API documentation version 2020-02-05 , to find the exact format that Simpli.fi API will be expecting.
Note that you will only need to add the suffix to the endpoint, as the base URL will be automatically set.
The base URL for Simpli.fi is: https://app.simpli.fi/api
For example, say that the 'List campaigns' operation did not exist in our Simpli.fi connector, and you wanted to use this endpoint, you would use the Simpli.fi API docs to find the 'List campaigns' endpoint. This is a GET request at the following URL:
https://app.simpli.fi/api/organizations/{organization_id}/campaigns
So if you know what your organization ID (e.g. 12345) is, you can get the list of active campaigns, with the following settings:
Method: GET
Endpoint: /organizations/12345/campaigns
Query: Filter with a query string and the children option enabled
Final outcome being: https://app.simpli.fi/api/organizations/12345/campaigns

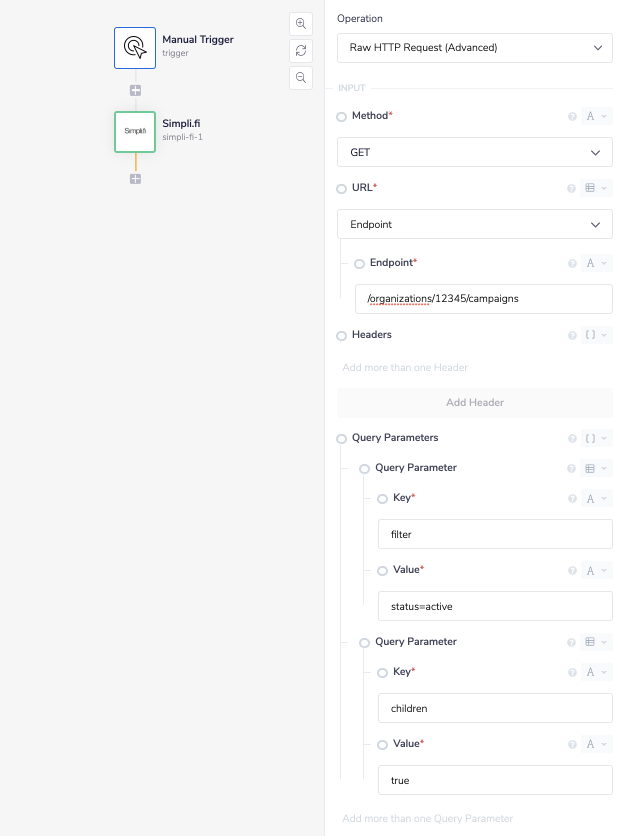
As a result, this will return a list of campaign details as requested.
Example usageCopy
TRAY POTENTIAL: Tray.io is extremely flexible. By design there is no fixed way of working with it - you can pull whatever data you need from other services and work with it using our core and helper connectors. This demo which follows shows only one possible way of working with Tray.io and the Simply.fi connector. Once you've finished working through this example please see our Introduction to working with data and jsonpaths page and Data Guide for more details.
To demonstrate usage of the Simpli.fi connector, the steps below explain how to create a workflow that produces a monthly summary of campaign stats.
The steps will be as follows:
Setup a manual trigger in order to retrieve a list of campaigns.
Create a plain text file that contains a list of data/ campaigns, and Loop through said list.
For each campaign, retrieve the stats for a given month.
After looping through the campaign list, add these stats to the plain CSV file & export said file for import into another system.
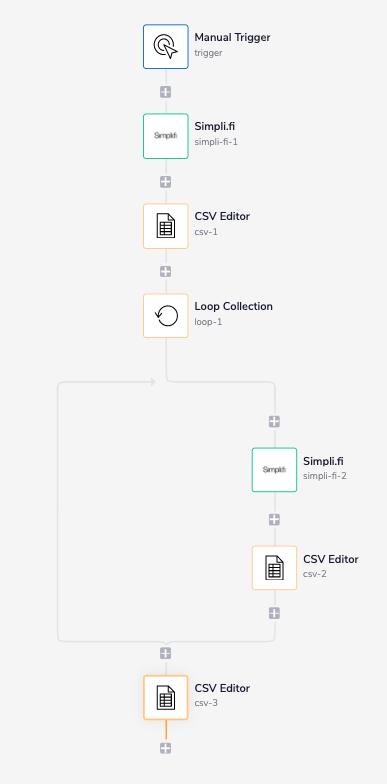
The final outcome should look like this:

1 - Setup trigger & List CampaignsCopy
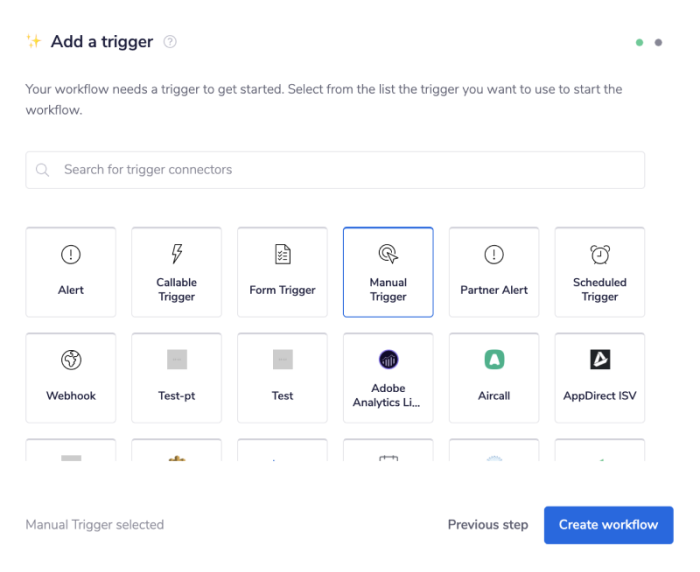
Once you have clicked 'Create new workflow' on your main Tray.io dashboard (and named said new workflow), select the Manual trigger from the trigger options available:

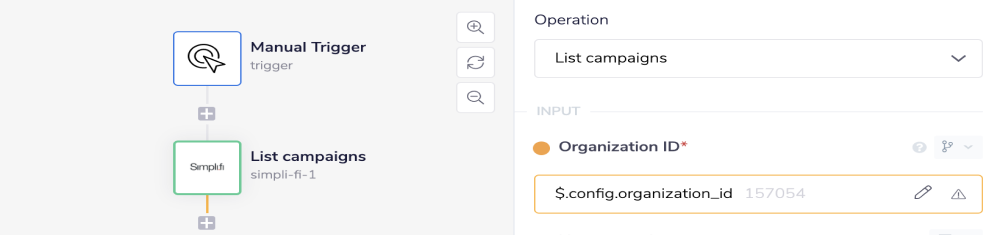
Once you have been redirected to the Tray.io workflow dashboard, from the connectors panel on the left, add a CSV Editor connector to your second step. Set the operation to 'List campaigns'.
The 'List campaigns' operation requires the 'Organization ID' under which the campaign has been created. You can generate this two ways, either by hard coding the ID or by creating a custom field. In this example the latter has been done as it is usually better practice to do so.
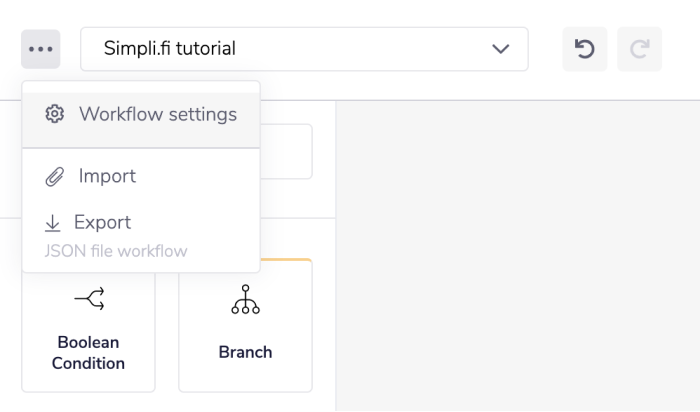
Go to the setting option within your builder in the top left corner of the dashboard.

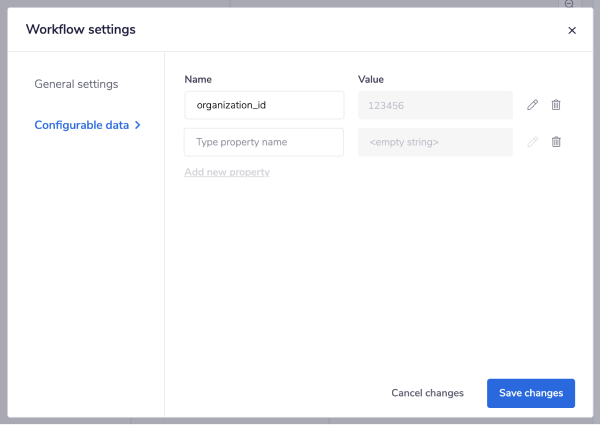
Select the 'Configurable data' heading and create a new option named organization_id (or however you see fit). In the grey box beside the name field, enter in the ID number and click 'Save changes'.

Now, when you go to the 'Organization ID' property, use $.config at the start of your jsonpath. It will automatically be followed by the option to select your new data field, organization_id.

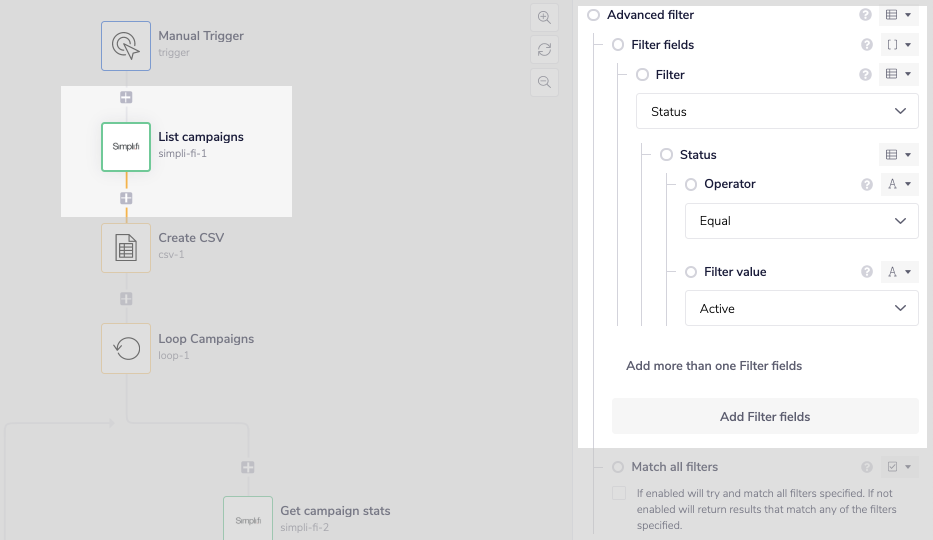
Next let's set a filter to retrieve only the campaigns with an active status. This can be done by using either the 'Name search' field or the 'Advanced filter' field.
If using the 'Name search' field, campaigns can be filtered by exactly or partially matching the 'Name'.
If the 'Advanced filter' is used, no matter what you may have put in your 'Name search' field, the 'Advanced filter' will take precedence. This is why we have utilised the 'Advanced filter' in this example, over the 'Name search' field.
Make sure your 'Filter' is set to 'Status', 'Operator' to 'Equal to' and 'Filter value' is 'Active'. See below image for more details.

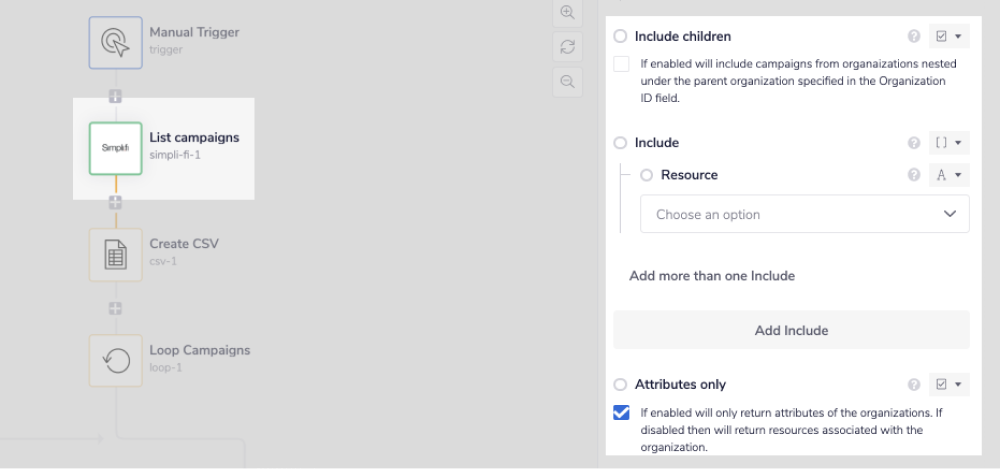
Other input that changes the result set are 'Include children','Include' and 'Attributes only'.
Enabling the 'Include children' option will return all campaigns that belong to the child organizations nested under the specified 'Organization ID'. In this example it is disabled as it is not necessary.
IMPORTANT!: Please note if enabling the 'Include children' option, then the nestedorganization ID would be required for the 'Get campaign stats'. This can be found by using the'List organizations' operation or by extracting the ID from the 'resource' property on theCampaign.
The 'Include' option includes other resources for each campaign e.g. Ads. Which again is not necessary for our purposes currently.
Enabling the 'Attributes only' option will reduce the amount of unnecessary data returned from the Simpli.fi API for this use case. Which is why it IS enabled in this example.

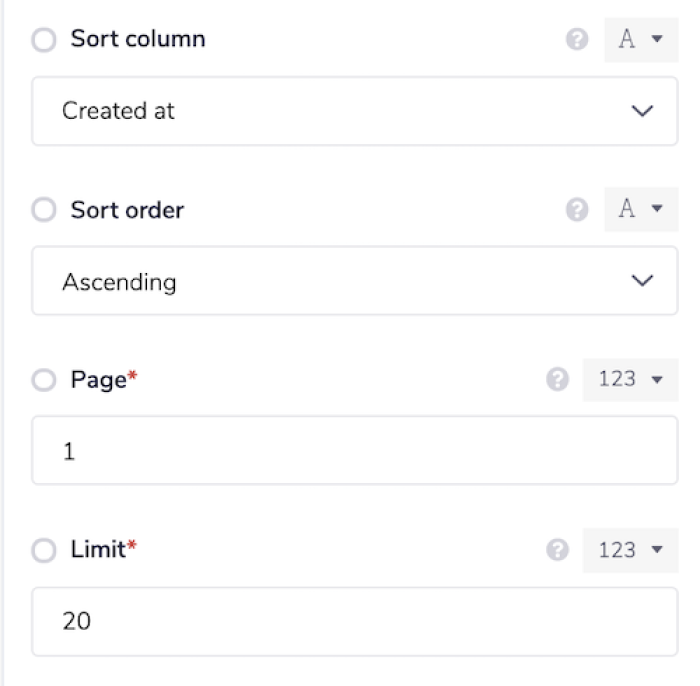
Lastly for listing campaigns we set the sorting and pagination options.
The maximum number of campaigns that can be returned is 500. If more campaigns are required to be retrieved, another loop step is required to loop through the pages.
To identify if this is required or not, the output of the 'List campaigns' step contains information about the page, the number of results on that page and the total number of results that match the filter.
Use the search bar in the Debug panel to look for the key: "paging". Be sure to not make any spelling mistakes else the result will not highlight in your output field.

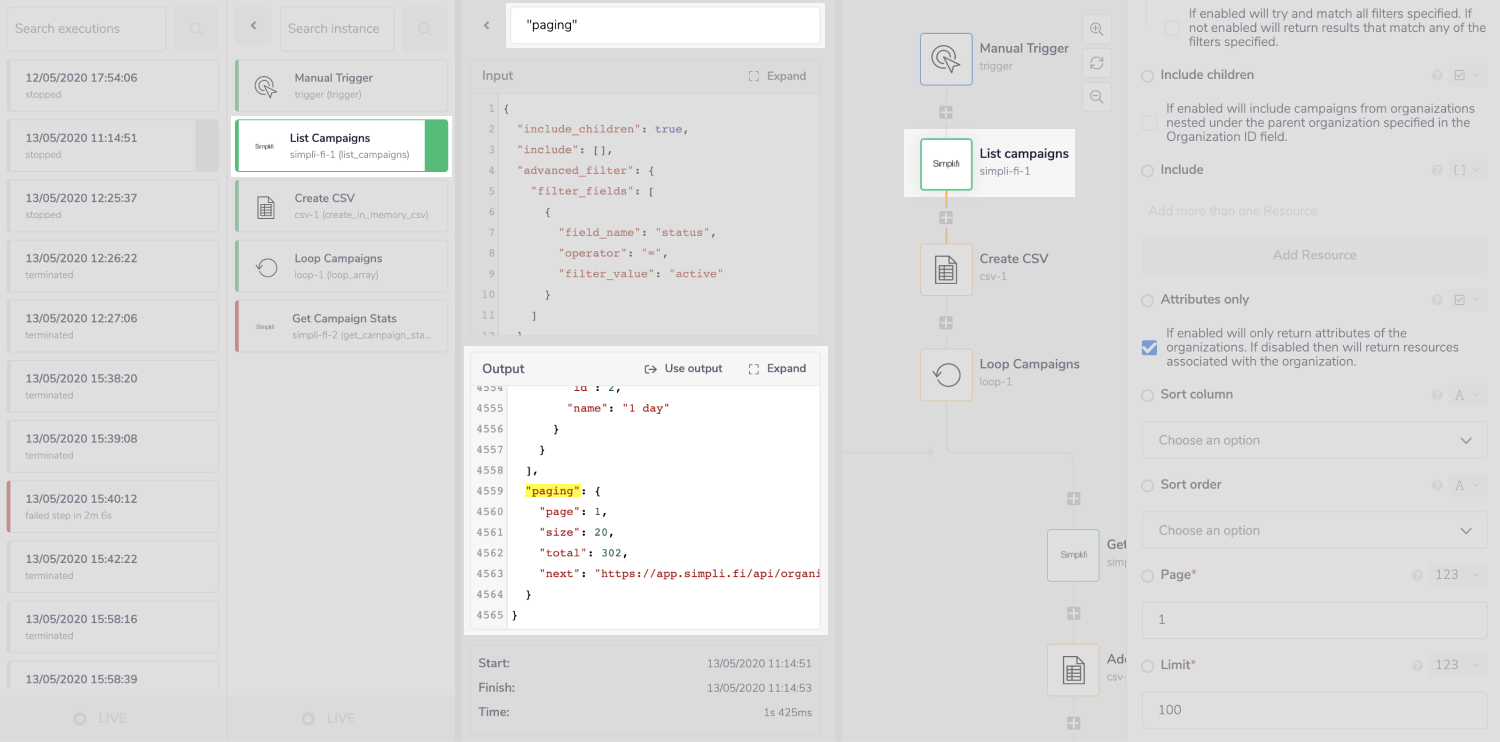
If the 'total' is more than the 'size' then an extra loop is required to paginate through the results. As it is not required in this example pagination has been limited to 1 page with a maximum of 20 results.

Now that the filters have been set, the workflow should retrieve the specified list of campaigns, for the organization mentioned.
2 - Create a Text file & Loop ListCopy
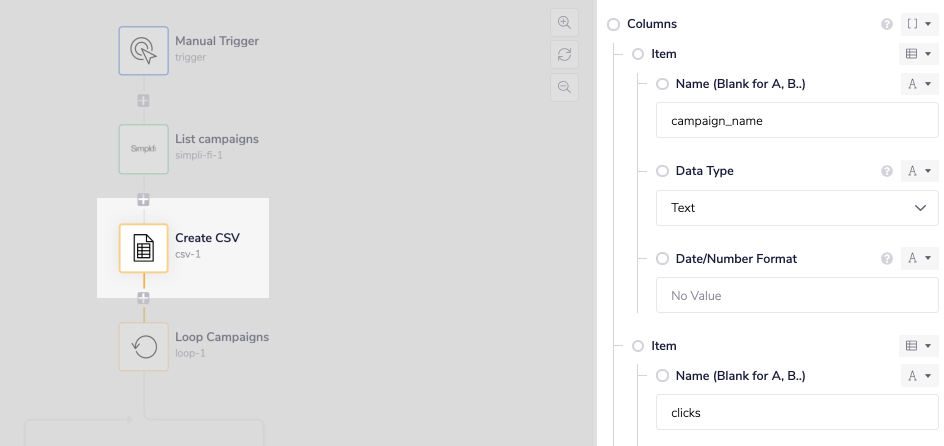
Add a CSV Editor connector as your second step (or third, if you include the trigger). Set the operation to 'Create CSV'.
Set the 'Scope' to 'Current Run' and the 'Number of Columns' to 9. Each column will be a different campaign statistic.
Here we have chosen the following, with 'Name (Blank for A, B...' set to campaign_name and 'Output' being set to 'Text'. The following options are also all 'Text' based, and include clicks, ctr, cpm, cpc, cpa, weighted_actions, total_spend, and impressions.
Your own column names will be dependent on your own campaign.

Add a Loop Collection connector step, and set the operation to 'Loop List'.
In order to auto-generate the jsonpath for the list required, drag your mouse over the 'List' input and stop above the first Simpli-fi step. You should see a dropdown list of options appear, select campaigns to see the input field self populate.
JSONPATHS: For more information on what jsonpaths are and how to use jsonpaths with Tray.io, please see our pages on Basic data concepts and Mapping data between steps
CONNECTOR-SNAKE: The simplest and easiest way to generate your jsonpaths is to use our feature called the Connector-snake. Please see the main page for more details.

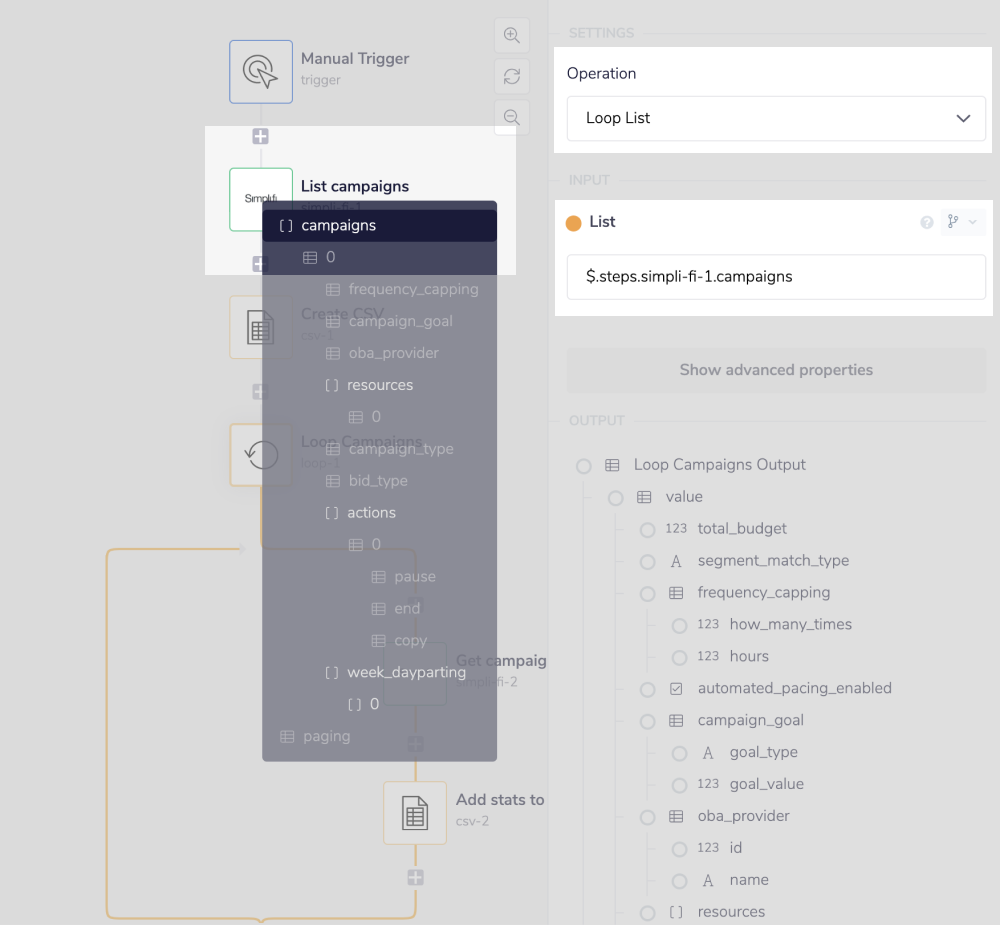
This will run the loop for every campaign returned by the 'List campaigns' step.
3 - Retrieve Campaign StatsCopy
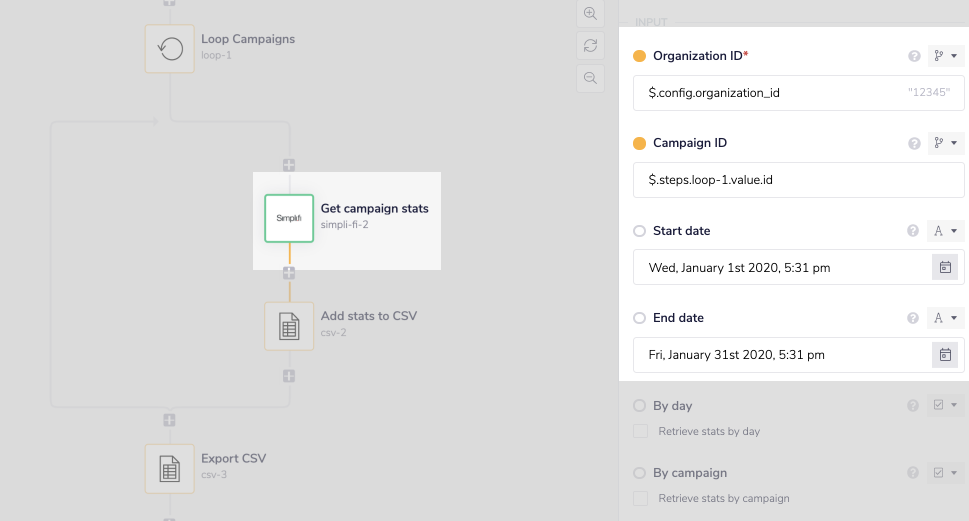
Add a second Simpli-fi connector WITHIN your Loop step. Set the operation to 'Get campaign stats'.
You will need the organization ID once more. Since we did not include campaigns from child organizations in our 'List campaigns' step, this would just be the same organization ID as before and can be generated via using the same method/ jsonpath.
The 'Campaign ID' will need to come from the Loop step. Using the same connector-snake method from earlier, hover over the Loop connector and select the ID option from the data level within value. Your output should be similar to: $.steps.loop-1.value.id.
The use case here is to retrieve stats for only 1 month, so the 'Start date' and 'End date' fields have been used to only return statistics for January. Set your own dates as appropriate.

4 - Add Stats & Export CSV FileCopy
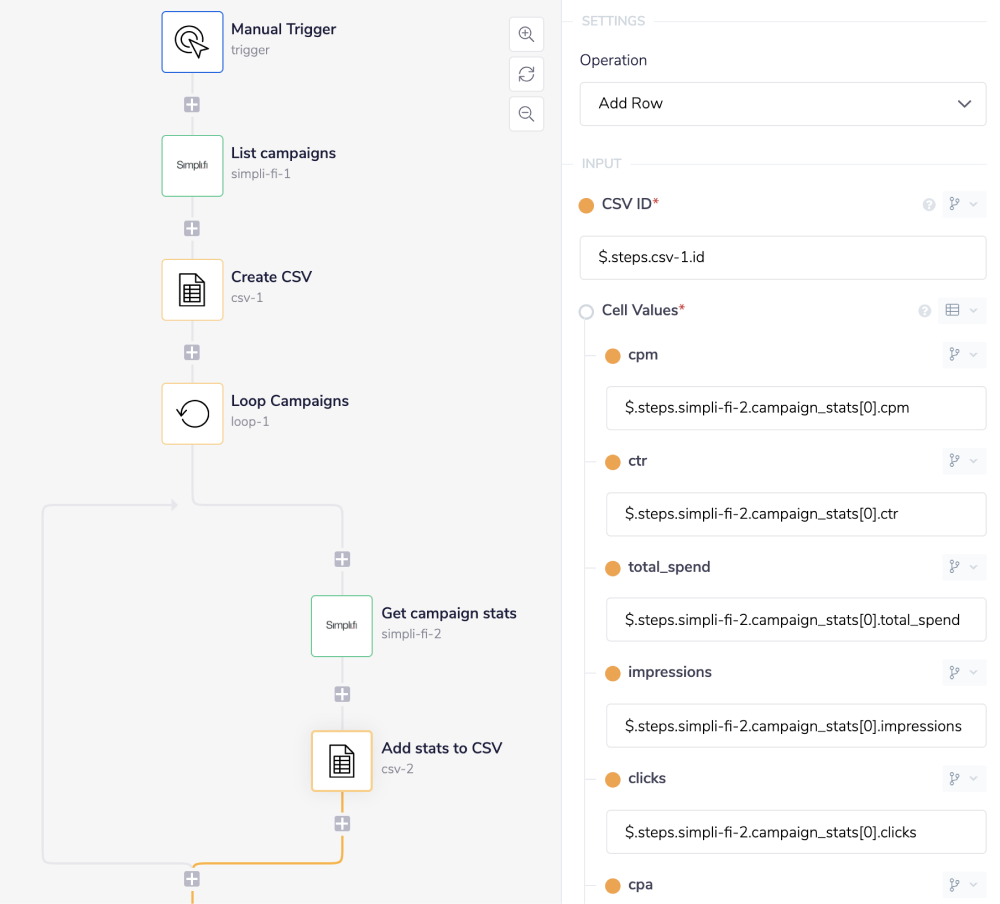
Add another CSV Editor connector WITHIN your Loop step, after your second Simpli-fi connector. Set the operation to 'Add Row'.
Adding these stats to the CSV is the next expected workflow step for within the Loop connector.
Get your 'CSV ID' via the connector-snake this time hovering over the first CSV Editor step (make sure to select the id option).
You can likewise use the connector-snake to generate the cell values expected. Make sure that the array number is set to [0] and that the path reflects the 'Cell Values' -> field name, whatever you might have put it as. Note that these will be the same as the column names which were created at the first CSV connector step.

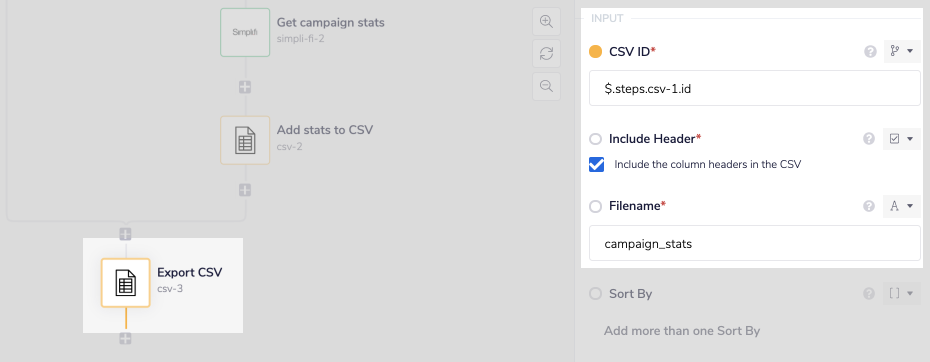
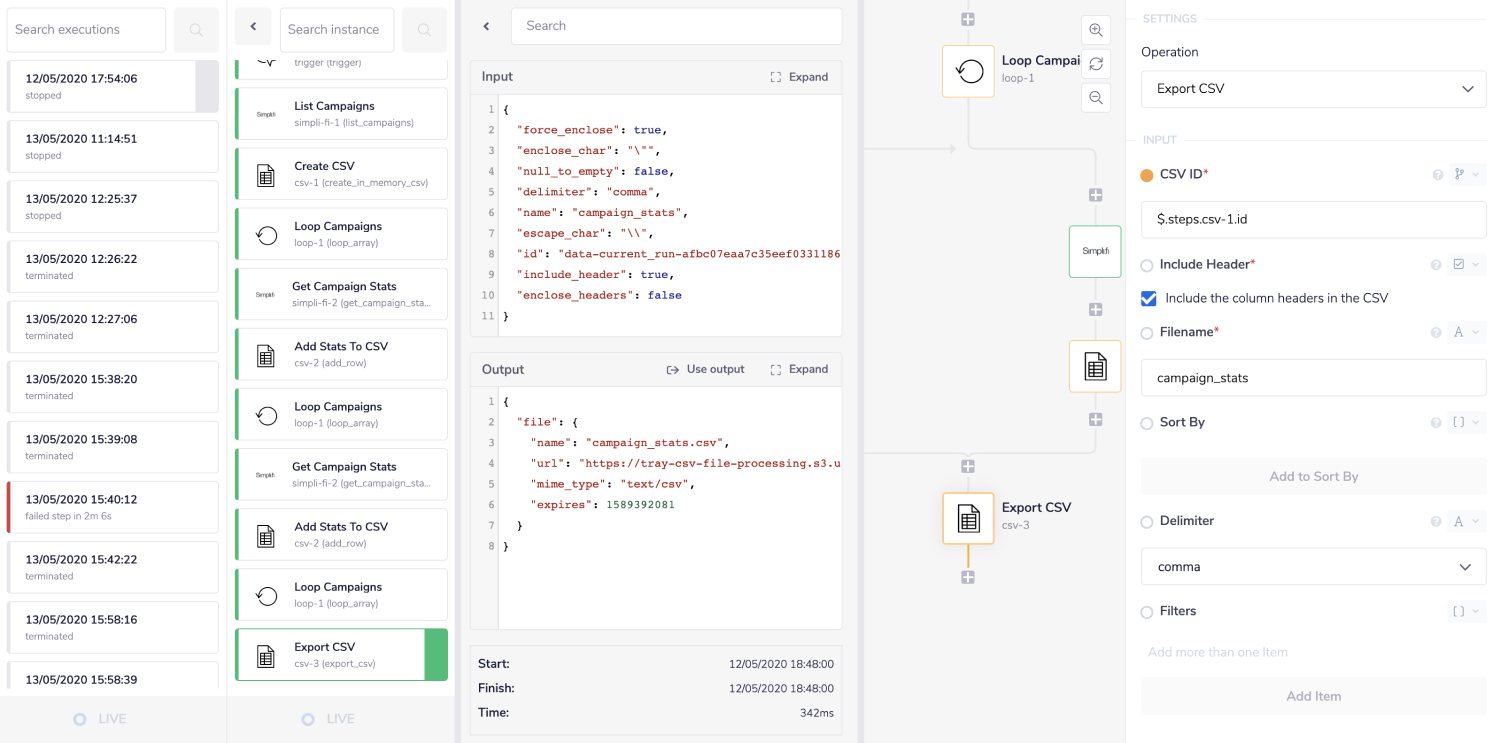
The final step is to export the CSV file. This should contain that statistics for the campaigns from the connector step previous. This export is so the file can be imported into another system.
Add a final CSV Editor connector, this time making sure that it is placed OUTSIDE of the Loop connector step. Set the operation to 'Export CSV'.
Set your 'CSV ID' as you did earlier, and tick the box that asks if you want to 'Include Header'. Set your file name and choose 'comma' as your deliminator.

Congratulations! When your workflow is run, you will have an exported file that contains all the filtered information you requested from your campaign!

BEST PRACTICES: Whenever you do decide to create your own workflow, be sure to check out some of our key articles such as: