PowerBI 1.2
Business intelligence like never before
- On this page
- PowerBI
- Overview
- API Information
- Authentication
OverviewCopy
Power BI is a business analytics service by Microsoft. It aims to provide interactive visualizations and business intelligence capabilities with an interface simple enough for end users to create their own reports and dashboards
API InformationCopy
The Power BI connector has the following Base URL: https://api.powerbi.com/v1.0/myorg. More information can be found on their main API documentation (v1) site. Details regarding their API limitations can be found here.
AuthenticationCopy
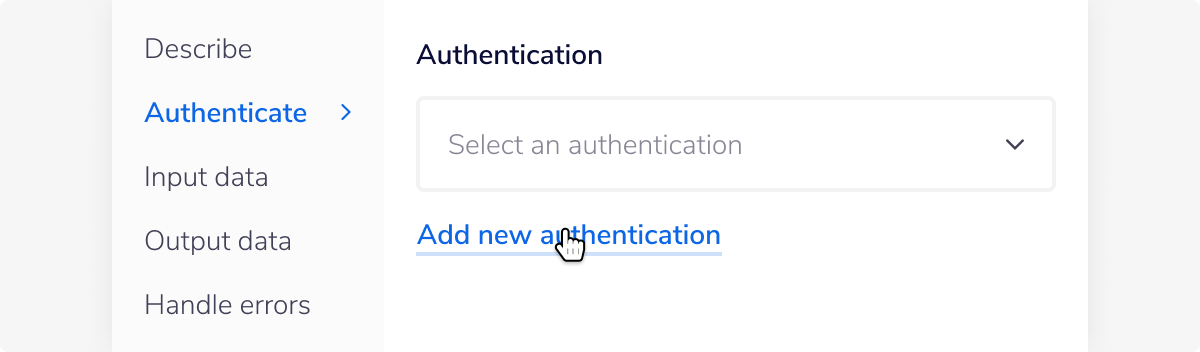
When using the PowerBI connector, the first thing you will have to do is click on 'New Authentication' in the step editor:

The following scopes are required:
Dataset.ReadWrite.All
Offline_access
These allow the connector to maintain read/write access to PowerBI datasets.
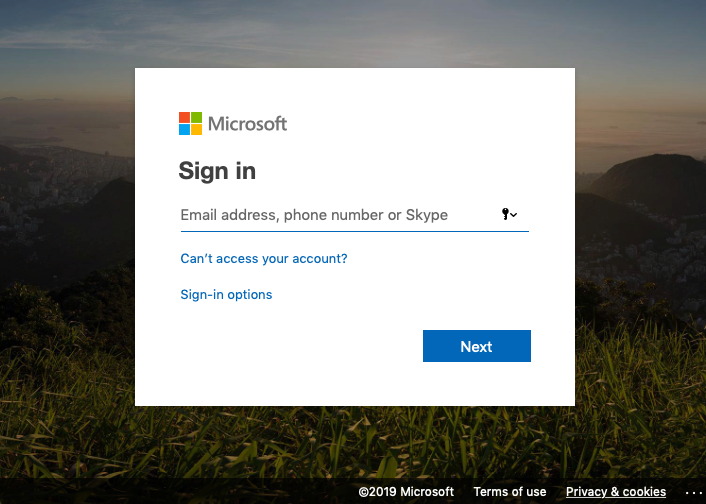
You can then enter your microsoft account credentials to link to your account:

Note on Operation usageCopy
The CSV file used in the Push rows operation must not contain more than 10,000 rows. If the CSV contains more rows, then you can use pagination to chunk the data and use the operation multiple times.
Example - Creating a dataset and pushing dataCopy
This example will demonstrate the Create push dataset and Push rows operation.
In this example we want to import a CSV from Google Drive into PowerBI.

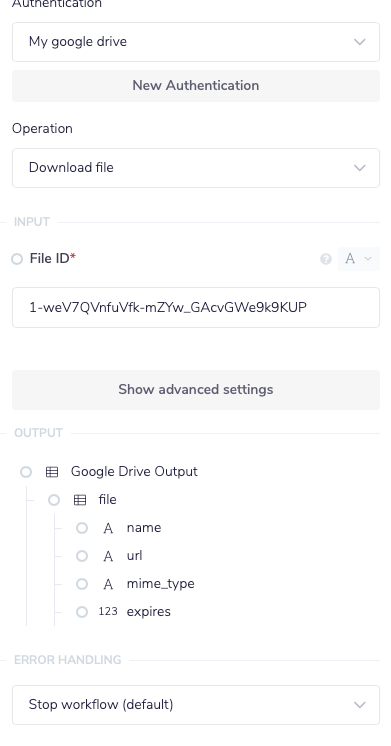
1 - Import CSV from Google DriveCopy
Using the Google Drive connector. Set the operation to Download file.
Set the File ID to the ID of a CSV.

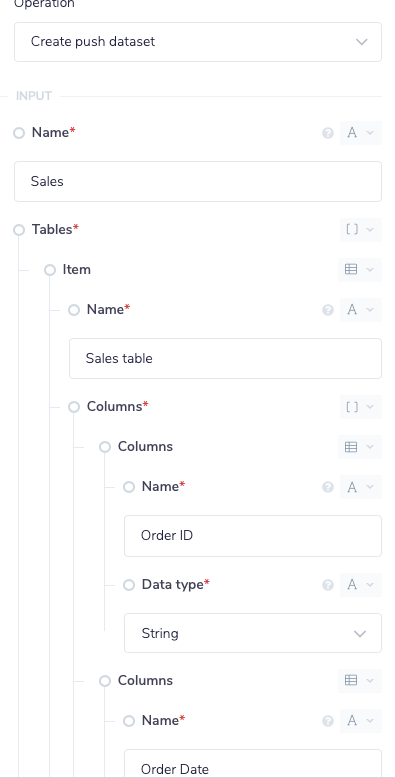
2 - Create a PowerBI datasetCopy
Using the PowerBI connector set the operation to Create push dataset and enter a name for the Dataset name.
To add a table to the dataset, click add table and enter a name for the Table name.
To add columns to the table, click add columns and enter a name and data type for each Column. The columns should match the columns from the CSV.

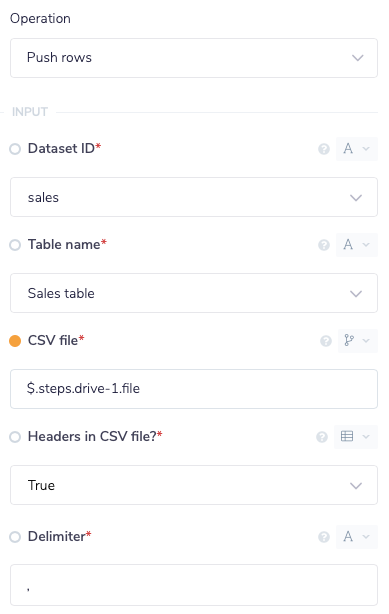
3 - Push rows to PowerBI datasetCopy
Using the PowerBI connector set the Operation to Push rows and the select the Dataset Name and Table Name
Set the CSV File to the output of the Google Drive connector $.steps.drive-1.file

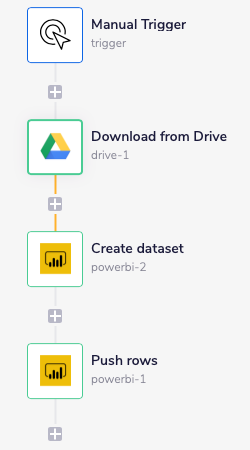
Example - Adding data from a webhook to PowerBICopy
This example will demonstrate the Push rows operation.
In this example we want to take JSON from a webhook, convert it to CSV and then add it an existing PowerBI dataset.


1 - Setup webhookCopy
Set up a webhook following the Webhook Trigger documentation.
In this example the webhook will receive the following data:
1{2"OrderID": [3{4"name": "Item 1",5"color": "Green",6"size": "X-Large"7},8{9"name": "Item 2",10"color": "Blue",11"size": "Small"12},13{14"name": "Item 3",15"color": "Yellow",16"size": "Large"17}18]19}
2 - Convert to CSVCopy
Using a script helper, set the operation to Execute Operation, add a variable called data and set the value to the output of the webhook: $.steps.trigger.body
Change the script to:
1exports.step = function(input) {2var data = input.data.OrderID;3var array = data;4var str = '';56for (var i = 0; i < array.length; i++) {7var line = '';8for (var index in array[i]) {9if (line != '') line += ','1011line += array[i][index];12}1314str += line + '\r\n';15}1617return str;18};


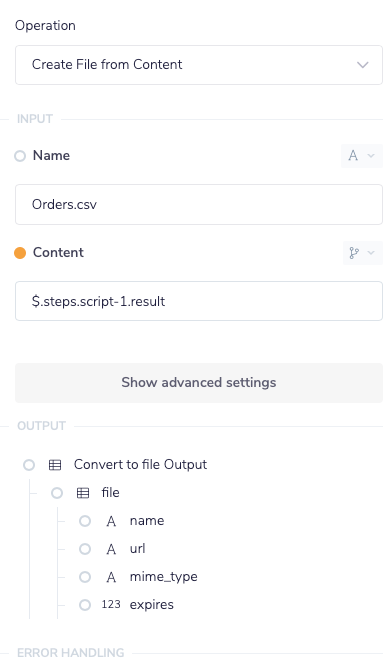
3 - Convert to fileCopy
Using the file helper, set the operation to Create File from Content and set content to the output of the script helper: $.steps.script-1.result

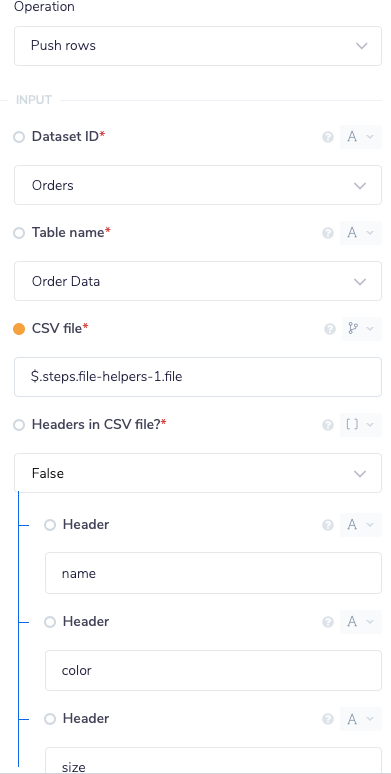
4 - Push data to PowerBiCopy
Using the PowerBI connector set the Operation to Push rows and the select the Dataset Name and Table Name
Set the CSV File to the output of the File helper $.steps.file-helpers-1.file
Set the Headers to the name of the columns in the dataset. Make sure that they are in the same order as they appear in the CSV, or the data could be set to the wrong column.