
Jira 3.0
Plan, track, and manage your agile and software development projects
- On this page
- Jira
- Overview
- Authentication
- OAuth 1 Authentcation
OverviewCopy
Jira is a proprietary issue tracking product developed by Atlassian which allows bug tracking and agile project management.
AuthenticationCopy
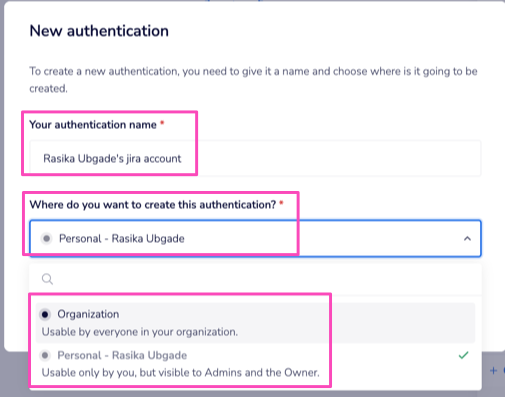
When using the JIRA connector for the first time, you need to create a new authentication.

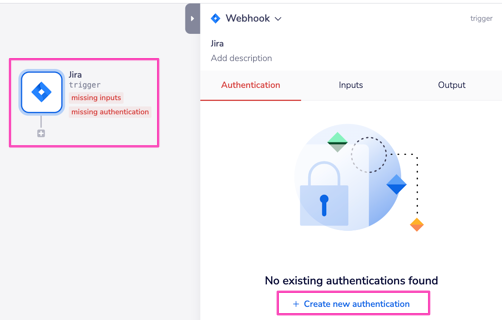
Name your authentication and specify the type ('Personal' or 'Organizational').

There are two ways to authenticate the JIRA connector:

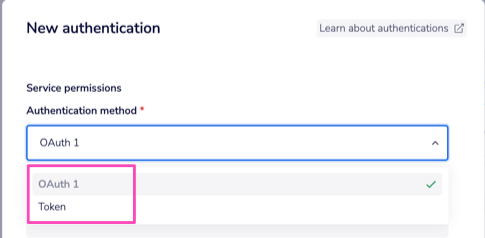
OAuth 1 AuthentcationCopy
Authentication using OAuth 1 requires:

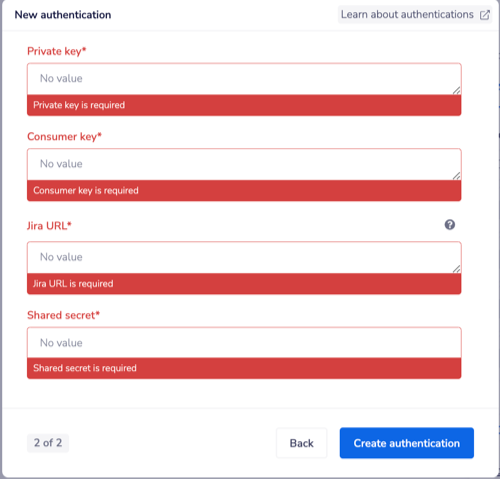
Follow the below mentioned steps to get values for all the above credentials:
1. Generate an RSA public/private key pair
In a Terminal, run the following openssl commands one at a time in the mentioned sequence:
openssl genrsa -out jira_privatekey.pem 1024openssl req -newkey rsa:1024 -x509 -key jira_privatekey.pem -out jira_publickey.cer -days 365openssl pkcs8 -topk8 -nocrypt -in jira_privatekey.pem -out jira_privatekey.pcks8openssl x509 -pubkey -noout -in jira_publickey.cer > jira_publickey.pem
Note: the last command may not work in Windows.
In which case you can just use the command openssl x509 -pubkey -noout -in jira_publickey.cer and then copy the terminal output (including the -------BEGIN PUBLIC KEY-------- and -------END PUBLIC KEY-------- lines) and paste it into a file named jira_publickey.pem.
Upon successful execution of the commands, the following files will be generated:
jira_privatekey.pcks8, jira_privatekey.pem, jira_publickey.cer and jira_publickey.pem.
2. Configure the client app as a consumer in Jira
Upon completion of this step you will have values for the Consumer key and Shared secret authentication attributes.
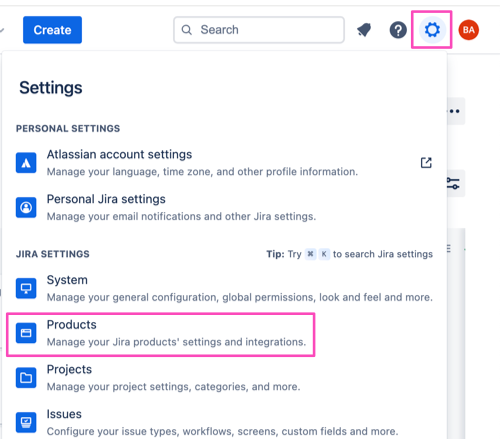
Log into your Jira instance and navigate to Jira settings -> Products -> Application links from the sidebar menu:

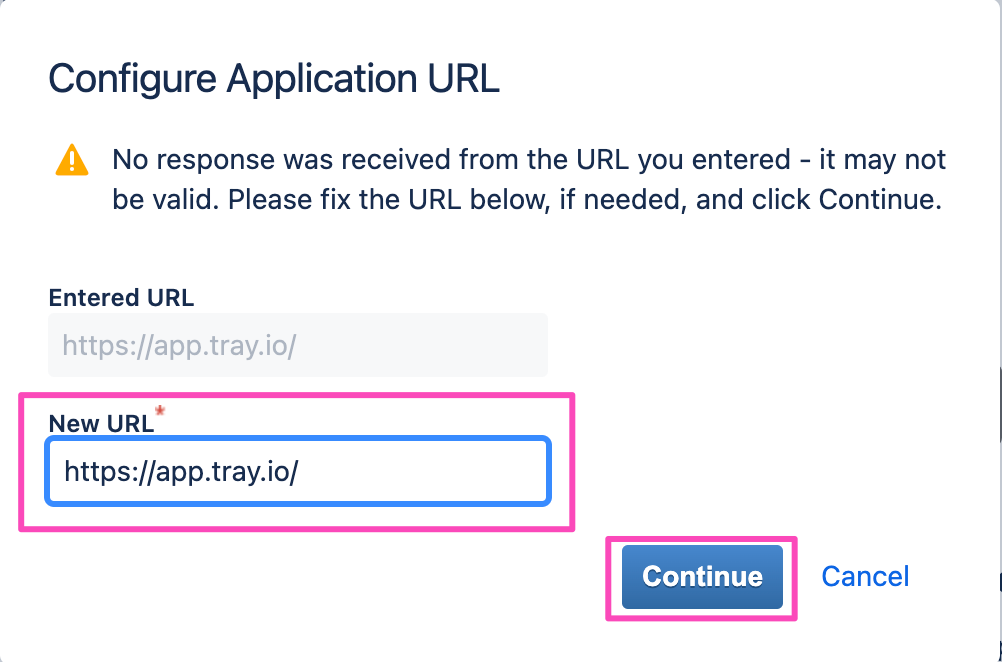
Click the Create link button and enter the Tray URL in the Application URL field.

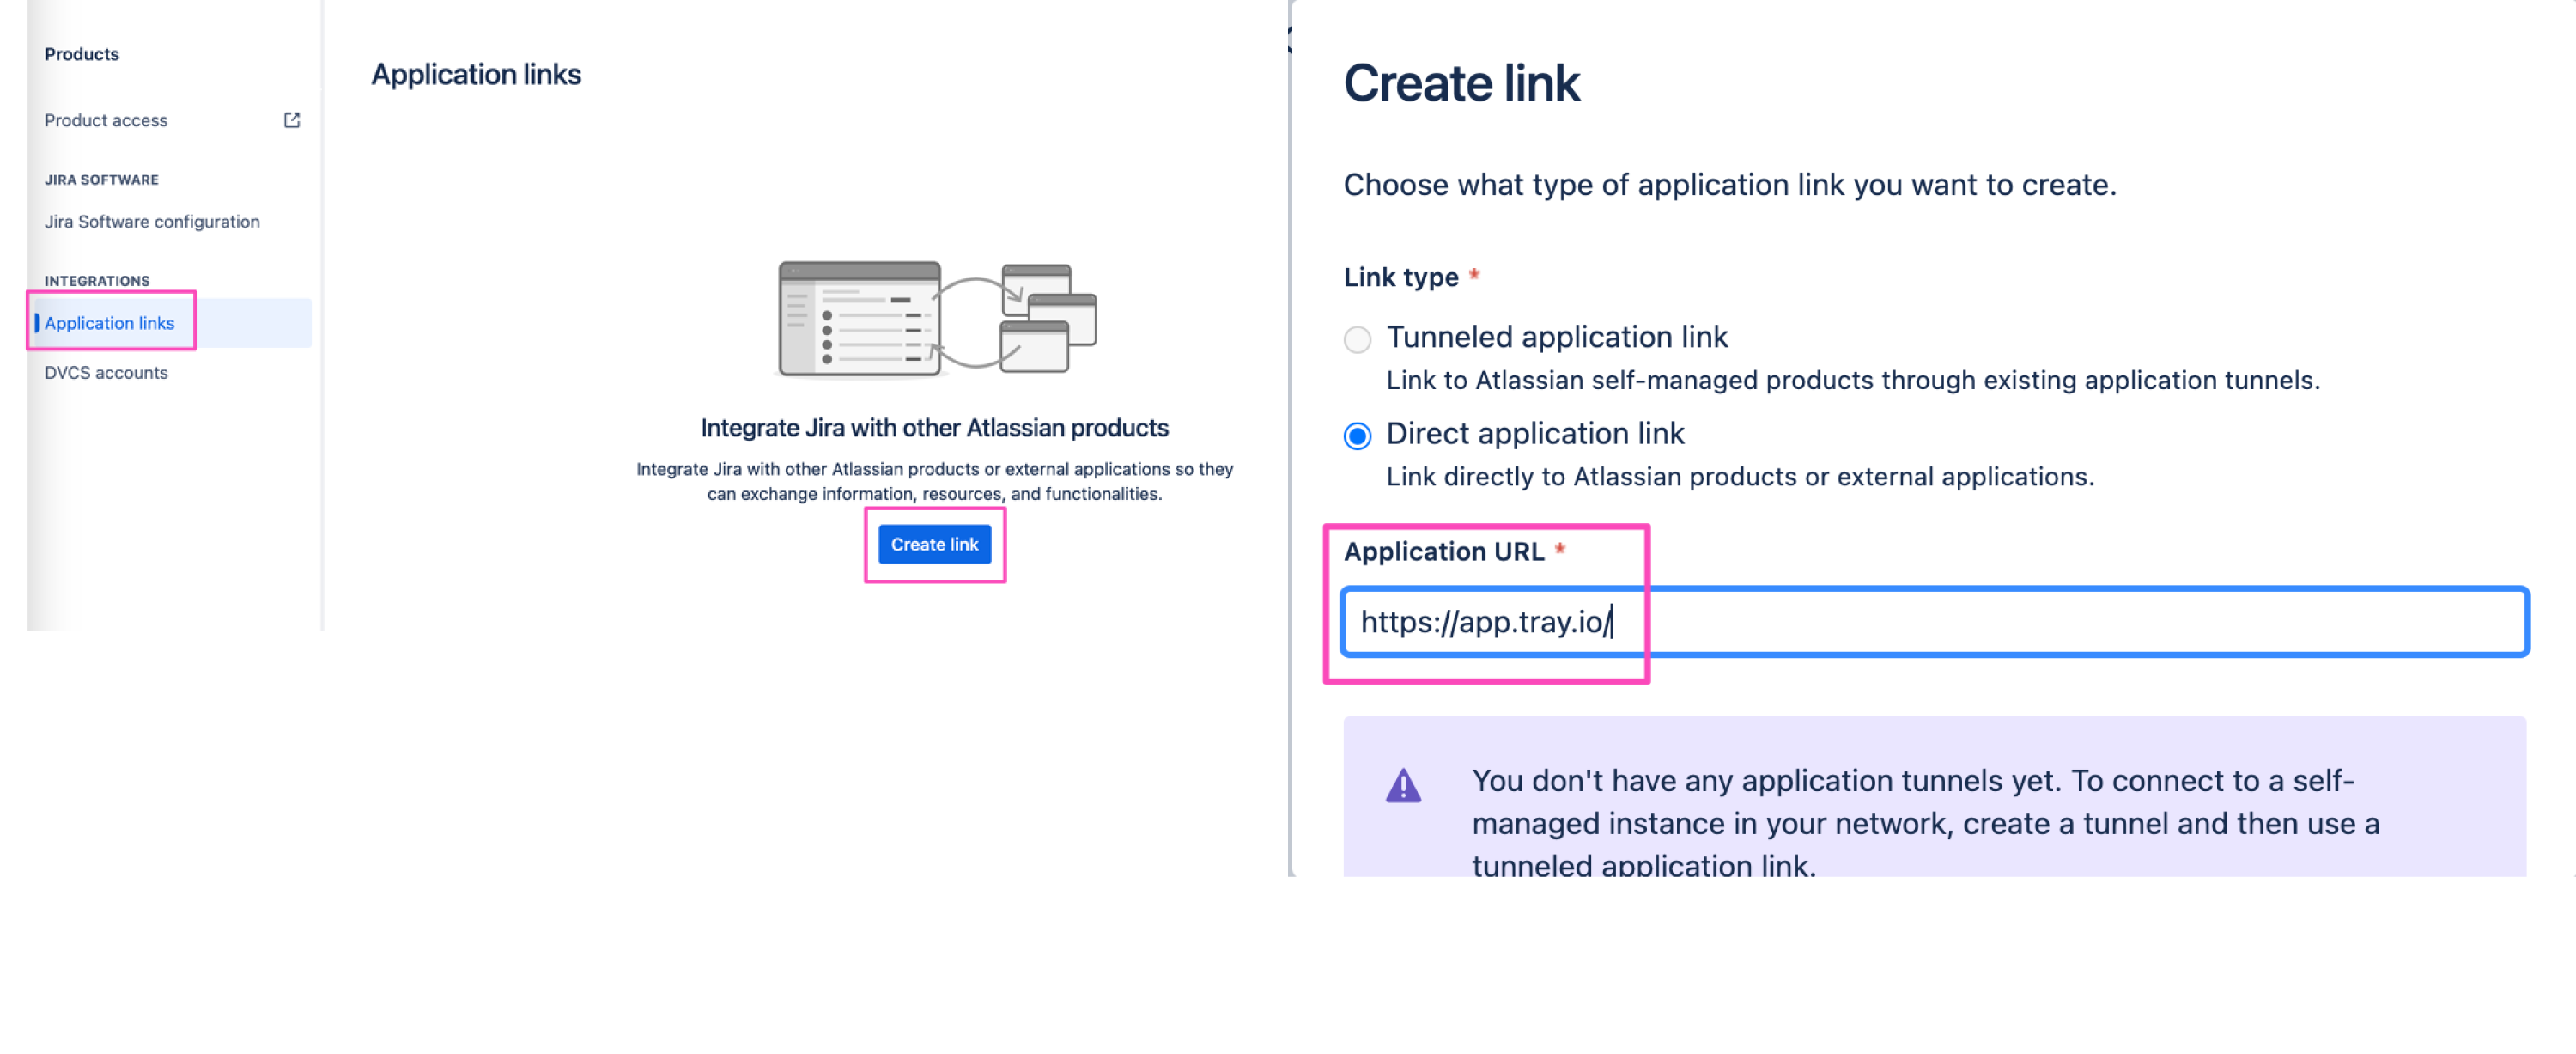
Continue despite any warnings.

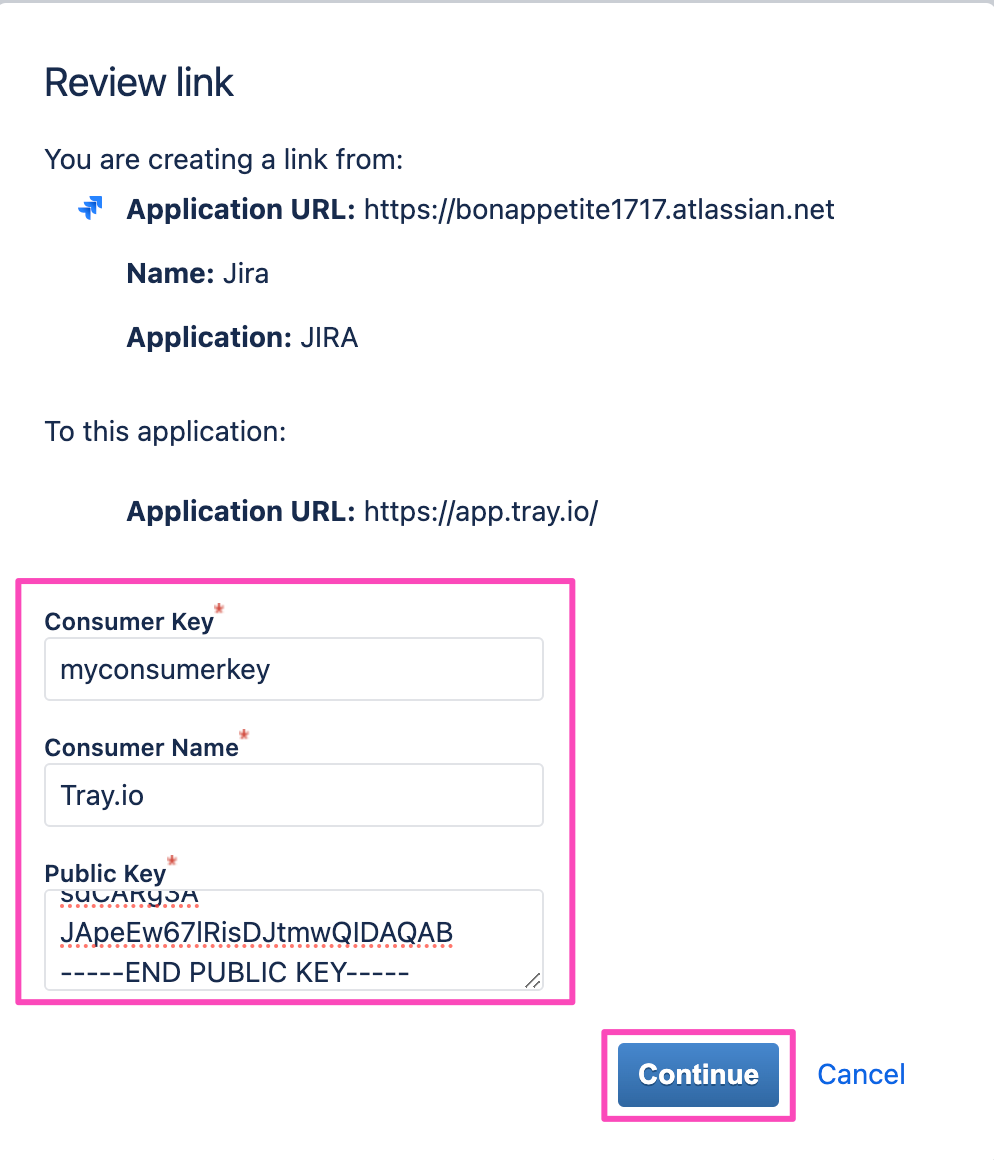
Review and add values for all the fields as shown in the below image.
Remember the values for the Consumer key, JIRA URL, and Shared secret fields as you will need them for authenticating the Tray JIRA connector.
The Consumer Key and Shared Secret are user-defined; choose values of your preference but ensure consistency during Tray connector authentication.
Select the 'Create incoming link' checkbox.

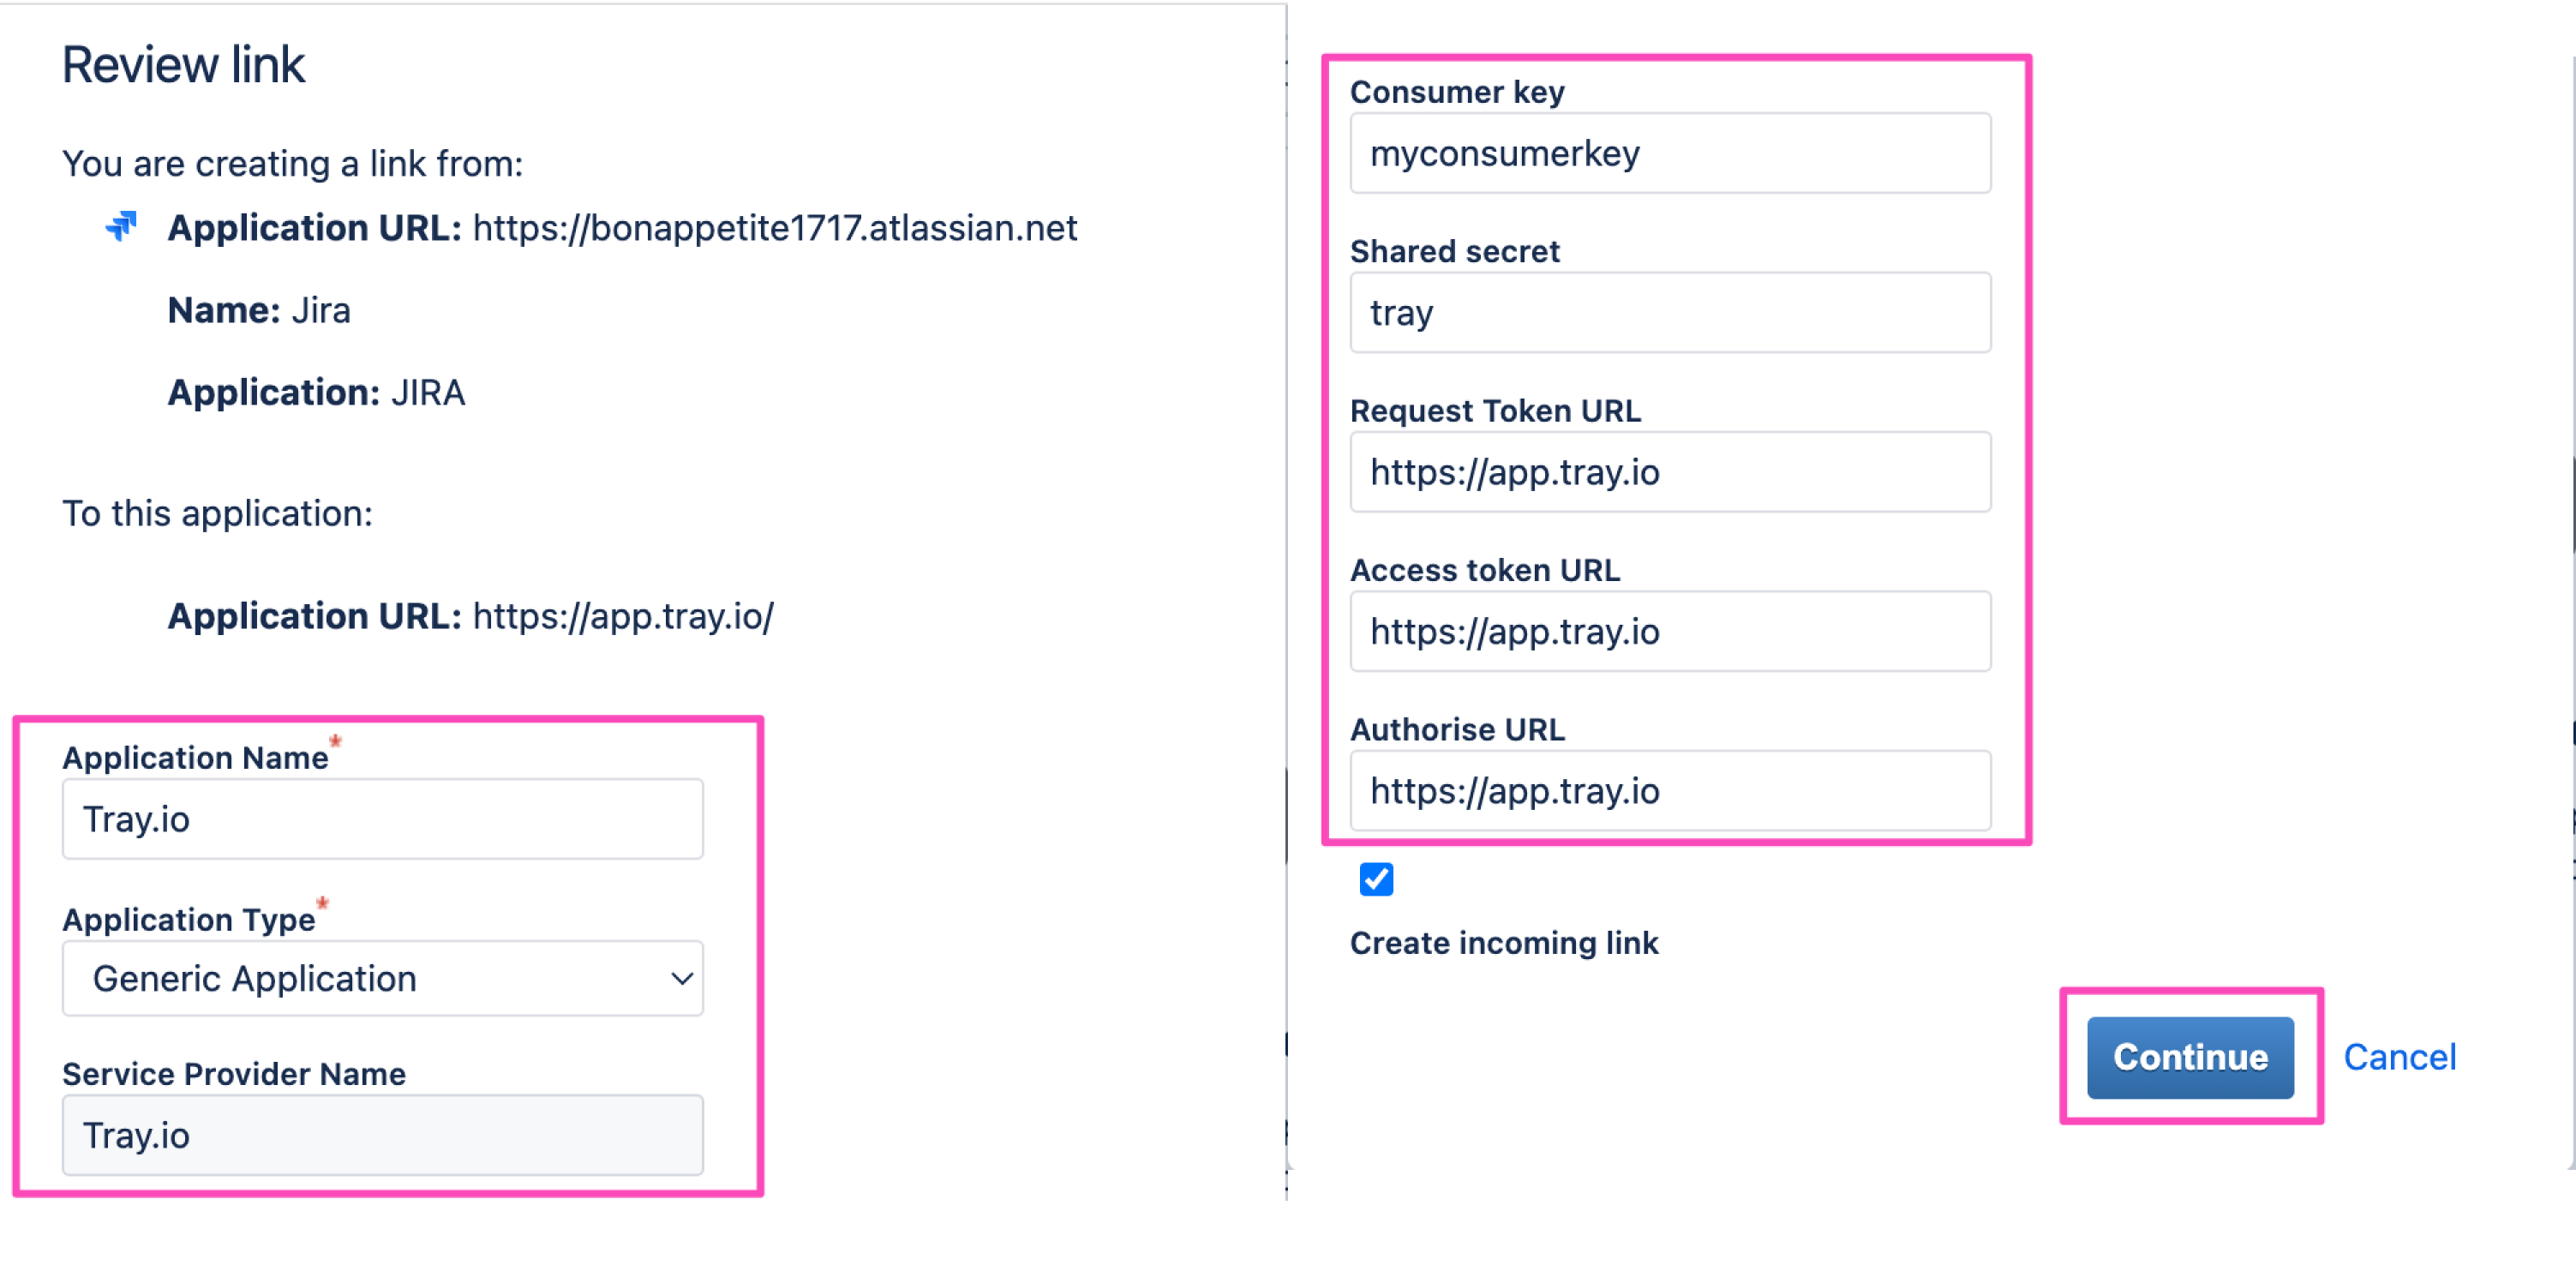
On the next page, repeat the consumer name and consumer key. In the 'Public Key' field, add the content from the jira_publickey.pem file (including -----BEGIN PUBLIC KEY----- and -----END PUBLIC KEY----- lines).

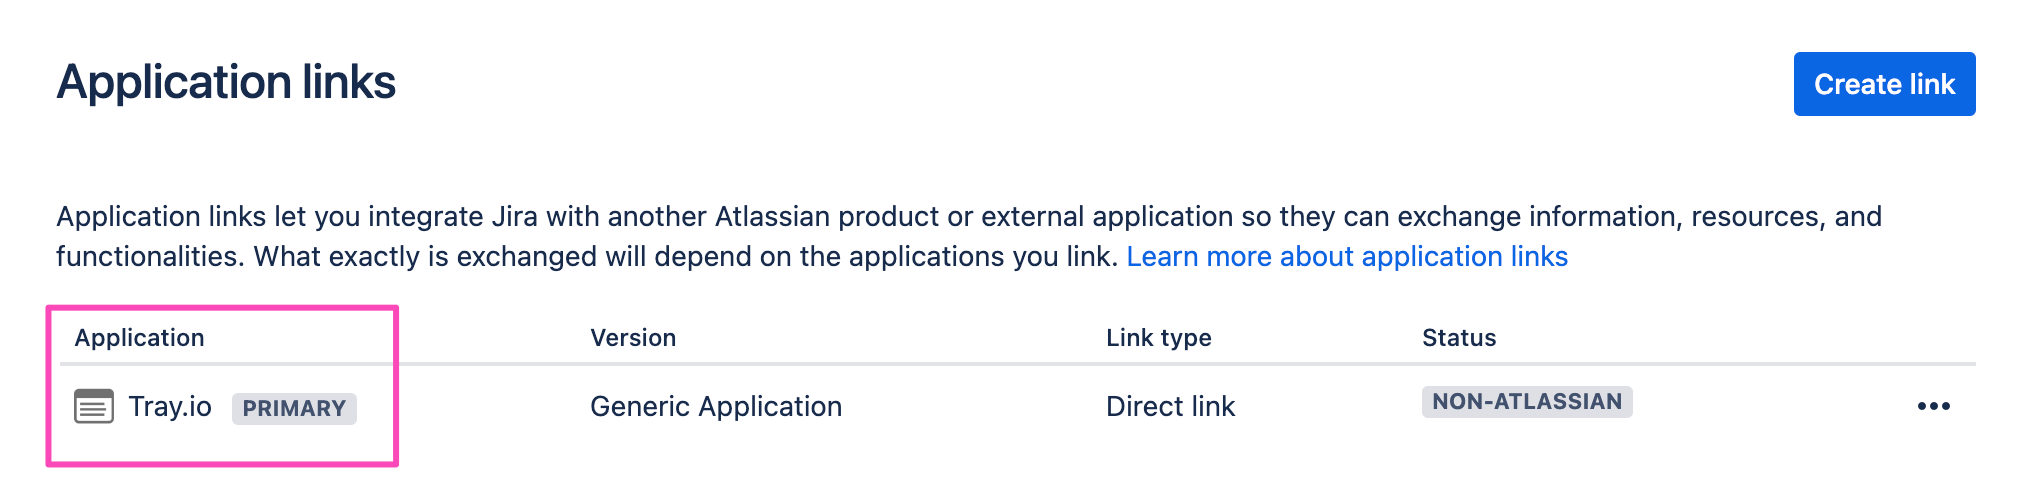
Upon successful completion, you should see Tray.io under the Application list.

Once you have added the Application successfully.
Return to Tray's New Authentication page and input values for the authentication attributes:
Private key: copy and paste the content from the
jira_privatekey.pemfile-------BEGIN PUBLIC KEY--------and-------END PUBLIC KEY--------lines).Consumer key: Use the similar values as configured in the app in JIRA. In this case, we used
myconsumerkey.Shared secret: Use the similar values as configured in the app in JIRA. In this case, we used
tray.JIRA URL: JIRA URL is the URL of your Jira account (e.g.,
https://mydashboard.atlassian.net/).
Click the Create authentication button. Your connector authentication setup is now complete.
Within the workflow builder properties panel select the recently added authentication from the available dropdown options.
Token AuthenticationCopy
Token based authentication requires your Jira account's Username, Password, and the URL of your Jira account (e.g., https://mydashboard.atlassian.net/).


Go back to your settings authentication field (within the workflow builder properties panel), and select the recently added authentication from the dropdown options now available.
Your connector authentication setup should now be complete.
Available OperationsCopy
The examples below show one or two of the available connector operations in use.
Please see the Full Operations Reference at the end of this page for details on all available operations for this connector.
Notes on operations usageCopy
The Jira connector supports two authentication methods: Username/Password and OAuth1. The Username/Password authentication is the simplest way to authenticate to your Jira instance, however it is less secure than OAuth1. On the other hand, OAuth1 requires some additional steps which are explained in the above paragraphs.
If you want to use a Username/Password authentication, then use the connector version 1.x
If you want to use a OAuth1 authentication, then use the connector version 2.x
Jira TriggerCopy
The Jira trigger allows you to receive notifications and trigger workflows when given events occur associated with the selected trigger operation.
Trigger Operations availableCopy
Webhook
Webhook SetupCopy
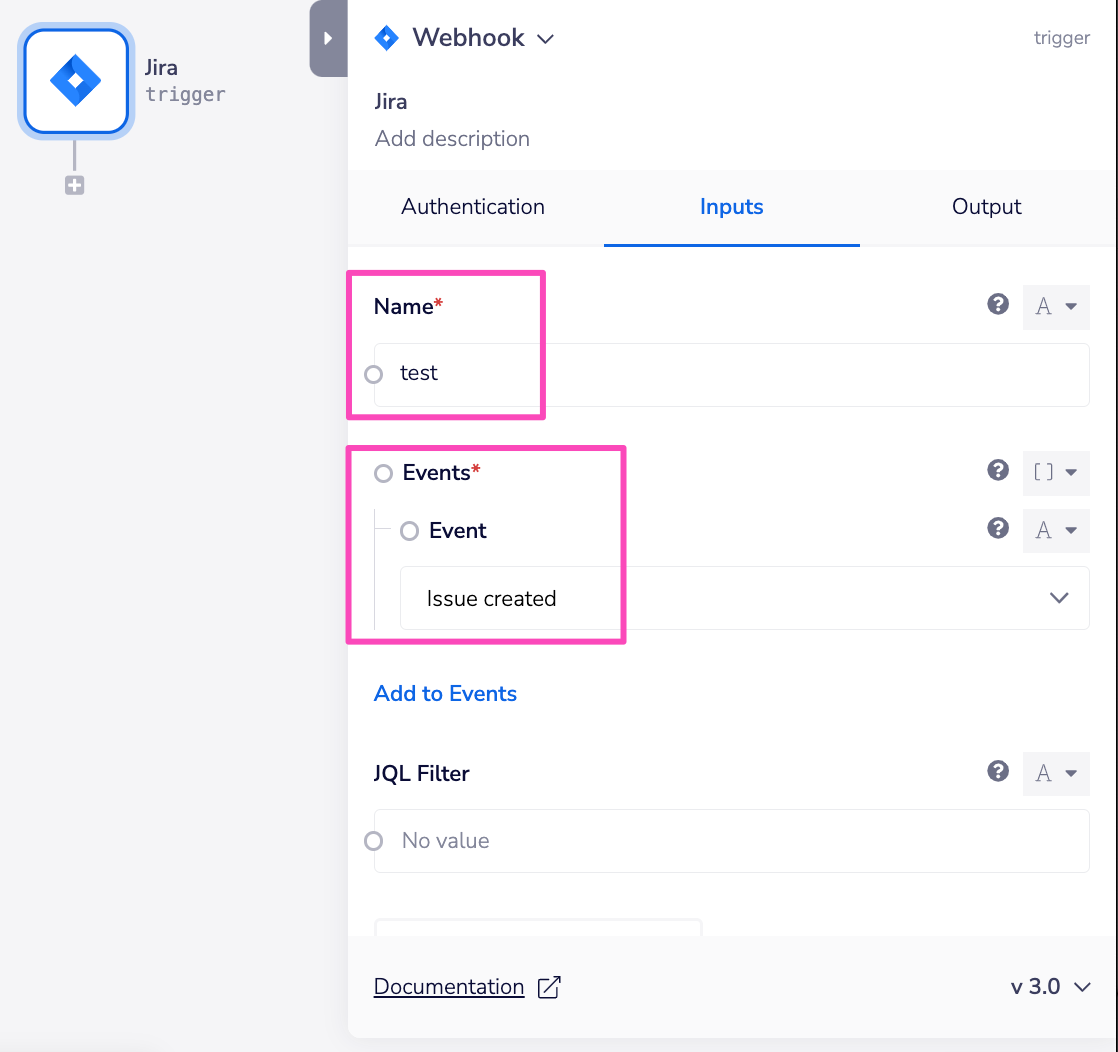
To set up a webhook, start by selecting the Jira trigger either during the creation of a new workflow or within the workflow builder.
Authenticate the JIRA trigger by following the instructions from the Authentication section above, or use an existing authentication.
Name the webhook and choose the action for the Event field from the available dropdown options. The selected action, such as Issue created, will trigger the workflow whenever the chosen event occurs in your Jira board.

After the first successful run of the workflow, a webhook is autocreated in your JIRA account. You can locate it under Settings(gear icon) > System > Advanced > WebHooks.
This setup ensures that your workflow seamlessly responds to specific Jira events.


Using the Universal Operation ('Raw HTTP request')Copy
As of version 2.3 it is now possible to effectively create your own operations.
This is a very powerful feature which you can put to use when there is an endpoint in Jira which is not used by any of our operations.
To use this you will first of all need to research the endpoint in the Jira API documentation , to find the exact format that Jira will be expecting the endpoint to be passed in.
Note that you will only need to add the suffix to the endpoint, as the base url will be automatically set (the base url is picked up from the value you entered when you created your authentication).
The base url is in the format of https://your-domain.atlassian.net/rest/api/2/
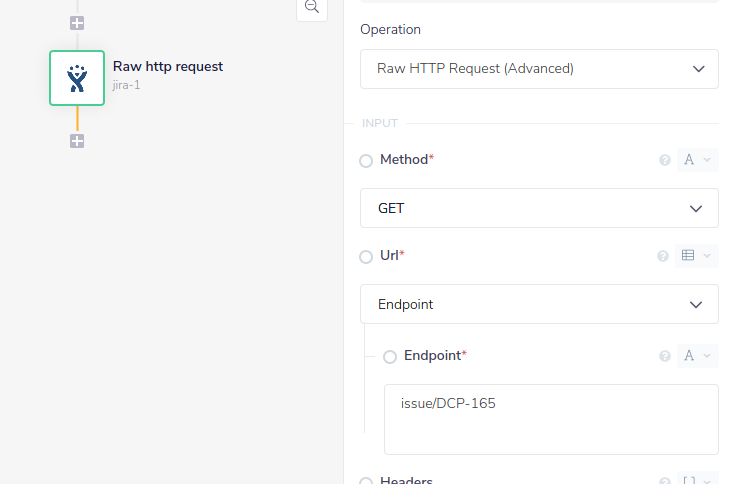
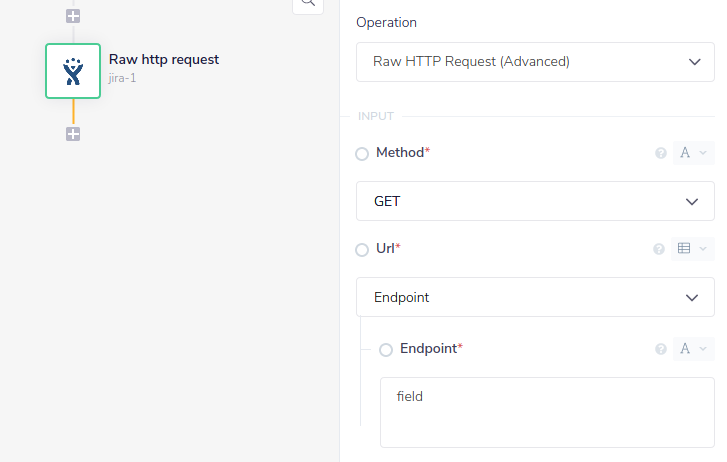
For example say that the Get issue operation did not exist in our Jira connector and you wanted to use this endpoint, you would use the Jira API docs to find that the get issue endpoint is a get request at the following url:


So if you know that an issue key is 'DCP-165' you can get this issue with the following settings:

As another example, if you wanted to return the system and custom issue fields available in your Jira instance, the API docs tell you that this is a get request at the following endpoint:


So you can get this information just using the following setting:

Note: If you are using DELETE you will have to set the content type to 'application/json' if body type is none (which it will be in most cases)
Example usage - setting up a JIRA bot in SlackCopy
Here in the Tray.io docs department we have a JIRA bot set up to send Slack notifications about documentation which has been put on hold or is ready to be published. These serve as reminders to make sure that nothing 'slips through the cracks'.
This is managed with a very simple workflow:

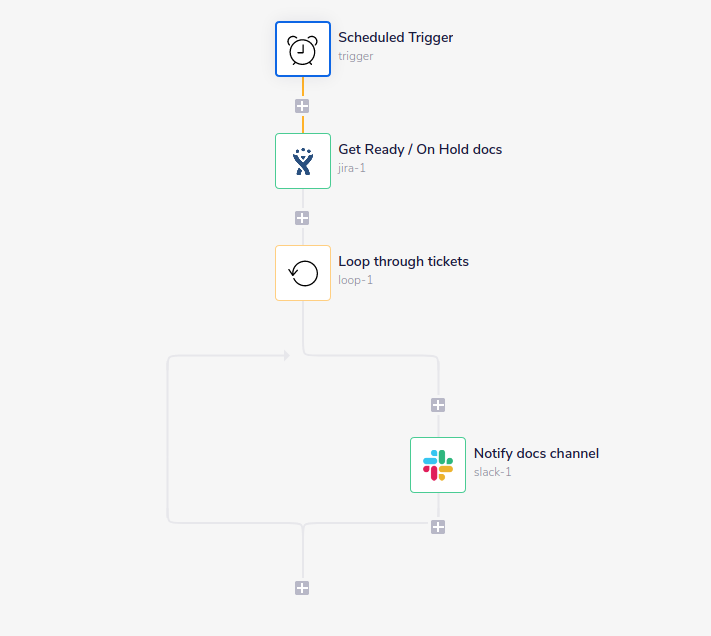
This workflow does the following:
A scheduled trigger runs once a week
Using JQL (Jira Query Language) a check is made for any docs tickets with a status of 'On Hold' or 'Ready to Publish'
A loop connector goes through these tickets one-by-one
The relevant 'docs-notifications' Slack channel is notified of each ticket
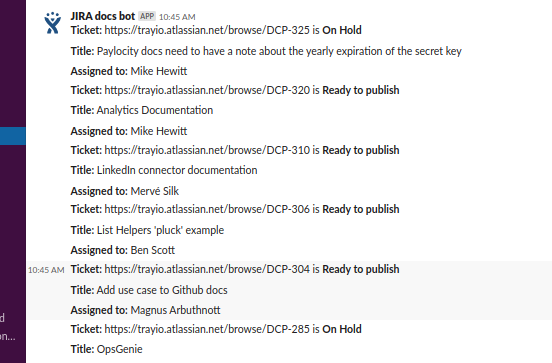
And the final output in Slack looks like this:

Step 1 - set the scheduled triggerCopy
First the trigger is set to run at a certain time every week:


Step 2 - set the query to filter tickets by project and statusCopy
Next we can use the Search Issues (JQL) operation to build a filter using the Jira Query Language (JQL) :


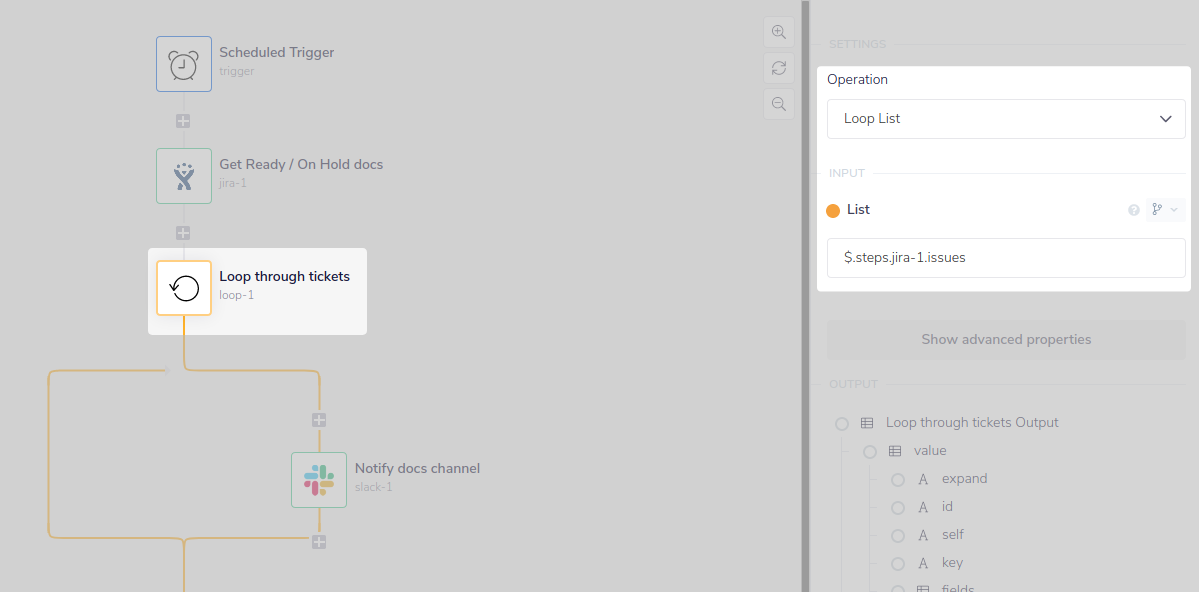
Step 3 - loop through the filtered ticketsCopy
Now we can use the loop connector and a $.steps.jira-1.issues jsonpath to pick up the results which match the query and loop through each of them one-by-one:

Step 4 - compose the Slack message for each ticketCopy
Finally we can use interpolated mode to compose the Slack message using the jsonpaths which extract the relevant ticket metadata from each ticket in the loop step:

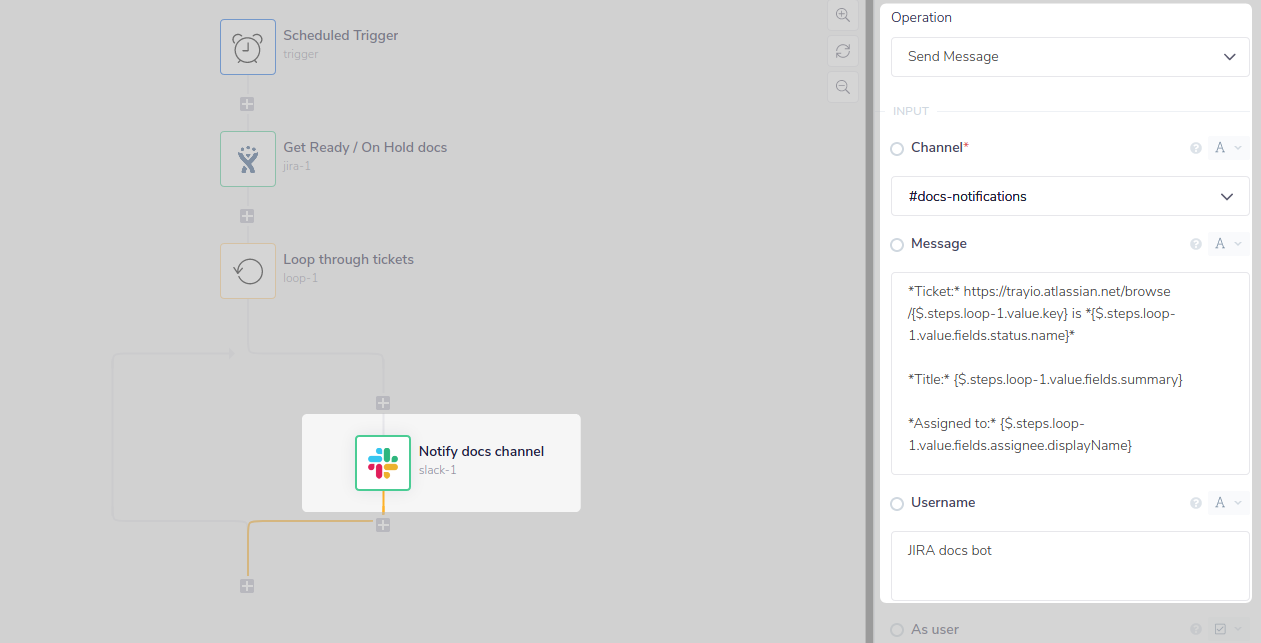
You can see that the message box corresponds with the messages that are then output to Slack:
Note that for the Slack Send message operation you can set Username and Icon url:

Jira vs Jira Cloud: When to useCopy
EMBEDDED USERS: If you choose a method where webhooks need to be copy and pasted, the last screen of the Configuration Wizard (or any other screen you wish to put it on) would simply display a URL that the end-user would copy and paste, along with instructions on where to put it within their Jira account.
We currently have two Jira connectors which are able to reach cloud-hosted Jira instances - Jira and Jira Cloud.
Depending on their use case, users may find that one Jira instance is more appropriate than the other. Users need to take the authentication process into serious consideration regarding their end users, during the selection process. As well as trigger set up should they require one.
There are essentially two options:
Option 1: Jira
Leverage the Jira connector (along with its prebuilt trigger if necessary), and ask your end users to use the OAuth 1 version of the service. This will require them to use the terminal, while gathering their OAuth 1 authentication parameters.
Option 2: Jira Cloud
Leverage the Jira Cloud connector, which allows your end users to authenticate with just their Jira site URL and username/ password. If a trigger is required, than separate setup will be necessary which will require them to copy/ paste a webhook URL into their Jira account.
While the OAuth 1 process and creating a Jira Cloud trigger may seem intimidating, both are rather straightforward and well documented on our site.
See below headers for more details.
OAuth 1 vs OAuth 2Copy
OAuth 1 (used by the the Jira connector) is slightly more complex than OAuth 2 (which is used by Jira Cloud).
The Jira OAuth 1 process requires users to be comfortable with using the terminal.
This is because when setting up their authentication, they will need to generate a private key using terminal commands.
This process is employed by many of our users as it is relatively simple and very well documented in the Authenticaition section above.
However less technically able users may still find this process intimidating so please take this into account for your end users.
The Jira Cloud OAuth 2 process only requires an end user to input their Jira site url and username/ password credentials.
TriggersCopy
The API version used when setting up either of the Jira instances dictated whether or not a trigger was able to be programmatically created.
Jira comes with a ready made Tray.io trigger.
Jira Cloud DOES NOT come with a prebuilt Tray.io trigger.
PLEASE NOTE: Rest assured, that while there is no trigger automatically available for Jira Cloud users, Jira Cloud does support the use of webhooks, and therefore creating a trigger is possible.
The Jira v3.0 API simply does not support the programmatic creation of then, which is the version Jira Cloud has been built on. This is a common complaint, as you can see in Jira support threads here. Webhooks are a modern construct, and many APIs do not allow you to create them programmatically simply because more development work is required by the service provider to enable this.
However with the help of the Webhook trigger, Tray.io users can set up an instance of their own Jira Cloud trigger relatively easily:
Select the Webhook trigger and choose Jira Cloud from the dropdown options available. Enable the workflow.
Paste in the Jira site url, and when the popup model appears approve and login.
Within the workflow settings, copy the workflow's public URL (aka webhook URL).
Head to your Jira account and sdd the URL to your 'System webhooks'. This should be under: 'Settings' -> 'Systems' -> 'Advanced' -> 'Webhooks'.
List of key differencesCopy
Jira
Hosts a service connector.
Hosts a trigger.
Leverages v2.0 of the Jira API.
Uses OAuth 1 authentication process (which in this case requires users to be comfortable working with the terminal).
Hosts a service connector.
No trigger available, however the Jira Cloud connector can support webhooks. See our note on Jira vs Jira Cloud: Triggers for more details.
Leverages v3.0 of the Jira API.
Uses OAuth 2 authentication process (which in this case only requires a username and password).