
Heap 1.0
Heap augments user data with flexible APIs and gain a complete view of your customer journey.
- On this page
- Heap
- Overview
- Authentication
- Heap Triggers
OverviewCopy
Heap is a popular web analytics platform that allows you to capture and measure minute user actions on your website or mobile application.
You can use this connector to send server-side data to Heap including user and account properties to enrich your auto-captured dataset.
This connector also includes client-side equivalents of several of Heap's server-side APIs (such as 'Track' and 'Add User Properties'). You are also able to delete users from your Heap workspace.
API INFO: The Base URL used for the heap connector is https://heapanalytics.com. More information can be found on their main API documentation (v1.0) site.
AuthenticationCopy
Please note that authentications are only mandatory for the "Heap data out" trigger and for the "Delete" operations.
Within the builder, click on the Heap connector to display the connector properties panel. Select the 'Authentication' tab and click on the 'New authentication' button.
In the Tray.io authentication pop-up modal name the authentication in a way that will easily identify it within a potentially large list. For example, whether it is a Sandbox or Production auth, etc.
Consider who / how many people will need access to this authentication when choosing where to create this authentication ('Personal' or 'Organisational'). Select the relevant service.
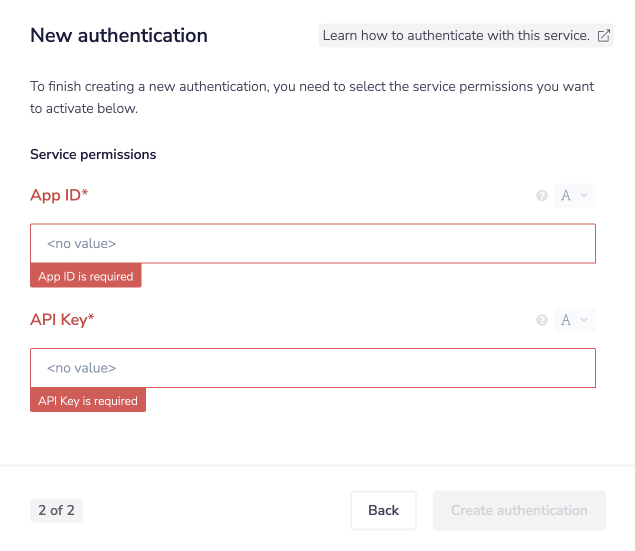
The second page asks you for your 'App ID' and 'API Key':

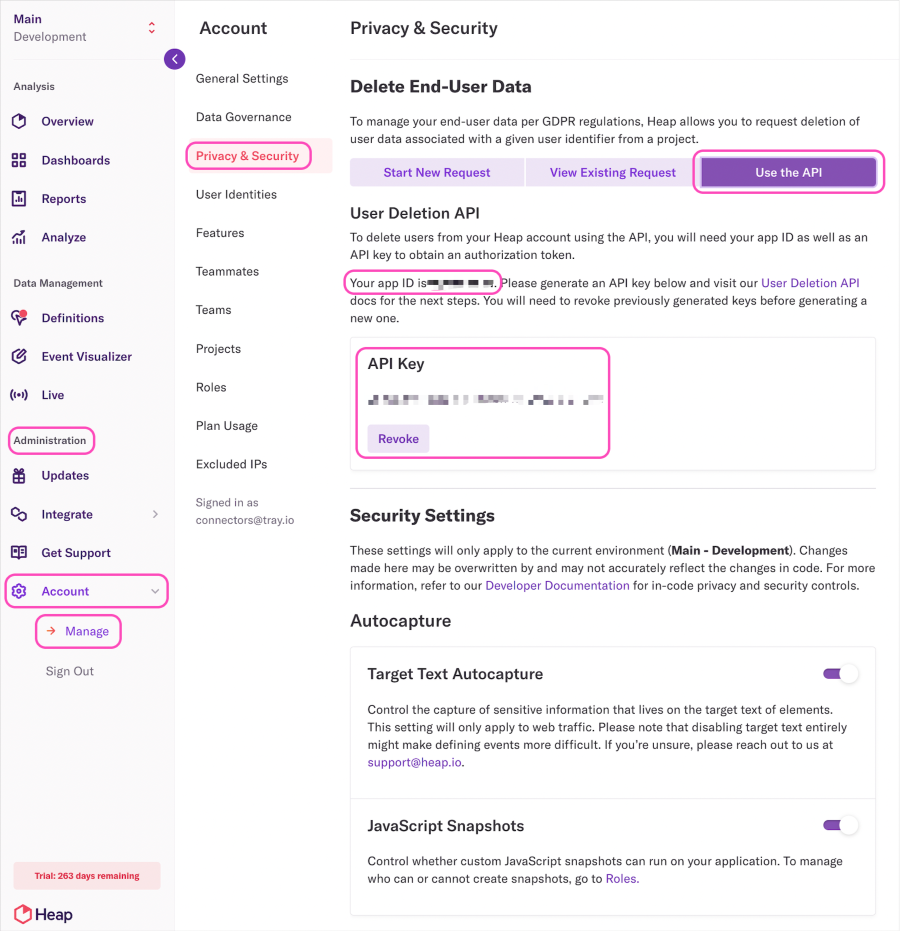
Both can be found within the left hand side menu via: 'Administration' -> 'Account' -> 'Manage' -> 'Privacy & Security'.
Select the 'Use the API' tab. If you have already generated an API key it will simply display the date it was generated.

Once you have added these fields to your Tray.io authentication pop-up window, click the 'Create authentication' button.
Your connector authentication setup should now be complete.
Heap TriggersCopy
The Heap trigger's allow you to receive notifications and trigger workflows when given events occur associated with the selected trigger operation.
Note that there are two types of Heap triggers:
Heap: This trigger is best used for when you want Heap to react to data collection events.
Heap (data out): This trigger is best used for when you want to synchronise users being added and removed from segments with another service.
Heap terminologyCopy
We have outlined below some of the more frequently used Heap terminology:
Note on Environment IDCopy
This property value is necessary for three operations: 'Add user properties', 'Add Account Properties', and 'Track event'.
The easiest way to find this information is via your Heap URL. It is the value found after the env/ section.
Make sure you remove any/ all trailing slashes before adding the value to your property panel.
IMPORTANT!: Notice that your Heap Environment ID is referred to as your "app_id" within your returned Heap payload


If you are not sure which environment ID to use or which project you are using note that all possible options are located within the 'Projects' tab.
Example UsesCopy
Tray.io is extremely flexible. By design there is no fixed way of working with it - you can pull whatever data you need from other services and work with it using our core and helper connectors. This demo which follows shows only one possible way of working with Tray.io and the heap connector.
The following examples highlight different valuable use cases with the Heap connector.
Form Submission (event trigger): A simple Heap trigger workflow demonstrating how you can use Heap to update a Google spreadsheet with user form data.
Lead Enrichment: Explains how to combine new user data coming in from multiple services and send it all to Heap.
Delete Heap Users: A best practices workflow concerning user deletion and status checking.
Form Submission (event trigger)Copy
EXTRA AUTHS: In order to complete this workflow, you will also need to be authenticated with the Google sheets connector.
This workflow consists of two steps including the Heap trigger. It is a very simplistic version of how you may wish to automatically capture Heap form data and send it to another third-party service.
End ResultCopy


Step-by-step breakdownCopy
Lead EnrichmentCopy
EXTRA AUTHS: In order to complete this workflow, you will also need to be authenticated with the Clearbit connector.
Often user data comes in many formats and from various third-party sources. The great thing about Heap is that once that information is combined it can be analysed.
This example shows how you can use Heap in combination with Clearbit to help generate Lead enrichment for you and your company.
A unique third-party service survey is filled in and Clearbit cross combines their email address as a unique identifier to see what other information can be gathered about them. This is then sent to Heap for analysis.
With the expectation that if there are any new values for the properties found/ created for said user they will be automatically updated when sent to Heap.
End ResultCopy

Step-by-step breakdownCopy
Delete Heap UsersCopy
You may wish to set up a system to check how long your loop has been running and if it has been running for too long. You could handle this as a timeout error. Use the example given here for inspiration.
EXTRA AUTHS: In order to complete this workflow, you will also need to be authenticated with the Slack connector.
Below is a best practice example of how you could use the Heap connector to delete users and check their completion status.
It minimises the number of calls required during the deletion process and outlines how best to use the deletion_request_id.
This example imagines a scenario where a survey was sent out to get clients to update their third-party service tracking cookies. Some have remained while others have opted out. This workflow collects the data and isolates the users who choose to opt-out. It then deletes those users from the Heap database and sends a notification once finished.
End ResultCopy


Step-by-step breakdownCopy
OperationsCopy
A List of Heap operations and how to use them.
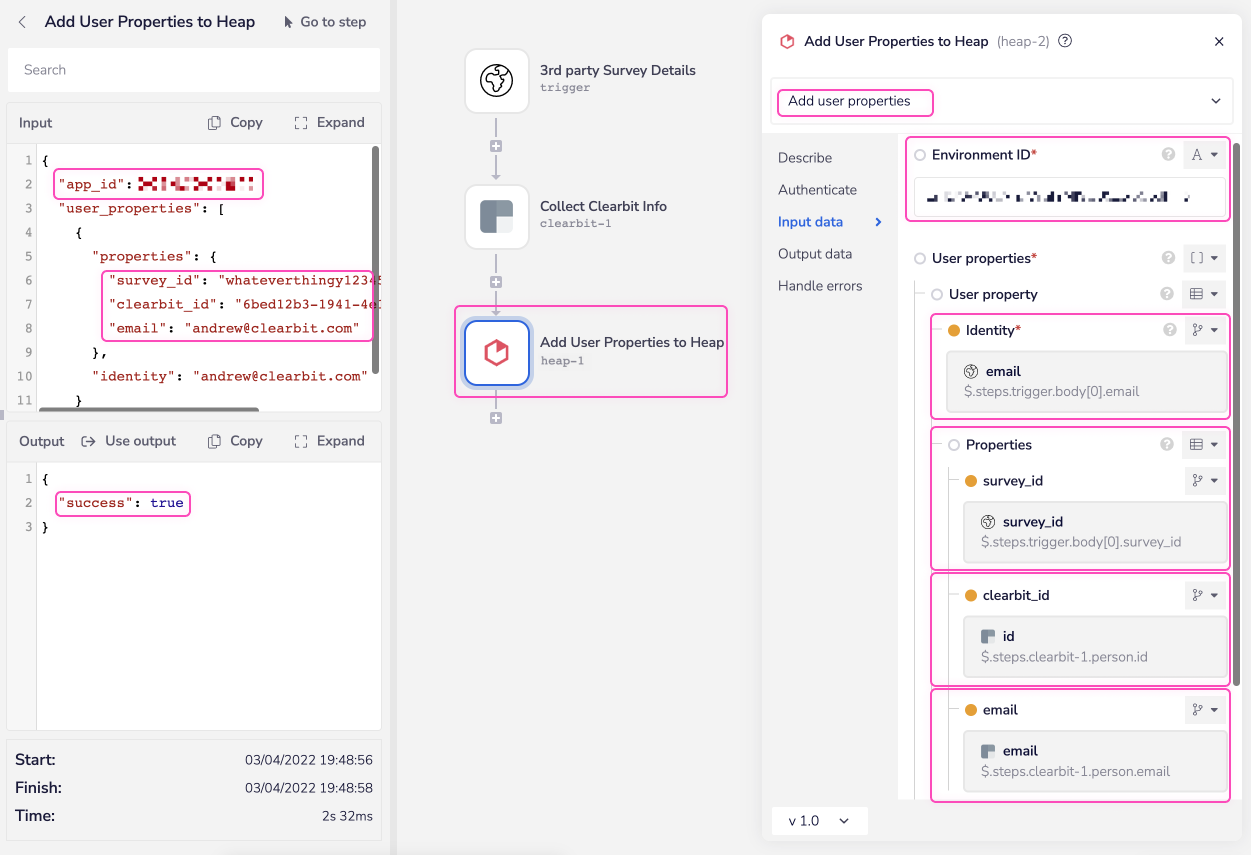
Add user propertiesCopy
Best used when you have one or several custom user properties to attach.
There are two key properties that you must set up before using this operation. Your user 'Identity' and 'Environment ID'.
You will need to specify the 'Identity' of your user under the 'User properties' section. This typically corresponds to a pre-existing user.
If no such identity exists then a new one will be created with whatever value you set. So long as that value is a case-sensitive string limited to 255 characters.
To locate your Environment ID see the section above for more details.

Add Account propertiesCopy
This operation allows you to add one or several custom account properties.
An 'Account ID' (as well as an Environment ID is required) for this to work.
In Heap you need to specify a user property to group users into accounts (i.e. 'Account ID'). Heap will associate all users with the same property value under the same account. This is the 'Account ID' you should refer to.
If no such identity exists then create a new one.


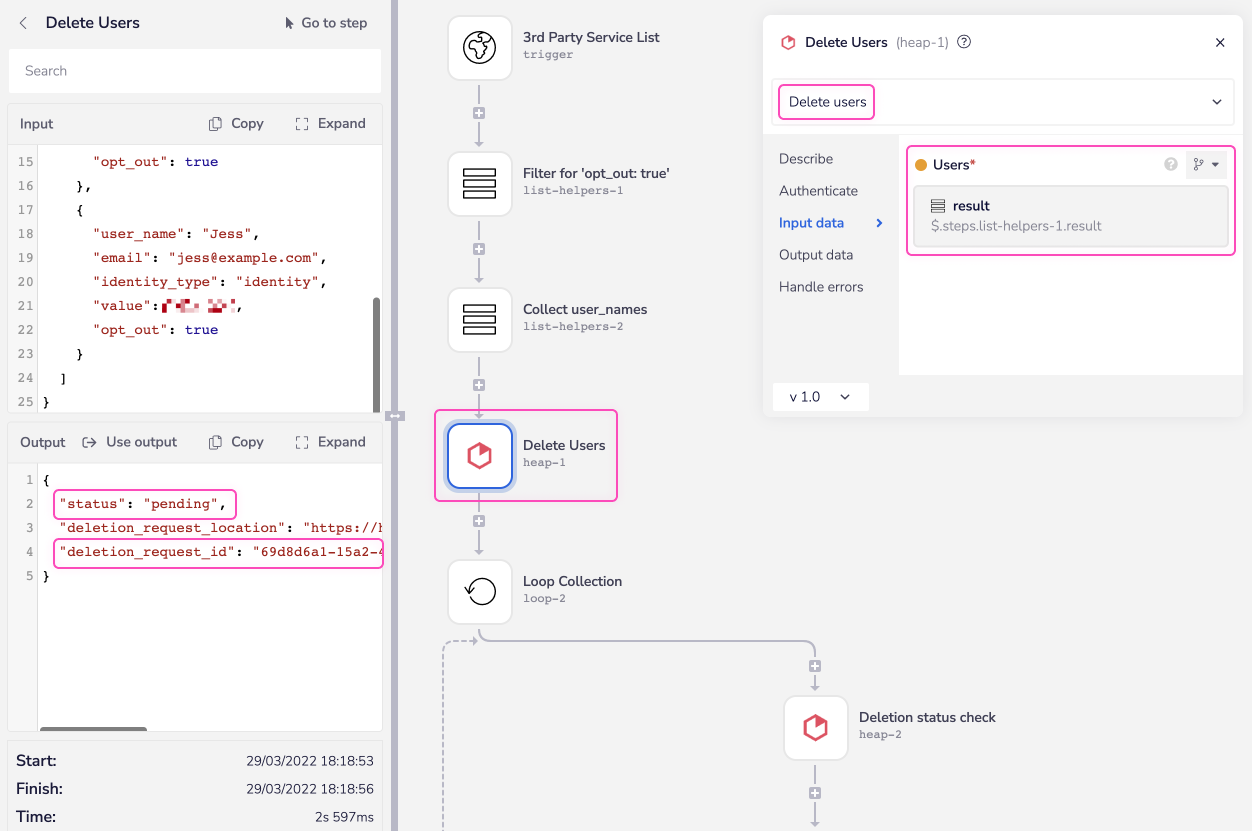
Delete usersCopy
As this operation is user-specific you will need to use a unique user identifier to specify which user/s need to be removed from Heap.
In this case it refers to the 'User ID' or 'Identity' of an individual user.
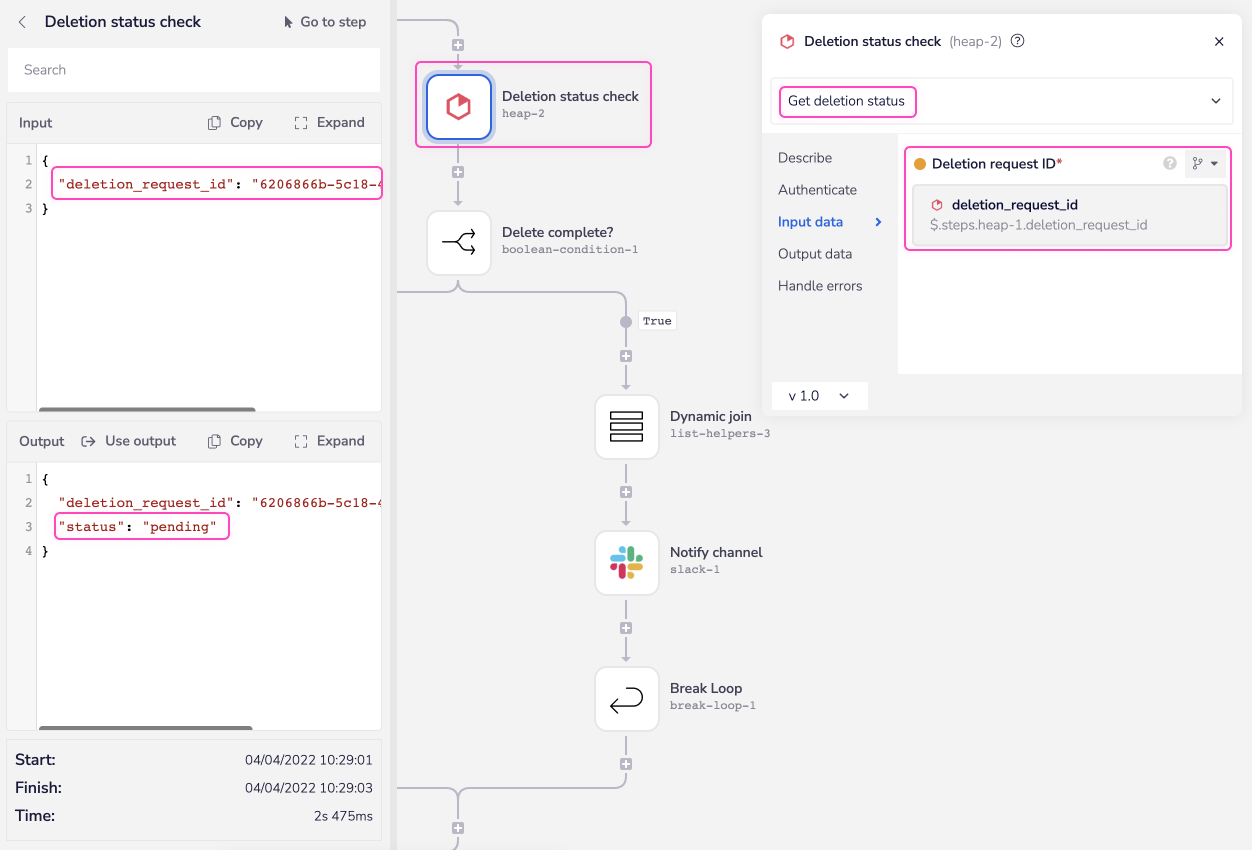
Whenever this operation is run it will return green in the logs. This is regardless of whether the operation has actually finished deleting the users specified.
As you can see from the output the status that is returned is pending (and therefore not yet complete) even with a clean run step.
This is why we strongly recommend you use this operation in conjunction with the Get deletion status operation.

Get deletion statusCopy
You cannot use this operation without a 'Deletion request ID'. This is auto-generated when you use the Delete users operation.
Once this is acquired this operation will check the status of the deletion request with each run.
We advise our users to limit the number of checks made to save on the number of calls required.
See our Delete Heap Users example below for a best practices walkthrough using this operation.

Raw HTTP requestCopy
Note that only the server side API will work with this operation.
This is a very powerful feature that you can put to use when there is an endpoint in Heap which is not used by any of our operations.
This operation gives you the power to implement any future server side endpoints built by Heap.
To use this you will first of all need to research the endpoint in the Heap API Server side documentation v1.0, to find the exact format that Heap will be expecting the endpoint to be passed in.
Note that you will only need to add the suffix to the endpoint, as the base URL will be automatically set (the base URL is picked up from the value you entered when you created your authentication).
The base URL for Heap is: https://heapanalytics.com
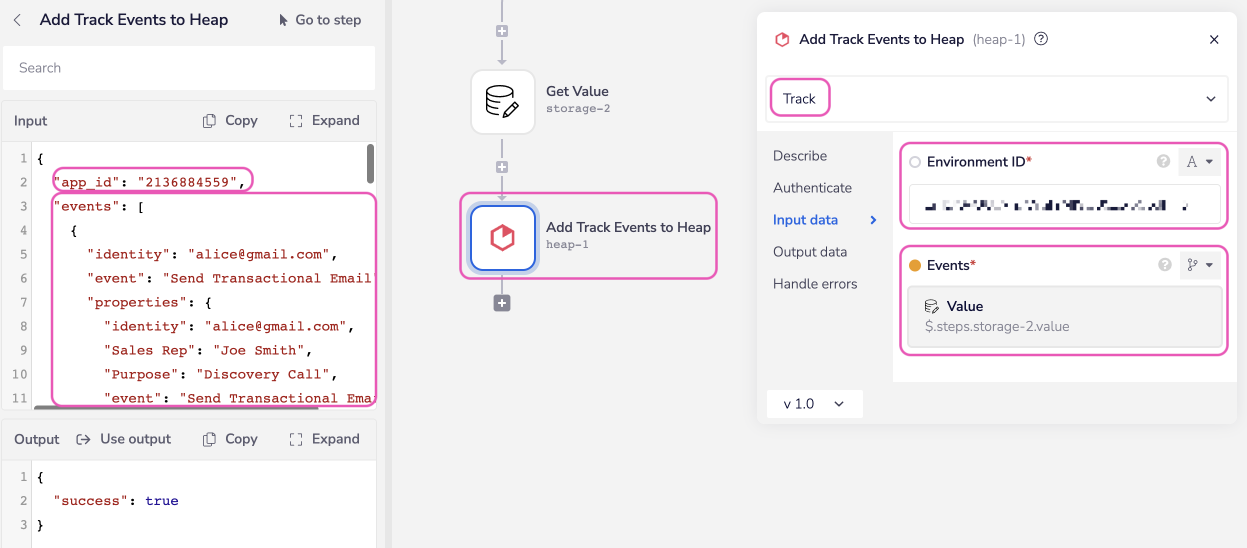
Track eventCopy
Use this operation to send custom events to Heap server-side. This can be used for singular or multiple events.
We recommend using this for events that need to exactly match your backends such as completed order transaction info or events that are not available for Heap to capture on the client-side.
To locate your Environment ID see section above.
'Identity' refers to the user's identifier. If no such identity exists then a new one will be created with whatever value you set. So long as that value is a case-sensitive string limited to 255 characters.
The 'Event' refers to the server-side event you wish to track.

Important Notes on using HeapCopy
Note on API limitsCopy
Some of the Heap operations are subject to API limits. There are basically two types of limits:
1 - API limits on individual requestsCopy
The amount of requests that can be made to a Heap endpoint within a certain timeframe. When this applies, it is 30 requests per 30 seconds per identity per app_id
This is a point of concern if, for example, you have a workflow triggered by service updates whereby large amounts of individual requests come in one after the other.
Please see our documentation on API limits for guidance on how to set up a queue system for dealing with such a scenario.
In particular this article shows how to set up a queue using Tray's data storage.
2 - API limits on items per requestCopy
The number of items that can be updated in a single request. For example a maximum of 1000 users per each 'Add user properties' request
This is a concern when you are receiving large lists of e.g. 10,000 new/updated users. The solution here is to chunk the lists into batches of 1000 or less, before looping through each batch and sending to Heap.
If you are pulling data from a service, that service may have a pagination system (such as demonstrated in our Salesforce pagination template) which allows you to receive data in batches of e.g. 100 which can then be looped through (using the loop connector) and added to Heap.
If pagination is not available and you have a list of e.g. 10,000 users, you could use the List Helpers 'chunk' operation to divide this up into smaller batches, which could then be looped through.
The following example shows how you can iterate through a list of incoming user data from a third party service which is more than 1000 user objects per payload.
It breaks down the data into manageable 'chunks' for the Heap API.


Satisfying input schema requirementsCopy
Certain operations, such as 'Add User Properties', can be used as bulk updates, so it is possible to send a list of items in one call.
It is important to note that the Heap API has specific input schema requirements for each item in the list. In this case the user object must have a top-level 'identity' field and a top-level 'properties' object:
1{2"app_id": "12345",3"user_properties": [4{5"identity": "alice@example.com",6"properties": {7"Role": "Admin",8"Vertical": "Ecommerce",9"email": "alice2@example2.com"10}11},12{13"identity": "bob@example.com",14"properties": {15"Role": "User",16"Vertical": "Saas",17"email": "bob2@example2.com"18}19}20]21}22