
Greenhouse 1.3
Greenhouse is a software suite for systematically recruiting and hiring the best talent.
OverviewCopy
Greenhouse is an applicant tracking system and recruiting solution designed to help businesses find suitable candidates, conduct interviews, and optimize their recruiting process. Greenhouse offers professional recruiting services from a dedicated support team.
API INFO: The Base URL used for the Greenhouse connector is https://[resource].greenhouse.io/v1/. More information can be found on their main API documentation (v1.0) site. This is where users will also be able to find the API Limitations page.
AuthenticationCopy
Within the workflow builder, highlight the Greenhouse connector.
In the Greenhouse connector properties panel to the right of the builder, click on the Authenticate tab and the 'New authentication' button.


This will result in a Tray.io authentication pop-up modal. The first page will ask you to name your authentication and select the type of authentication you wish to create ('Personal' or 'Organisational').
The next page asks you for your 'api-key'.


In order to get the api-key, log in to your Greenhouse account.
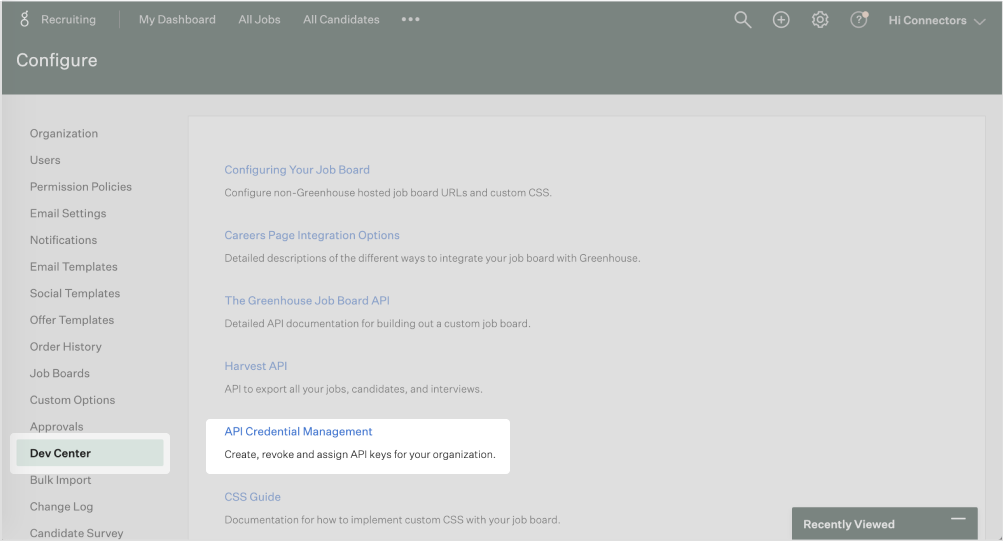
From 'My Dashboard' page, click the gear(settings) icon available at the top of the page.
You will be directed to the 'Configure' page. On this page select the 'Dev Center' tab from the left panel and then select the 'API Credential management' link.

Now, from the 'Dev Center' page click the 'Create New API Key' button from the top-right corner.
Next, enter a valid description, and select 'Harvest' as 'API Type' from the available drop-down options. Once done, click the 'Manage Permissions' button.


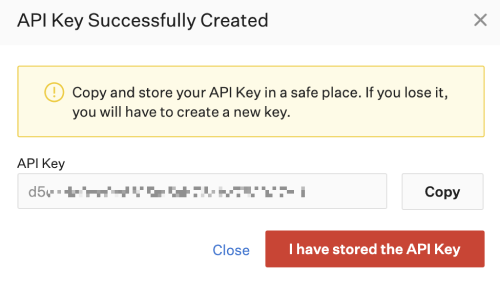
With this, you have created your API Key successfully. You can copy and use it now.
PLEASE NOTE: Make sure you copy and store your API Key in a safe place. If you lose it, you will have to create a new key.

You can now manage the API key permissions by selecting the available permissions, as shown in the image below. Once done, click 'Save'.


Once you have added the 'api-key' to your Tray.io authentication pop-up window, click the 'Create authentication' button.
Go back to your settings authentication field (within the workflow builder properties panel), and select the recently added authentication from the drop-down options now available.
Your connector authentication setup should now be complete.
Available OperationsCopy
The examples below show one or two of the available connector operations in use.
Please see the Full Operations Reference at the end of this page for details AP all available operations for this connector.
Example UsageCopy
TRAY POTENTIAL: Tray.io is extremely flexible. By design there is no fixed way of working with it - you can pull whatever data you need from other services and work with it using our core and helper connectors. This demo which follows shows only one possible way of working with Tray.io and the Greenhouse connector. Once you've finished working through this example please see our Introduction to working with data and jsonpaths page and Data Guide for more details.
Below is an example of a way in which you could potentially use the Greenhouse connector, to fetch the recently created new jobs and then assign those jobs to the recruiters by notifying them and their managers with appropriate messages on the chosen Slack channel.
In these examples, we have shown that you have received the job details via the Webhook trigger, and now need to process it into Greenhouse. However, users may have received this data in any number of other ways, like maybe from any website or any other relevant resource.
The steps will be as follows:
Pull the job details from the source (a webhook trigger in this example) and get newly created jobs from Greenhouse.
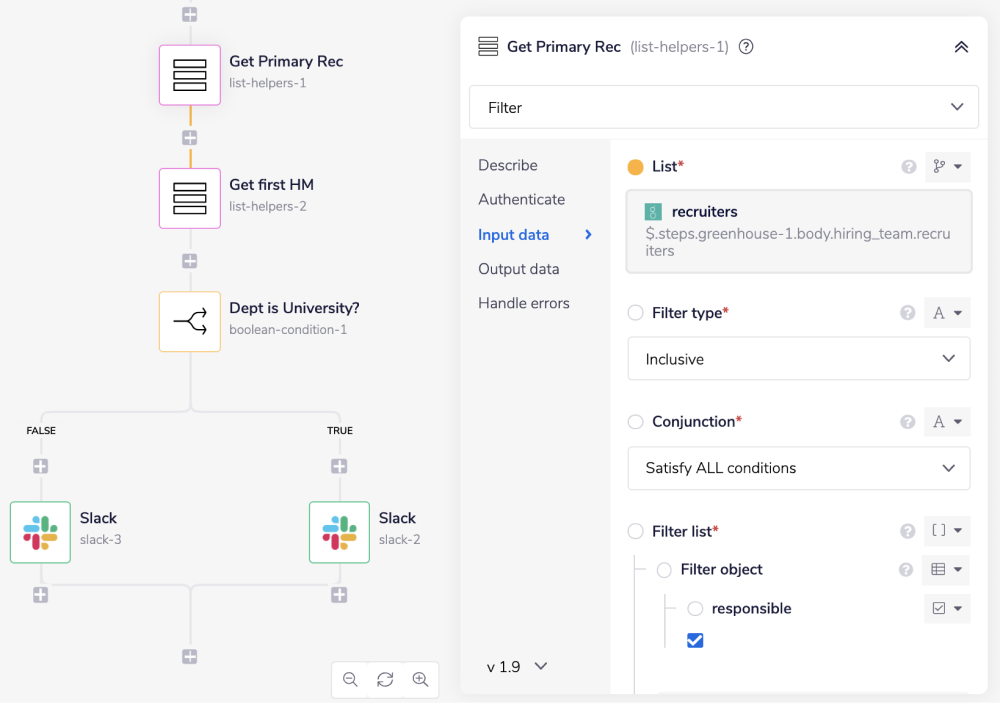
Get a list of primary recruiters and their managers from Greenhouse using the List Helpers connector.
Add a boolean check to verify the department name.
Based on the department name check, done in the previous step, send appropriate notifications on the selected Slack channel.
The following workflow gives an example of how you can achieve this:


1 - Setup Trigger & get jobsCopy
Select the Webhook trigger from the trigger options available, and set the operation to 'When webhook is received, auto respond with HTTP 200'. Be sure to click the 'Enable' button before continuing. This makes the workflow ready to receive incoming calls.
The job details received by the Webhook are in JSON format and is as follows:
{ "method": "post", "path": "/", "body": { "organization_id": 5378, "organization_name": "Peace", "action": "job_created", "payload": { "job": { "id": 9035617, "name": "Manager, People Partner - Customer Experience", "requisition_id": "OPxxxx64", "notes": null, "confidential": false, "job_post_id": 31xxxx9, "status": "draft", "created_at": "2021-05-24T16:03:08Z", "opened_at": null, "closed_at": null, "url": "https://peace.greenhouse.io/sdash/1834017", "departments": [ { "id": 8xxx5, "name": "People Operations", "external_id": "people_operations" } ], "offices": [ { "id": 4xxx3, "name": "Charlotte, NC", "location": "Charlotte, North Carolina, United States", "external_id": "451" }, { "id": 4xxx9, "name": "New York, NY", "location": null, "external_id": "671" }, { "id": 9xxx4, "name": "Westlake, TX", "location": "Westlake, Texas, United States", "external_id": "951" } ], "hiring_team": { "hiring_managers": [], "sourcers": [], "recruiters": [], "coordinators": [] }, "openings": [ { "id": 4xxx81, "opening_id": "P-06454", "custom_fields": {} } ], "custom_fields": { "bamboo_department": { "name": "Bamboo Department", "type": "single_select", "value": null }, "bonus": { "name": "Bonus", "type": "short_text", "value": null }, "business_priority": { "name": "Business Priority", "type": "single_select", "value": null }, "cost_center": { "name": "Cost Center", "type": "single_select", "value": null }, "employment_type": { "name": "Employment Type", "type": "single_select", "value": null }, "interviewer": { "name": "Interviewer", "type": "short_text", "value": null }, "job_family_job_15xxxxx01.590545": { "name": "Job Family", "type": "single_select", "value": null }, "job_level": { "name": "Job Level", "type": "single_select", "value": null }, "job_profiles": { "name": "Job Profiles", "type": "multi_select", "value": [] }, "options": { "name": "Options", "type": "short_text", "value": null }, "recruiting_pod": { "name": "Recruiting Pod", "type": "single_select", "value": "Foundation" }, "recruiting_team": { "name": "Recruiting Team", "type": "single_select", "value": null }, "sub_team": { "name": "Sub Team", "type": "single_select", "value": null }, "target_hire_date": { "name": "Target Hire Date", "type": "date", "value": "" }, "team": { "name": "Team", "type": "single_select", "value": null }, "university_division": { "name": "University Division", "type": "single_select", "value": null } } } } }, "query": {}, "headers": { "accept": "application/json", "content-length": "2499", "content-type": "application/json", "host": "5f97040x-xxx-xxx-xxx-xxx1a14877.trayapp.io", "user-agent": "Needle/2.1.2 (Node.js v10.24.1; linux x64)", "x-amzn-trace-id": "Root=1-60abxxx-xxxxxxxxx62f1fc28", "x-forwarded-for": "35.xx.xx.123", "x-forwarded-port": "443", "x-forwarded-proto": "https" } }
From the connectors panel on the left, add a Delay connector and set the '5 minutes' delay.


We are adding a delay connector to manage the rate limits set by Greenhouse, i.e., the limit on the number of requests that can be made within a given time window.
The Greenhouse API imposes limits on the amount of data a single client can request overtime, as well as the complexity of individual requests. This is done to ensure that servers can always service requests as quickly as possible.
To know more about the rate limits refer to Greenhouse's documentation on Rate Limiting.
Now, add a Greenhouse connector to your workflow as a next step. Set the operation to 'Get job'.
Using a connector-snake, find a jsonpath for the 'Job ID' field from the trigger step. It should appear similar to this: $.steps.trigger.body.payload.job.id.
Using all the job IDs the Get job operation will retrieve details of each job.


Feel free to re-name your steps as you go along to make things clearer for yourself and other users. The operation names themselves often suffice.
2 - List recruiters and managersCopy
Next, add a List Helpers connector as a next step and set the operation to 'Filter'.
LIST HELPER: This is just one example of how the List Helper can be utilised. For more ways and uses regarding the List Helper connector, please see the main docs page for more details.
Here, we wish to fetch the list of recruiters from Greenhouse.
To do so, using a connector snake, find the josnpath for the recruiter details from the 'Get Job' step. It should appear similar to this: $.steps.greenhouse-1.body.hiring_team.recruiters.

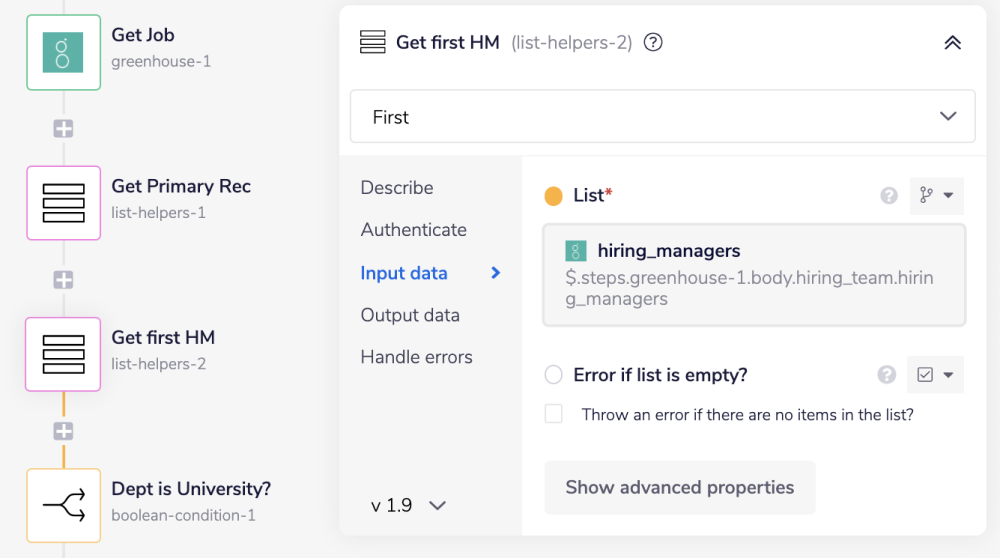
Add another List Helpers connector as a next step and set the operation to 'First'.
Using a connector snake, find the josnpath for the hiring_managers from the 'Get Job' step. It should appear similar to this: $.steps.greenhouse-1.body.hiring_team.hiring_managers.
The 'First' operation will list all the hiring managers and then will provide the first one on the list as an output.

Now we have details of the recruiters and manager, and these details will be used to send an informative message on the Slack channel.
3 - Send notifications on Slack channelCopy
The next step is to check if the department name for each job is equal to 'University' or not.
For that, add a Boolean Condition connector and set the operation as 'Boolean condition'.
To check the department name, using the connector-snake, add the jsonpath for the departments.name from the trigger step as a 1st Value.
Set the Comparison type as 'Equal to' and 2nd Value as 'University'.


If the department name is equal to University, it means the condition satisfies. In such a case, the message is sent on the gh-university-job-profiles slack channel. If it is not, then the message is to be sent on the gh-job-profiles slack channel.
As the last step, to send messages to Slack channels, add a Slack connector on each branch of the Boolean Condition connector and set the operation to 'Send message'.
Set the channel as gh-university-job-profiles for the Slack connector on the true branch and set the channel as gh-job-profiles channel for the Slack connector on the false branch.
The message sent on both the channels is the same and is as shown in the image below.
The below message is not the only way to send messages to Slack channels. This is just a sample for demonstration purposes. Feel free to send the message as per your requirements.

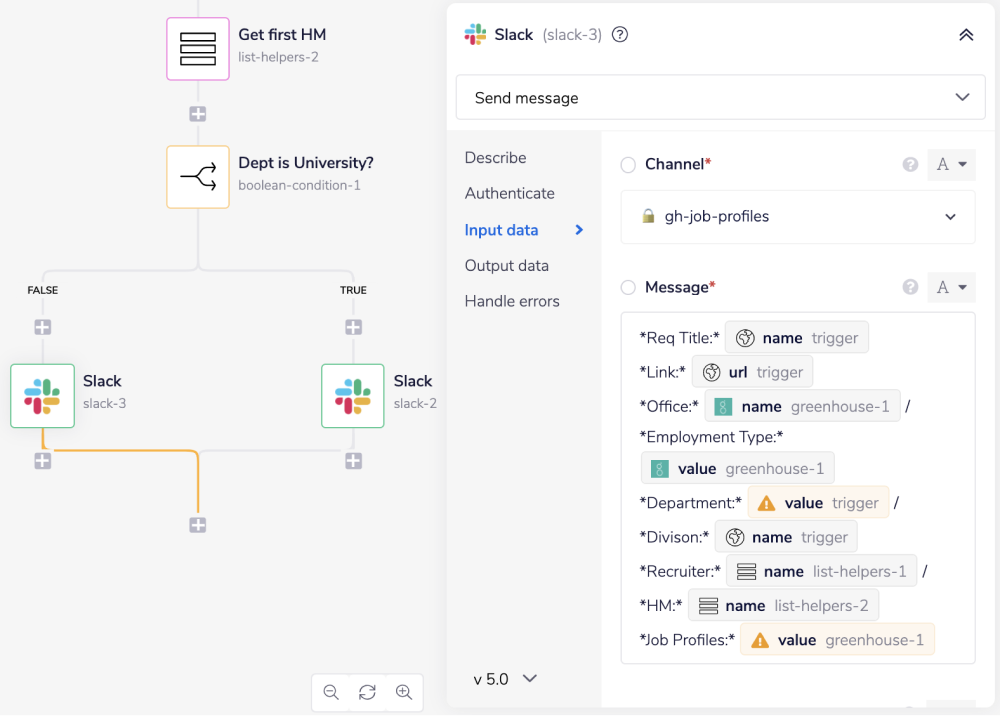
The above message contains the job details, and name of recruites and managers. Information for each field is a jsonpath from the previous steps and they are as follows:
Req Title:
$.steps.trigger.body.payload.job.nameLink:
$.steps.trigger.body.payload.job.urlOffice:
$.steps.greenhouse-1.body.offices[0].nameEmployment Type:
$.steps.greenhouse-1.body.keyed_custom_fields.employment_type.valueDepartment:
$.steps.trigger.body.payload.job.custom_fields.bamboo_department.valueDivision:
$.steps.trigger.body.payload.job.departments[0].nameRecruiter:
$.steps.list-helpers-1.result[0].nameHM:
$.steps.list-helpers-2.result.nameJob Profiles:
$.steps.greenhouse-1.body.keyed_custom_fields.job_profiles.value
For more clarification on the pathways, you have available, open the Debug panel to view your step's Input and Output.
BEST PRACTICES: Whenever you do decide to create your own workflow, be sure to check out some of our key articles such as: