
EventGeek 2.0
A platform for events project management and ROI tracking.
OverviewCopy
EventGeek is an events project management platform. It enables you to keep track of registration, budgets, ROI, scheduling, calendar events, and more, making it much easier to get the most out of events.
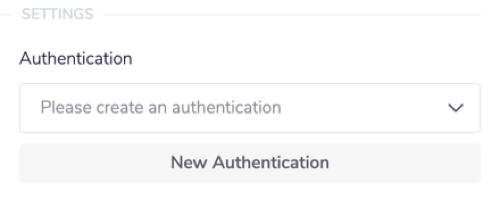
AuthenticationCopy
When using the EventGeek connector, the first thing you will need to do is go to your Tray.io account page, and select the workflow you wish to work on. Once in the workflow builder itself, search and drag the EventGeek connector from the connectors panel (on the left hand side) onto your workflow.
With the new EventGeek connector step highlighted, in the properties panel on the right, click on 'New Authentication' which is located under the 'Settings' heading.

This will result in a Tray.io authentication pop-up window. The first page will ask you to name your authentication, and state which type of authentication you wish to create ('Personal' or 'Organisational').
As you can see, the next page asks you for your 'Instance URL' and 'API Key' credentials.

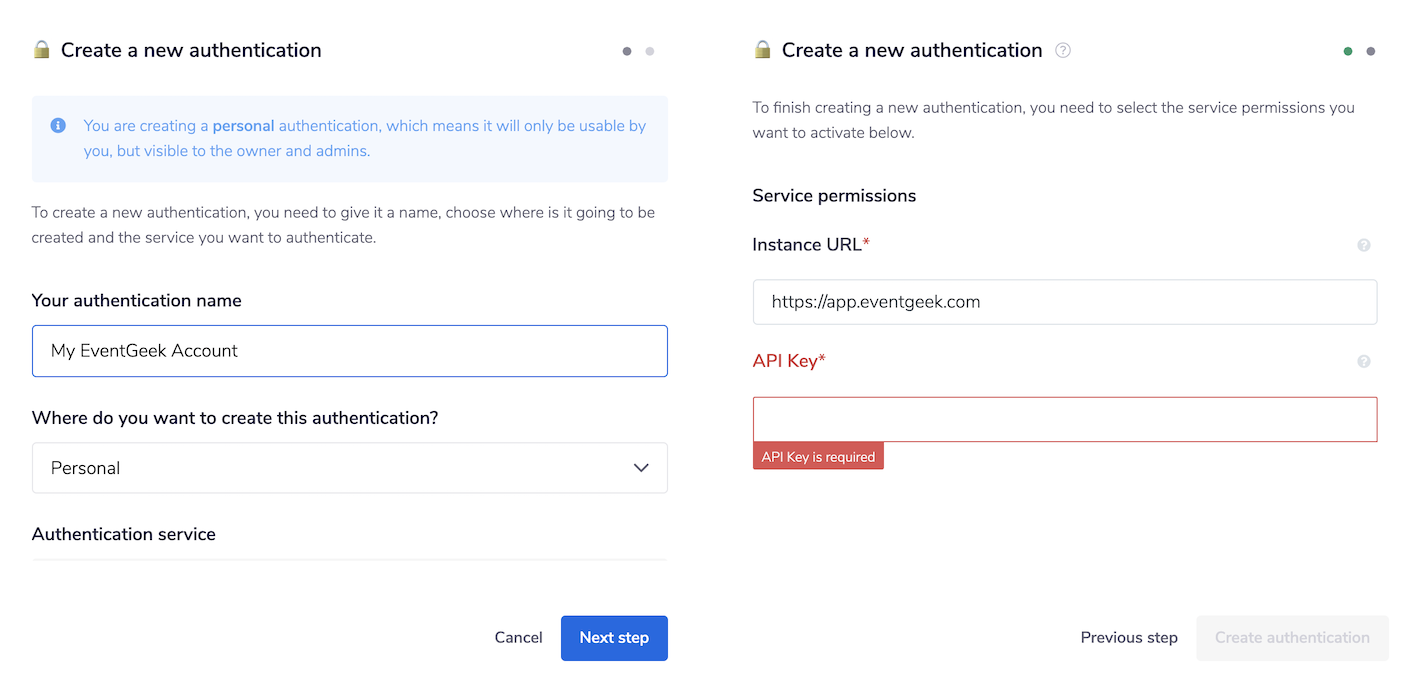
By default, your 'Instance URL' will be https://app.eventgeek.com, but if your EventGeek instance is hosted at a different location, please make sure to change the URL here.
In order to get both these fields, head to your EventGeek dashboard. Click on the 'Org' icon/ button in the top-left of the page, within the sidebar itself:


In the Org Reports & Settings section, click on the 'Integrations' tab, and then 'API'. You will find your API key on this page; copy it into the 'API Key' field in the Tray authentication pop-up.


Once you have added these fields to your Tray.io authentication popup window, click on the 'Create authentication' button. Go back to your settings authentication field (within the workflow builder properties panel), and select the recently added authentication from the dropdown options now available.
Your connector authentication setup should now be complete.
Available OperationsCopy
The examples below show one or two of the available connector operations in use.
Please see the Full Operations Reference at the end of this page for details on all available operations for this connector.
Using the Raw HTTP Request ('Universal Operation')Copy
At the moment, the only operation the EventGeek connector has is the Raw HTTP Request. This is a very powerful operation which you can put to use when there is an endpoint in EventGeek which is not used by any of our operations.
To use this you will first of all need to research the endpoint in the EventGeek API documentation v1.0 , to
find the exact format
that EventGeek will be expecting the endpoint to be passed in.
Note that you will only need to add the suffix to the endpoint, as the base URL will be automatically set (the base URL is picked up from the value you entered when you created your authentication).
The base URL for EventGeek is: {your_instance_url}/api/v1, where {your_instance_url} is the same as the Instance URL that you provided during the authentication setup. The most likely version of your base URL is therefore: https://app.eventgeek.com/api/v1
For example, say that you wanted to use the 'List teams' endpoint, you would use the EventGeek API docs to find the relevant endpoint - which in this case is a GET request called: /teams. More details can be found here .

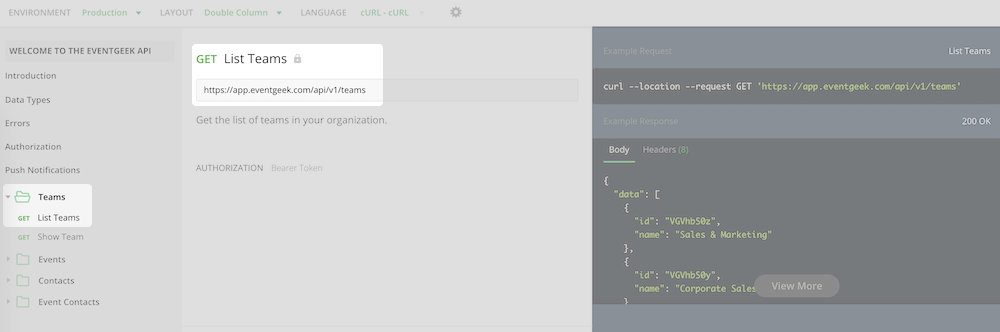
As you can see there is also the option to include a query parameter, should you wish to do so. So if you know what your method, endpoint and details of your query parameters are, you can get the teams information with the following settings:
Method: GET
Endpoint: /teams
Example Instance URL: https://app.eventgeek.com
Final Example outcome being: https://app.eventgeek.com/api/v1/teams

