
Box 2.2
Box is a contemporary workspace created with easy content management in mind, to securely share, access and manage all of your files and folders from one central place.
- On this page
- Box
- Overview
- Authentication
- Box Trigger
OverviewCopy
Box is a cloud-based file hosting platform, which includes automated backup, sync and restore, secure distribution, and access from any device. It has an impressive array of tools designed with agile collaboration in mind.
AuthenticationCopy
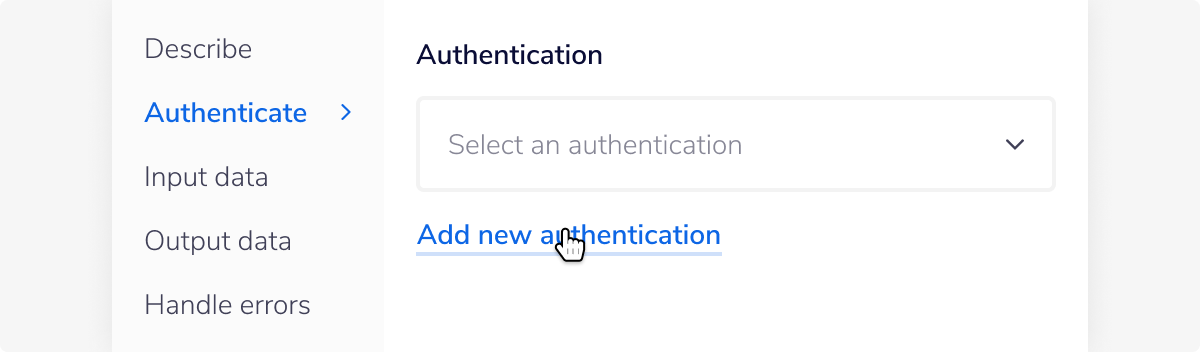
When using the Box connector, the first thing you will need to do is go to your Tray.io account page, and select the relevant workflow. Once in the workflow dashboard itself, search and drag the Box connector from the connectors panel (on the left hand side) onto your workflow.
With the new Box connector step highlighted, in the properties panel on the right, click on 'New Authentication' which is located under the 'Settings' heading.

This will result in a Tray.io authentication pop-up window, that should look like this:

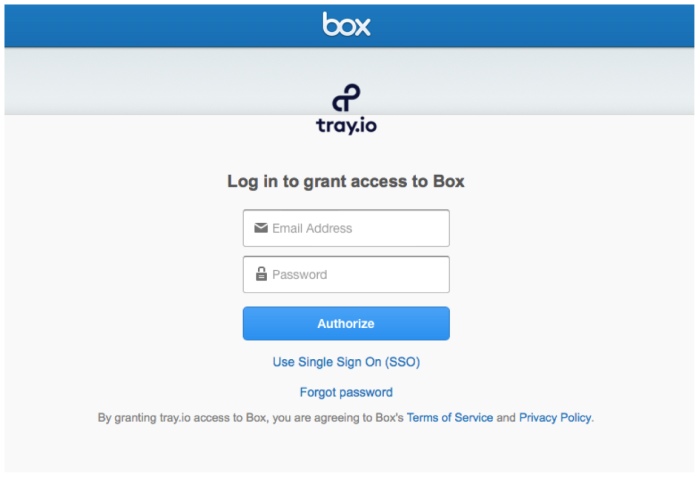
Enter your credentials to allow Tray access to your Box account. Once the ‘Authorize’ button has been hit, you will be redirected to Box and asked to approve the authentication request:


Once you have clicked the 'Add authentication' button, go to back to your authentication field (within the workflow dashboard properties panel from earlier), and select the recently added authentication from the dropdown options now available.
Your connector authentication setup should now be complete.
Box TriggerCopy
If you wish your workflow to be kicked off by a particular action in Box, you can use the Box Trigger.
The Box trigger allows you to receive notifications and trigger workflows when given events occur associated with the selected trigger operation.
Trigger operations available:Copy
Webhook
Webhook SetupCopy
When creating a new workflow, click the 'Create new workflow' button in the top right hand corner of your main Tray.io dashboard. When the trigger popup window opens, search and select the Box trigger. Wait to be redirected to your new workflow and the workflow dashboard itself.


With the new Box trigger step highlighted, in the properties panel on the right, click on 'New Authentication' which is located under the 'Settings' heading (as previously explained above).
This will result in a Tray.io authentication pop-up window. Follow the instructions above to authenticate your trigger, and select 'Webhook' as the event you want your trigger to listen to (aka the operation), in order to set off the workflow itself.
WEBHOOKS: As this uses a webhook as its operation type, you will also need to integrate it with your Box account, in order to complete the authentication process.
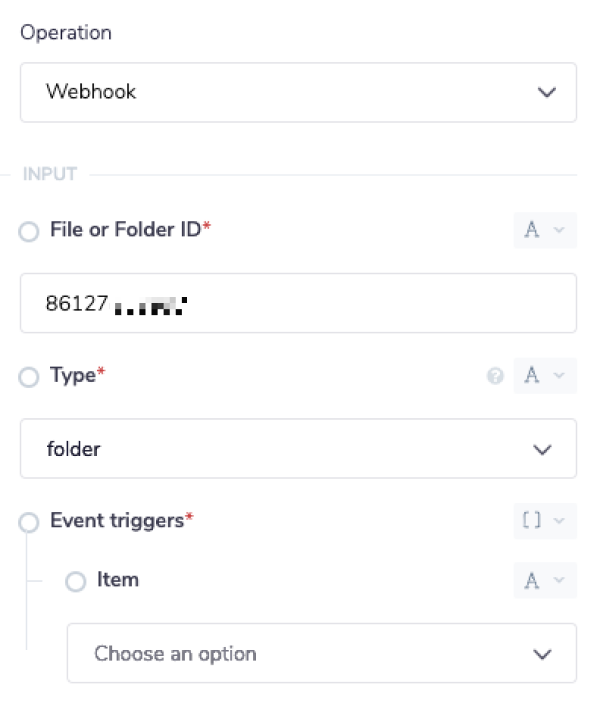
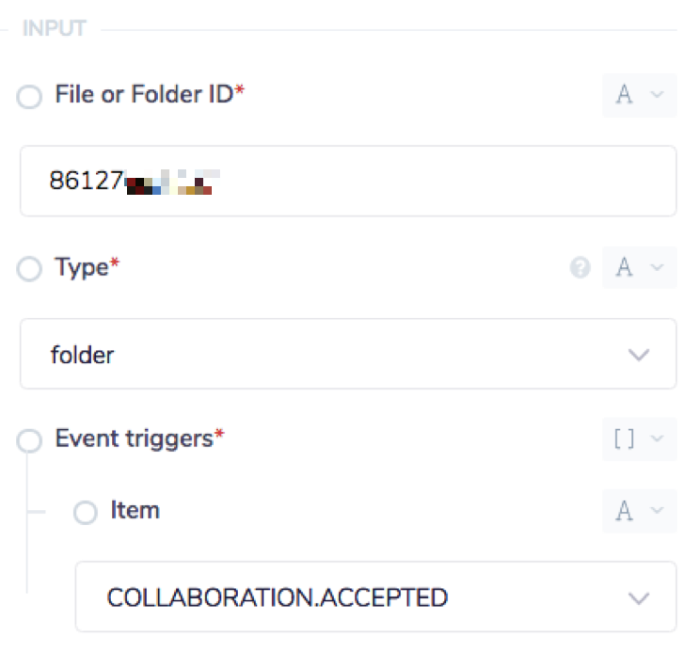
For this you will need to specify your 'File or Folder ID', 'Type', and 'Event triggers' -> 'Item'.
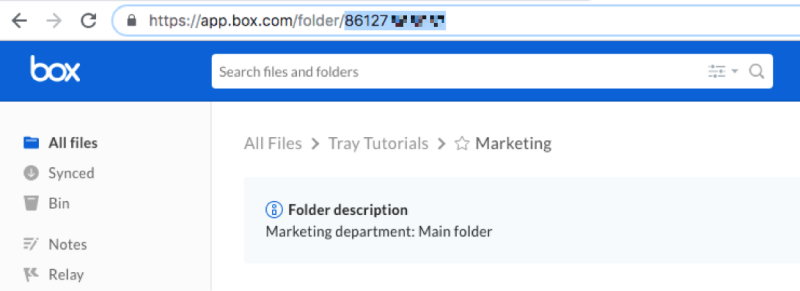
The first required field is File or Folder ID. This particular example uses a folder based trigger. The simplest way to get the ID, in either case, is to look within the pathway of the Box URL.
If your folder is based at the root of your Box account, the ID is 0 by default.
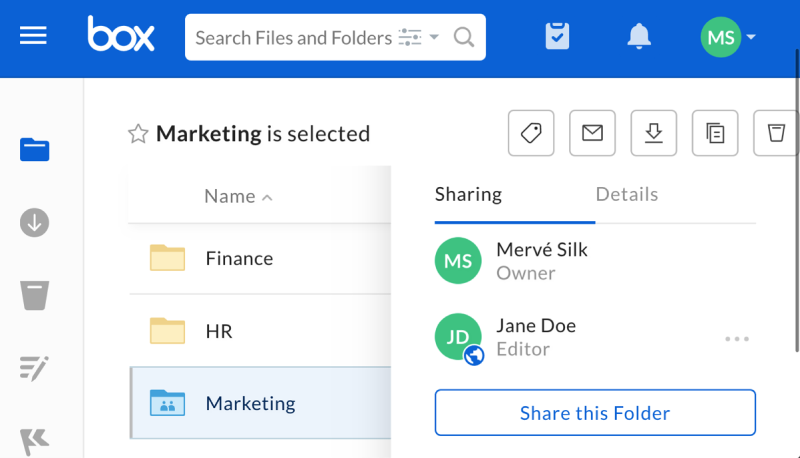
In order to get this, head to the Box website and log into your Box account. Go to the main dashboard and select the folder or file you wish to target. As you can see in the image below, the folder ID is contained within the URL itself.

Note that this would be true of a file type as well. As such, please choose your 'Type' field appropriately and the operation you wish to trigger your workflow with.
The end result should look similar to the below:

Available OperationsCopy
The examples below show one or two of the available connector operations in use.
Please see the Full Operations Reference at the end of this page for details on all available operations for this connector.
Example usageCopy
TRAY POTENTIAL: Tray.io is extremely flexible. By design there is no fixed way of working with it - you can pull whatever data you need from other services and work with it using our core and helper connectors. This demo which follows shows only one possible way of working with Tray.io and the Box connector. Once you've finished working through this example please see our Introduction to working with data and jsonpaths page and Data Guide for more details.
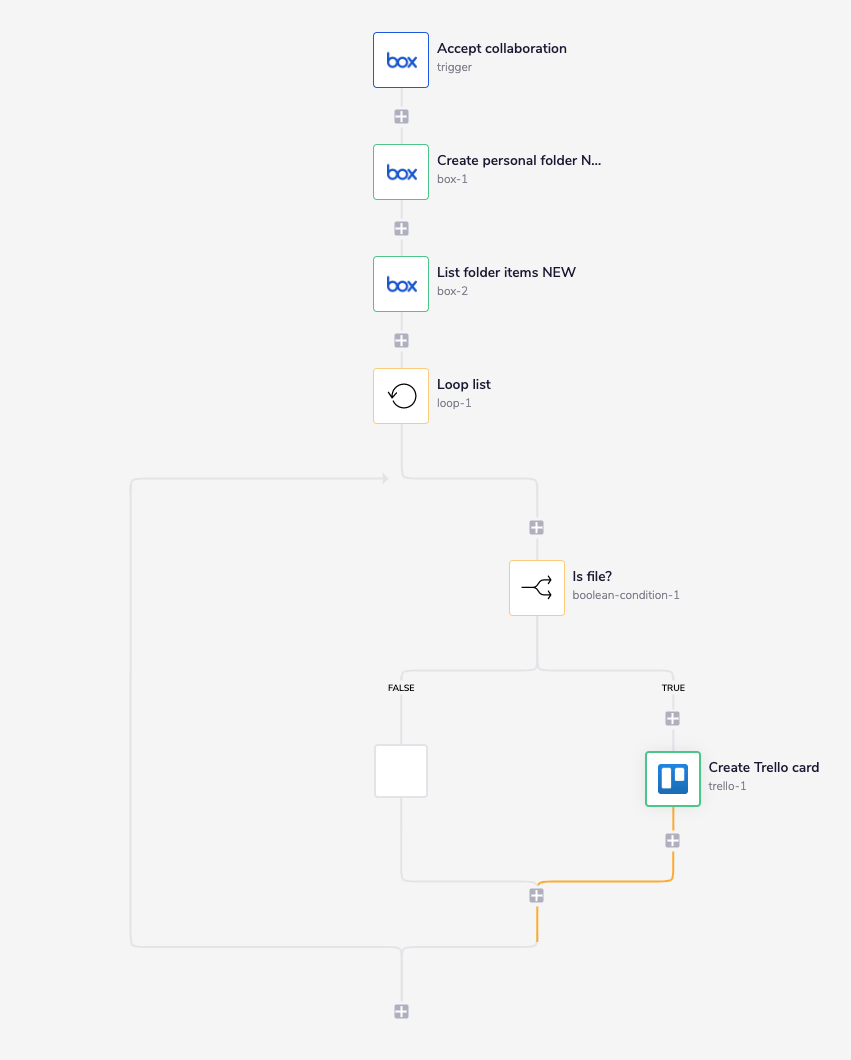
This brief tutorial will explain how to use the Create folder and List folder items Box operations to return relevant information. It will also show you how Box can be used in conjunction with other services to display said values.
This example envisages a scenario whereby the first step is triggered, due to a new collaborator accepting responsibility for a departmental folder. This, in turn, kicks off the following sequence of events:
The steps will be as follows:
A new collaborator accepts a ‘share folder’ invitation.
A new personalised sub-folder is auto-created.
A check is run within the main folder to display each available item’s name, description and tags.
A new “To do” card is auto-created in Trello that returns the values for each file found.
The final outcome should look like this:

1 - Setup the Box triggerCopy
Once you have clicked 'Create new workflow' on your main Tray.io dashboard (and named said new workflow), select the Box trigger from the trigger options available:
Once you have been redirected to the Tray.io workflow dashboard, from the connectors panel the left, add a Box connector to your second step. Make sure the Operation is set to Webhook.
You may also choose to update your Step title and include a Step description for your own reference, so that it is easier to understand the principals behind each workflow step.
The first required field is File or Folder ID. This particular example uses a folder based trigger. The simplest way to get the ID, in either case, is to look within the pathway of the Box URL.
If your folder is based at the root of your Box account, the ID is 0 by default.
Copy the given ID, whilst making sure that you are within said folder, not the parent:
Paste this into the File or Folder ID field. The next required fields are Type and Event triggers. Select folder and 'COLLABORATION.ACCEPTED'.

The workflow will be triggered when your offer to share the project folder has been accepted, in this case by ‘Jane Doe’:

2 - Create a sub-folderCopy
Drag and drop the Box connector to the next step and select your Box authentication. Set the Operation to Create folder.
You can pick up the Parent folder ID either through the method shown earlier or by using a jsonpath. Use the connector snake and/ or the trigger Output to confirm the correct path for the desired field.
JSONPATHS: For more information on what jsonpaths are and how to use jsonpaths with Tray.io, please see our pages on Basic data concepts and Mapping data between steps
CONNECTOR-SNAKE: The simplest and easiest way to generate your jsonpaths is to use our feature called the Connector-snake. Please see the main page for more details.
The folder Name displayed below is likewise created by using a jsonpath. This example includes a string appendage: {$.steps.trigger.source.accessible_by.name} project folder. In order to accomplish this, the 'Path' box is set to String type, and the jsonpath is ‘interpolated’ by enclosing it in {} .
INTERPOLATION: When you wish to include JSON generated data within another input/output result, use our Interpolation method as described here.


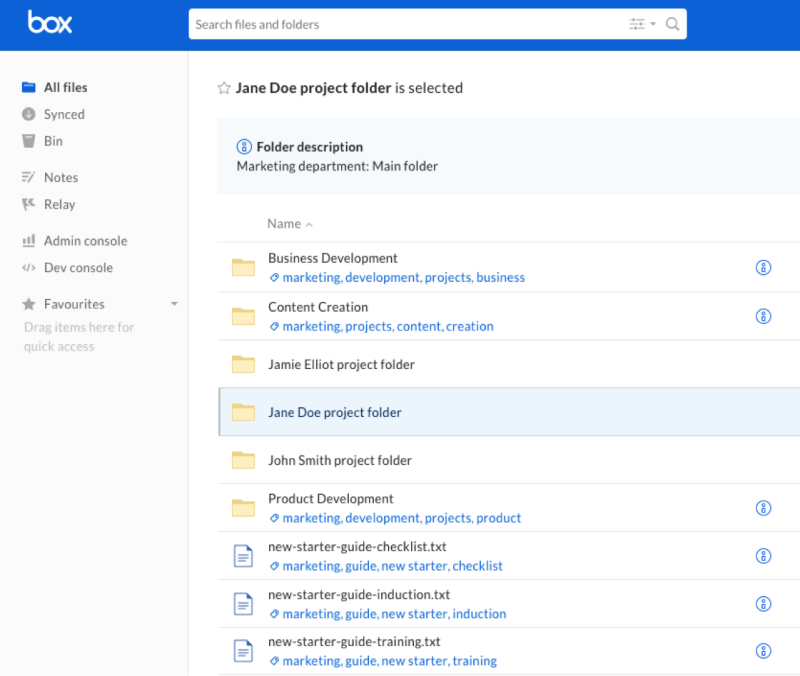
When the workflow is triggered, the main Box folder will now also contain a new personalised sub-folder that utilises the new collaborator’s Box account details:

3 - List & specifyCopy
Select another Box connector and authentication. Choose List folder items for the Operation and set up your Folder ID.
The other options available are not necessary in order to run the operation itself. They are useful tools to better organise the list results and make the output more human-readable.
Running a basic list operation will return the standard core information for each item within the folder:


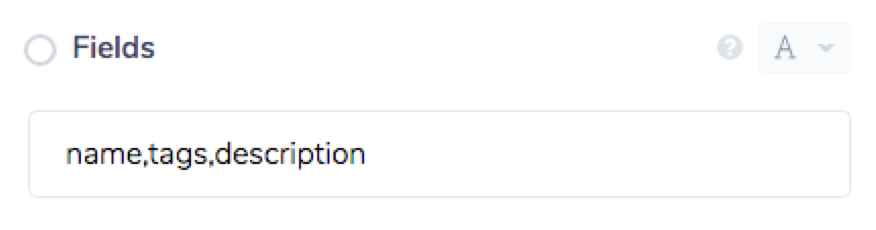
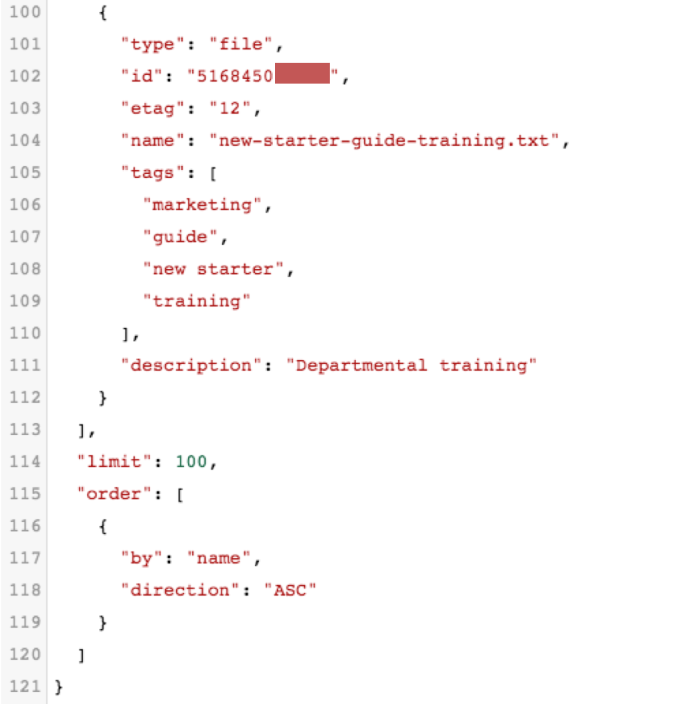
Less-frequently used fields are not included in the standard format. In order to get more specific item details, the Fields Input has to be used. For our purposes, we will use the List operation to return each item’s name, description and tags.
In order to return multiple fields you must set the type to String and use a comma-separated list of the field names, with no white spaces after the commas, as shown below:

Depending on your declarations, your output will return accordingly:

For more details on the Box ‘fields’ query or options that can be returned, check out their API documentation.
Extra step - Integrate and displayCopy
Using the above example, it is likely that having gone to the trouble of obtaining said field values, you will wish to use them in some way.
This section will demonstrate how you can use the Loop Collection and Boolean Condition core service connectors, in order to integrate with Trello to display your listed file outputs.
Select the loop connector and Loop List as the Operation. In order to create a jsonpath that will process each item one-by-one, set the List value with a connector snake and select Entries from the options available.
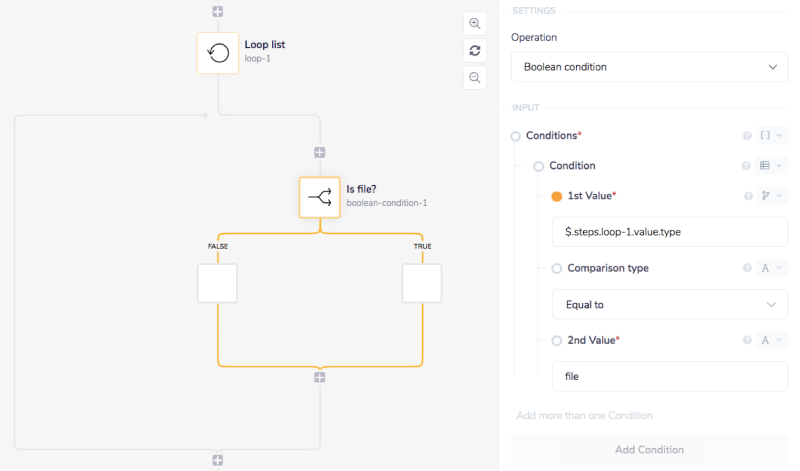
Add a boolean connector to the workflow, and use the connector snake once more to choose the ‘type’ property from the loop step in order to generate the 1st Value.
Put the Comparison type as Equal to and have the 2nd Value set to string type: 'file' . The actions on the True path will only be activated if the item type found in our list is file. Make sure to select Satisfy ALL conditions for your Strictness setting.

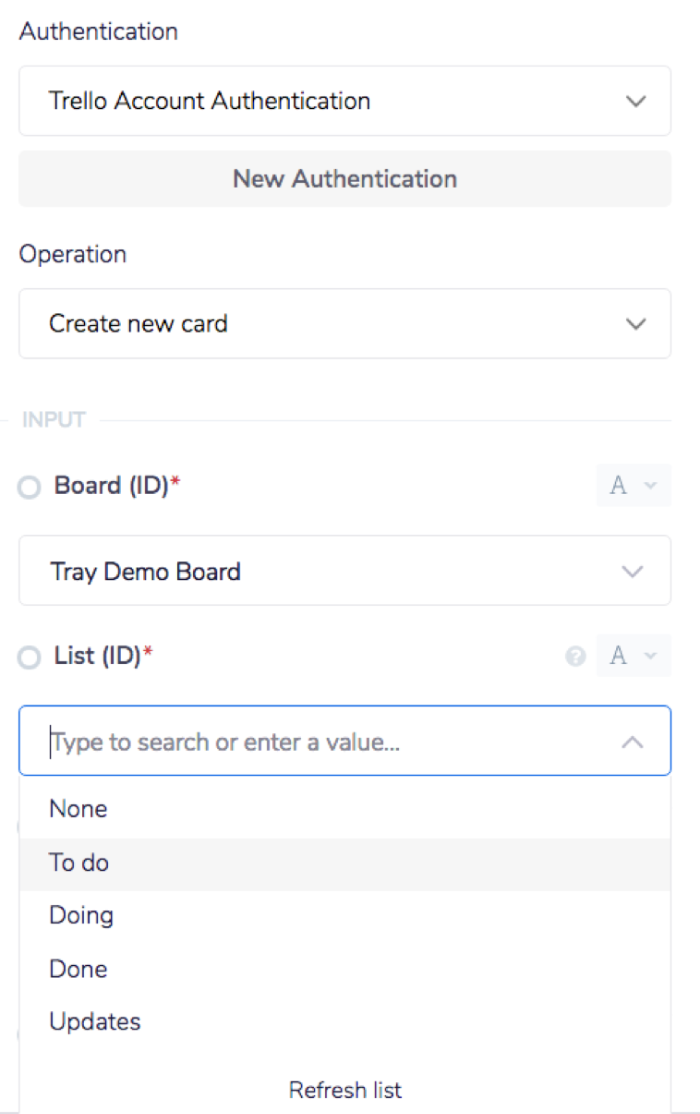
Choose a Trello connector and place it in the True path. Create a new ‘Trello authentication’ in line with the Box method shown above.
Set the Operation to Create new card . You will then need to select the board you want to display your items on, as well as the Trello list from within said board. Both of these are set using dropdown options that are automatically generated:

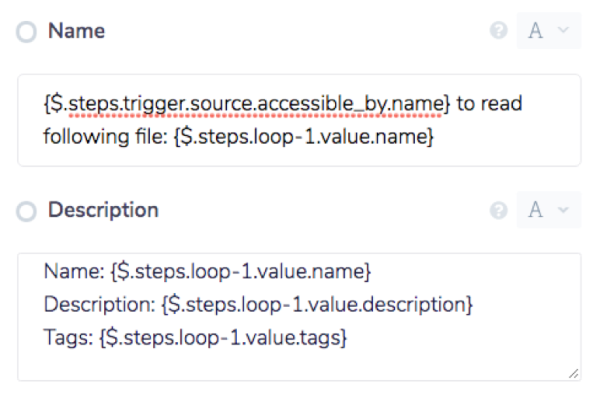
Use the jsonpath ‘interpolation method’ from earlier to display the item details on your cards. Use the other input fields as you deem fit, such as Due Date etc:

Now when your workflow is triggered, your end result will include not only a new personalised project folder but ‘To do’ Trello cards detailing the files your new collaborator will need:


BEST PRACTICES: Whenever you do decide to create your own workflow, be sure to check out some of our key articles such as: