
Bitbucket Server 1.0
Bitbucket Server is an on-premises source code management solution for Git.
OverviewCopy
Bitbucket Server is a combination Git server and web interface product that allows users to do basic Git operations while controlling read and write access to the code. It is secure, fast, and enterprise grade. Create and manage repositories, set up fine-grained permissions, and collaborate on code.
API INFO: The Base URL used for the Bitbucket Server connector is http://host:port. More information can be found on their main API documentation (v1.0) site.
AuthenticationCopy
Within the workflow builder, highlight the Bitbucket Server connector.
In the Bitbucket Server connector properties panel to the right of the builder, click on the Authenticate tab and the 'Add new authentication' button.


This will result in a Tray.io authentication pop-up modal. The first page will ask you to name your authentication and select the type of authentication you wish to create ('Personal' or 'Organisational').
The next page asks you for your 'Username', 'Password', 'URL', and 'Port' credentials.


Once you have added these fields to your Tray.io authentication pop-up window, click the 'Create authentication' button.
Go back to your settings authentication field (within the workflow builder properties panel), and select the recently added authentication from the dropdown options now available.
Your connector authentication setup should now be complete.
Available OperationsCopy
The examples below show one or two of the available connector operations in use.
Please see the Full Operations Reference at the end of this page for details on all available operations for this connector.
Using the Raw HTTP Request ('Universal Operation')Copy
As of version 1.0, you can effectively create your own operations.
This is a very powerful feature which you can put to use when there is an endpoint in Bitbucket Server which is not used by any of our operations.
To use this you will first of all need to research the endpoint in the Bitbucket Server API documentation v7.10.0, to find the exact format that Bitbucket Server will be expecting the endpoint to be passed in.
Note that you will only need to add the suffix to the endpoint, as the base URL will be automatically set (the base URL is picked up from the value you entered when you created your authentication).
The base URL for Bitbucket Server is the custom URL you entered in the authentication with /rest/api/1.0 appended to it, i.e. https://example.com:8000/rest/api/1.0
For example, say that the 'List projects' operation did not exist in our Bitbucket Server connector, and you wanted to use this endpoint. You would use the Bitbucket Server API docs to find the relevant endpoint - which in this case is a GET request called: /projects.
More details about this endpoint can be found here.

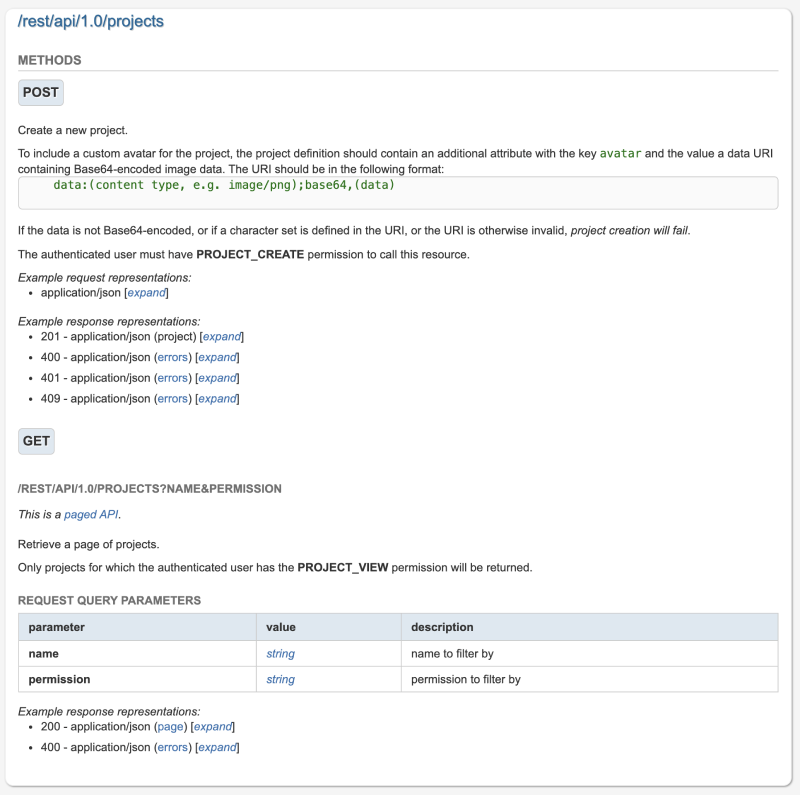
As you can see, there is also the option to include a query parameter, should you wish to do so. So if you know what your method, endpoint, and details of your query parameters are, you can list all projects with the following settings:
Method: GET
Endpoint: /projects
Final outcome being: https://example.com:8000/rest/api/1.0/projects


Example UsageCopy
TRAY POTENTIAL: Tray.io is extremely flexible. By design there is no fixed way of working with it - you can pull whatever data you need from other services and work with it using our core and helper connectors. This demo which follows shows only one possible way of working with Tray.io and the Bitbucket Server connector. Once you've finished working through this example please see our Introduction to working with data and jsonpaths page and Data Guide for more details.
Below is an example of a way in which you could potentially use the Bitbucket Server connector to retrieve the details of a project.
The steps will be as follows:
Setup using a manual trigger and list all the projects.
Loop through the received list of projects.
Retrieve the details of each project.
Your completed workflow should look similar to this:


1 - Setup Trigger & List projectsCopy
Select the manual trigger from the trigger options available. From the connectors panel on the left, add a Bitbucket Server connector to your workflow. Set the operation to 'List projects'.


Feel free to re-name your steps as you go along to make things clearer for yourself and other users. The operation names themselves often suffice.
Upon completion, you will have set up the manual trigger and fetched a list of all the projects.
2 - Loop collectionCopy
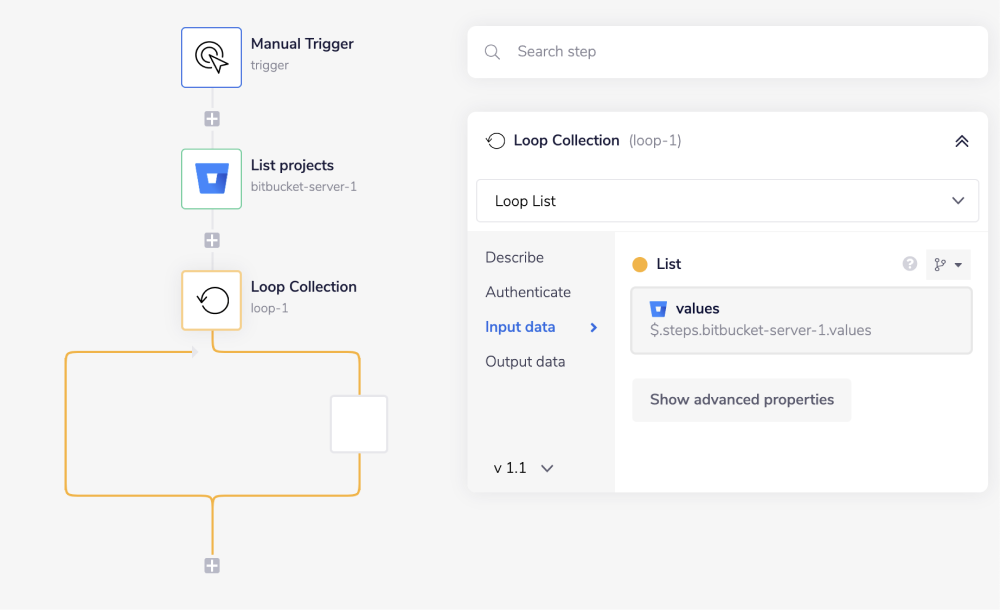
Next, search for the Loop collection connector within your connector panel, and drag it into your workflow as your next step. Set your operations to 'Loop Collection'.
The Loop Collection connector allows you to iterate through a list of results. In this example, we will use it to iterate through the data found within the previous 'List projects' connector step.
In order to specify the list you want to loop through, start by using the list mapping icon (found next to the list input field, within the properties panel) to generate the connector-snake.
While hovering over the 'List projects' step (with the tail end of the connector-snake), select values from the list of output properties displayed. This will auto-populate a jsonpath within your list input field and update the type selector to jsonpath.
For more clarification on the pathways you have available, open the Debug panel to view your step's Input and Output.
JSONPATHS: For more information on what jsonpaths are and how to use jsonpaths with Tray.io, please see our pages on Basic data concepts and Mapping data between steps
CONNECTOR-SNAKE: The simplest and easiest way to generate your jsonpaths is to use our feature called the Connector-snake. Please see the main page for more details.

Now, you will be able to loop through the list of the projects you have fetched in the first step.
3 - Get project detailsCopy
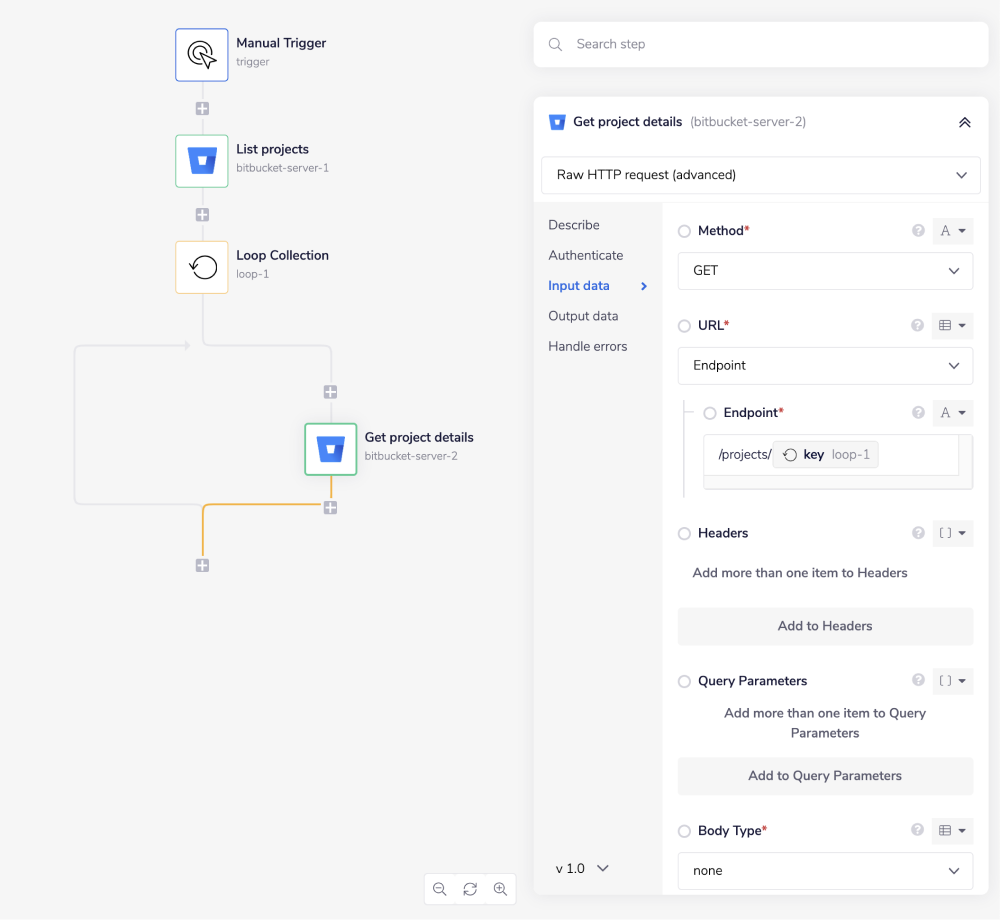
The last step is to drag a Bitbucket Server connector inside of the Loop Collection step itself. Set the operation to 'Raw HTTP Request'. As you can see from the Bitbucket Server API docs, the 'projectKey' field is required in the resource path.
Use the connector snake and hover over the 'Loop Collection' step (with the tail end of the connector-snake) and select the jsonpath for the specified identifier from the list of output properties displayed.
In this case the jsonpath for 'Endpoint' is selected and it should appear similar to $.steps.loop-1.value.key. Then update the type selector to string, surround it with curly braces and prepend it with '/projects/'. It should look like:
/projects/{$.steps.loop-1.value.key}.
INTERPOLATION: When you wish to include JSON generated data within another input/output result, use our Interpolation method as described here.

You can always inspect the logs of your workflow by using the ‘Debug’ tab available on the top of the Tray builder.
If you go through each execution of the 'Get Project Details' step, you will see the results of each loop.


BEST PRACTICES: Whenever you do decide to create your own workflow, be sure to check out some of our key articles such as: