Azure DevOps 2.1
Plan smarter, collaborate better and ship faster with a set of modern dev services.
OverviewCopy
Azure DevOps Services is a cloud hosted version of Azure DevOps Server developed and maintained by Microsoft. It provides version control, reporting, requirements management, project management, automated builds, testing and release management capabilities. It covers the entire application lifecycle, and enables DevOps capabilities.
AuthenticationCopy
The Azure DevOps connector requires an OAuth2 application to be created on the user's Azure DevOps Services account. This allows the user to define granular and precise permission scopes when working with the Tray platform.
The section below will guide you through the process of creating and configuring an OAuth2 application on the Azure DevOps Services platform so that it can be used with the Tray platform.
It will also cover how to use these details to authenticate the Azure DevOps connector so that it can interact with an Azure DevOps Services account.
Creating an OAuth2 applicationCopy
In order to authenticate the Azure DevOps connector, we first need to create an OAuth2 apllication configured in a specific way.
Before you begin, you will need to ensure that you have an Azure DevOps Services account set up and ready to use. This account is going to be used to host the Oauth2 application that we are going to require in order to authenticate to the service.
Please note, the account you use to host the OAuth2 application can be either the same account you wish to interact with via Tray.io or a separate account used specifically for the purpose of hosting your Oauth2 application.
IMPORTANT!: Regardless of which account you use, the account must have the relevant roles and permissions required to create an OAuth2 apllication.
To create the application, go to the Azure DevOps Services Application Registration Page. After logging in, you will be presented with a page that allows you to set up your application.

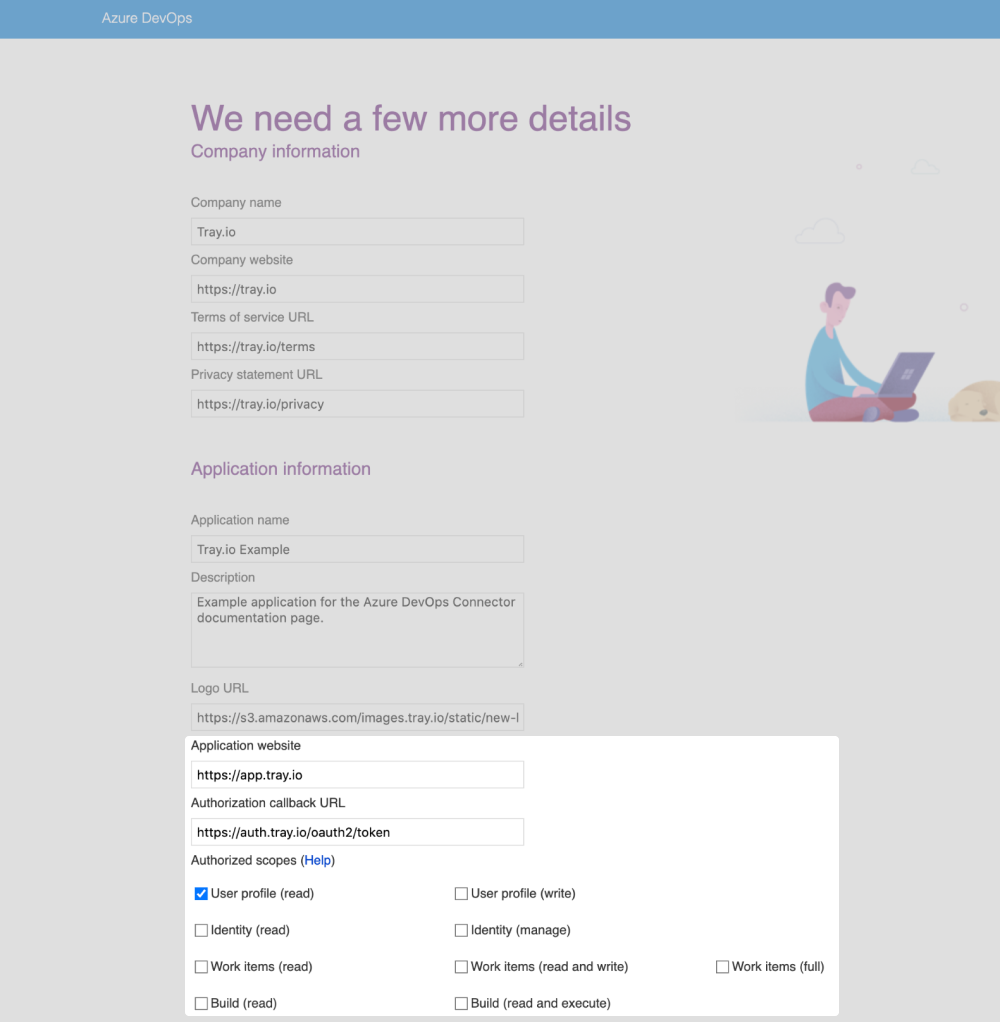
The highlighted area in the screenshot above indicates the fields that must contain Tray.io specific values to ensure that the Azure DevOps connector is able to communicate with your application.
You are free to populate the following fields as you wish. Although suggestions have been provided should you want this to be populated with information pertaining to Tray.io:
Company name: Any value (Suggestion:
Tray.io)Company website: Any value (Suggestion:
http://tray.io)Terms of service URL: Any value (Suggestion:
https://tray.io/terms)Privacy statement URL: Any value (Suggestion:
https://tray.io/privacy)Application name: Any value (Suggestion:
Tray.io)Description: Any value (Suggestion:
Tray.io is the most advanced integration platform for connecting up the tools you use every day.)Logo URL: Any value (Suggestion:
https://s3.amazonaws.com/images.tray.io/static/new-brand/Tray-Mark-Dark_Navy.png)
With the next two fields, you must use the values given below:
Application website: Must be
https://app.tray.io/Authorization callback URL: Must be
https://auth.tray.io/oauth2/token
IMPORTANT!: The Tray.io platform will not be able to communicate with your OAuth2 application if you do not use the values specified above for "Application website" and "Authorization callback URL".
After populating the fields above, you then need to select the scopes you wish to authorize by selecting the scopes you require using the checkboxes under the Authorized scopes section. You must ensure that you enable all of the scopes that you intend to use.
IMPORTANT!: Azure DevOps Services does not provide a way to change the scopes after you have created your application. If you require additional scopes after application creation, you will need to create a new application. It is therefore strongly advised that you enable all of the scopes you require at this stage of the process.
Once you have finished populating the fields and have selected your required scopes, you can click on Create Application at the bottom of the page. You will then be redirected to the application details page. We can now use these details to authenticate with Tray.io.
Authenticate with Tray.ioCopy
If you followed the previous steps, you should be on the application details page (you can also get to this page by navigating to your application from the main Azure DevOps Dashboard).
In order to authenticate to Tray.io, we will need to find the values of the App ID, Client Secret and the list of Authorized Scopes.

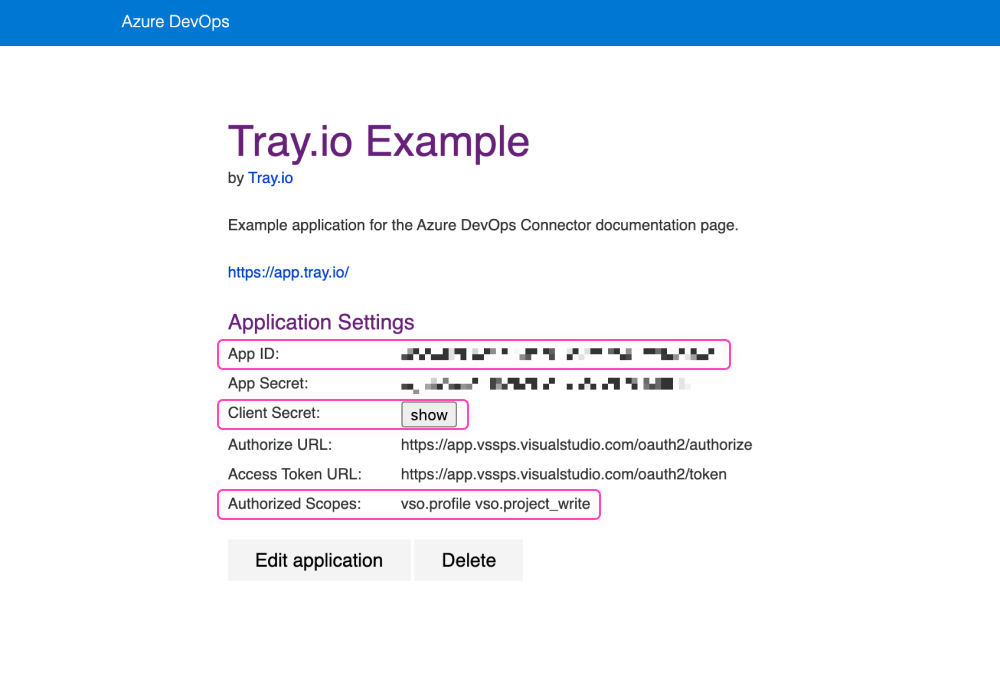
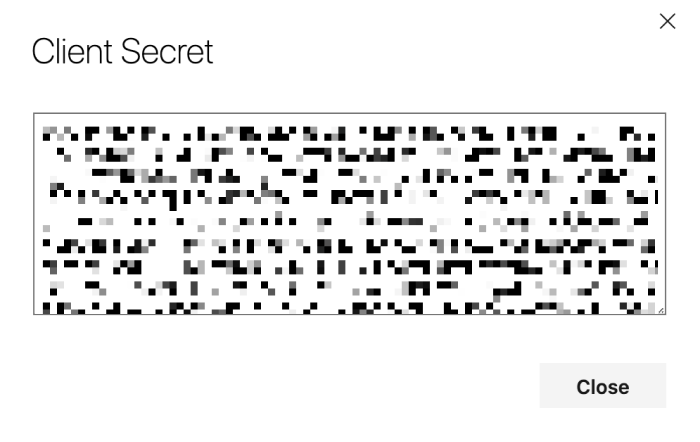
The App ID and Authorized Scopes can be retrieved from the area highlighted above. To retrieve the Client Secret, you can click on the on "Show" button highlighted above. Once clicked, a popup displaying the full Client Secret will appear.

Now that we have all of the details needed to authenticate, we can return to the Tray.io platform to complete the authentication process.
When using the Azure DevOps connector, click on 'New Authentication' in the step editor:

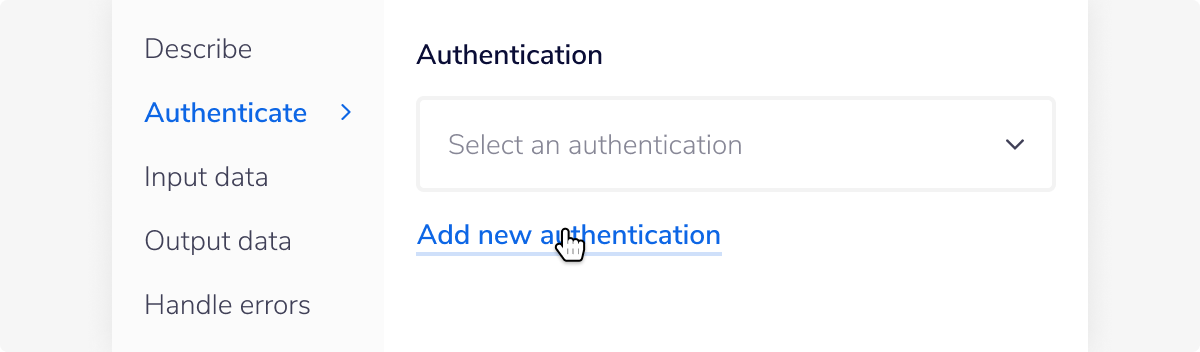
A popup will appear that will ask you to provide a name for your authentication. This can be anything you choose and is simply used to help you identify your authentication.

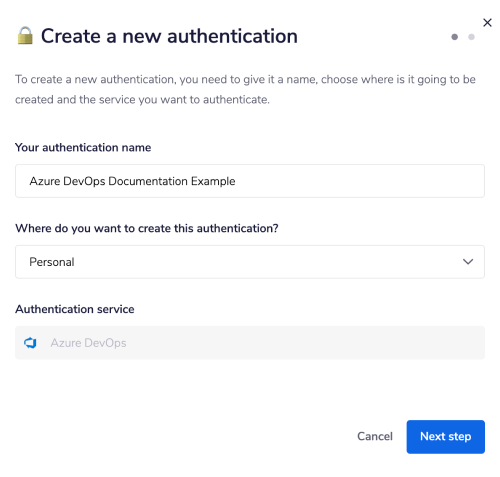
Once you are ready to proceed, click "Next". You will then be moved onto the next stage of the authentication process. Here, you will be asked for your App ID, Client Secret and will also be given the opportunity to specify the Scopes.

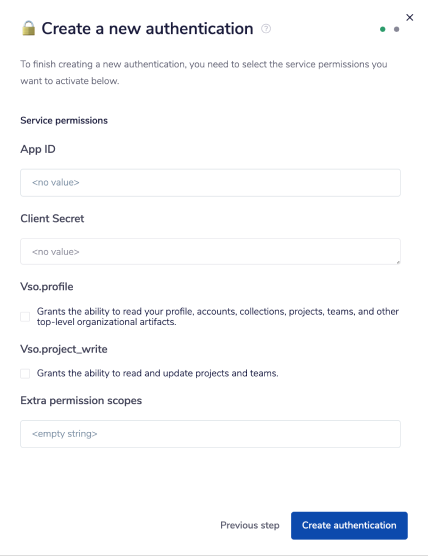
For the App ID and Client Secret, you can copy and paste the details you gathered earlier from your OAuth2 application.
IMPORTANT!: Be very careful when copying these values to ensure that no additional spaces are introduced at the start or end of the value when pasting.
For the Scopes you have 2 options:
Check the "vso.profile" and "vso.project_write" to enable just these two scopes.
Do not check the scopes above and instead specify your scopes in manually using the "Extra permission scopes" field, separating each scope with a single space. (recommended method)
For the example below, we are going to manually specify our scopes by pasting them into the "Extra permission scopes" field.

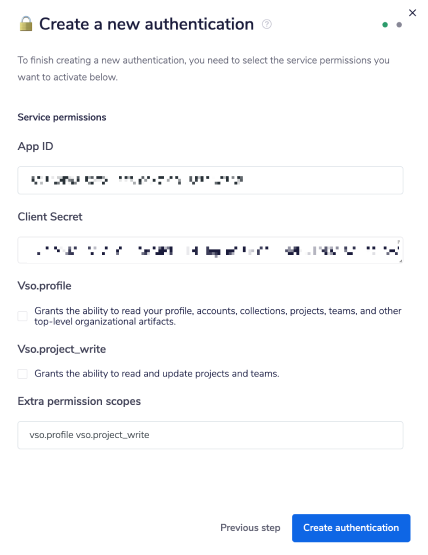
As can be seen above, we have pasted in the value vso.profile vso.project_write in the "Extra permission scopes" field. This is the exact value that can be found in the "Authorized Scopes" section of the OAuth2 application details page. Also notice that the scopes are separated with a single space between each scope.
IMPORTANT!: Azure DevOps will only allow you to specify the exact scopes that you have authorized during your OAuth2 application creation process. You cannot add any additional scopes, nor can you leave any out. You must paste in the exact same authorized scopes that you obtained from the "Authorized Scopes" section of the OAuth2 application details page mentioned above. If you do not provide the same scopes as-is, Azure will return an error during the authentication process.
Once you have populated the required feilds, you can then click on "Create authentication" which will open a popup window where you will be redirected to the Azure login page.
PLEASE NOTE: If you intend to use a different Azure DevOps account from the one tied to the OAuth2 application you created earlier, you should ensure that you are logged into the correct Azure DevOps account before clicking "Create authentication".

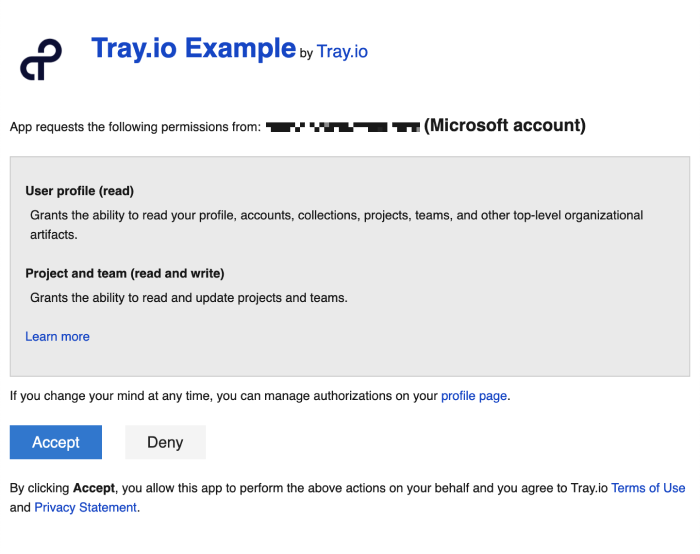
Here, you can review the permissions being granted. Once you are ready to continue, click "Accept". The popup will close and you will be redirected back to the workflow builder. You have now created an authentication and can continue to use the connector.
Using the Raw HTTP Request ('Universal Operation')Copy
As of version 1.0, you can effectively create your own operations.
This is a very powerful feature which you can put to use when there is an endpoint in Azure DevOps which is not used by any of our operations.
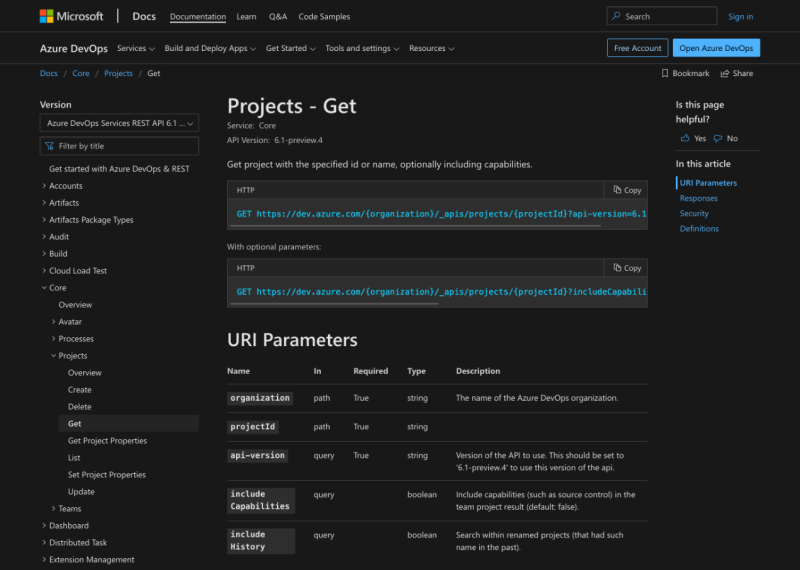
To use this you will first of all need to research the endpoint in the Azure DevOps Services REST API Reference v6.1 , to find the exact format that Azure DevOps will be expecting the endpoint to be passed in.
Note that you will only need to add the suffix to the endpoint, as a default base URL will be automatically set.
The default base URL for Azure DevOps is: https://dev.azure.com
PLEASE NOTE: Some of the endpoints within the Azure DevOps API have a base URL that is different to the one listed above. Please refer to the second example below for guidance on how to use the Raw HTTP Request operation with a custom base URL.
Example 1: Making a request to the default base URLCopy
For this example, say that the 'Get Project' operation did not exist in our Azure DevOps connector, and you wanted to use this endpoint, you would use the Azure DevOps API docs to find the relevant endpoint - which in this case is a GET request called: /{organization}/_apis/projects/{projectId}?api-version=6.1-preview.4.
More details can be found here.

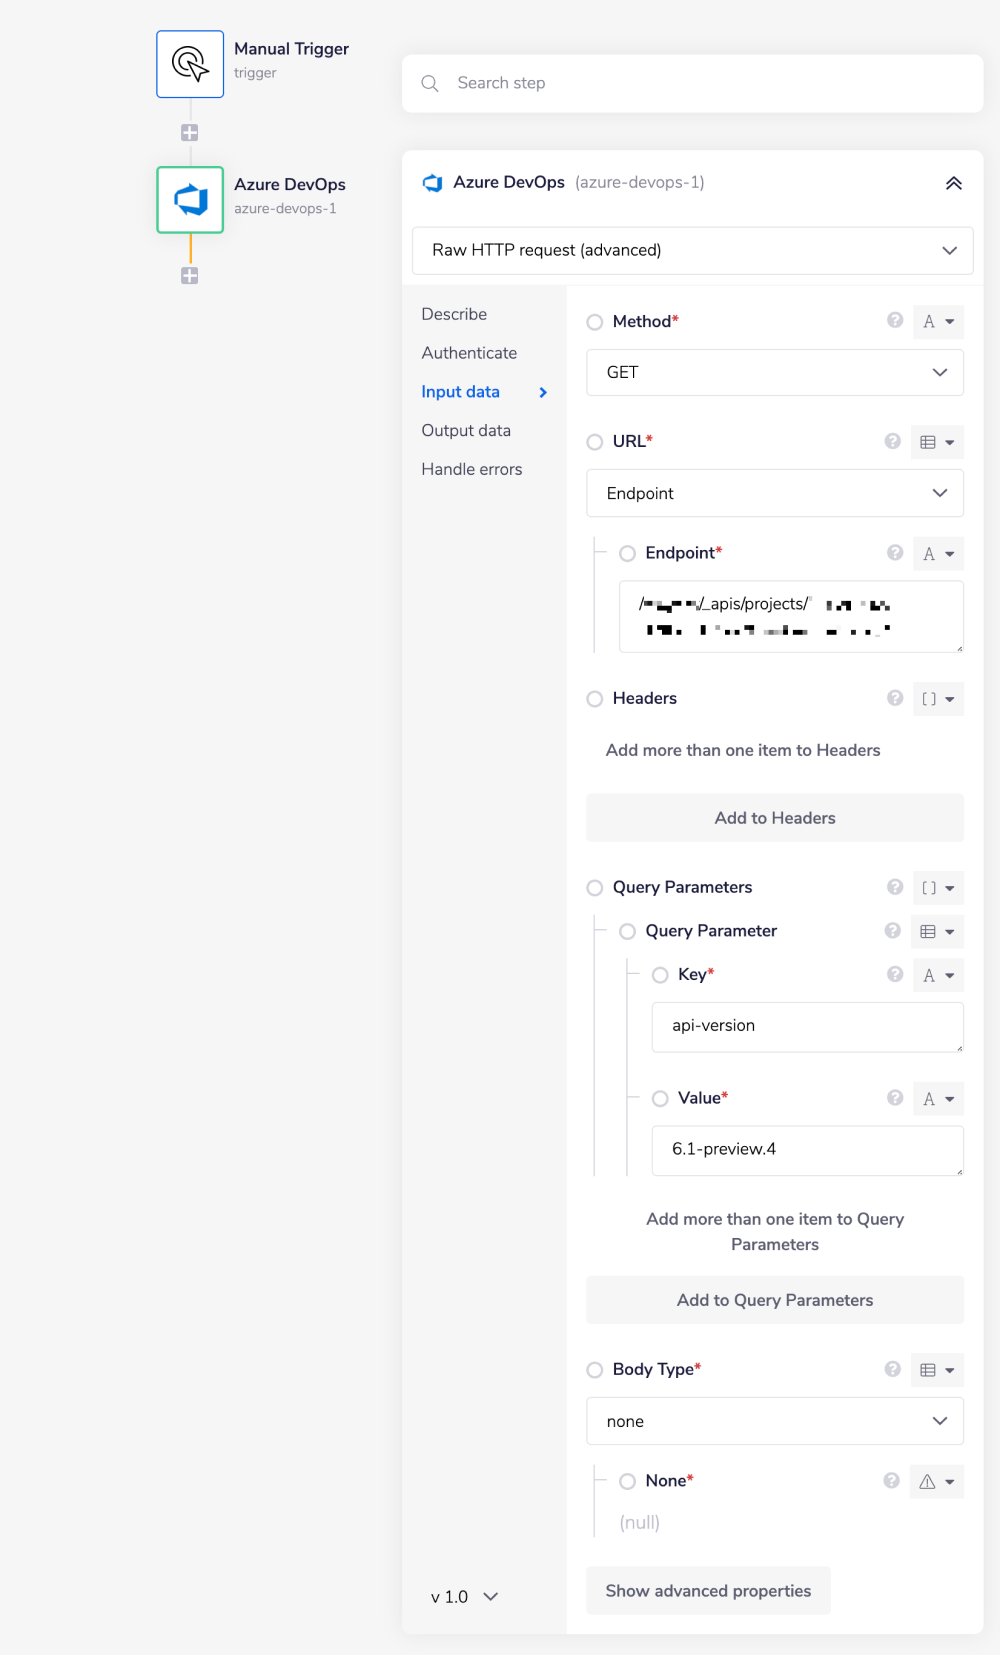
As you can see there is also the option to include a query parameter, should you wish to do so. There is also a required query parameter in this example in the form of api-version. So if you know what your method, endpoint and details of your query parameters are, you can get the project information with the following settings:
Method: GET
Endpoint: /{YOUR-ORGANIZATION-ID}/_apis/projects/{YOUR-PROJECT-ID}
Query Parameter: Key: api-version Value: 6.1-preview.4
Body Type : None
Final Example outcome being: https://dev.azure.com/{YOUR-ORGANIZATION-ID}/_apis/projects/{YOUR-PROJECT-ID}?api-version=6.1-preview.4

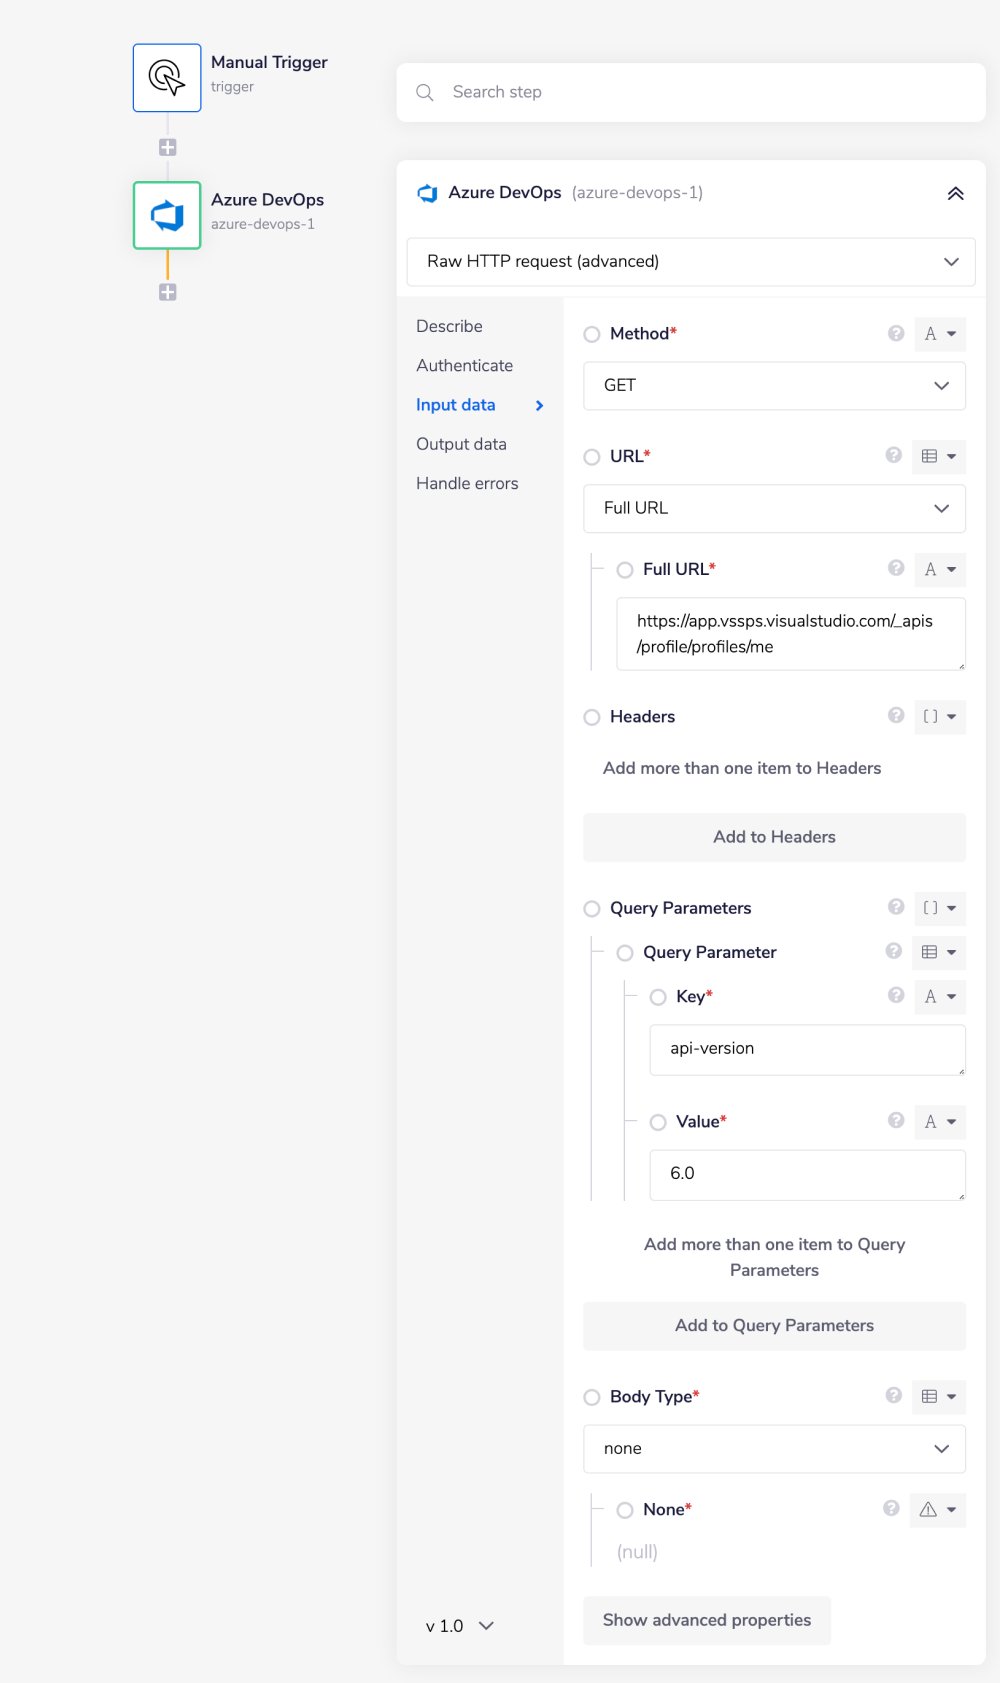
Example 2: Making a request to custom base URLCopy
For this example, say that the 'Get Me' operation did not exist in our Azure DevOps connector. What makes this endpoint unique is that it uses a different base URL from the default one. To use this endpoint, you would once again use the Azure DevOps API docs to find the relevant endpoint - which in this case is a GET request called: https://app.vssps.visualstudio.com/_apis/profile/profiles/me?api-version=6.0.
More details can be found here.

As with the previous example, there is also the option to include a query parameter, should you wish to do so. There is also a required query parameter in this example in the form of api-version. So if you know what your method, endpoint and details of your query parameters are, you can get the project information with the following settings:
Method: GET
Full URL: https://app.vssps.visualstudio.com/_apis/profile/profiles/me
Query Parameter: Key: api-version Value: 6.0
Body Type : None
Final Example outcome being: https://app.vssps.visualstudio.com/_apis/profile/profiles/me