
AWS SQS 2.1
AWS SQS is a fully managed message queuing service
OverviewCopy
AWS SQS is a fully managed message queuing service which helps to send, store, and receive messages between software components.
When using Tray it is very common to use SQS in order to throttle the rate of messaging or data 'throughput', especially in situations where you may have a limit on the number of queries you can make to an API within a certain period.
The example tutorial below gives you basic guidance on dealing with such a scenario.
AuthenticationCopy
Before authenticating you will need to make sure that you have a queue and access permissions set up in the SQS console.
The simplest way of doing this is to right-click on a queue and select 'Add a permission':


You can then add your AWS Account number and set the relevant permissions (send, receive and delete as per the example tutorial below):


Once your permissions are set and you have added an SQS step to your workflow you can click on 'New Authentication' in the step editor:


In the authentication dialog you will then need to enter your AWS IAM credentials issued when your account was created (make sure the Account ID matches the one for which you configured queue permissions above):


Example - set up a simple send / receive and delete message systemCopy
In this example we will be setting up two workflows - one to generate and send messages to an SQS queue, and one to receive and delete messages.
Note that for testing purposes these workflows will use a manual trigger.
Workflow 1 - generate and send messages to the queueCopy
The complete first workflow looks like this:

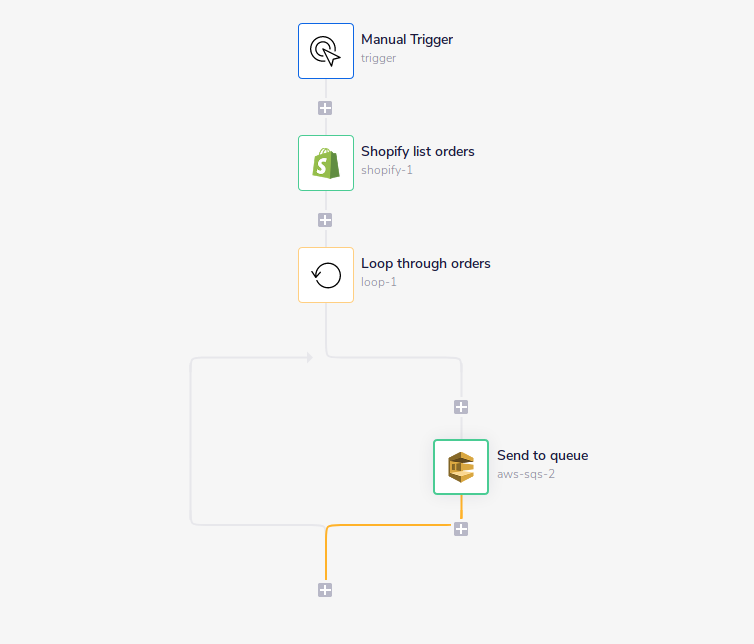
Step 1 - list orders from ShopifyCopy

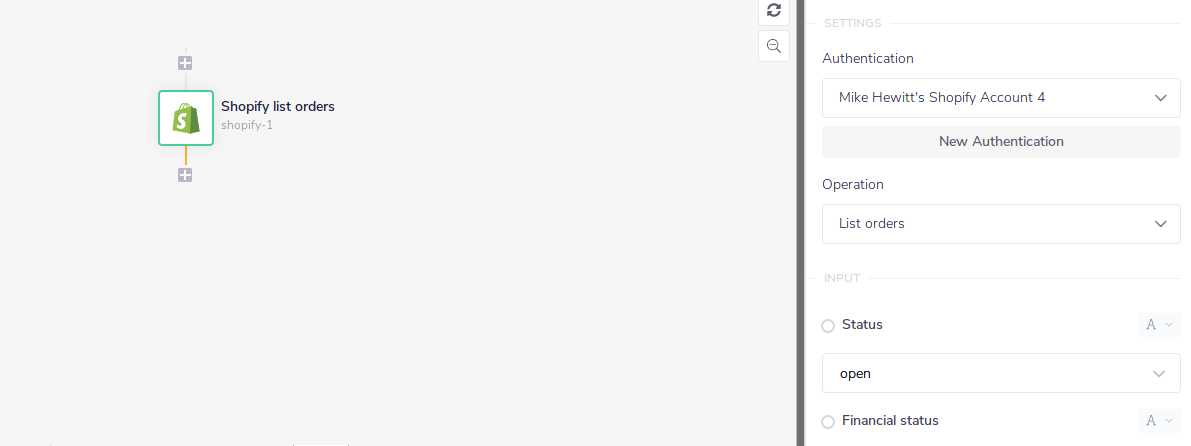
Here you can set the Operation as 'List Orders' and leave the order Status filter as 'open'.
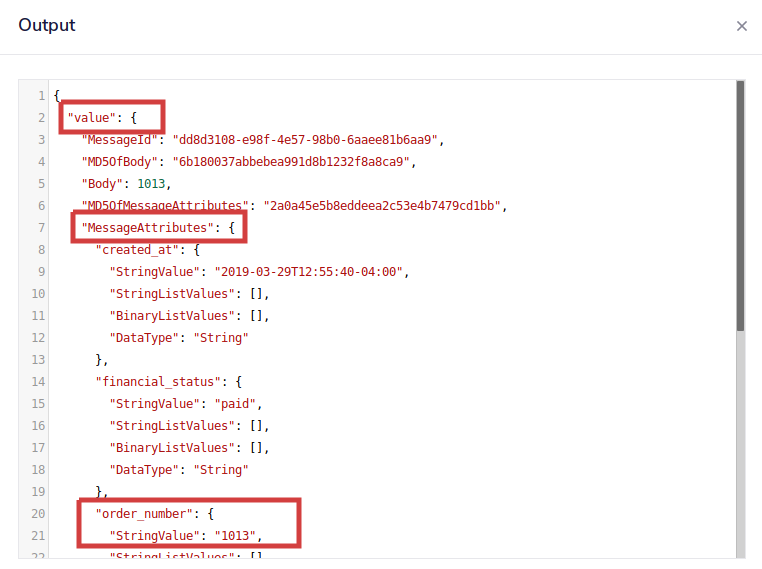
This is the step which will generate the data that we can then use to format and send to the SQS queue.
As per a successful log output, it will return data in the following format:


This step could be done using any connector - Salesforce returning records, Stripe listing accounts, Zendesk listing tickets, ActiveCampaign listing subscriptions etc.
Note: If you want a simple and quick way of testing and you don't have an account for a service like Shopify or Salesforce to hand, you could replicate data being produced using our Script connector to produce some dummy data as per the example on the Script connector page
Step 2 - loop through the dataCopy

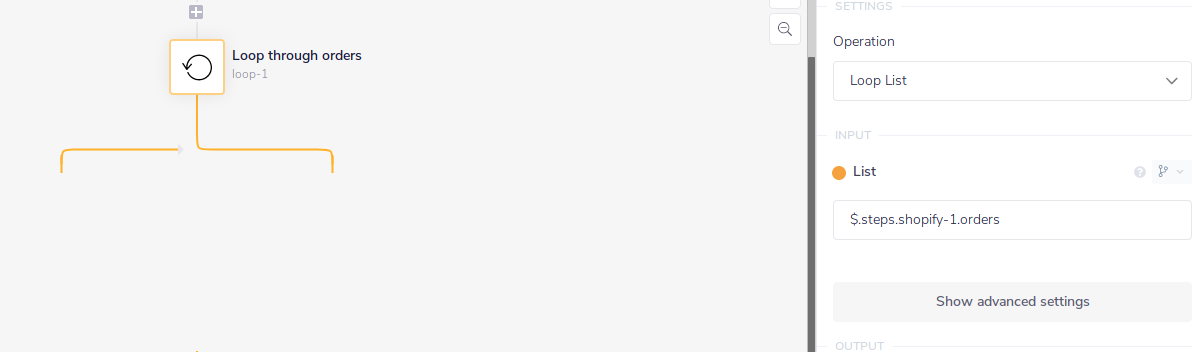
Then add a loop connector which uses the $.steps.shopify-1.orders jsonpath to take each order one-by-one.
Step 3 - format the message and send to SQSCopy


For the Send messages SQS step, set the operation as Send Message, enter the Queue name and Queue type
Then, to begin formatting the message you first of all need to set the Body - this is just the name that the message is given in the SQS queue. Here we are just using the order number. Note that SQS only accepts attributes in String format and Shopify returns order_number as an integer. So we can convert it to string by using { } for the jsonpath {$.steps.loop-1.value.order_number}
We can then define what order data we want to be passed as message attributes. From the above screenshot you can see that we are passing order_number, created_at, financial_status and total_price
Step 4 - Run the workflow and populate the SQS queueCopy
Now click 'Run Workflow' and check the debug output to make sure all steps have run correctly.
You can then check the SQS interface to see the messages appear in the queue:


Clicking to show more details will confirm that your attributes have been set correctly:


Workflow 2 - receive, delete and format messagesCopy
The complete second workflow looks like this:


Step 1 - receive / delete messagesCopy


For the first SQS step, set the operation to Receive and Delete Messages, set the Queue name and then enter the message attributes we created in the first workflow, so they are returned in the data output.
Step 2 - loop through received messagesCopy


Then add a loop connector which uses the $.steps.aws-sqs-1.messages jsonpath to take each received message one-by-one.
Step 3 - format the received messagesCopy

Finally you can use our Script connector to format the incoming messages so that they are available for use by other connectors.
Note that this step can also be achieved using the Object Helpers Add key/value pairs operation as per the example given on the Object Helpers docs page.
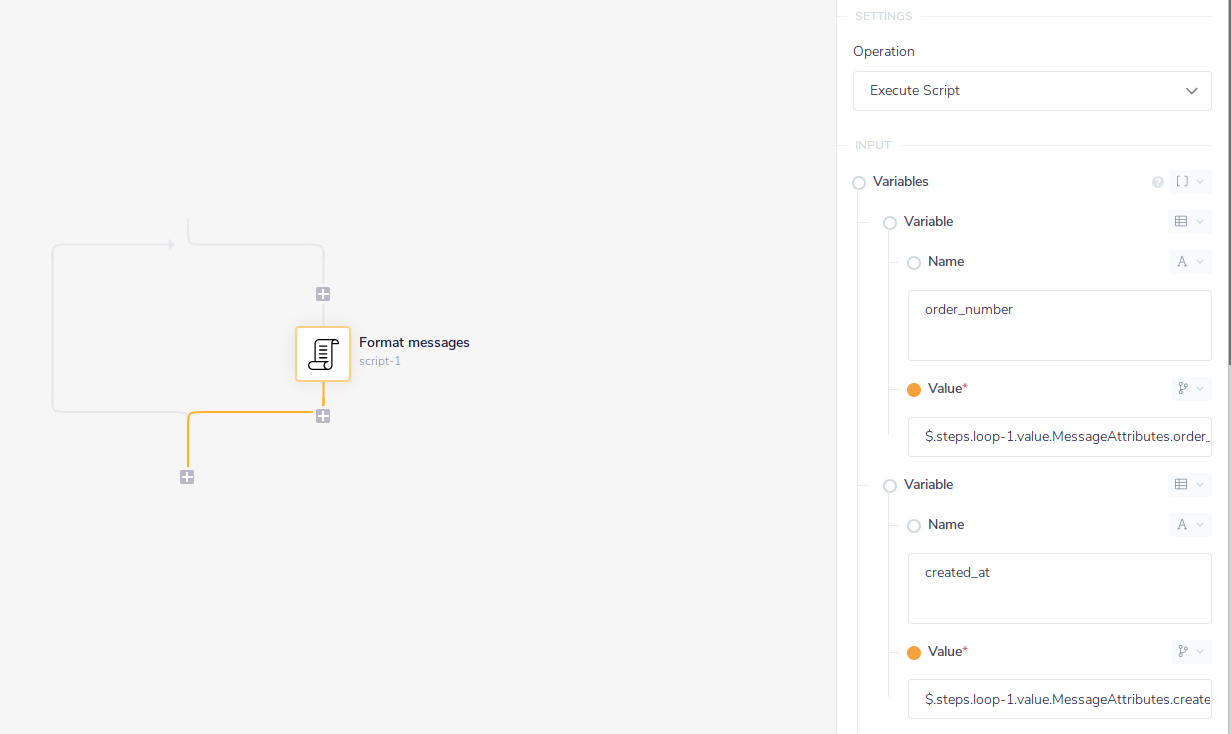
First you will need to define the variables which the script will be using.
For example we set order_number as $.steps.loop-1.value.MessageAttributes.order_number.StringValue
If you look at the output from the loop connector you will see that this refelects the way in which SQS returns message data:

Once you have set the variables for order_number, created_at, financial_status and total_price you can then enter the following in the Script box:
1exports.step = function(input) {2return {3"order": {4"order_number": input.order_number,5"created_at": input.created_at,6"financial_status": input.financial_status,7"total_price": input.total_price8}9}10};
Step 4 - run the workflow and check the outputCopy
Now click 'Run Workflow' and check the debug output to make sure all steps have run correctly.
For each run of the Format messages script connector you should see an output similar to:


Note on schedulingCopy
As mentioned above these workflows use a manual trigger for testing purposes.
If you wish to manage the frequency at which you make the calls to services such as Shopify and also the rate at which you consume messages from the SQS queue you would use the Scheduled Trigger