
CSV Reader 3.2
The CSV Reader is a connector for importing and querying large sets of data
OverviewCopy
The CSV Reader core connector currently allows for the querying of very large CSV files and then paginating through the results, or exporting the results to a new CSV file if need be.
CSV Editor vs CSV ReaderCopy
Incompatible connectorsCopy
IMPORTANT!: Please note that the CSV Reader and CSV Editor cannot be used interchangeably. A CSV instance created in the CSV Reader is not compatible with an instance created in the CSV Editor and vice versa. For example, a CSV instance ID created in the Editor is not valid if used in the Export CSV operation in the Reader
When to use?Copy
CSV Editor: When heavy manipulation of, or adding to, the data within the CSV file itself is required.
CSV Reader: Allows for querying of very large CSV files, paginating through the results and exporting said results.
Available OperationsCopy
The examples below show one or two of the available connector operations in use.
Please see the Full Operations Reference for details on all available operations for this connector.
Create CSV
Export CSV file
Export split CSV file
Get query execution
Get query results
Start query
Example - Basic use of the CSV ReaderCopy
This example will take you through creating a CSV instance from a file downloaded from Google Drive and then querying that CSV instance.
What we will be achieving here is:
Create a CSV instance with Create CSV operation
Start a query with Start Query operation
Poll the Start Query with the Get Query Execution operation and await
SUCCEEDstatusGet query results with the Get Query Results operation
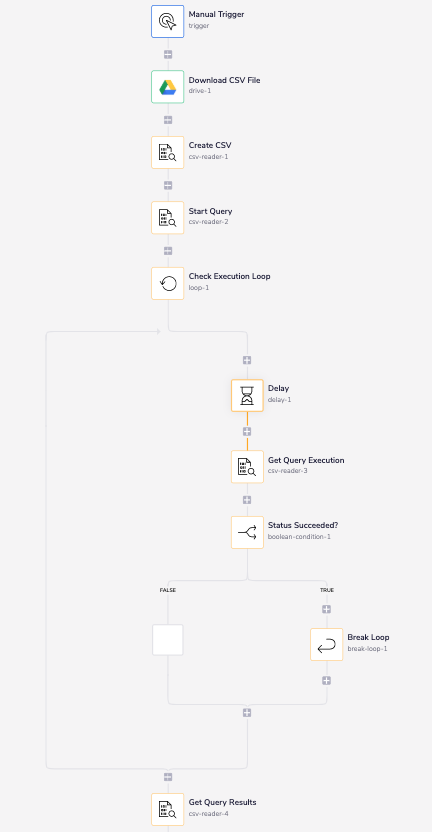
The complete workflow will look something like this:

Step 1 - Create a CSV instanceCopy
The first step when using the CSV Reader is to create a CSV instance. This step prepares the CSV file for querying. This operation expects that the CSV file has been downloaded using one of the other connectors. In this example, we will use the Google Drive connector. The Create CSV operation accepts a file object from the output of this connector.

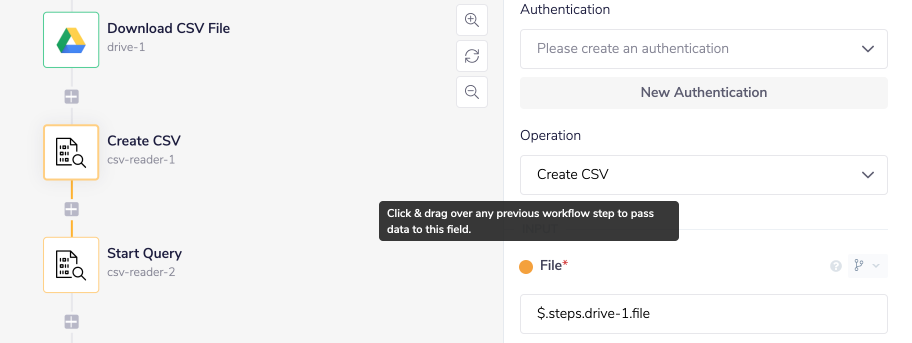
The column names and data types also have to be specified when Creating a CSV instance. Please do this in the Columns input option in the property panel. If any column requires specific querying as a number, then that must be specified here, otherwise the query may not behave as expected.


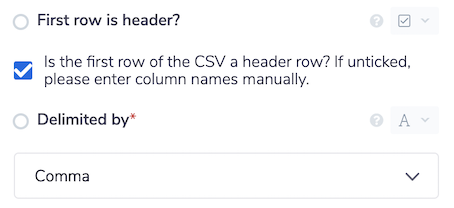
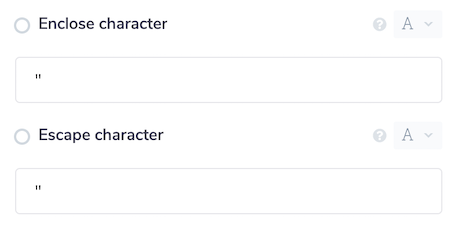
Once the CSV file and columns names/types have been specified, some more information about the CSV file to be queried is needed. This is specified through the following options:
Header row- specifies if the CSV to be query contains the column names as the first row. If this is the case, the CSV Reader will need to ignore the first row when returning results.Delimiter- the character that separates values in the file, usually a commaEnclose character- the character used to enclose values within the CSV file, usually double quotesEscape character- the character used to escape other reserved characters. For example, if double quotes are used as the enclose character, and there is also a double quote in a value, then this needs to be escaped, usually by another double quote e.g "Value ""with"" quote".


Step 2 - Start a queryCopy
The CSV Reader works by setting up query executions that run in the background. This means results will not be returned in the Start query operation. Instead, the workflow needs to poll the status of the query execution until the status shows as SUCCEEDED. The query execution must be in this state in order for results to be obtained.
To use the Start query operation, firstly a CSV ID must be specified. The CSV ID can be obtained from the Create CSV operation.


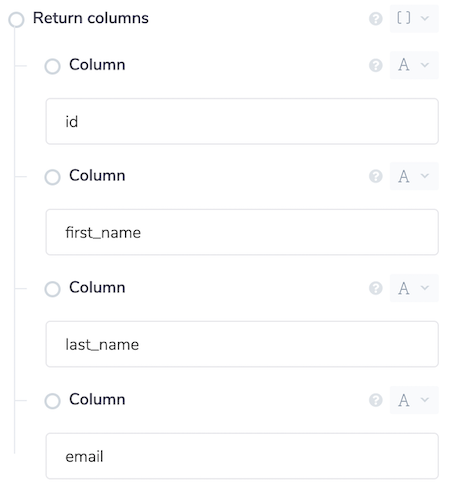
When starting a query, conditions can be provided to filter on specified columns and values. The first condition is to specify the Columns that you would like returned in the results. If this section is left blank, all columns will be returned.

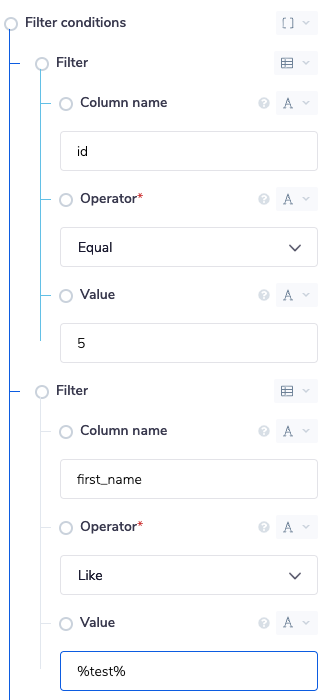
The Filters section can be used to filter out rows based on their values. Instead of individual filters, filters can be combined in Filter groups to give more flexibility over the query. There are two types of filter group:
Match all- all filters specified in a match all group will mean that all filter criteria must be satisfied for a row to be return e.g. id equal to more than 5ANDfirst_name equal to 'Catherina'Match any- rows will be returned if any of the criteria within a match any group are met e.g. id equal to more than 5ORfirst_name equal to 'Catherina'
Multiple filter groups can be specified.
Each filter has three components, the Column name (the column to apply filter), Operator (how the value should be compared to the cell value in the CSV) and Value. The Like operator should be used with text columns. The % wildcard can also be used here to filter on parts of a value e.g. %test would return all values with the word test at the end.
If the column data type is number, then the Equal operator would be more appropriate.

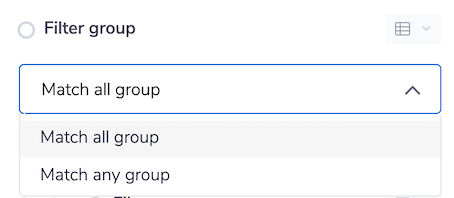
The Filter group option specifies if all filter groups should be satisfied before returning a row in the query results.

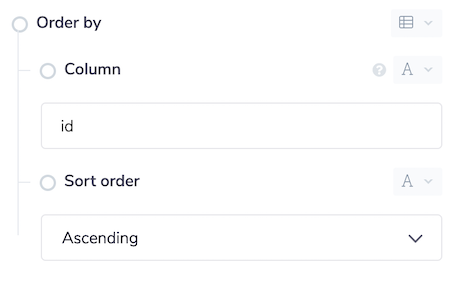
The last option that can be specified is the Order by option. This is important if you would like to retrieve results in a certain order. Results will not necessarily be returned in the order that they appear in the CSV so use of the order by option is advised.

Once the columns and filters are specified, the query can then be executed. This operations returns a query execution ID, which can be used in other operations to find out the state of a query and to obtain the results once the query has finished.
Step 3 - Get query executionCopy
To find out the state a of a query execution, the Get query execution operation can be used. This takes a query execution ID as input and returns the status of that execution.


If combined with the Delay, Loop and Boolean condition connectors, get query execution can be polled until the status of the query execution has SUCCEEDED, as shown in the below screenshot.
Set the delay connector to 1 second. This will give the CSV Reader time to finish querying.
Please be aware that the query execution may show a FAILED state, in which case the workflow should also check for this using a boolean condition and Terminate the workflow.

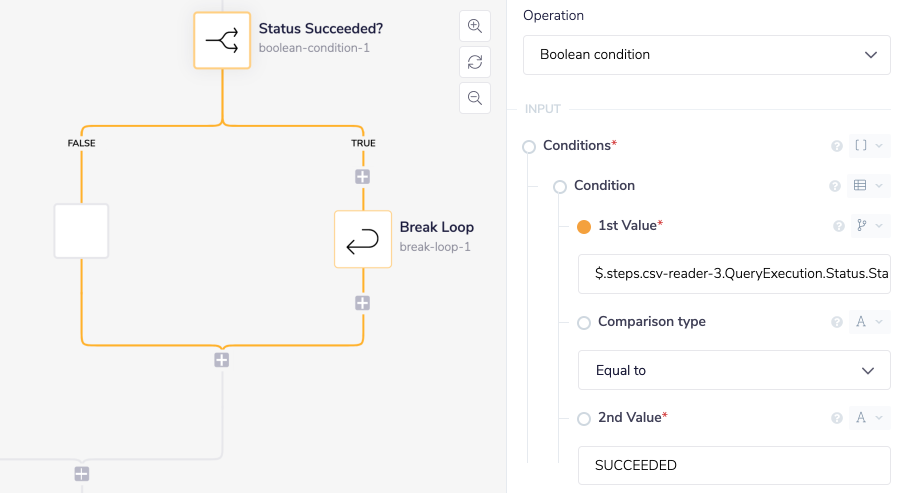
Once the operation has succeeded, the loop can be broken and the workflow can be proceed to the next CSV Reader operation.
Step 4 - Get query resultsCopy
This operation accepts a Query execution ID and, as long as that query has completed, will return a list of results. If the expected result set is very large, the results can be truncated.
When results are truncated, a Next token will be provided with the output. This next token can be used to obtain the next page of results. This can continue until all results have been obtained. No next token indicates the end of the results.
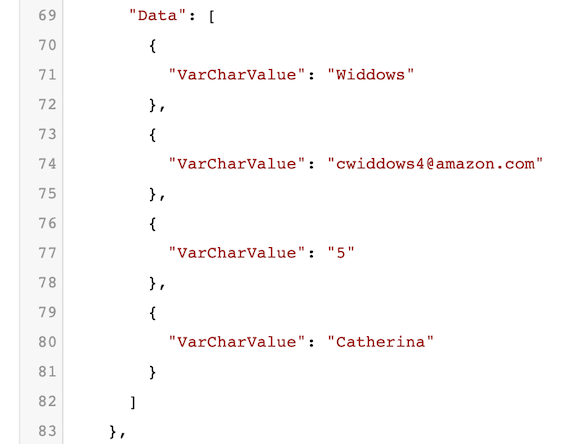
The results are returned as a list of items/objects. Each of these objects represents a row in the CSV file. Within these row items are a further list of items/objects which represent the individual values/cells of data.


The order of items in the Data property correspond to the order of columns in the CSV file e.g. the first item would be the first column. The exception to this rule is when Columns were specified in the Start query operation. If columns were specified, the order of the items will correspond to the order of the columns entered in the input property panel.

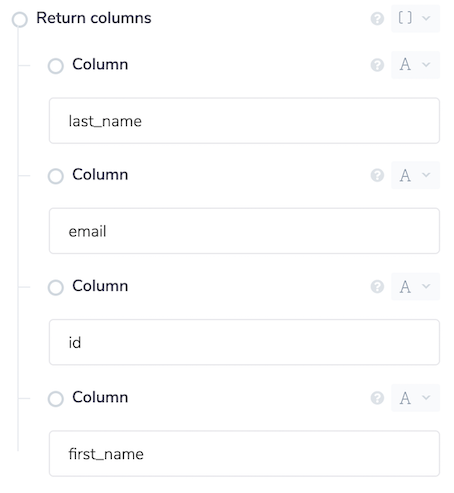
For example, in the above screenshot, we can see that last_name, email, id, first_name have been entered. This means that, despite the order in the CSV file being id, first_name, last_name, email, the values in the VarCharValue property will be in the order last_name, email, id, first_name, as shown below.

Step 5 - Export CSV fileCopy
This step may not be required, but if you would like to export the entire result set into another CSV file, the Export CSV file operation can be used to retrieve a CSV file. Provide a Query execution id as input, and as long as the execution has completed the results should be available to export to CSV.
CSV files can also be split by file size. Using the Export split CSV file operation, users can split files into a file size of their choice. However, there is a limit on the number of files that can be generated. Please make sure when splitting by a file size, the number of split files will not exceed 100. The minimum file size that can be entered is 0.5. The file size is in megabytes.